Transcription
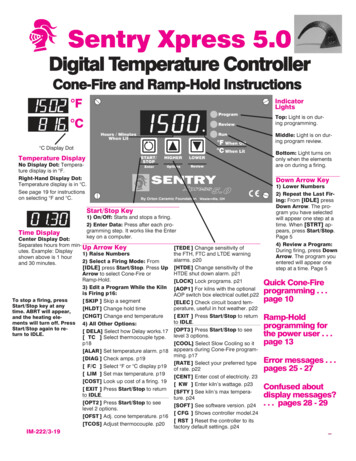
Sentry Xpress 5.0Digital Temperature ControllerCone-Fire and Ramp-Hold Instructions FIndicatorLightsTop: Light is on during programming. CMiddle: Light is on during program review. C Display DotBottom: Light turns ononly when the elementsare on during a firing.Temperature DisplayNo Display Dot: Temperature display is in F.Right-Hand Display Dot:Temperature display is in C.See page 19 for instructionson selecting F and C.Down Arrow KeyStart/Stop KeyTime Display1) On/Off: Starts and stops a firing.2) Enter Data: Press after each programming step. It works like the Enterkey on a computer.Center Display Dot:Separates hours from minUp Arrow Keyutes. Example: Display1) Raise Numbersshown above is 1 hour2) Select a Firing Mode: Fromand 30 minutes.[IDLE] press Start/Stop. Press UpArrow to select Cone-Fire orRamp-Hold.3) Edit a Program While the Kilnis Firing p16:To stop a firing, press[ SKIP ] Skip a segmentStart/Stop key at any[HLDT ] Change hold timetime. ABRT will appear,[CHGT] Change end temperatureand the heating elements will turn off. Press 4) All Other Options:Start/Stop again to re[ DELA] Select how Delay works.17turn to IDLE.[ TC ] Select thermocouple type.p18[ALAR ] Set temperature alarm. p18[DIAG ] Check amps. p19[ F/C ] Select F or C display p19[ LIM ] Set max temperature. p19[COST] Look up cost of a firing. 19[ EXIT ] Press Start/Stop to returnto IDLE.[OPT2 ] Press Start/Stop to seelevel 2 options.[OFST ] Adj. cone temperature. p16[TCOS] Adjust thermocouple. p20IM-222/3-19[TEDE ] Change sensitivity ofthe FTH, FTC and LTDE warningalarms. p20[HTDE ] Change sensitivity of theHTDE shut down alarm. p21[LOCK] Lock programs. p21[AOP1 ] For kilns with the optionalAOP switch box electrical outlet.p22[ELEC ] Check circuit board temperature, useful in hot weather. p22[ EXIT ] Press Start/Stop to returnto IDLE.[OPT3 ] Press Start/Stop to seelevel 3 options.[COOL] Select Slow Cooling so itappears during Cone-Fire programming. p17[RATE ] Select your preferred typeof rate. p22[CENT ] Enter cost of electricity. 23[ KW ] Enter kiln’s wattage. p23[SFTY ] See kiln’s max temperature. p24[SOFT ] See software version. p24[ CFG ] Shows controller model.24[ RST ] Reset the controller to itsfactory default settings. p241) Lower Numbers2) Repeat the Last Firing: From [IDLE] pressDown Arrow. The program you have selectedwill appear one step at atime. When [STRT] appears, press Start/Stop.Page 54) Review a Program:During firing, press DownArrow. The program youentered will appear onestep at a time. Page 5Quick Cone-Fireprogramming . . .page 10Ramp-Holdprogramming forthe power user . . .page 13Error messages . . .pages 25 - 27Confused aboutdisplay messages?. . . pages 28 - 29
Sentry Xpress 5 Cone-Fire / Ramp-HoldBefore You BeginThank you for purchasing the Sentry Xpress temperaturecontroller. As you read the manual, pull up a chair and sit infront of your kiln so you can try out the keys.The controller display messages are limited to four characters. If at any time you are confused by these messages, turnto Display Messages on pages 28 - 29.The back cover is a shorthand guide to programming, to beused after you have read the programming instructions onpages 10 and 13.You can customize the programming (pages 10 and 13) byadding or removing these steps:Delay: Schedule a firing for later. This works in all firings. Page 17Fan: If your kiln is set up with a vent and switch box outlet, or, socket, you can turn the fan on oroff for Ramp-Hold segments. Page 22.Lock: Passcode-protect individual Ramp-Hold programs. Page 21Slow Cooling: Enhance certain glazes in Cone-Fire mode. Page 17.If you don’t need these features, streamline programming by removing their display prompts.Turn to the pages shown above for instructions.Do not worry if you hear a clicking noise during operation. Mechanical relays click as they turnthe heating elements on and off. This is normal. It is also normal for the temperature to fluctuateup and down as the kiln heats up. Please don’t be concerned.The warranty on your Sentry controller does not cover damage fromoverfiring, regardless of the circumstances. It is the operator’sresponsibility to make sure the kiln turns off at the end of the firing.We are constantly trying to find better ways to make kilns, and your kiln is extremely reliable.Nevertheless, it contains mechanical parts that eventually wear out. In some cases, a parts failurecan lead to a kiln overfire. Therefore it is important that you occasionally check on the kiln duringoperation. Although the kiln does not require constant attention, it should never be left unattended. Please check the kiln especially during the later stages of firing.Write notes on the controller features that you use. Then if you are away from your kiln for aperiod, you can review your notes to refresh your memory. The cover shows the controller options at a glance. Use the cover as a quick index.Use Program Review (page 5) every time you fire the kiln. This is your assurance that you arefiring the correct program. Check the program in the display against a written copy.2Do not leave your kiln unattended during operation. 2019, by Paragon Industries, L.P. IM-222/3-19
ContentsBefore You Begin . . . . . . . . . . . . . 2Safety Rules . . . . . . . . . . . . . . . . . 4Safety first. Quick habits for trouble-free firing.Chapter 1 Basic Pointers . . . . . . . 5A quick read of this chapter willsave you time later.Time and Temperature Displays . . . . 5Operation Begins fromthe IDLE Display . . . . . . . . . . . . . . . . 5Thermocouple Inspection . . . . . . . . . 5How to Scroll Numbers Rapidly . . . . 5Program Review & Repeat Firing . . . 5Delay . . . . . . . . . . . . . . . . . . . . . . . . . 6The LID Message. . . . . . . . . . . . . . . . 6Power Failures . . . . . . . . . . . . . . . . . . 6CPLT Message: Firing Completed . . 6Hot and Cold Weather;Storage Sheds. . . . . . . . . . . . . . . . . . 6Thunder Storms and Power Surges . 7Canceling a New Program . . . . . . . . 7Two Firing Modes:Cone-Fire and Ramp-Hold . . . . . . . . 7Preventing an Overfire. . . . . . . . . . . . 7How to Disable the Audible Alarm . . 7Chapter 2 Cone-Fire . . . . . . . . . . . 8Learn quick ceramic firing.Pyrometric Cones . . . . . . . . . . . . . . . 8Firing Schedules . . . . . . . . . . . . . . . . 9How to Interpret the Bendingof a Pyrometric Cone. . . . . . . . . . . . . 9How to Correct forUnder- or Over-Fired Cones . . . . . . . 9Cone-Fire ProgrammingInstructions . . . . . . . . . . . . . . . . . . 10Firing Speed [SPD] . . . . . . . . . . . . . 10Hold at Cone Temperature [HOLD] 10Slow Cooling [COOL] . . . . . . . . . . . 11How to Customize Cone-Fire . . . . . 11For Kilns with the AOP Outlet . . . . . 11Chapter 3 Ramp-Hold . . . . . . . . . 12Read this section for non-ceramicfirings and customized ceramicfirings.Theory of Ramp-Hold Operation . . . 12How to Store Programs . . . . . . . . . . 12Ramp-Hold Rate: 3 TypesRate as Degrees Per Hour . . . . . . 13Rate as Degrees Per Minute. . . . . 14Rate as Time Needed to Reachthe Target Temperature . . . . . . . . 14Ramp-Hold ProgrammingInstructions . . . . . . . . . . . . . . . . . . 13Hold (HD ) . . . . . . . . . . . . . . . . . . . . 14Temperature Overshoot . . . . . . . . . 14AOP: Turn on a Fan or Alarm . . . . . 14Programming a Cooling Segment . 14A Ramp-Hold Practice Program . . . 15Chapter 4 Customize YourController with Options . . . . . . . 15Become a power user. The information is here if you ever need it.How to Edit a ProgramDuring a Firing . . . . . . . . . . . . . . . . . 15Skip to the Next Segment . . . . . . 16Change Hold Time . . . . . . . . . . . . 16Change Target Temperature . . . . 16Cone-Fire OptionsOFST / Cone Offset . . . . . . . . . . . . 16Interpreting Cone Bending toSet a Cone Offset . . . . . . . . . . . . . 17When Cone TemperatureIs Off More Than 20 F/11 C . . . . . 17COOL / Slow Cooling for Glazes . . 17General OptionsDELA / Delay the Firing for Later . . 17TC / Choose Thermocouple Type . 18ALAR / Temperature Alarm. . . . . . . 18Setting the Alarm From IDLE . . . . 18Setting the Alarm During a Firing . 18DIAG (Diagnostics) . . . . . . . . . . . . . 19Check the AmperageTest the Relays and AOP1 OutletF/C / Select F or CTemperature Display . . . . . . . . . . . . 19 F/ C TemperatureConversion FormulasLIM / Set a MaximumTemperature for Your Kiln . . . . . . . . 19COST / View the ElectricalCost of a Firing . . . . . . . . . . . . . . . . 19TCOS / Thermocouple Offset . . . . . 20TEDE / Temperature Deviation . . . . 20HTDE / Adjust HighTemperature Deviation . . . . . . . . . . 21LOCK / Program Lock . . . . . . . . . . 21How to Activate the Lock Option . 21How to Lock Individual Programs 22AOP1 / Auxiliary Output . . . . . . . . . 22ELEC / Electronics Temperature . . 22RATE / Select PreferredType of Ramp-Hold Rate . . . . . . . . . 22CENT / Enter Cost Per Kilowatt-Hourfrom Your Electric Bill(for Firing Cost) . . . . . . . . . . . . . . . . 23KW / Kilowatts of Your Kiln(Needed to Calculate Firing Cost). . 23SFTY / Maximum Temperature . . . . 24SOFT / Software Version. . . . . . . . . 24CFG / Configuration Code . . . . . . . 24RST / Reset . . . . . . . . . . . . . . . . . . . 24Chapter 5 Error Messages . . . . . 25Error messages are like the heartrate monitor on a digital watch.They let you know when something is wrong.Non-Interrupting Error MessagesFTC / Failed to Cool . . . . . . . . . . . . 25FTH / Failed to Heat . . . . . . . . . . . . 25LTDE / Low Temperature Deviation 25PF / Power Failure . . . . . . . . . . . . . . 25Terminating Error Messages- - - - / No Thermocouple . . . . . . . . 25BADP / Bad Programming . . . . . . . 25ETH / Electronics Too Hot . . . . . . . 25FAIL / Thermocouple Failure . . . . . 25FE 1 / Failed to Read/WriteTo Memory . . . . . . . . . . . . . . . . . . . 26FE 4 / Unstable Analog-to-Digital Conversion; Errors DetectingThermocouple Signal . . . . . . . . . . . 26FTL / Firing Too Long . . . . . . . . . . . 26HTDE / High TemperatureDeviation . . . . . . . . . . . . . . . . . . . . . 26LAG / Thermocouple Lag . . . . . . . . 26LID / Safety Switch . . . . . . . . . . . . . 26OTL / Over Temperature Limit . . . . 27PF1 / Power Failure. . . . . . . . . . . . . 27PF 2 / Power Failure . . . . . . . . . . . . 27PF 3 / Power Failure . . . . . . . . . . . . 27TC 2 / Thermocouple Failure . . . . . 27TCR / Thermocouple LeadsReversed . . . . . . . . . . . . . . . . . . . . . 27Basic Power Failure Principles . . . . 27Using Ceramic Witness ConesAfter an ExtendedPower Failure . . . . . . . . . . . . . . . . 27Display Messages. . . . . . . . . . . . 28Preset Cone-Fire Programs . . . . 30Orton Cone Temperature Chart . 31Ramp-Hold Firing Records . . . . 33Make copies. Keep a log book ofyour firings. Build a knowledgebase.Glossary . . . . . . . . . . . . . . . . . . . 34Ramp-HoldShorthand Instructions . . . . . . . 35Cone-FireShorthand Instructions . . . . . . . 36Keep the kiln lid or door closed when the kiln is not in use.3
Sentry Xpress 5 Cone-Fire / Ramp-HoldSafety Rules The warranty on your Sentry Xpress controller does notcover damage from overfiring, regardless of the circumstances. It is the operator’s responsibility to make sure thekiln turns off at the end of the firing.Follow these safety rules in addition to the ones in yourkiln manual: When the kiln is not in use, disconnect thepower and keep the lid or door closed. (Forlarger kilns with heavy cordsets, we recommenda power disconnect box near the kiln.) Large studio kilns should have a power disconnect box for thekiln. Place the box in the kiln room. 4Do not leave the kiln unattended, especiallynear the expected shut-off time. Do not leave akiln turned on at your studio while you are athome sleeping.Wear green #3 firing safety glasses when looking into the peephole of a hot kiln.Do not touch hot sides of kiln. Keep unsupervised children away.Install your kiln at least 12 - 18 inches from anywall or combustible surface. (See manufacturer’s recommendation for your model.)Do not open lid or door until kiln has cooled andall switches are off.Fire only in a well-ventilated, covered and protected area away from flammable materials.Keep cordset away from hot sides of kiln.DANGEROUS VOLTAGE! Do not touchheating elements with anything. Disconnectkiln before servicing. Do not operate if the controller itself is hotterthan 158 F / 70 C. (See instructions on page 22for checking circuit board temperature.) Neverallow the firing room temperature to exceed110 F / 43 C. (Measure room temperaturethree feet from the kiln.)Stop a firing by pressing the Start/Stop button,not by only disconnecting the power. In certainconditions, the controller will interpret a powerinterruption as a power failure and turn the kilnback on when you reconnect the power.Place the kiln on the stand recommended by themanufacturer. When a kiln is safety tested, thelab fires the kiln on the stand designed for thekiln. Cinder blocks or bricks can inhibit the flowof air under the kiln. They can also change thekiln’s heating characteristics.Place the kiln on a non-combustible surface.Keep the kiln lid or door closed when the kiln isnot in use. This keeps dust out of the kiln. Also,should someone turn on the kiln while you areaway, the closed lid will keep the heat safely inside the firing chamber.Never place anything on top of the kiln, evenwhen the kiln is idle. If people become accustomed to placing papers and other objects onthe kiln, they may forget and do that while thekiln is firing.Remove tripping hazards from around the kiln.Keep the kiln’s supply cord out of traffic areas.Avoid using extension cords.Never fire tempered glass inside a kiln. It couldexplode.Greenware, which is unfired clay, must be bonedry before firing. Moist greenware can explodeinside the kiln, damaging the ware and the kiln.Place a piece of greenware against the inside ofyour wrist. If it feels cool, it is too wet to fire.Store kiln shelves in a dry area. Moist shelvescan explode inside a kiln.If you smell burning plastic, turn the kiln off.Examine the wall outlet (socket) and supplycord for signs of burning.Never place extra insulation around the kiln inan attempt to conserve energy. The extra insulation can cause the wiring and the steel case toover-heat.Do not leave your kiln unattended during operation.
chamber. A ¼” - ½” diameterthermocouple should extendinto the kiln about ¾” - 1”. (Donot be concerned if your thermocouple extends into the firingchamber even farther.)Chapter 1Basic PointersIn This Chapter you will learn to . . . Choose between Cone-Fire and Ramp-HoldUse the controller in freezing or hot weatherUnderstand the display window layoutEasily repeat the last firingMake a quick visual check of your thermocoupleAvoid overfiring your kilnDisable the audible alarmTime and Temperature DisplaysCenter Dot: TimeA center dot appears duringtime display. It separates hoursfrom minutes. (Example: 1 hour,30 minutes displays as 01.30.)During temperature display, thedot disappears.TimeRight-Hand Dot: CWhen temperature is displayed in C, a dot appears in thelower right. In F display, it disappears. You can choose betweenFahrenheit and Celsius display. See page 19. COperation Beginsfrom the IDLE Display[IDLE] must appear before youcan fire the kiln. If [CPLT], [PF3], or other message appears instead of[IDLE] when the kiln is first turned on, press theStart/Stop key (the key with the circular arrow).[IDLE] will appear. If you press Start/Stop during a firing, [ABRT] will appear. To get back to [IDLE], press Start/Stop again. If the display shows an error message such as [FAIL] instead of [IDLE], see pages 25-27.[CPLT] (firing completed) appears at the end of a firing.To make [IDLE] appear, press Start/Stop.Thermocouple InspectionThe small rod protruding into the firing chamber is thetemperature sensor, or thermocouple.CAUTION: Bumping the thermocouple can pushit out of the firing chamber. This could cause anoverfire! The controller does not contain an alarmto detect this type of failure. Bumping the thermocouple could also cause inaccurate readings.Thermocouples come in different widths. The wider thethermocouple, the farther it should extend into the firingNote: Keep shelves, postsand ware 1” - 1 ½” awayfrom the thermocouple.Keep an extra thermocouple on hand, especially ifyou fire hotter than 2000 F /1093 C.Pointer: Keep shelves,posts and ware 1” - 1 ½” awayfrom the thermocouple.If you are using a separate portable controller, you willneed to install the thermocouple on the kiln. See the separate TnF 2 installation instructions.How to Scroll Numbers RapidlyDuring programming, hold an arrow key down severalseconds, and numbers will begin to scroll rapidly. Ordinarily, you would press the Up Arrow to raise a numberand the Down Arrow to lower it. But sometimes it is fasterto press the opposite key. This is because the numbers scrollbelow 0000 to the highest number, and vice versa. Examples: To program a 99.59 hour Hold when the display shows[00.00], press the Down Arrow once. To program a FULL rate when the display shows[0000], press the Down Arrow once. To program a temperature of 200 F when the displayshows [1800], press the Up Arrow. That is faster thanpressing the Down Arrow and scrolling from 1800 to200.Program Review & Repeat FiringProgram Review lets you check that the program in thecontroller is accurate. Use Program Review before everyfiring. It takes only seconds. Program Review shows the values for the program in active memory. Use Program Review from [IDLE] to repeat the last program you fired. Theprogram in active memory is 1) the program that you firedlast, or 2) the program that you entered or selected sincethe last firing. Using Program Review during firing: Press the DownArrow key. The rate, temperature, hold, etc. will display one after the other. The firing will continue. To repeat a firing, use Program Review from [IDLE]:Press the Down Arrow key. After rate, temperature,hold, etc., [STRT] will appear. Press Start/Stop.[DELA] will appear unless it has been removed in Options. Enter the delay time, or press the Start/Stop key.[-ON-] will appear, and the kiln will begin firing the program just reviewed.Pointer: When [DELA] flashes after [STRT], youcan end the firing before it begins. Do nothing for60 seconds. The display will return to [IDLE].Keep the kiln lid or door closed when the kiln is not in use.5
Sentry Xpress 5 Cone-Fire / Ramp-HoldNote: In Program Review, Cone-Fire speed is displayed as the RA (ramp) part of each segment.Cone-Fire Review shows the segments and ramprates listed in the charts on pages 30-31.DelayDelay is a count-down timer. The kiln begins firing whenthe timer runs out of time. Use delay to fit a firing into yourschedule. See also page 17.CAUTION: For safety, do not leave the kiln aloneduring a delay or a firing. We cannot guaranteeyour kiln against overfiring even though the controller is automatic.1 After you have selected a program and the controller is ready to begin firing, [STRT] will appear.2 Press the Start/Stop key once. [DELA] will appear, alternating with [00.00].3 Use the arrow keys to enter delay time. (The decimal separates hours and minutes. Example: 1 hourand 10 minutes 01.10) Then press Start/Stop.[-ON-] will appear, then [DELA] alternating withtime left until the firing begins.[PF 3] The power failed during a firing and the temperature dropped more than 72 F / 40 C by the time the powercame back on.CPLT Message: Firing CompletedWhen the firing has successfully completed, the SentryXpress will beep for 60 seconds and shut off the elements.Then four messages will cycle one after the other:1 [CPLT] (complete)2 Firing time in hours and minutes3 The temperature reached during the last segmentthat you programmed4 The current kiln temperatureNote: After the kiln fires to completion, disconnect the power. It is okay to turn off the power tothe controller while the kiln cools to roomtemperature.Hot and Cold Weather; Storage ShedsIt is okay to store the Sentry Xpress at sub-zero temperatures. But before operating, raise the room temperature toat least 32 F / 0 C.Note: Press Start/Stop during delay to end thedelay and begin the firing. The maximum delay is99 hours and 59 minutes.CAUTION: For safety, do not leave the kiln aloneduring a delay or a firing. We cannot guaranteeyour kiln against overfiring even though the controller is automatic. The operator assumes full responsibility for shutting the kiln off at the propertime.The LID MessageThis indicates that your kiln is equipped with a lid ordoor safety switch, and the lid or door is open. This will turnoff the elements.If your kiln does not have a safety switch, or the kiln isclosed, please see page 26.Power FailuresAfter a power failure, the controller will continue firingprovided– The kiln temperature is above 212 F / 100 C when thepower comes back on. The temperature dropped no more than 180 F / 100 Cwhile the power was off.Power Failure Messages[PF 1] The power failed during a cooling segment, andthe kiln cooled past the target temperature while the powerwas off.[PF 2] The power failed during a firing and the kiln temperature was below 212 F / 100 C when the power cameback on.6Hot weather pointer: Blow a gentle stream of air through the controlpanel of the kiln to reduce the temperature of the controller circuit board.The Sentry Xpress will register sub-zero F / C temperatures. However, 32 F / 0 C is the lowest recommended operating temperature.Pointer: Raise the room temperature with a spaceheater before firing the kiln. Place the space heaterwithin a couple of feet of the control panel and let itrun for an hour or so. Or even hang a shop lightnear the kiln to raise the temperature abovefreezing.The circuit board is rated for 176 F / 80 C maximum operating temperature. However, the maximum recommended temperature is 158 F / 70 C, measured at the controller inside the kiln switch box. To lower the temperature,open windows and blow air across the kiln’s switch box witha fan. Place several fans in the room during hot weather.(See ELEC, page 22, to check circuit board temperature.)High humidity will not adversely affect the SentryXpress unless water condenses on the circuit board. In thiscase, do not fire the kiln until the moisture has evaporatedfrom the board.Do not leave your kiln unattended during operation.
Thunder Storms and Power SurgesPreventing an OverfireUnplug the kiln when not in use, especially during thunder storms and in areas that have frequent power surges. Ifthe kiln is part way through a firing when a storm begins, itmay be okay to continue the firing. When the kiln shuts off,disconnect the power.Even though a digital controller turns off the kiln automatically, you should monitor the kiln during firing. This isto prevent a possible overfire.1 Remain nearby while the kiln is firing. Check thekiln occasionally.2 Set the temperaturealarm (page 18) to remind yourself to checkthe kiln. If you are too faraway to hear the alarm,you might try using ababy monitor.Try to avoid firing your kiln during thunderstorms. Keep the kiln disconnected from the power when not in use. (Lake Grapevine, Texas. Photo byJared Davidson.)CAUTION: When firing the kiln during a storm,do not leave the kiln unattended.Canceling a New ProgramIt’s okay if you pause while entering a program. There isno time out. If you change your mind and want to cancel anew program, turn off the power to the controller. Or continue entering a program. When [STRT] appears, press theDown Arrow key. The controller will cancel the firing andgo back to [IDLE].Cone-Fire and Ramp-HoldTo give you greater flexibility, your controller has twofiring modes: Cone-Fire and Ramp-Hold.Cone-Fire Mode (see pages 8-11)Cone-Fire mode fires the ware to a pyrometric conenumber using the Orton cone tables on page 32. This modeis for ceramics, pottery, stoneware, and glazes. Your supplier can tell you which cone number to program.Ramp-Hold Mode (see pages 12-15)Use Ramp-Hold mode to create custom firings. Selectyour own firing speed, temperature, and hold time in up to20 steps, or segments.The chart shows the recommended firing mode for several types of ware:Type of FiringModeChina PaintingCeramic DecalsCeramic GlazeCeramic GreenwareGlass Bead AnnealingGlass FusingGlass SlumpingLost WaxSuggested dRamp-HoldRamp-HoldRamp-Hold3 After the kiln fires tocompletion, disconnectthe power. It is okay toturn off the power to thecontroller while the kilncools to room temperature.Pointer: Set a wristwatch alarm,cell phone, or even an alarm clockto remind youself to check on yourkiln.How to Disable the Audible AlarmThe Sentry Xpress makes a beeping noise when it fires tocompletion and when it displays error messages. Some people prefer not to have an audible alarm. You can disable thealarm by removing a jumper on the back of the controller.Replace the jumperwhen you want thealarm again.1 Disconnect the kilnfrom the power.2 Remove the fourcorner screws thathold the controllerto the switch box.Lift out the controller.3 F i nd the 2 - p i njumper plug for thealarm on the backof the controller. Itis on the connection pins labeledBUZZ ENABLE.Remove and savethe jumper plug.Remove the 2-pin jumper plug from theconnectors labeled BUZZ ENABLE to silence the beeping alarm.You will find theconnectors on the back of the controller.4 Reinstall the controller being careful not to tug on the wires.Keep the kiln lid or door closed when the kiln is not in use.7
Sentry Xpress 5 Cone-Fire / Ramp-HoldChapter 2Cone-FireIn this chapter you will learn to . . . See witness cones at high temperaturesProgram a Cone-Fire program in minutesPre-heat the ware so it doesn’t explodeBend a cone by adding extra hold timeCool slowly (called down fire) to alter glazesCone-Fire mode is based on Orton pyrometric cones. It is not designed for heattreating, glass fusing and enameling. Forthese firings, see “Ramp-Hold,” pages12-15. Use Ramp-Hold to fire ceramicpieces that require a custom firingschedule, such as some types of stoneware sculpture or crystalline glaze.Note: If the bending of the witness cone does notmatch the Cone-Fire shut-off, you may want to adjust Cone Offset (page 16) or Thermocouple Offset (page 20). If the witness cones bend inconsistently from one firing to another, see “SentryTroubleshooter,” a separate publication.How to Position Cones on the Shelf(for Ceramic Kilns)Position the witness cones soyou can see them through apeephole during firing. If thekiln takes longer than usual tofire, you may wonder if something has gone wrong and thekiln is over-firing. But by seeingthe cones, you will know how thefiring is actually progressing.If you follow these guidelines,you should be able to see thecones even at cone 10:Use self-supporting witnesscones on the shelf. They standupright without cone holders.1 Place the cones 8” - 12”away from a peephole. Positioning them closermakes them difficult to see.Before using Cone-Fire mode, read all ofthis chapter. Have your controller infront of you so you can try out the keys asyou read. For more details on pyrometriccones, please see your kiln manual.Pyrometric Witness ConesQuestion A cone 5 firing was 7 F below the targetlisted in your manual, and a cone 6 firing was 22 Fbelow the target. Is this typical and okay? Is the digital controller on my kiln operating normally eventhough it did not achieve the controller temperatures that were programmed at cone 5 and 6?Answer This is normal for Cone-Fire operation. Ifthe kiln fires slower than the normal rate, it willshut off at a lower temperature. If the kiln firesfaster than a normal rate, it will shut off at a highertemperature, sometimes by only a few degrees.The Sentry Xpress controller shuts off automaticallywithout cones. Nevertheless, every ceramic firing shouldinclude at least one witness cone (also called the shelfcone). The witness cone is placed inside the kiln. The witness cone is the most accurate measurement of heat work ina ceramic firing.If you fire the same size load and type of ware regularly,the witness cones let you compare one firing to the next andalert you when something is wrong. For example, if the witness cone bends farther and farther with each consecutivefiring, this may indicate thermocouple temperature drift.8The heating element in the background should be lined up with the lowerpart of the witness cones. If the element is too high, the tips of the coneswill disappear from view when they bend.2 Have enough spacearound the cones tokeep them from touching a piece of warewhen they bend.3 Position cones so thatwhen viewed from thepeephole, they are silhouetted by a glowingheating element on theopposite kiln wall.(Keep cones at least 2”from an element.)Silhouette the lower part of thecone against an element. Keepthe cone 8” - 12” away from thepeephole.4 The element that silhouettes the cones should belevel with the lower part of the cone. If the elementis in line with the upper part of the cone, you won’tbe able to see the cone when it bends.Do not leave your kiln unattended during operation.
5 If you use the three cone system, always have thehigher temperature cone on the same side in everyfiring. Otherwise you can lose track of which cone iswhich.6 Wear green #3 kiln firing safety glasses when viewing the cones through the peephole.See your dealer if in doubt about which cone number touse with each clay and glaze.Firing SchedulesCone-Fire uses three ranges of firing schedules: Low fire cones 022 - 011 Medium fire cones 010 - 01 High fire cones 1 - 10The firing schedules programmed into Cone-Fire modeare listed on pages 30-31. Should you ever want to customize a Cone-Fire program, make the desired changes to a firing schedule and program it in Ramp-Hold (page 11).CAUTION: Cone numbers beginning with 0 arelower i
Sentry Xpress 5 Cone-Fire / Ramp-Hold SafetyRules The warranty on your Sentry Xpress controller does not cover damage from overfiring, regardless of the circum-stances. It is the operator's responsibility to make sure the kiln turns off at the end of the firing. Follow these safety rules in addition to the ones in your kiln manual:
