Transcription
INSTRUCTIONAL, ASSESSMENT DELIVERYAND DATA COLLECTION SOLUTIONSTurningPointcloudTurningPoint CloudQuick Start Guide081815255 West Federal Street Youngstown, Ohio 44503
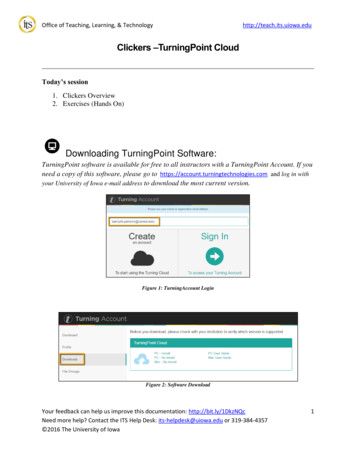
TurningPointcloudSetting UpTurningPoint Cloud SoftwareDownloading TurningPoint CloudInstalling TurningPoint Cloud(EXE File)Opening TurningPoint Cloud(Zipped File)The TurningPoint Cloud software is accessibleThe Extraction Wizard will install the software ontoThe zipped file must be extracted beforethrough the Turning Account website.your computer if the “install” version of TurningPointTurningPoint Cloud can be opened.1. Go to account.turningtechnologies.com to createCloud was selected from the Turning Account website.1. Double-click the downloaded ZIP file.an account. For information on creating an1. Double-click the downloaded setup file.2. Select the desired folder location and click Unzip.account, see help.turningtechnologies.com/2. Click Next. The license agreement window opens.3. Open the unzipped folder and double-clickTurningAccount.2. After your account has been created, sign in withyour Username and Password.3. Select Downloads from the left menu.setting up turningpoint cloud software4. Select the appropriate version of TurningPointCloud.5. Save the file to a specified location.Read the End User License Agreement (EULA) or clickthe Print button to print.3. Select the button labeled I accept the terms in thelicense agreement to accept.4. Click Next.5. Verify the install location. Optionally, select the boxTurningPoint Cloud.exe.TIP: Create a shortcut for TurningPoint Cloud on thedesktop for quicker access. DO NOT remove any filesfrom the Application folder. Application will notfunction properly if files are removed.labeled Open PowerPoint Polling add-in every timeOpening TurningPoint Cloud MacPowerPoint is launched. If selected, theTurningPoint Cloud software is downloaded as aTurningPoint Cloud add-in will open withDMG file.PowerPoint each time PowerPoint is opened1. Double-click the DMG file.independent of TurningPoint Cloud.2. Drag and drop the TurningPoint Cloud icon to6. Click Next.7. Click Install. The computer installs TurningPointthe Applications folder.NOTE: It is recommended to create an alias andCloud and displays the Finish button on the pageadd it to the Dock.when the process is complete.3. Double-click TurningPoint Cloud.8. Click Finish. Select the Launch TurningPoint Cloudcheckbox to immediately open the application, ordouble-click the shortcut on the desktop to openthe application.
Setting Up anOffline PasswordTo use TurningPoint Cloud when you are notPREREQUISITESOptionally, the Preferences window can be accessedconnected to the internet, you must set up anYou must be connected to the internet to set upthrough any of the polling environments.offline password.your offline password. 1. Open TurningPoint Cloud and sign in to yourPowerPoint polling environment, clickon the TurningPoint Cloud ribbon.Turning Account.available to Single Sign-On users.2. ClickIMPORTANTThe Preferences window opens.on the bottom right corner polling environment, clickof the Dashboard.When you are signed in to TurningPoint Cloudoffline, online features (ResponseWare andIntegrations) will not be available.To open Preferences in the Anywhereand selectPreferences. To open Preferences in the Self-Paced pollingenvironment, click Tools on the menu barand select Preferences.3. Click Set Password.4. Enter and confirm your offline password in theboxes provided.NOTE: Your password must contain a minimum ofeight characters including one upper case, onelower case and one number.5. Click Set.6. Click Close to return to theTurningPoint Cloud Dashboard.SETTING UP AN OFFLINE PASSWORDNOTE: Setting up an offline password is notTo open Preferences in the
TurningPoint Cloud DashboardLaunchPollingCreateContentManage ParticipantList and Polling DataTurning Account Seat License Provide UserUsernameCountFeedbackThe TurningPoint CloudDashboard offers one, er interface for polling inPowerPoint, polling in anyListapplication and self-pacedpolling. The Dashboardprovides instant managementSelectContentof polling, participants,content, sessions and reports.ListIn order to accessturningpoint cloud dashboardthe Dashboard, you must signin to your Turning AccountChoose PollingEnvironmentfirst. Create a TurningAccount at https://account.turningtechnologies.com.Help & TutorialsAbout TurningPointCloudPreferences
Receiver Connection SetupSetting Up a Receiver1. Plug in the receiver and open TurningPoint Cloud.2. Click the channel number below Receiver. ThePreferences window opens.3. Select the channel number from the drop-downmenu under ResponseCard Channels. Once thereceiver has been set up, it is now possible tobegin testing the polling connections. To test thepolling connections, the devices(ResponseCards) need to be set to the samechannel as the receiver.RF ReceiverRF ReceiverWhen the receiver is plugged in,it is automatically recognized bythe computer. The default channelon the RF receiver is set to 41. IRreceivers do not work on channelsand require no adjustments. Thedevices (ResponseCards) need tobe set to the same channel as thereceiver when polling.IR Receiverreceiver connection setupHow to Change the Channelon the Receiver
Connect to ResponseWareResponseWare must be enabled for participants to use ResponseWare as a response device.The virtual response solution allows participants to respond through web-enabled devices andapplications available for smartphones and tablets. If you do not use ResponseWare, skip this task.How to Set Up ResponseWare1. Click Click to Connect in the upper right corner of the TurningPoint Cloud Dashboard.2. Optionally, click Session Options to configure participant settings. Adjust the session options as necessary and click Save.Require Participant Accounts - Place a check in the box next to this option to require participants to have licensedaccounts to be able to respond. This option is only available if you have a Concurrent License applied to your Turning Account.Participant Session Login Information - First Name, Last Name, User ID and Email can be set to Optional, Require or Don’t Show. If set to Require, participants will be prompted to enter the required fields prior to joining the session. If set to Optional, participants will be prompted to enter the optional fields but can join the session without enteringthe information. If set to Don’t Show, participants will not be prompted to enter the optional fields and the fields will not appear inTurningPoint Cloud reports.Participant Messaging - Presenters can configure the messaging feature so that participants can message the presenterand all other participants, the presenter only or disable messaging. Participants may message presenter and all participants - A participant can choose to message the presenter alone orconnecting to responsewarethe presenter and all participants in the session. Participants may message the presenter only - A participant can send direct messages to the presenter. Disable participant messaging - Participant messaging is disabled, however presenters retain the ability to message thegroup or individual participants.3. Click Start Session.4. Click Close to return the TurningPoint Cloud Dashboard.5. Select either PowerPoint Polling or Anywhere Polling from the TurningPoint Cloud Dashboard.
PowerPoint PollingThe polling function in PowerPoint allows you to poll an audience with questions embedded directly into yourPowerPoint presentation. A ribbon/toolbar is directly integrated into ent Participant ListResetPollingSessionModeMessagingPC PowerPoint RibbonConnectionInformationSelectedParticipant ListImport ContentLoadParticipant SessionSaveSessionStartSlide ShowMac PowerPoint Toolbarpowerpoint pollingLoadParticipant ListSlidePreferences Pane
PowerPoint Polling PCBefore You BeginPolling in PowerPoint: PC ShowbarToggleMove ResponseShowbar isplayRepollQuestionTo poll in PowerPoint, you need nformationAttendanceInsert NewQuestionDelete orDisplayMessagingWindowpresentation with questions slides or a questionlist. To track results based on participants, aparticipant list is also recommended.ResponseCounterPollingStatusHow to Poll in PowerPoint for PC1. Open TurningPoint Cloud and sign in with your Turning Account.powerpoint polling continuedSelect a participant list and content, if applicable.6.Start the Slide Show.7.Depending on the Polling Options that were selected during slide creation,2. Plug in the receiver or establish a ResponseWare session.when you come to a polling slide you may need to advance the slide to3. Click PowerPoint Polling. The TurningPoint Cloud Dashboard windowopen polling.closes and PowerPoint opens. If a question list was selected, TurningPoint8.Continue until the Slide Show is finished.Cloud will automatically parse the content into slides. If there are a large9.Close the presentation when you have finished polling.number of questions in the question list, this may take a few moments.10. Click Yes to save the session. TIP: To save session before closing the4. Open the PowerPoint presentation that contains the question slides ifcontent was not selected before PowerPoint was opened.5. Verify the correct participant list has been loaded and Live Polling isselected in the Polling drop-down box from the TurningPoint Cloud ribbon.application, click Save on the TurningPoint Cloud ribbon, name session andclick Save.11. TurningPoint Cloud opens to the Manage tab to view reports.
PowerPoint Polling MacPolling in PowerPoint: Mac ShowbarDisplayStart PollingBefore You BeginShow/HideResponseResponse GridRepollQuestionSetAnonymousAttendanceInsert NewQuestionHow to Poll in PowerPoint for MacViewOriginalChartDelete DataLast SliceQuestionPolled1. Open TurningPoint Cloud and sign in with your Turning Account. Select aDisplayParticipantMonitor6.2. Plug in the receiver or establish a ResponseWare session.closes and PowerPoint opens. If a question list was selected, TurningPoint4. Open the PowerPoint presentation that contains the question slides ifcontent was not selected before PowerPoint was opened.5. Verify the correct participant list is gStatusStart the Slide Show from the TurningPoint Cloud toolbar. Starting the Slidenon-interactive.7.Click Start to open polling.8.Click Stop to close polling.a) Press the spacebar, enter/return key or down arrow to advance the slide.Cloud will automatically parse the content into slides. If there are a largenumber of questions in the question list, this may take a few moments.To poll in PowerPoint, you need a presentation withquestions slides or a question list. To track results based onparticipants, a participant list is also recommended.Show from the PowerPoint toolbar will result in the Slide Show running asparticipant list and content, if applicable.3. Click PowerPoint Polling. The TurningPoint Cloud Dashboard windowShow/HideConnectionInformationIf using a mouse, a mouse click also advances the slide. Alternatively, aPresenterCard may be used to advance slides and control polling.9.Continue until the Slide Show is finished.powerpoint polling continuedMinimizeShowbarToggleResponseCount
Anywhere PollingThe Anywhere Polling option opens a floating showbar that allows you to poll on top of any CounterHow to Poll with Any Application1. Open TurningPoint Cloud and sign in with your TurningAccount. Select a participant list and content, if applicable.2. Plug in the receiver or establish a ResponseWare session.3. Click Anywhere Polling. The TurningPoint Cloud Dashboardwindow closes and the polling application opens.4. Click the Start Polling button. Participants may now respond.5. Click the Stop Polling button. Polling is closed and the chartis displayed.6. Close the application when you have finished polling.7. Click Yes to save the session. TIP: To save the session beforeclosing the application, click the Options button, mouse overSession and select Save Session.8. Name the session and click Save.9. TurningPoint Cloud opens to the Manage tab to view reports.anywhere pollingShow/HidePresentationOptions erShow/HideResponseGridDisplayMessagingWindow MinimizeShowbarShow/HideConnectionInformation
Self-Paced PollingThe Self-Paced Polling application allows participants to take a paper-basedtest on a ResponseCard NXT or QT Device.Accept Logins,Start Polling,Stop Polling,Live ResultsSave SessionMonitorTimerAdd/RemoveTimeHow to Poll with Self-Paced PollingDisplayMessagingWindow1.Open TurningPoint Cloud and sign in withyour Turning Account. Select a participant listTurningPointand question list.2.3.Plug in the receiver.Click Self-Paced Polling. The TurningPoint CloudDashboard window closes and the pollingChannelInformationapplication opens.4.Click Accept Logins and set login options asdesired.5.Click OK. At this time the participants may loginto the test.6.can submit their results from the responsedevice.7.Click Stop Polling once all the results have beenreceived.8.Close the application to return to theTurningPoint Cloud Dashboard.9.# of ParticipantsLogged In# of CompletedTestsClick Save to save the session results.10. Name the session and click Save.11. TurningPoint Cloud opens to the Manage tab toview reports.self-paced pollingQuestionListInformationClick Start Polling. Participants may now beginthe test. Once they have finished the test theyParticipantListInformation
Creating ContentFor Anywhere Polling and Self-Paced Polling, content is created through question lists. PowerPoint Polling can utilize thequestion lists, but question slides can also be made directly through the TurningPoint Cloud ribbon embedded in PowerPoint.Creating a New Question ListA question list is a file that contains questions and answers. The question list can be used for PowerPoint Polling, Anywhere Polling and Self-Paced Polling. Whencreating the question list, the preferences can be saved and used as a template for other question lists.How to Create a New Question List1.Select the Content tab.2.Click the Content drop-down menu, mouse overNew and select Question List.3.Enter a name and a brief description for thequestion k the arrow next to Preferences to expand the windowand adjust the options as necessary in the Content andPolling sections.TIP: Save the preferences as a preset for other question lists.Click Save as Preset, provide a name, click Add and then Save.The next time a question list is created, select the name fromthe Use Preset drop-down menu.5.Click Save. Now that a new question list has been created,the content, such as question text, answer text and correctanswers, may be entered.creating sSet ces
Creating Content in PowerPointContent is created directly from the ribbon/toolbar.InsertInteractive SlideInsert Slide Objects(i.e. CountdownTimer)Refresh SlidesInsert InteractiveSlideInsertCompetitionInteractive ToolsSlides(i.e. Demographic Comparison)Insert Slide Objects(i.e. Countdown Timer)Interactive Tools(i.e. Standards,Import Question List)PC PowerPoint RibbonPreferencesHelpMac PowerPoint ToolbarPreferencesHelpcreating content in powerpointSavePowerPoint Presentation
Creating Content in PowerPointBefore You BeginOpen PowerPoint throughTurningPoint Cloud. Select the Pollingtab and click PowerPoint Polling.PC PowerPoint RibbonHow to Create Content in PowerPointMac PowerPoint Toolbar1. Select the TurningPoint Cloud ribbon or toolbar.creating content in powerpoint2. Click New and select the question type.TIP: On PC, you can specify a default chart type in the Preferences. The TurningPoint Cloud PowerPoint Preferences are accessed through thePreferences button on the TurningPoint Cloud ribbon. You can also insert a new chart onto a slide using the Objects button on the ribbon.3. Enter the question text and answer text. On Mac, click the Refresh button to update your chart to reflect your slide changes.4. Optionally, set the Question Options in the Slide Preferences pane. On Mac, verify the slide number on the Slide Preferences panebefore making option adjustments.5. Optionally, set the Scoring Options, such as point values or speed scoring in the Slide Preferences pane.6. Optionally, adjust the Polling Options in the Slide Preferences pane.7. Optionally, click on the chart and adjust the Chart Options in the Slide Preferences pane. (Only available on PC.)8. When finished, save the PowerPoint presentation.
Managing DataParticipant ListsTurningPoint Cloud sessions are grouped based on the participant list withwhich they are associated. Participant lists created in TurningPoint Cloud canbe used for PowerPoint Polling, Anywhere Polling and Self-Paced Polling.Downloading a Participant ListCreating a Participant ListParticipant information can be imported from a student roster in a LearningManagement System (LMS) or from your Turning Account.Creating a participant list from your Turning Account allows participants toregister for a course. After the participant list is created, an e-mail invite issent to participants requesting them to register for the course associatedto the participant list.1. Go to https://account.turningtechnologies.com and sign in to yourTurning Account.2. Select the Manage tab.2. Click the Participant Lists tab.3. Click the Participant List drop-down menu and select New. The Create ParticipantList window opens.4. Enter the participant list name and ID.4. Select the Download from Integration radio button and click Create List. TheConnect to Integration window opens.5. Select the appropriate Integration from the Integration drop-down menu.6. Enter the Server Address, Username and Password in the appropriate fields.7. Click Connect. Optionally, click Remember this information to have theIntegration, Server Address and Username stored for future use.8. If applicable, select the Institution from the Select an Institution drop-down menu.The Import Partcipant List window opens.9. Select the course or courses to import. Optionally, select the Select All checkboxto import all courses.10. Click Import. A confirmation box is displayed.11. Click OK. The participant list is added to the left panel of the Participant ListOverview screen.12. Select the participant list to view the participant information.NOTE: The imported participant list contains the following information: Device ID(s),License Status, First Name, Last Name, User ID and Email.3. Click Add.TIP: It is highly recommended to name the participant list after the course(see below). Participants can search for the course by course name,course ID, instructor name or EXACT instructor email.5. Click Save. The participant list is successfully saved and added to theParticipant Lists menu.6. Select the participant list and click the Manage icon. The participant listopens.7. Click Add.8. Enter a participant’s email address in the appropriate field and clickEnter. To add multiple participants, separate email addresses with acomma. Valid email addresses will be marked green while invalidemail addresses will be marked red.TIP: You can copy and paste email addresses into the Invite Participantswindow. However, email addresses MUST be separated with a comma.9. Click Send to invite participants.NOTE: Click the Manage icon and select Accepted or Invited to trackwhich participants have or have not registered for the course. participant list1. Open TurningPoint Cloud and sign in to your Turning Account.managing dataNOTE: Importing from an LMS can only be used if the integration has been installedon the LMS server. Please contact your IT Department to confirm that the LMSintegration is installed and configured to operate with TurningPoint Cloud.
Managing DataGenerating ReportsThere are eight types of session reports. Each report can be customized by selecting the data options on the right side of the reportswindow.IMPORTANT: A Turning Account license is mandatory for each participant in the participant list. If the participant does not have an activeTurning Account license, his or her score will show as an asterisk in all TurningPoint Cloud participant reports. Furthermore, his or herscore will export as “0” to an Excel workbook and will not be exported to an LMS.Export toCSV, XLS, HTML1. From the Manage tab, select a session from the left panel.2. Click Reports at the bottom of the Session Overview screen.TIP: Double-clicking the session name will also open the reportsPrint ReportSelect ReportTypewindow.3. Select the report type from the drop-down menu in the upperright corner.4. The report session header appears on all reports. The sessionheader includes the session name, date created, activemanaging dataparticipant count, average score and the question count.NOTE: The calculation for the average score is the sum of the totalpoints for each active participant divided by the number of activeparticipants. generating reportsCustomizationOptions
QT DeviceQuick Start GuideThe QT Device is an audience response device with a full QWERTY style keyboard usedfor immediate feedback or Self-Paced Testing. The QT Device is compatible with TurningTechnologies RF receiver (RRRF-03) and RF receiver (RRRF-04) and with TurningPoint 5,TurningPoint Cloud, Flow (2.0 or higher) and Insight 360 (Student ID Login mode only).The ToolboxSend Message - Send a message to the presenter. The presenter isunable to respond via the same method.NOTE: The presenter may have this feature disabled in the software. If disabled,you will see “Not Open” when trying to send a message.Your ID - Assigns an alphanumeric identification to device.Device Info - Press the function key below OK to display the Device ID.Press the right arrow once to display the firmware version and language.Contrast - Press the function key below OK and use the left or right arrowsto adjust the contrast of the objects. Press the function key below OK tosave.Brightness - Press the function key below OK and use the left or rightarrows to adjust the brightness on the QT Device. Press the function keybelow OK to save.TIP: Expose the QT Device to natural or artificial light to charge the “glow in thedark” keyboard.qt device quick start guideSettings - Press the function key below OK to open the settings anduse the right or left arrow keys to scroll through the options.
QT DeviceQuick Start Guide Presentation ModeManually Changingthe ChannelUse the steps below to manually set the channelor use the Find Channel function to find a receiverwithin range.WARNING: If thelock symbol appears next to thechannel number, the channel cannot be changed.1.2.3.Press the Channelbutton.Use the number pad to enter the new channelnumber.Once the channel number has been entered,press the function key below OK.TIP: Alternatively to select an option, press theEnter key.Find Channelsqt device quick start presentation mode1.2.3.4.Press the Channelbutton.Press the middle function key below. The QTDevice scans for receiver(s) within range.Use the arrow keys to scroll through availablechannels.Press the function key below OK to select thechannel.RespondingDuring the presentation, the QT Device promptsyou to enter the proper response type. An indicatorappears at the top left of the screen for specialquestion types.123.Numeric Response question3,1,2.Multiple Response question withnumeric answer valuesC,A,B.Multiple Response question with alphaanswer valuestxtShort Answer and Essay questionsThe following icons appear at the bottom center of thescreen when sending a response:The response is being sent.The response was sent successfully.Example ScreensSingle Response - Single Responsequestions are multiple choicequestions where only one answeris selected. Press the button on thenumber pad that corresponds to youranswer choice for alpha andnumeric responses. For example,press 1/A for answer choice A.Multiple Response - MultipleResponse questions are multiplechoice questions, where multipleanswers can be submitted. Use thenumber pad to enter your alpha ornumeric answer choices andpress the function key below OK tosubmit your response. For example,press 1/A and 2/B for answerchoices A and B.Numeric Response - Numeric Responsequestions require a numeric value tobe entered. Use the number pad on thekeyboard to enter your answer and pressthe function key below OK to submit yourresponse. Numeric responses accept a /sign at the beginning of an answer and onedecimal point.Short Answer/Essay - Short Answer andEssay questions require a text response. Usethe keyboard to enter your text and pressthe function key below OK to submit yourresponse. The available number of remainingcharacters is indicated in the upper right ofthe screen.Invalid Response - If this screen is displayedafter submitting a response, it means that theresponse was invalid. For example, answeroptions are A - D, and you submitted E asyour answer choice.No Linkup on Channel - This screen is toalert you that the QT Device is not on thecorrect channel or is unable to communicatewith the receiver.Polling Closed - This screen indicates thatpolling is closed and answers are not beingaccepted.
Quick Start Guide Test ModeThe Toolbox?Go to Question - Select a specific question. Usethe number pad to enter the question number andpress the function key below OK.Skipped Question - View the next unansweredquestion.Test Info - Displays the test name, version (ifapplicable) and number of questions.Device Info - Press the function key below OKto display the Device ID. Press the right arrowonce to display the firmware version andlanguage.Contrast - Press the function key below OKand use the left or right arrows to adjust thecontrast of the objects. Press the function keybelow OK to save.Brightness - Press the function key below OKand use the left or right arrows to adjust thebrightness on the QT Device. Press thefunction key below OK to save.Exit Test - Exits a test. A message is displayed thatthe test is incomplete or complete. Unansweredquestions are also displayed.Go Back Arrow - Press the correspondingfunction key to return to the Tools.Delete Test - Press the correspondingfunction key to delete the test. To confirmdeletion, press the function key below OK.Send Test - Press the corresponding functionkey to send the test to the host computer. Toconfirm test send, press the function keybelow OK.Send Message - Send a message to the presenter.The presenter is unable to respond via the samemethod.Settings - Press the function key below OK to openthe settings and use the right or left arrow keys toscroll through the options. The settings contain:NOTE: The presenter may have this feature disabledin the software. If disabled, you will see “NotOpen” when trying to send a message.Changing the ChannelBefore logging into a test, the QT Device must be on thesame channel as the receiver.1.2.3.Press the Channelbutton.Use the number pad to enter the question number.Once the channel number has been entered, pressthe function key below OK.Logging into a Test1. Press a button on the QT Device to “wake up” the device.2. The Welcome Screen is displayed followed by the BatteryIndicator Screen.3. You may be prompted for Your ID.a. Press the Backspace key to clear the informationdisplayed.b. Use the keyboard and/or number pad to enter Your ID.c. Press the function key below OK.4. You may be prompted for Test Version.a. Locate the Test Version number on the papertest.b. Use the number pad to enter the Test Version.c. Press the function key below OK.The test name, version number (if applicable) andquestion count are displayed.5. If the information displayed is correct, press thefunction key below OK. If the information is incorrect,press the far left function key, verify that the QT Deviceis on the correct channel and begin the process fromstep 1.You are now in Test Mode.Navigating Through QuestionsScrolling through questions.1. Use the left and right arrows to scroll back orforward through the question rolodex.Go to a specific question.1. Presson the keypad.2. Use the arrow keys to highlight the Go to Questionicon and press the function key below OK.3. Use the number pad to enter the question number.4. Press the function key below OK.?qt device quick start test modeTest ModeQT Device
QT DeviceQuick Start Guide Test ModeTaking a TestSending a TestUse the arrow keys to move on to the next question.Single Response - Press the function key below your answerchoice. Up to five answer choices will be visible on the QT Devicescreen. Press the up or down arrows to view more answer choices.Alternatively, select your answer by pressing the corresponding keyon the number pad.Multiple Response - Use the number pad to enter your answerchoices and press the function key below OK once you have madeyour selection.Numeric Response - Use the number pad to enter your answerand press the function key below OK once you have made yourselection.qt device quick start test modeTrue or False - Press the function key below your answer.Alternatively, select your answer by pressing the correspondingkey on the number pad.Short Answer/Essay - Use the keyboard to enter the answertext and press the function key below OK once you have madeyour selection. The available number of remaining characters isindicated in the upper right of the screen.Use the Toolbox to send your test. To send your
TurningPoint Cloud software is downloaded as a DMG file. 1. Double-click the DMG file. 2. Drag and drop the TurningPoint Cloud icon to the Applications folder. NOTE: It is recommended to create an alias and add it to the Dock. 3. Double-click TurningPoint Cloud. cloud tPoint