Transcription
2019E-Mail Setup GuidesWALKTHROUGHS FOR MOST COMMON MAIL CLIENTSD&P COMMUNICATIONS
1Outlook 2013/20161. Open Outlook2. Click “File” and then select “Info”Fig. 1-1: Locating the File Menu3. Click the “Account Settings” box and select “Account Settings”. This will open the new window.Fig. 1-2: Entering the Account Settings4. Click the “E-mail” tab in the new window
25. Click “New ”Fig. 1-3: Creating a New Account Profile6. Choose “Manual setup or additional server types” and then click “Next ”Fig. 1-4: Manually Configuring the Mail Servers7. Select “POP or IMAP” and then click “Next ”
38. Fill in the User Information, Server Information, and Logon Information sections*Use POP3 if this is the only device you check your e-mail with. If you use multiple devices tocheck e-mail (smartphones, tablets, etc.) use IMAP**Incoming/Outgoing mail servers will match the same domain as your e-mailex:an e-mail of “example@d-pcomm.net” would have a mail server of “mail.d-pcomm.net”an e-mail of “example@cass.net” would have a mail server of “mail.cass.net”an e-mail of “example@tc3net.com” would have a mail server of “mail.tc3net.com”*** The User Name should be your full e-mail addressFig. 1-5: Entering Server Settings9. Click “More Settings ”10. Select the “Outgoing Server” tab and check the box for “My outgoing server (SMTP) requiresauthentication”11. Select “Use same credentials as my incoming mail server” and click “OK”Fig. 1-6: Adjusting Outgoing Server Settings12. Click “Next ” to test the account and complete setup.
4Mozilla Thunderbird1. Open Mozilla Thunderbird2. On the “Home” tab, look under “Accounts” and click “Email” under “Set up an account:”Fig. 2-1: Add a New E-Mail Account3. Fill in the information and click “Continue”Fig. 2-2: Fill in Credentials4. Once Thunderbird finishes fetching information, click “Manual config”
55. For incoming server, select IMAP if you access your e-mail from multiple device or POP3 if this isthe only device you use for e-mail6. “Server hostname” should be “mail.(your e-mail’s domain)”ex:an e-mail of “example@d-pcomm.net” would have a mail server of “mail.d-pcomm.net”an e-mail of “example@cass.net” would have a mail server of “mail.cass.net”an e-mail of “example@tc3net.com” would have a mail server of “mail.tc3net.com”7. Set “SSL” to “None” for incoming and outgoing servers—leaving SSL enabled can cause e-mail tocome into your account or keep you from sending e-mail.Fig. 2-3: Entering Manual Server Settings8.9.10.11.Make sure the Username for incoming and outgoing is your full e-mail addressSet authentication for incoming and outgoing to “Normal password”Click “Re-test” to make sure there are no issues found, then click “Done”A pop-up window may have you confirm the security settings since SSL is not turned on. Checkthe box next to “I understand the risks.” and click “Done”
6Apple Mail1. Open Mail2. Click “Mail” and select “Preferences”Fig. 3-1: Opening Apple Mail Preferences3. Click “Accounts” and then “ ” to add an accountFig. 3-2: Adding an Account
74. Fill in the information for “Account Information”*Incoming and outgoing mail servers should both be “mail.(your e-mail’s domain)”ex:an e-mail of “example@d-pcomm.net” would have a mail server of “mail.d-pcomm.net”an e-mail of “example@cass.net” would have a mail server of “mail.cass.net”an e-mail of “example@tc3net.com” would have a mail server of “mail.tc3net.com”*User Name should be your full e-mail address*In Outgoing Mail Server, click “Use Authentication” and enter your User Name and PasswordagainFig. 3-3 to 3-6: Apply Server Credentials5. Click “Server Settings ”Fig. 3-7: Accessing Server Settings
86. Verify the outgoing mail server is still correct7. Outgoing Server Port should be 587Fig. 3-8: Changing Outgoing Server Port8. Make sure that “Use Secure Sockets Layer (SSL)” is disabled9. Authentication should be set to “Password” and the User Name (your full e-mail address) andpassword are filled in10. Click “OK”11. Click the “Advanced” tab and make sure that SSL is disabled on the incoming server, as wellFig. 3-9: Verifying Incoming Server Settings12. Close the Accounts window13. Compose and send a self-addressed e-mail to verify that Incoming and Outgoing Servers areworking properly.
9iPhone/iPad1. From the Home screen, go to “Settings” “Passwords & Accounts”, and then select “AddAccount”Fig. 4-1 to 4-2: Adding a New Account2. Select “Other” and then tap “Add Mail Account”Fig. 4-3 to 4-4: Choosing Account Type
103. Fill in the account information on the New Account screen and then tap “Next”Fig. 4-5: Entering Account Information4. Select “IMAP”5. Fill in the information for “Incoming Mail Server” and “Outgoing Mail Server”*Incoming and outgoing mail servers should both be “mail.(your e-mail’s domain)”ex:an e-mail of “example@d-pcomm.net” would have a mail server of “mail.d-pcomm.net”an e-mail of “example@cass.net” would have a mail server of “mail.cass.net”an e-mail of “example@tc3net.com” would have a mail server of “mail.tc3net.com”*User Name should be your full e-mail addressFig. 4-6: Entering Incoming and Outgoing Server Settings
116. After submitting this info, hit “Save” and then tap the account again to go back into the profile7. Under “Outgoing Mail Server”, select “SMTP mail.(your e-mail domain)”Fig. 4-7: Locating the SMTP settings8. Tap on the “Primary Server” and make sure that “Use SSL” is off, “Authentication” is set toPassword, and “Server Port” is 5879. Tap “Done” and the settings will be verifiedFig. 4-8: Disabling Outgoing Server SSL
1210. Navigate back to the “IMAP Account Information” screen and under the outgoing mail serversettings, tap “Advanced”11. Scroll down and ensure SSL is turned off here, as well.Fig. 4-9: Disabling Incoming Server SSL12. When done, tap “Accounts” to go back to the main account window. The settings willautomatically be verified again. If issues are found, correct them and continue.13. Tap “Done” and the account should now be activeFig. 4-10: Finalizing Account Setup
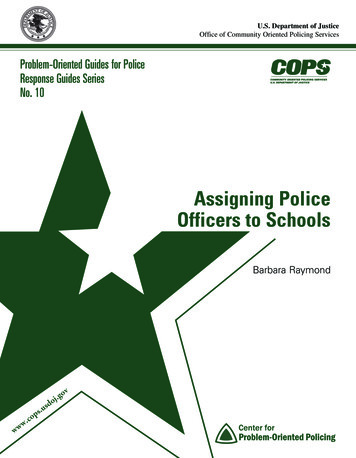
13Windows Mail (Windows 10)1. Open the Mail app2. Click “Accounts” in the left pane3. In the new menu to the right, click “Add account”Fig. 5-1: Adding a New Account to Windows Mail4. In the new window, select “Other account”5. Enter the account information in the appropriate areas and click “Sign in”Fig. 5-2: Completing General Account Information
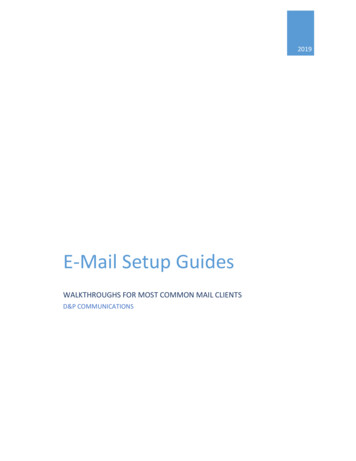
146. Click “Done” if the account creation was a success. Otherwise, verify the e-mail andpassword and retry7. The account may say “Attention required” on the right. Click the account and then select“Change settings”Fig. 5-3: Changing Settings after Primary Creation8. In the account settings, click “Options for syncing your content” under “Change mailboxsync settings”Fig. 5-4: Navigating to Account Sync Settings9. Scroll to the bottom of the sync settings and click “Incoming and outgoing mail server info”under “Advanced mailbox settings”Fig. 5-5: Navigating to Additional Server Settings
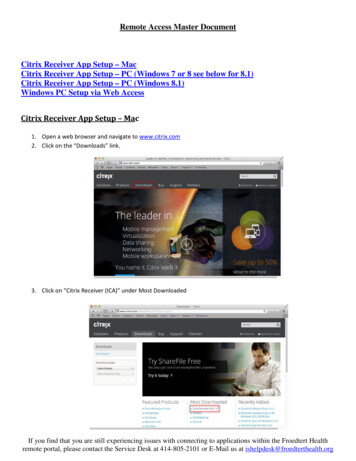
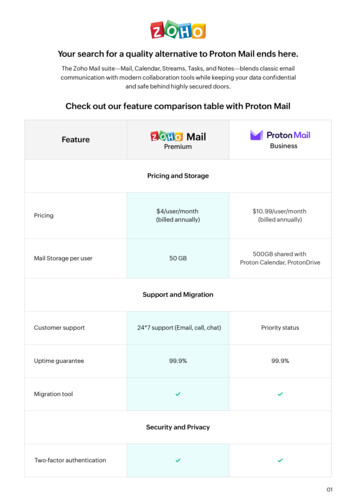
1510. Incoming and outgoing mail servers should both be “mail.(your e-mail’s domain)”ex: an e-mail of “example@d-pcomm.net” would have a mail server of “mail.d-pcomm.net”an e-mail of “example@cass.net” would have a mail server of “mail.cass.net”an e-mail of “example@tc3net.com” would have a mail server of “mail.tc3net.com”11. Uncheck the boxes for “Require SSL for incoming email” and “Require SSL for outgoingemail”12. Click “Done”Fig. 5-6: Submitting Changes Made to Server Settings13. The account will still say further attention is required. Since changes were made to theserver info, you will need to verify your password.14. Click the account on the right again, but this time select “Fix account”15. Retype your password and click “Save”16. Within a few moment, your messages should begin to sync and the process is complete
8. In the account settings, click "Options for syncing your content" under "Change mailbox sync settings" Fig. 5-4: Navigating to Account Sync Settings 9. Scroll to the bottom of the sync settings and click "Incoming and outgoing mail server info" under "Advanced mailbox settings" Fig. 5-5: Navigating to Additional Server Settings