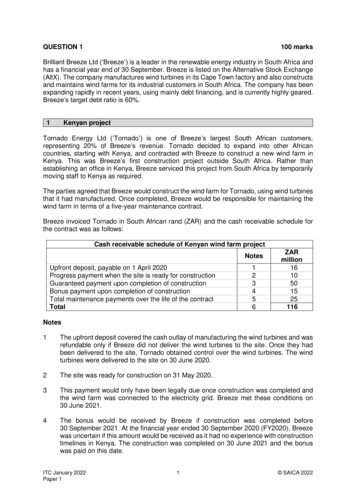
Transcription
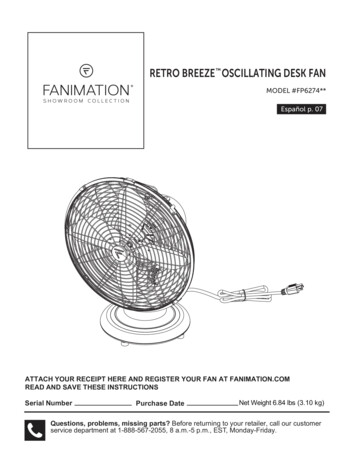
RETRO BREEZE OSCILLATING DESK FANMODEL #FP6274**Español p. 07ATTACH YOUR RECEIPT HERE AND REGISTER YOUR FAN AT FANIMATION.COMREAD AND SAVE THESE INSTRUCTIONSSerial NumberPurchase DateNet Weight 6.84 lbs (3.10 kg)Questions, problems, missing parts? Before returning to your retailer, call our customerservice department at 1-888-567-2055, 8 a.m.-5 p.m., EST, Monday-Friday.
Important Safety InstructionsWARNING: To avoid fire, shock and serious personal injury, follow these instructions.1. Read your owner’s manual and safety information before installing your new fan. Review the accompanying assembly diagrams.2. Before servicing or cleaning unit, switch power off at service panel and lock service panel disconnecting means to prevent powerfrom being switched on accidentally. When the service disconnecting means cannot be locked, securely fasten a warning device, suchas a tag, to the service panel.3. Be careful of the fan and blades when cleaning, painting, or working near the fan. Always turn off the power to the fan beforeservicing.4. Do not insert anything into the fan blades while the fan is operating.Additional Safety InstructionsWARNING: This product is designed to use only those parts supplied with this product and/or accessories designated specifically foruse with this product. Using parts and/or accessories not designated for use with this product could result in personal injury or propertydamage.WARNING: To reduce the risk of personal injury. Do not insert foreign objects in between rotating fan blades.WARNING: Unplug the fan before maintenance and when the fan is not being used.WARNING: Do not touch the fan and plug if your hands are wet.WARNING: Do not unplug the fan by holding the power cord. Unplug the fan by holding the plug.WARNING: Do not use the fan if the power cord or the plug is damaged, or if the power socket is loose.WARNING: Do not make repairs when there is damage to the cord. Do not load the fan with dual power cords or bin the cord.WARNING: Do not use the fan near any of the following: gas stove, any fire source, unusually humid or high temperature, oil soot witha lot of metal powder, obstacles affecting oscillating or outdoor.WARNING: Do not insert hands or fingers into the fan grille, or the movable parts.WARNING: Do not use the fan with any solid-state speed control device to reduce the risk of fire or electric shook.WARNING: Place the fan on a smooth and level surface.WARNING: Those who are not qualified electricians should not dissemble, repair or rebuild the fan.LIMITED LIFETIME WARRANTYExtends to the original purchaser of a Fanimation Fan1. LIMITED LIFETIME MOTOR WARRANTY - If any part of your fan motor fails, due to a defect in materials or workmanship duringthe lifetime of the original purchaser, Fanimation will provide the replacement part free of charge, when the defective fan is returnedto our national service center. Proof of purchase is required. Customer shall be responsible for all costs incurred in the removal orreinstallation and shipping of the product for repairs or replacement.2. ONE YEAR MOTOR LABOR WARRANTY - If your fan motor fails at any time within one year from the original purchase, due todefects in materials or workmanship, labor to repair the motor will be provided free of charge at our national service center. Purchaserwill be responsible for labor charges after this one-year period. Customer shall be responsible for all costs incurred in the removal orreinstallation and shipping of the product for repairs or replacement.3. If any other part of your fan fails at any time within one year after original purchase, due to a defect in materials or workmanship, wewill repair, or replace, at our option, the defective part free of charge for parts and labor performed at our national service center.4. Because of varying climate conditions, this warranty does not cover changes in the finish, including rusting, pitting, corroding,tarnishing, or peeling.5. This warranty is void and does not apply to damage from improper installation, neglect, accident, misuse, exposure to extremes ofheat or humidity, or as a result of any modification to the original product.6. All costs of removal and reinstallation of the fan are the sole responsibility of the owner of the fan and not the store that sold the fanor Fanimation.7. Fanimation reserves the right to modify or discontinue any product at any time and may substitute any part under this warranty.8. Under no circumstances may a fan be returned without prior authorization from Fanimation. The receipt of purchase must accompany authorized returns and must be sent freight prepaid to Fanimation. The fan to be returned must be properly packed to avoiddamage in transit; Fanimation will not be responsible for any damage resulting from improper packaging.9. It is understood that any repair or replacement is the exclusive remedy available from Fanimation. There is no other expressed orimplied warranty. Fanimation hereby disclaims any and all implied warranties, including, but not limited to those of merchantability andfitness for a particular purpose to the extent permitted by law. Some states do not allow limitations on implied warranties. Fanimationwill not be liable for incidental, consequential, or special damages arising out of or in conjunction with product use or performance,except as may otherwise be accorded by law. This warranty gives you special legal rights and you may also have other rights that varyfrom state to state.10. A certain amount of vibration is normal and should not be considered a problem or a defect.Table of ContentsElectrical Requirements . . . . . . . . . . . . . . . . . . . . . . . . . . . . . . . . . . . . . . . . . . . . . . . . . . . 3How to Set Up Your Desk Fan. . . . . . . . . . . . . . . . . . . . . . . . . . . . . . . . . . . . . . . . . . . . . . . 3Maintenance. . . . . . . . . . . . . . . . . . . . . . . . . . . . . . . . . . . . . . . . . . . . . . . . . . . . . . . . . . . . . 4Fuse Safety Instructions . . . . . . . . . . . . . . . . . . . . . . . . . . . . . . . . . . . . . . . . . . . . . . . . . . 4How To Replace The Fuse . . . . . . . . . . . . . . . . . . . . . . . . . . . . . . . . . . . . . . . . . . . . . . . . . 4Parts List . . . . . . . . . . . . . . . . . . . . . . . . . . . . . . . . . . . . . . . . . . . . . . . . . . . . . . . . . . . . . . . 5Trouble Shooting . . . . . . . . . . . . . . . . . . . . . . . . . . . . . . . . . . . . . . . . . . . . . . . . . . . . . . . . . 5
Electrical RequirementsELECTRICAL REQUIREMENTS WARNINGTable fan requires a grounded electrical supply line of120 volts AC, 60 Hz, 15 amp circuit. 8 ft power cordincluded. NOT for Damp Location Use.To avoid fire or shock, follow all wiring instructionscarefully. Any electrical work not described in theseinstructions should be done or approved by a licensedelectrician.How to Set Up Your Desk Fan1. Carefully remove from package. Plug corddirectly into the electrical outlet. (Figure 1)Figure 12. Select the desired airflow, located on top of fanby rotating switch clockwise. (Figure 2)The switch speeds are as follows:0 Off1 Low2 Med3 HighFigure 23. Pull up on the oscillating knob for non-oscillatingoperation. Push down on the oscillating knob foroscillating operation. (Figure 3)4. Turn the tilt angle adjusting knob on the fan’sneck to the left to loosen and hold the fan headto adjust up and down to the desired tilt angle.Turn tilt angle adjusting knob to the right totighten the fan head once your fan is at thedesired tilt angle. (Figure 4)30 80 OscillatingFigure 33Figure 4
Maintenance1. To clean the fan, first unplug it from the electrical outlet,CAUTIONthen clean it with a soft cloth.Do not use water when cleaning your fan. It could2. Never wet or immerse the motor, oscillating mechanism,damage the motor or the finish and create the possibilityswitch, power cord or plug.of electrical shock.3. To clean the fan blade, remove the fan grill by looseningthe grill's screws. Fit the cover back onto the fan and tightenthe screws after maintenance and before use.Fuse Safety Instructions2. Do not operate any fan with a damaged cord or plug.Discard fan or return to an authorized service facility forexamination and/or repair.1. This product employs overload protection (fuse). Ablown fuse indicates an overload or short-circuitsituation. If the fuse blows, unplug the product from theelectrical outlet. Replace the fuse as outlined in theHow to Replace The Fuse section below (follow productmarking for proper fuse rating) and check the product.If the replacement fuse blows, a short-circuit may bepresent and the product should be discarded or returnedto an authorized service facility for examination and/orrepair.3. Do not run cord under carpeting. Do not cover cordwith throw rugs, runners, or similar coverings. Do notroute cord under furniture or appliances. Arrange cordaway from traffic area and where it will not be trippedover.How To Replace The FuseUser Servicing Instructions:1. Grasp plug and remove from the electrical outlet.Do not unplug by pulling on cord.2. Slide open fuse access cover on top of the plug,pushing away from the cord and toward the blades (Fig. 1).3. Remove the old fuse carefully and replace with a newfuse (Fig. 2).Figure 14. Slide closed the fuse access cover on top of theplug. WARNINGRisk of fire. Replace fuse only with 5 Amp, 125 Voltfuse. WARNINGRisk of fire. Do not replace the plug as it containsa safety device (fuse) that should not be removed.Discard product if the plug is damaged.Figure 24
Parts ListModel #FP6274**21Ref #Description1Fan grillAP627408**2BladeAP627404**How To Order PartsWhen ordering repair parts, alwaysgive the following information: Part Number Part Description Fan Model NumberContact your retail store for repair parts.Trouble Shooting WARNINGFor your own safety unplug your fan before trouble shooting.TroubleFan does not run after beingswitched onSuggested Remedy1. Check to see if the plug is securely connected to the electrical outlet.2. Check to see if the cord is knotted or tangled.3. Check to see if the fan blade and the guard are jammed.Blade rotates slowly,irregularly or with abnormalnoises1. Check to see if the fan blade and the fan grille are securely fitted.2. Check to see if the fan blade and the fan grille are locked.5Part #
10983 Bennett ParkwayZionsville, IN 46077Phone: 888-567-2055Outside U.S.: 317-733-4113FAX: 866-482-5215FANIMATION.COM2018/01 V.01Copyright 2018 Fanimation
VENTILADOR OSCILANTE DEESCRITORIO RETRO BREEZE MODELO#FP6274**ADJUNTE SU RECIBO AQUÍ Y REGISTRE SU VENTILADOR EN FANIMATION.COMLEA Y GUARDE ESTAS INSTRUCCIONESNúmero de serieFecha de compraPeso neto 3.10 kg (6.84 lbs)Preguntas, problemas, piezas faltantes? Antes de volver a la tienda, llame a nuestroDepartamento de Servicio al Cliente al 1-888-567-2055, 8 a.m. - 5 pm, hora del Este, delunes - viernes.
Instrucciones importantes de seguridadADVERTENCIA: siga estas instrucciones para prevenir incendios, descargas eléctricas y lesiones personales graves.1. Lea el manual del propietario y la información de seguridad antes de instalar su nuevo ventilador. Observe los diagramas deensamblaje adjuntos.2. Antes de llevar a cabo el mantenimiento o la limpieza de la unidad, desconecte la electricidad en el panel de servicio y bloquee losmedios de desconexión del mismo para evitar que se active accidentalmente. Si no se pueden bloquear los medios de desconexión delservicio, coloque un dispositivo de advertencia, como una etiqueta, en el panel de servicio.3. Tenga cuidado con la estructura y las aspas del ventilador cuando limpie, pinte o trabaje cerca del mismo. Desconecte siempre laelectricidad del ventilador de techo antes de llevar a cabo el mantenimiento.4. No coloque ningún elemento en las aspas del ventilador cuando éste se encuentre en funcionamiento.Instrucciones de seguridad adicionalesADVERTENCIA: Este producto está diseñado para ser utilizado sólo con las piezas suministradas o los accesorios indicadosespecíficamente para el mismo. Si utiliza piezas o accesorios que no están indicados para su uso con este producto podría sufrirlesiones personales o dañar el ventilador.ADVERTENCIA: para reducir el riesgo de lesiones personales. No coloque obje tos extraños entre las aspas del ventilador enfuncionamiento.ADVERTENCIA: Desconecte el ventilador antes de realizar el mantenimiento y cuando el ventilador no esté siendo utilizado.ADVERTENCIA: No toque el ventilador y desconéctelo si sus manos están húmedas.ADVERTENCIA: No desconecte el ventilar sosteniendo el cable de la fuente de alimentación. Desconecte el ventilador sosteniendo elenchufe.ADVERTENCIA: No use el ventilador si el cable de la fuente de alimentación o el enchufe están dañados, o si enchufe de la pared estásuelto.ADVERTENCIA: No haga reparaciones cuando el cable esté dañado. No cargue el ventilador con dos cables de fuentes de alimentaciónni tire el cable.ADVERTENCIA: No use el ventilador cerca de ninguno de los siguientes: estufa de gas, ninguna fuente de fuego, lugar inusualmentehúmedo o con temperatura alta, lugar con hollín y mucho polvo de metal, obstáculos que afecten a la oscilación o en exteriores.ADVERTENCIA: No inserte las manos o los dedos en la reja del ventilador o las piezas móviles.ADVERTENCIA: No use el ventilador con ningún dispositivo de control de velocidad de estado sólido para reducir el riesgo de fuego odescarga eléctrica.ADVERTENCIA: Coloque el ventilador sobre una superficie plana y suave.ADVERTENCIA: Aquellos que no sean electricistas cualificados no deberían desmontar, reparar o montar el ventilador.GARANTÍA LIMITADA DE POR VIDASe extiende al comprador original de un Ventilador Fanimation.1. GARANTÍA LIMITADA DE POR VIDA DEL MOTOR - Si se produjera una falla en alguna de las partes del motor de su ventilador debidoa un defecto en los materiales o en la fabricación durante el tiempo de vida del comprador original, Fanimation proporcionará la pieza derepuesto sin cargo una vez que el ventilador defectuoso sea devuelto a nuestro centro de servicios nacional. Se requiere comprobante deventa. El cliente se hará responsable de todos los gastos de remoción o reinstalación y envío del producto para reparaciones o sustitución.2. GARANTÍA DE MANO DE OBRA DEL MOTOR POR UN AÑO - Si el motor de su ventilador fallara antes de cumplirse un año a partir delmomento de su compra original debido a defectos en los materiales o en la fabricación, se le efectuará la reparación del mismo sin cargoen nuestro centro de servicios nacional. El comprador se hará responsable de los gastos de mano de obra luego del período de un año.El cliente se hará responsable de todos los gastos de remoción o reinstalación y envío del producto para reparaciones o sustitución.3. Si otra pieza del ventilador fallara dentro del período de un año a partir de la fecha de compra original debido a un defecto en losmateriales o en la fabricación, repararemos o sustituiremos, según creamos conveniente, la pieza defectuosa sin cargo alguno ennuestro centro de servicios nacional.4. Debido a las diversas condiciones climáticas, esta garantía no cubre cambios en la terminación, incluidos oxidación, corrosión,falta de brillo o peladuras.5. Esta garantía es nula y no se aplica a daños por instalación incorrecta, negligencia, accidentes, uso indebido, exposición al calor oa la humedad en exceso, o como resultado de cualquier modificación realizada al producto original.6. Todos los gastos de remoción y reinstalación del ventilador son responsabilidad exclusiva del propietario, y no de la tienda quevendió el ventilador ni de Fanimation.7. Fanimation se reserva el derecho de modificar o discontinuar un producto en cualquier momento, o sustituir cualquier pieza segúnlo establecido por esta garantía.8. En ningún caso se podrá devolver un ventilador sin previa autorización por parte de Fanimation. Las devoluciones autorizadasdeberán ir acompañadas del recibo de venta y deberán enviarse a Fanimation, previo pago del flete. El ventilador que se devuelvadeberá estar embalado en forma adecuada a fin de evitar daños durante el transporte. Fanimation no se hará responsable de losdaños que resulten del embalaje incorrecto del producto.9. Se entiende que las reparaciones y las sustituciones son el único recurso disponible de Fanimation. No existe ninguna otragarantía expresa o implícita. Por la presente, Fanimation niega todas las garantías implícitas, que incluyen, entre otras, lacomerciabilidad y la aptitud para determinado fin hasta donde la ley lo permita. Algunos estados no permiten limitaciones sobre lasgarantías implícitas. Fanimation no se hará responsable por daños accidentales, resultantes o especiales derivados del uso o elrendimiento del producto o en conjunción con éste, excepto en los casos en los que la ley así lo disponga. Esta garantía le otorgaderechos legales especiales y es posible que también goce de otros derechos que pueden variar según el estado.10. Es normal que se produzca un cierto movimiento oscilante y esto no debe considerarse un problema o defecto.ÍndiceRequisitos eléctricos. . . . . . . . . . . . . . . . . . . . . . . . . . . . . . . . . . . . . . . . . . . . . . . . . . . . . 9Cómo instalar su ventilador de escritorio. . . . . . . . . . . . . . . . . . . . . . . . . . . . . . . . . . . . .9Mantenimiento . . . . . . . . . . . . . . . . . . . . . . . . . . . . . . . . . . . . . . . . . . . . . . . . . . . . . . . . . .10Instrucciones de seguridad del fusible . . . . . . . . . . . . . . . . . . . . . . . . . . . . . . . . . . . . . .10Sustitución del fusible . . . . . . . . . . . . . . . . . . . . . . . . . . . . . . . . . . . . . . . . . . . . . . . . . . . 10Lista de piezas . . . . . . . . . . . . . . . . . . . . . . . . . . . . . . . . . . . . . . . . . . . . . . . . . . . . . . . . . .11Solución de problemas. . . . . . . . . . . . . . . . . . . . . . . . . . . . . . . . . . . . . . . . . . . . . . . . . . . . . . 11
Requisitos eléctricosADVERTENCIAREQUISITOS ELÉCTRICOSEl ventilador de mesa necesita una fuente dealimentación eléctrica con toma a tierra de 120 voltiosCA, 60 Hz y circuito de 15 amperios. Se incluye un cablede fuente de alimentación de 8 pies (2,43 m). NUNCA loutilice en una ubicación húmeda.A fin de evitar incendios o descargas eléctricas, siga concuidado todas las instrucciones de instalación eléctrica.Cualquier trabajo eléctrico que no se describa en estasinstrucciones deberá ser realizado o aprobado por unelectricista autorizado.Cómo instalar su ventilador de escritorio1. Saque los elementos con cuidado del paquete.Conecte el cable directamente en el enchufe.(Figura 1)Figura 12. Seleccione la velocidad de aire deseada,ubicadaen la de la base del ventilador rotando elinterruptor en el sentido de las agujas del reloj.(Figura 2)Velocidades de Interruptor son los siguientes:0 apagado1 velocidad baja del ventilador2 velocidad media del ventilador3 velocidad súper alta del ventiladorFigura 23. Tire el pomo oscilante hacia arriba para quefuncione el ventilador sin oscilación. Pulse elpomo oscilante hacia abajo para que funcioneel ventilador con oscilación. (Figura 3)4. Gire el pomo ajustable de ángulo de inclinacióndel cuello del ventilador a la izquierda para aflojarloy sostenga la cabeza del ventilador para ajustarloarriba o abajo para ponerlo en el ángulo deinclinación deseado. Gire el pomo ajustable deángulo de inclinación a la derecha para fijar lacabeza del ventilador una vez que haya ajustadoel ventilador en el ángulo de inclinación deseado.(Figura 4)30 80 OscilanteFigura 39Figura 4
MantenimientoEl único mantenimiento necesario para el ventilador detecho es una limpieza periódica.Al llevar a cabo la limpieza, use sólo un cepillo suave o unpaño sin pelusas, para evitar rayar la terminación.No se requieren agentes abrasivos de limpieza; los mismosdeben evitarse para prevenir daños en la terminación.PRECAUCIÓNNo utilice agua para limpiar el ventilador de techo. Podríadañar el motor o la terminación y ocasionar posiblesdescargas eléctricas.Instrucciones de seguridad del fusible1. Este producto utiliza protección contra sobrecargas(fusible). Un fusible fundido indica una situación desobrecarga o cortocircuito. Si se funde el fusible,desconecte el producto del enchufe. Sustituya el fusiblesegún las instrucciones de mantenimiento del usuario(siga la señalización del producto para conocer laclasificación correcta del fusible) y compruebe elproducto. Si el fusible sustituido se funde, puedeque haya un cortocircuito, por lo que deberá deshacersedel producto o llevarlo al servicio de mantenimientoautorizado para su revisión y/o reparación.2. No utilice ningún ventilador que tenga dañado el cableo la conexión. Deshágase del mismo o llévelo al serviciode mantenimiento autorizado para su revisión y/oreparación.3. No instale el cable debajo de alfombras. No cubra elcable con alfombras, tapetes o cubiertas similares. Nocoloque el cable debajo de muebles o dispositivos.Mantenga el cable lejos de la zona de tránsito para quenadie se tropiece con el mismo.Sustitución del fusibleUsuario Instrucciones de mantenimiento:1. Coja el enchufe y extráigalo del receptáculo u otrodispositivo de enchufes. No lo desenchufe tirando delcable.2. Abra la carcasa del fusible ubicada en la partesuperior del enchufe deslizándola hacia las clavijas(Figura 1).Figura 13. Extraiga el fusible con cuidado. (Figura 2).4. Cierre la carcasa del fusible deslizándola hacia el lado opuesto. ADVERTENCIARiesgo de fuego. Sustituya el fusible solo con unfusible de 5 Amp. y 125 V. ADVERTENCIAFigura 2Riesgo de incendio. No sustituya el enchufe.Contiene un dispositivo de seguridad (fusible) queno debe ser extraído. Deshágase del producto si sedaña el enchufe.10
Lista de piezasModelo #FP6274**21N. de RefDescripción1Unidad GrillAP627408**2AspaAP627404**Cómo hacer un pedido de piezasAl hacer un pedido de piezas de repuesto,proporcione siempre la siguiente información: Número de pieza Descripción de la pieza Número de modelo del ventiladorContact your retail store for repair parts.Solución de problemasADVERTENCIAPara su propia seguridad, desconecte la electricidad de la caja de fusibles o disyuntor antes desolucionar problemas en su ventilador.Solución sugeridaProblemaEl ventilador no funcionadespués de haberloencendido1. Compruebe que el conector esté bien conectado al enchufe de la pared.2. Compruebe si el cable del conector tenga algún nudo o esté enredado.3. Compruebe si la pala del ventilador o la protección están atascadas.La pala gira lentamente,irregularmente o con ruidosanormales1. Compruebe que la pala y la reja del ventilador estén bien colocadas.2. Compruebe que la pala y la reja del ventilador estén aseguradas.11Pieza N.º
10983 Bennett ParkwayZionsville, IN 46077Llame sin cargo al (888) 567-2055FAX (866) 482-5215Desde fuera de los EE.UU., llame al (317) 733-4113Visite nuestro sitio Web en www.fanimation.com2018/01 V.01Copyright 2018 Fanimation
to an authorized service facility for examination and/or repair. 2. Do not operate any fan with a damaged cord or plug. Discard fan or return to an authorized service facility for examination and/or repair. 3. Do not run cord under carpeting. Do not cover cord with throw rugs, runners, or similar coverings. Do not route cord under furniture or .