Transcription
The GreenFanElectric Fan (for home use)EGF-1600 SeriesInstruction ManualWarranty IncludedImportantThank you for purchasing The GreenFan.Please be sure to read this manual,especially “Safety Precautions” on pages 3-6 before using the product.Also be sure to take note of content marked with aon individual pages.This manual also includes the warranty.Fill in the spaces for information such as dateand place of purchase, and keep this manual for future reference.
ImportantThank you for purchasing The GreenFan.Please be sure to read this manual, especially “Safety Precautions” (P. 3–6), before using the product.Also be sure to take note of content marked with a [] on individual pages.This manual also includes the warranty.Fill in the spaces for information such as the date and place of purchase, and keep this manual in a safe place for future references.
Table of ContentsSafety PrecautionsSafety Precautions ‧ 3Maintenance ‧ 18Special Cautions ‧‧‧‧ 4Using the Battery & Dock (Sold Separately)Warning � 5Installation ‧‧‧‧‧‧‧‧ 19Caution �‧ 6Before UsingPackage Contents ‧ 7Storing the Product ��‧‧‧‧‧ 21Assembly of the Head Unit ��‧‧‧‧ 8Assembly ‧‧‧‧‧‧‧‧‧‧‧‧‧‧‧ 9Product Specifications �� 22Using in the Short Size ��‧‧‧‧‧‧‧‧ 10How to UseTroubleshootingOperating Instructions ��‧‧‧‧‧‧‧‧‧ 11Troubleshooting ��‧‧‧‧‧‧‧‧‧‧‧‧‧‧‧‧ 23Manual Angle Adjustment ��‧‧‧‧ 12Warranty and After-Purchase Service � 25Automatic Oscillation Angle Setting �‧‧‧‧‧‧ 13Handling of Personal Information �‧‧‧‧‧‧‧ 25Using the Remote Control ��‧‧‧ 15Disposal of waste batteries and electrical andReplacing the Batteries ��‧‧‧‧‧‧‧‧ 16electronic equipment ��‧‧‧‧‧‧‧‧ 26Precautions on Using the Remote Control ‧‧‧‧‧‧‧‧‧‧‧‧‧ 16Customer Service ��‧‧‧‧‧‧‧‧‧‧‧‧‧ 26Using the AC Adapter ��‧‧‧‧‧‧‧‧‧‧ 17Warranty ‧‧‧‧‧‧‧‧ 27Table of Contents
Safety PrecautionsPlease read the safety precautions and use the product correctly. The cautions herein are intended to help you use the product safely and avoid injuryand property damage.When using the separately sold Battery & Dock, be sure to read and follow the included instruction manual.The following classifications indicate hazards or damage that could result from improper use.WarningIndicates possibility of death or serious injury.CautionIndicates possibility of minor injury or damage to buildings,property, etc.The following symbols indicate precautions that must be followed.Indicates actions that must not bedone.Indicates actions that must be done. In case of emergencies such as an earthquake or fire, immediately unplug and stop use of the product. This product is intended for home use only. Please do not use for any other purposes.3Safety Precautions
Special CautionsDo not disassemble or modify the product.Make sure curtains and the like do not becomeBe careful not to pinch yourself on the movingIn the event of a malfunction, discontinue useDoing so may cause a malfunction, fire,entangled. Doing so may cause a malfunction orparts or connection parts.and request an inspection.or electric shock.accident.To request an inspection of your fan, contact theBALMUDA Europe Service Center (P. 26).Do not insert fingers or foreign objectsDo not place the fan on uneven or unstableDo not use any AC adapter other thaninside the Guard or moving parts.surfaces. Injury or malfunction may occurthe one included. Doing so may causeDoing so may cause injury.if the fan falls over.malfunction or fire.Safety Precautions4
WarningDo not disassemble except for maintenance purposes.Doing so may cause fire, electric shock, or injury.Do not use the cord or power plug if damaged or if incapable of being firmly inserted into the power outlet.Doing so may cause a short-circuit, electric shock, or fire.Do not damage, modify, bend, pull, twist, or bundle the cord. Do not place heavy objects on top of orpinch the cord.Doing so may cause a short-circuit, electric shock, or fire.Do not operate without attaching the Fan or the Fan Guard.Doing so may cause injury.Do not allow water or foreign objects inside the product.Intrusion of water or foreign objects may cause fire or electric shock. If water or foreign objects enter the fan,immediately unplug the fan or remove the Battery Pack (sold separately) if used.Do not touch the or – terminals of the remote control battery to wires or other metal. Do not transportor store with metallic necklaces, hair pins, etc.Doing so may cause overheating, rupture, or ignition.Make sure the power supply to the AC adapter is 220-240 VAC. Also note that this product is for use in Europe only.Failure to do so may cause fire or electric shock.Insert the power plug completely.Failure to do so may cause fire or electric shock.Unplug the product when not in use.Failure to do so may cause electric shock, electric leakage fire, or injury.When unplugging the power plug from the power outlet, pull on the AC adapter and never pull on the cord.Also, never allow dust to settle on the power plugDoing so may cause a short-circuit, electric shock, or fire.This appliance must only be supplied at safety extra low voltage corresponding to the markingon the appliance.5Safety Precautions
CautionDo not use the product in the following places. Doing so may cause electric shock or fire. Near a gas stove or open flame Near flammable gases Near water or rainDo not expose your body to the wind for an extended period of time.Excessive decreases in temperature can be harmful to your health.Do not plug in or unplug the product with wet hands.Doing so may cause electric shock or injury.Do not expose the product to water.Water may cause short circuits or electric shock.Do not use sprays or liquids on the product.Inflammable sprays may cause fire or explosion.Other sprays may damage the plastic or paint.Do not allow children or individuals who require assistance to operate the product,and do not place in a location accessible by young children.Doing so may cause electric shock or injury.Do not drop or subject the product to strong impacts.Doing so may cause malfunction or damage.Do not use or store in direct sunlight or locations with high temperatures or humidity.Doing so may cause deformation, discoloration, or corrosion of the battery.Stop use immediately if malfunctions such as overheating, irregular shape, or abnormal odors occur.Failure to do so may cause overheating, explosion, fire, or corrosion of the battery.Children shall not play with the appliance.Cleaning and user maintenance shall not be made by children without supervision.Doing so may cause electric shock or injury.Always unplug the product before performing maintenance. To clean the product after attaching theBattery Pack (sold separately), remove the Battery Pack from the main unit.Failure to do so may cause electric shock or injury.This appliance can be used by children aged from 8 years and aboveand persons with reduced physical, sensory or mental appliance in asafe and understand the hazards involved.Safety Precautions6
Package ContentsThe number in the parentheses indicates the number of products.①①②Unpacking the Fan GuardRotate the Front Fan Guard (①)and pull (②) to remove.Base Unit (1)Battery Cover (1)7Before UsingFront Fan Guard (1)Fan (1)Side Guard (1)AC Adapter (1)Motor Unit (1)Fan Holder (1)Center Pole (1)Guard Holder (1)Instruction Manual/Warranty (1)Remote Control (1)Button battery inside (1)* Test battery
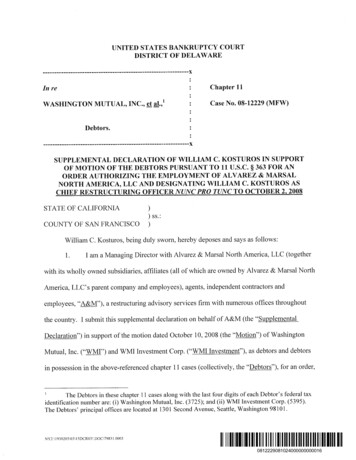
Assembly of the Head Unit12Fix the Side Guard to the Motor Unit with theGuard Holder.counterclockwTurn to tighten iseclockwiseTurnto tighten* Match the Side Guard to the marks on theHead Unit to attach.3Secure the Fan using the Fan Holder.* Be sure to note the orientation of the Fan when attaching.Attach the Front Fan Guard.Snap!②Blade Caution Label* Do not remove the Blade Caution Label attached tothe Fan.①* Using the fan with the Guard attached incorrectly isextremely dangerous. Make sure the Guard is firmlysecured before use.① Attach the Front Fan Guard ontothe Side Guard.② Rotate the Front Fan Guarduntil tight.* Use thick gloves when performing steps 2 and 3 .Before Using8
3Assembly1Insert the Center Poleinto the Base Unit.2Connect the AC adapter plug.Insert the assembled Head Unitinto the Center Pole.Inserting the shaft joints intothe holesInsert the thinshaft into thesmall hole.4Connect the AC adapter to an outlet.Insert the thickshaft into thelarge hole.Beep!* No electric current flows through the shafts.* Inserting the shaft will not be possible if the wrong hole is used.* Make sure neither pole can be removed without pressing the Lock Release button.* Be careful not to pinch yourself when connecting the components.Insert firmly until a “Click!” can be heard.9Before Using* A beep will be heard if the AC adapter is connected correctly.* No beep will be heard when connecting the AC adapter if theBattery Pack (sold separately) is installed.
Using in the Short SizeRe-AssemblyThis product can be used in the Tall Size as a stand fan,or in the Short Size as a desk fan.1Press the Lock Release buttonto remove the Head Unit.Lock Release button3Tall SizeShort SizeBe sure to remove the AC adapter or Battery Pack(sold separately) before proceeding.2Remove the Center Pole whilepressing the Lock Release buttonon the underside of the Base.Lock Release buttonInsert the Head Unitinto the Base Unit.* Inserting the shaft will not be possibleif the wrong hole is used.* Make sure neither pole can be removedwithout pressing the Lock Release button.* Be careful not to pinch yourself whenconnecting the components.Insert firmly until a “Snap!” can be heard.Snap!Before Using 10
Operating InstructionsPower ButtonTurns power on/offLED indicatorsAir Volume ButtonAdjusts air volumeOscillation ButtonTurns oscillation on/offAir Volume DisplayOff Timer ButtonAdjusts how long before the unit turns offIndicates the air volume setting in green lights.The air volume can be adjusted in 4 steps, from anextra-gentle breeze for sleeping to a strong circulatormode.Off Timer DisplayIndicates how long until the unit turns off (from left; 1, 2, 3, or 4 hours) inslow-blinking green lights.* This product is equipped with a 12-Hour Auto Off function thatautomatically turns the power off after 12 hours with no operation. ThisAuto Off function cannot be disabled.* The LED indicators will dim after 1 minute if the fan is not operated.11 How to Use
Manual Angle AdjustmentIn addition to automatic oscillation, the oscillation angle of the fan can be adjusted up, down, left, or right by hand.19 upwardNon-incrementaladjustment11 downward75 to the left75 to the right* Vertical adjustments are non-incremental.* Do not move the fan beyond the above angles when manually adjusting the angle. Doing so may damage the fan.* Make sure no children are in the vicinity when setting the oscillation angle. Failure to do so may lead to unintendedinjury such as from the fan hitting the children in the head.How to Use 12
Automatic Oscillation Angle SettingThe automatic oscillation angle of this product can be set as desired.To set the angle, rotate the Head Unit to the left and right during automatic oscillation operation to set Point A and Point B. Once set,the fan will oscillate automatically between Point A and Point B.Example 11The automatic oscillation angle can be set up to 150 .Press the Oscillation button to begin oscillation.* Setting the automatic oscillation angle is possible only while thefan is oscillating.2With your hands on the Side Guard, quickly rotate the fan to set Point A.* Point A can be set to either the left or the right.Beep beep!Set Point AQuickly rotate the fan to the desiredposition. Two beeps will be heard,signifying that Point A has been set.Oscillation Button①* The automatic oscillation angle is set to 80 when shipped from the factory. The setting will return to the factory default if the AC adapter is disconnected.* During automatic oscillation operation or when setting the automatic oscillation angle, fan operation will stop if oscillation is prevented for a certain period of time.This is a safety feature of The GreenFan. To release the safety feature, turn the power off and back on.13 How to Use
3After setting Point A, quickly rotate the fan to the desired position toset Point B. When two beeps are heard, the automatic oscillationangle has been set.Example 2The automatic oscillation angle of this productcan be set as desired.* The minimum oscillation angle is 30 . If the angle between Point A and Point Bis less than 30 , the automatic oscillation angle will be set to 30 .Beep beep!Set Point BSet automatic oscillationangleSet Point APoint ABeepbeep!②Beep beep!Set Point ASet Point BSet automatic oscillation angle②* When the fan is turned off, the Head will move to the center automatically.When the power is turned back on, automatic oscillation at the previouslyset angle will begin.①Quickly rotate the fan to thedesired position. Two beepswill be heard, signifying thatPoint A has been set.Visit the BALMUDA homepage for a video on how to setthe automatic oscillation angle.http://www.balmuda.com/de/greenfan/designHow to Use 14
Using the Remote ControlThe buttons on the remote control enable the same operation as the buttons on the fan. (P. 11)Signal EmitterPower ButtonTurns power on/offAir Volume ButtonAdjusts air volumeOscillation ButtonTurns oscillation on/offSignal ReceiverOff Timer ButtonAdjusts how long before the unit turns offApprox.8m* The remote control is designed specifically for usewith The GreenFan.* The distance and angle figures displayed above are for reference only.* Point the signal emitter at the signal receiver on the fan to use the remote control.15 How to Use
A battery is included inside the remote control when shipped from the factory.Pull the insulating sheet in the direction indicated by the arrow to use the remote control.Read the following precautions on using the remotecontrol to ensure correct usage. Do not allow the signal receiver on the fan to be directly exposed to sunlight or stronglight from lighting equipment. Operation may not be possible in such conditions.Remote control Do not obstruct the signal receiver. Any obstacles between the remote control andthe signal receiver on the fan will prevent operation via the remote control.Insulating sheet Replace the battery if the operation response of the remote control declines. Use only a button-cell battery (CR2025, 3 V) for the remote control. Remove the battery from the remote control if the remote control will not be usedfor extended periods. Failure to do so may cause the batteries to become corroded.Replacing the BatteriesNOTICEPull while pressing on the latch.①②LatchFace the “ ”side upward.* When replacing the button battery,be sure to note the “ ” and “–” sidesof the battery. Keep the remote control (specifically the battery) out of reach of children.Contact a doctor immediately if the battery is ingested. If corrosion from the battery enters the eye, do not rub the eye and washthoroughly with clean water such as tap water, and seek medical attentionimmediately. Corrosion may cause permanent damage to the eyes. If corrosion from the battery comes into contact with skin or clothing, rinseimmediately with clean water such as tap water. Failure to do so maycause skin rash. Corrosion from the battery may stain cloth, leather, furniture, flooring, or otherobjects if coming into contact. Take sufficient care. Be sure to follow local waste disposal sorting guidelines when disposing ofbatteries. (Apply cellophane tape to the “ ” and “–” sides of the batterybefore disposal.)How to Use 16
Using the AC AdapterBALMUDA Multi-Plug AC AdapterThe Plug Unit on the BALMUDA Multi-Plug AC Adapter can be plugged into an outlet in four ways,letting you choose the best fit for the outlet.UpRightDownLeftRemovalAttachmentPUSH buttonClick!1Press the PUSH button.217 How to UseSlide and lift.1Attach the plugunit.2Slide in the Lock directionuntil a “Click!” is heard.
MaintenanceBALMUDA recommends performing maintenance on the fan once every two weeks.When performing maintenance, be sure to remove the AC adapter or Battery Pack (sold separately) before proceeding.12①3①Refer to P. 10“Re-Assembly”for informationon disassembly.②ckwise to loosn cloenTurRotate the Front Fan Guard (①) andpull (②) to remove.OKrclockwise to loocountesenTurn* Use thick gloves when performing steps1 and 2 .Parts That Can Be WashedParts That CANNOT Be WashedUse diluted mild kitchen detergent with a soft clothor a sponge to wash the parts.Wipe gently with a soft, dry cloth.* After washing, dry the parts thoroughly before use.NO* Never wash the following parts.* Do not use organic solvents such as thinner or benzine,cleansers, alkaline detergents, or alcohol.Maintenance 18
Using the Battery & Dock (Sold Separately)Unplug the AC adapter when attaching the battery.The Battery & Dock allows the fan to be used as a cordless device.* When using the Battery & Dock, be sure to read and follow theincluded instruction manual.Battery PackInstallation1Battery & DockEGF-P100 Series(Sold separately)2Remove the Battery Cover.Attach the Battery Pack.LockLockBattery CoverBattery PackUnlocked②DockRemove theBattery Cover.①Tabs①Release the lock.* Use a coin or the like to release the lock.* Do not lose the Battery Cover. It will be required when removing the Battery Pack.* If the Battery Cover or Battery Pack is difficult to remove, place the Base Unit on the floor andremove by hand.19 Using the Battery & Dock (Sold Separately)Unlocked②③① Insert the tabs.② Attach the Battery Pack.③ Lock in place.* Rotate until a “Click!” is heard.Be sure to lock the Battery Pack in place after attachment.Malfunction or injury may occur if the Battery Pack falls out.
34Connect the AC adapter plug to the Dock.Insert the AC adapter plug all the way in.When using the Dock, place the fan on a level surface.5Connect the AC adapter to an outlet.AC adapterBe sure to use the AC adapter included with The GreenFan.Use of a different AC adapter may cause a malfunction or breakdown.Connect The GreenFan to the Dock.Checking the Remaining Battery PowerPressing the Power button on the fan for at least 2 seconds during operationwill show the remaining battery power.Beep!* Align the dimple on the underside of the Base Unit to the Dock, and slowlyplace the fan on top.* The fan must be connected to the Dock to charge the Battery Pack.Connecting the AC adapter directly to The GreenFan without using theDock will result in the Battery Pack not being charged.* The green and white LEDs will illuminate when operating the fan with theDock connected. When the fan is disconnected from the Dock for cordlessuse, only the green LEDs will illuminate.* The LED indicators will flash green.Battery power is “1” (less than 25%)Battery power is “4” (more than 75%)* Checking the remaining battery power is not possible if the fan is not turned on.* The remaining battery power may change depending on the usage conditions suchas the air volume or if The GreenFan is used connected to the Dock.Using the Battery & Dock (Sold Separately) 20
Storing the ProductPlease store the product as shown below.1③①②⑤⑥2①③②④Packaging view from above34* To ensure safety, store the Battery Pack(sold separately) and the fan separately.④⑥* Charge the Battery Pack (sold separately)once every six months (recommended)when storing it to ensure the maximumlife of the product. To prevent battery corrosion, remove the batteryLockwhen the remote control will not be used for⑤extended periods. Store in a cool location away from direct sunlightwith no high temperatures or humidity.21 Storing the Product
Product SpecificationsFanAC AdapterProduct NameThe GreenFanRated Input Voltage100–240 VACModelEGF-1600 SeriesRated Input Capacity79–93 VAVoltage12 VDCRated Frequency50/60 HzPower ConsumptionMax. 20 WRated Output Voltage12 VDCMax. RPM775 rpmRated Secondary Electric Current3ADimensions (W D H)330 320 871/497 mmCord LengthApprox. 1.8 mOff Timer1, 2, 3, or 4 hoursWeightApprox. 4.1 kgIntended UsageFor home use* Power consumption and RPM are measured with the air volume set to level 4.* Specifications and appearance are subject to change without notice for improvement purposes.Product Specifications 22
TroubleshootingAfter reviewing the suggestions in this section, if the problem persists, contact the BALMUDA Europe Service Center (P. 26).ProblemPoints to CheckOperation will not start whenpressing the Power button Has a fuse blow or breaker been tripped in your home? Is the AC adapter properly plugged into the power outlet? Is the AC adapter plug firmly connected to the connectoron the fan? Is the Fan attached with the correct orientation? Is the Battery Pack (sold separately) charged?Possible Solutions Check your fuses and breaker. Ensure the AC adapter is plugged into the power outletproperly. Ensure the AC adapter plug or multi-plug is insertedsecurely. Re-attach the Fan correctly. Charge the Battery Pack (sold separately).PageP. 9P. 8P. 19Fan operation is noisy Is the Fan firmly secured with the Fan Holder? Is the Fan facing the right way? Is the Guard bumping against the Fan? Attach the Fan correctly. Check the orientation of the Fan and re-attach if necessary. Make sure the Fan and Fan Guard are firmly attached.P. 8The airflow has decreased Has dust accumulated on the Fan or Guard? Airflow efficiency declines when dust accumulates around the Fan Guard.BALMUDA recommends cleaning once every two weeks.P. 18Can’t fasten the Fan Holder Are you turning the Fan Holder in the right direction tosecure? The Fan Holder must be rotated in the correct direction toattach. Turn the Fan Holder counterclockwise to fasten.The oscillation sound isdisturbing When oscillating, does the fan temporarily exhibit strongclicking or grinding sounds? The oscillation motor has a unique sound that may beinterpreted as a malfunction.Oscillation is unbalancedtoward the right or left Have you adjusted the automatic oscillation angle? Adjust the automatic oscillation angle.P. 13Operation stoppedautomatically Have you set the Off Timer? Have 12 hours passed since last operating the fan? Double-check the Off Timer setting. To ensure safety, the product has a 12-hour Auto Off function.P. 1123 TroubleshootingP. 8P. 11
ProblemPoints to CheckPossible SolutionsThe remote control doesn’t Is the battery old? Replace the batteries.work Is the battery oriented correctly? Are you pointing the remote control toward the signal receiver? Are you operating the remote control within the effective distance? Is the signal receiver directly exposed to strong light?The fan seems to shakeunnaturally Has the Blade Caution Label attached to the Fan beenremoved?PageP. 16 Check the orientation of the batteries. Review the location of the signal receiver on the fan. Ensure the remote control is used within 8 m. Make sure the signal receiver is not exposed to strong light.P. 16P. 15P. 15P. 16 The fan is designed to be balanced with the fan label attached. The GreenFan is designed with a multiple-blade fan thatresults in pronounced shaking if the fan is out of balance.Note, however, that all shipped products have passedquality inspection.The LED indicators for theAir Volume Display and OffTimer Display on the BaseUnit are flashing Is the first LED indicator from the left of the Off Timer Display(P. 11) flashing? Oscillation is not possible. Switch the power to the fanoff and make sure nothing is hindering oscillation. Is the second LED indicator from the left of the Off TimerDisplay (P. 11) flashing? The fan blade cannot rotate. Switch the power off andmake sure the product is assembled properly. The LED indicator may flash if the Battery Pack (soldseparately) has low remaining power. Charge the BatteryP. 8P. 19Pack (sold separately) fully before using. Are any other LED indicators flashing? Unplug the AC adapter or Battery Pack (if used) andwait 5 seconds before reconnecting. If the problempersists, check which LED indicators are flashing, andcontact the BALMUDA Europe Service Center.The LED indicator on theBase Unit have dimmedThe oscillation angle isnarrower than thecustomized angleP. 9P. 19P. 26 Has the fan not been operated for more than 1 minute? The LED indicator will dim after 1 minute if the fan isnot operated.P. 11 Was the AC adapter disconnected or the Battery Pack (soldseparately) removed? The automatic oscillation angle will return to the factorydefault if the fan is disconnected from the power supply.P. 13 Is the fan tilted? Place the fan on a level surface for use.Troubleshooting 24
Warranty and After-Purchase ServiceFor inquiries on repairs, usage, or maintenance, please call the BALMUDA Europe Service Center (p26), or contact your dealer.1. Please receive the warranty card from your dealer with the purchase date and the dealer name filled in.2. The warranty is valid for 2 years from the date of purchase. For repairs, please contact the BALMUDA Europe Service Center oryour dealer. The repair will be carried out according to the warranty.3. Contact the BALMUDA Europe Service Center or your dealer for out-of-warranty repairs. You can request for a repair withcharge, if it enables the product to function properly.4. Never attempt to repair or modify the product by yourself.Handling of Personal Information1. BALMUDA Inc. (hereinafter “BALMUDA” ) may use personal information for customer service and repairs, and may keep arecord of the inquiries.2. BALMUDA will not disclose personal information to third parties, except in the following cases:a. When repairs or confirmation of repairs are entrusted to third parties.b. In cases pursuant to the provisions of laws and regulations.3. For inquiries on personal information, please contact the BALMMUDA Europe Service Center.See page 26 for information on BALMUDA Europe Service Center.25 Troubleshooting
Disposal of waste batteries and electrical andelectronic equipmentThis symbol on the product, the battery or on the packaging indicates that the product and the battery shall not be treated as householdwaste. On certain batteries this symbol might be used in combination with a chemical symbol. The chemical symbols for mercury (Hg)or lead (Pb) are added if the battery contains more than 0.0005% mercury or 0.004% lead. By ensuring these products and batteries aredisposed of correctly, you will help prevent potentially negative consequences for the environment and human health which couldotherwise be caused by inappropriate waste handling. The recycling of the materials will help to conserve natural resources. Hand thebattery over to the applicable collection point for the recycling of waste batteries. For more detailed information about recycling of thisproduct or battery, please contact your local Civic Office, your household waste disposal service or the shop where you purchased theproduct or battery.Notice for lithium batteries : Please hand only discharged batteries over to the collection point. Due to danger of short circuit, pleasepatch the terminals of the battery with tape. Lithium batteries can be identified by the Li or CR marking on the battery.Customer Service (for inquiries on usage, maintenance, repair)040-897 25 35 15BALMUDA Europe Service Center9:00-16:30, weekdays & business days only(* Call charge required)Online InquiriesBALMUDA,Please search the net with the keyword “BALMUDA,”or visit https://www.balmuda.com/de/support/.* Please check the product model before inquiry.Troubleshooting 26
WarrantyModel : EGF-1600-SeriesWarranty Period:2 years from the date of purchaseBody and AC Adapter (supplied)Date of Purchase:* CustomerMonthNameAddressTel.* DealerName/Address/Tel.DateYearThis warranty guarantees free repair of the product based on conditions stated herein.Within the warranty period from the day of purchase, if the product proves defective despite normal use incompliance to the instruction manual, product label, and other warnings, BALMUDA will repair the productat no charge in accordance to this warranty. Please request for a repair by submitting the warranty cardwith the product at the BALMUDA Europe Service Center (see Instruction Manual P.24) or your dealer.Recycled parts compliant with our quality standard may be used for repair.1. Repairs for the following cases will be conducted with charge, even during the warranty period:a. Misuse, defect or damage due to modifications or improper repair, and repair conducted byunauthorized service organizations.b. Damage caused by change of installation after initial setup, falling impact, removal, or transportation.c. Damage caused by fire, earthquake, flood, lightning, or other natural disasters, pollution, abnormalvoltage, and other external factors.d. Damage, rust or mold caused by use or storage of product in vehicles, ships, places of extremetemperature, humidity, or dust.e. Damage due to non-domestic (commercial) use.f. Failure to prese
Fix the Side Guard to the Motor Unit with the Guard Holder. Attach the Front Fan Guard. ① Attach the Front Fan Guard onto the Side Guard. ② Rotate the Front Fan Guard until tight. * Use thick gloves when performing steps and . ② ① 1 2 Secure the Fan using the Fan Holder. 2 3 3 * Using the fan with the Guard attached incorrectly is