Transcription
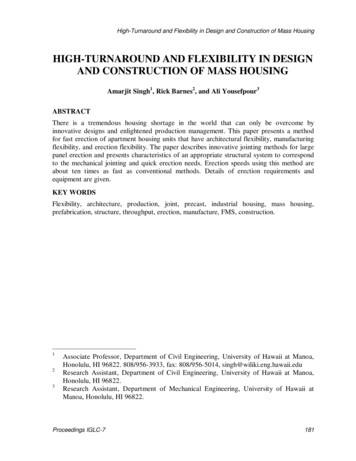
Handling, Erection andBracing of Wood TrussesFollow these guidelines for safe installation of Wood Trusses.These guidelines should not be considered to be the only method for erecting and bracing of a roofsystem. TPIC disclaims any responsibility for damages arising from the use, application or reliance onthese guidelines.1. Check Trusses, while they are on the ground.a) Count trusses to ensure that you have the correct number for the job.b) Measure trusses for the correct pitch, span and any special details.c) Check for damage, broken members, loose plates, etc.2. Erection Procedure,a) Mark the bearing plates on both walls to the required spacing of trusses,(Normally 24” O/C).b) Hoist the trusses to the roof level, taking care not to bend or twist the trusses.c) If interior walls are available, trusses may be laid flat.d) If no partitions exist, trusses shorter than 32’ may be inverted and hung from the bearingplates.e) Erect Gable or End trusses and install braces to prevent lateral movement,(See Figure below).f) Run a string from heel to heel of the end trusses to be used as a guide line.g) Erect trusses using string to locate heels. Brace each truss as it is erected.h) Trusses may be marked at one end. Place trusses so that all marked ends are on the sameside of the building.i) When flat trusses are used, ensure that they are installed with the proper side up.j) Install temporary bracing with sufficient X-bracing to prevent trusses from bucklingor toppling over. Install permanent bracing.k) Complete roof by installing roof decking, gable end ladders, etc.Always provide horizontal restraint for the Top Chords1
3. Handling RecommendationsTrusses must be in the vertical plane to take advantage of their superior ability to support loads.The truss erector or the builde r shall take the necessary precautions to ensure that erectionprocedures and handling methods do not damage the trusses and thus reduce their loadcarrying capacity.4. Mechanical HandlingIdeally when mechanical means are used, the trusses should be lifted in banded sets and loweredonto supports.When this method is used, extreme caution must be exercised when breaking the metalstraps. Trusses may domino, lose lateral stability, or totally collapse, if temporary bracesand supports are not in place before releasing the banding.Lifting trusses singly should be avoided, but if necessary an appropriate spreader bar should beused with slings of sufficient strength and placed in a “toed-in” position. The “toed-in” positionwill prevent the truss from folding.If erectors have any doubt, contact the truss supplier immediately.For spans of 20 feet or less, a single pick up point may be used to lift the truss. A tag line should be usedwhenever a truss is lifted to avoid having it swing and do damage.2
Trusses up to 30 feet in length should be lifted using two pick up points located so that the distancebetween them is approximately one-half the length of the truss. The angle between the two cables shouldbe 60 degrees or less to reduce the tendency for the truss to buckle laterally during the lift. A tag lineshould be fastened to one end to prevent the truss from swinging and causing damage to other parts of thework or to the truss itself.A spreader bar and short cable slings should be used to lift trusses in the 30 to 60 foot range. The cableslings may be vertical but it is recommended that they be “toed-in” to prevent the truss from foldingduring the lift. Two tag lines should be used to control the raining of trusses of this size.Trusses above 60 feet in length should be lifted with a strongback 2/3 to 3/4 the length of the truss. Thetruss should be securely tied to it at 10 foot intervals or less. For flat trusses, the strongback should be tiedto the top chord. Pitched trusses should be positioned high enough on the strongback to preventoverturning of the truss. Two tag lines should be used to control the truss during lifting.3
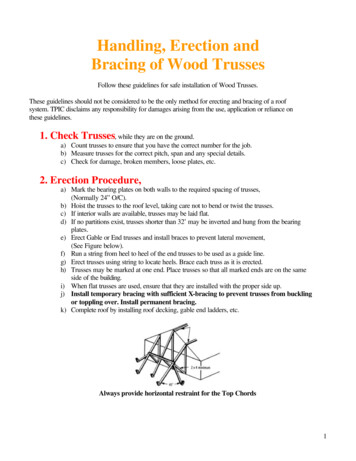
5. Vertical and Lateral AlignmentALL TRUSSES ARE LATERALLY UNSTABLE until properly braced. The longer the span the morecare required. Adequate restraint is necessary at all stages of construction.COMPLETE STABILITY is not achieved until the bracing and decking is completely installed andproperly fastened.ERECTION, BRACING AND PROCEDURES as well as the safety of the workers are theresponsibility of the erector.PROBLEMS MAY OCCUR in attempts to realign trusses. Align each truss and place it permanently inposition before it is connected to the bracing system. Once there is a load, even from the weight of thetruss itself, large lateral forces are developed by attempts to realign the trusses. This may break thebracing system.When properly aligned, each top chord shouldnot vary more than 1/2 inch from a straight line.Out-of-plumb installation tolerances4
THE BRACING SYSTEM should providesupport at spacings at no farther apart thanthe drawings show for the bridging. Withoutproper bracing trusses may not support eventheir own weight.COLLAPSE CAN EASILY OCCUR withouta bracing system that will prevent both horizontalsway (pictured to the left) or roll over (picturedabove). By rolling on their sides, where theyhave no strength, the trusses will break or pull theends off the bearings.DO NOT permit cutting, drilling or any procedure that may damage the chords or webs.DO NOT remove webs (even temorarily).DO NOT make field repairs to damaged trusses without the approval of the manufacturer.DO NOT overload single or groups of trusses with plywood, roofing or other construction materials ortools.DO NOT erect damaged trusses. Should a truss or group of trusses fall to the ground or be damaged whatso ever, do not proceed! Thesite engineer of note must certify that the trusses are satisfactory to erect.Notify the truss supplier immediately.6. Temporary Gable End and Top Chord BracingFlat Roof Temporary BracingPitched Roof Temporary Bracing5
7. Laminating GirdersAll girder trusses that require laminating; two plys or more, must be laminated according to theinstructions on the truss design drawings or as per Appendix B, Tables B.1.1, B.1.2, B.1.3, B.1.4 andB.1.5 of TPIC Truss Design Procedures manual.8. Permanent Bracing Specified by the Building DesignerPermanent bracing is designed and specified for the structural safety of the building. It is theresponsibility of the building designer or an authority other than the truss designer to indicate size,location and attachments for all permanent bracing. Typical applications of permanent bracing to bespecified by the building designer are as follows:a) Top chord bracing:If purlins are used, it is recommended that diagonal bracing be applied to the underside ofthe top chord as shown below.6
b) Bottom chord bracing:This lateral and diagonal bracing is required to maintain the proper truss spacing and totransfer force due to lateral forces into the side walls, shear walls or other resistingstructural elements.7
c) Diagonal web bracing:The diagonal web bracing specified by the building designer is used to hold the trusses in avertical position, to maintain the proper spacing, to distribute unequal loading to adjacenttrusses and to transfer lateral forces to the diaphragms and shear walls.d) Anchoring of permanent lateral web bracing:Permanent lateral bracing similar to that described in Section 9 must be anchored. It is theresponsibility of the building designer to specify the type of anchor. A typical method ofanchoring the permanent lateral web bracing is illustrated below.8
9. Permanent Lateral Bracing Specified by the Truss Designera) All permanent lateral bracing shown on the truss design drawing must be of the size andgrade as specified and must be fastened at the locations shown using the number and sizeof nails as specified on the truss design drawing.b) Lateral movement of the lateral bracing shall be restrained by permanently installing crossbracing (as shown in Section 8d) at the ends of each truss run and at intervals notexceeding 20 feet or as shown on the structural drawings.c) If it is not possible to install permanent lateral web bracing as specified on the truss designdrawing or if the truss run is less than three trusses of the same kind, a “T” brace shall beinstalled as per the truss design drawing or Appendix C, Table C.1.1, of the TPIC TrussDesign Procedures manual.10.Top Chord Sheathing Planea) If plywood sheathing is used, it must be applied with staggered joints and adequatenailing.b) If purlins are used, spacing should not exceed the design buckling length of the top chordand should be adequately attached to the top chord.c) If Valley Sets, Conventional Framing, Piggyback Trusses, etc., are installed on top ofthe main trusses, the full length of the top chords of these trusses must be restrained bysheathing or purlins spaced as specified on the structural or truss design drawings. Topchords of trusses must always be restrained from lateral movement.9
RECOMMENDATIONSWhile the recommendations for handling, erection and bracing contained herein are technically sound, it is notintended that they be considered the only method for erecting and bracing of a roof system. Neither should theserecommendations be interpreted as superior to or a standard.These recommendations originate from the collective experience of leading technical personnel in the wood trussindustry, but must, due to the nature of responsibilities involved, be presented only as a guide for the use of aqualified building designer, builder or erection contractor. Thus, the Truss Plate Institute of Canada expresslydisclaims any responsibility for damages arising from the use, application, or reliance on the recommendations andinformation contained herein be building designers or by erection contractors.FOR A COMPLETE PROFESSIONAL JOB READ ALL PRECEEDING INSTRUCTIONS.The Truss Plate Institute of Canada would like to acknowledge the contribution of the work doneby the Western Wood Truss Association of Alberta in the preparation of this document10
i) When flat trusses are used, ensure that they are installed with the proper side up. j) Install temporary bracing with sufficient X-bracing to prevent trusses from buckling or toppling over. Install permanent bracing. k) Complete roof by installing roof decking, gable end ladders, etc. Always provide horizontal restraint for the Top Chords