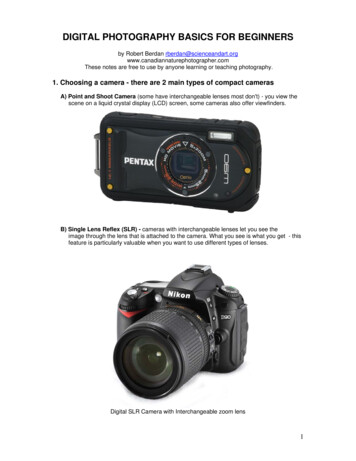
Transcription
DIGITAL PHOTOGRAPHY BASICS FOR BEGINNERSby Robert Berdan apher.comThese notes are free to use by anyone learning or teaching photography.1. Choosing a camera - there are 2 main types of compact camerasA) Point and Shoot Camera (some have interchangeable lenses most don't) - you view thescene on a liquid crystal display (LCD) screen, some cameras also offer viewfinders.B) Single Lens Reflex (SLR) - cameras with interchangeable lenses let you see theimage through the lens that is attached to the camera. What you see is what you get - thisfeature is particularly valuable when you want to use different types of lenses.Digital SLR Camera with Interchangeable zoom lens1
Point and shoot cameras are small, light weight and can be carried in a pocket. These camerastend to be cheaper then SLR cameras. Many of these cameras offer a built in macro modeallowing extreme close-up pictures. Generally the quality of the images on compact cameras isnot as good as that from SLR cameras, but they are capable of taking professional qualityimages.SLR cameras are bigger and usually more expensive. SLRs can be used with a wide variety ofinterchangeable lenses such as telephoto lenses and macro lenses. SLR cameras offer excellentimage quality, lots of features and accessories (some might argue too many features). SLRcameras also shoot a higher frame rates then compact cameras making them better for actionphotography. Their disadvantages include: higher cost, larger size and weight. They are calledSingle Lens Reflex, because you see through the lens attached to the camera, the light isreflected by a mirror through a prism and then the viewfinder. The mirror is pulled away (reflex)when the user pushes the button to take a picture and allows light to hit the sensor behind themirror.Important Camera controls:1. ISO Speed - determines the digital sensors sensitivity to light and the amount of "grain" in yourpictures. When there is lots of light e.g. sunny day, set your camera ISO speed to 100-200. If youwant to shoot inside without using a flash, then set your camera to ISO 400, 800,1600 or higher.The higher the ISO speed the grainier your image will be. Always try use the lowest ISO speedthat allows you to shoot with a shutter speed of 1\30 or faster if you are not using a tripod.Doubling the ISO speed e.g. from 100 to 200 doubles the camera's sensitivity to light (equal toone F-stop or one shutter speed). Advances in noise reduction allow digital cameras to achievelow grain images even at high ISO speeds around 1600 or more. Some cameras change the ISOspeed automatically depending on the ambient light - I recommend you control the ISO speed.2. Camera Shooting Modes: A, S, M, P, B -some cameras also include additional automatedmodes. Use P Program or "party" mode when you don't want to think, use A or aperture prioritymode most of the time to control depth of field. In A mode you control the lens F-stop and hencethe depth of field - just keep an eye on the shutter speed which should always be 1\30 of asecond or faster if the camera is being hand held. Other modes are used less often, e.g. S shutterspeed might be used in sports to lock in a fast shutter speed. M or manual might be used to lockexposure for taking panoramas. B or bulb keeps the shutter open as long the shutter button isheld down. B mode is useful for long exposures at night time e.g. fireworks, and lightening butrequires a tripod. Sometimes B setting falls under the M or manual control mode. I recommendusing A or Aperture priority mode most of the time if you want to control the camera and thedepth of field in the picture.2
3. Exposure meter - most new cameras have several types of metering systems - they allmeasure light reaching your digital sensor. The choices include: 1) multisegment also calledMatrix, evaluative, or honeycomb 2) Center weighted and 3) spot meter. Spot metering is used indifficult lighting or backlit situations and requires the most skill to use properly. I recommend youset your camera to use Matrix metering most of the time (i.e. 99% of the time).4. The Histogram feature is used to evaluate exposure particularly in bright light outdoors. Thegraph simply indicates how many pixels in a picture are light in tone, medium or dark. The leftside of the histogram represents total black, the right side total white with intermediate tones inbetween. The height of the histogram represents the number of pixels in your picture with aparticular tone. If the histogram is too far left - the picture may be underexposed; if it is too far tothe right the picture is overexposed. Overexposure is the worst thing you can do because it cannot be fixed afterwards. A good histogram is centered as much as possible - see images below.Left picture shows histogram from underexposed image, middle - proper exposure, right - overexposed image. See your manual how to call up your histogram and evaluate exposure. Somecameras show overexposed regions by flashing on screen - use exposure compensation toreduce the exposure and flashing areas.3
5. Exposure CompensationSometimes even the best light meters can be fooled if the background is really bright or reallydark. Many digital cameras offer the ability to alter the exposure by making the picture lighter ordarker using an exposure compensation button. The exposure compensation button often hasa \- sign beside it, if not check your camera manual. Sometimes this feature is buried in a menu.When you press this button you may have to press another button to change the exposure so it islighter lighter or - darker. When you are finished taking the shot don't forget to reset the buttonback to zero! See example photos below where the expousure was made darker or lighter - thisis an important camera control you will want to master.5. File type to store you images: JPG is the most common file type and usually comes in S, M,L sizes - always choose L the Largest file for best quality (Some cameras call this size FINE bigger files are better). If your camera offers different quality settings always pick the maximumquality - you can easily reduce an image in size, but we can't always enlarge a JPG file withoutdegrading the image.All digital SLR cameras offer the ability to shoot a RAW file format, unfortunately only a fewcompact cameras offer this feature. RAW files are bigger then JPG files and the quality of theimages after processing is better (more data and colours). RAW files, however must beprocessed in software before you can print the files. RAW files permit you to enlarge your images200% or more and it is possible to modify exposure and white balance afterwards - you get asecond chance to improve the exposure! Most cameras will also permit you to shoot both RAWand JPG files simultaneously. RAW is best if you want high quality and flexibility. JPG filesare easier to work with, smaller and can be taken to a be printed as is. Currently the file extensionfor RAW files various between camera manufacturers and at this time there is no one acceptedStandard (Adobe is trying to set .DNG as the standard). RAW files must also be processed insoftware before they are placed within a web page, printed or sent by email.6. Storeage Cards - come in a variety of shapes and sizes, writing speeds and total memorysize. the number of photos you can take with a particular card is usually indicated on yourcamera. I recommend having at least one extra card. If you are planning to shoot a lot e.g. on avacation or at a wedding get more. A questions I often get is "Should I spend more money ongetting a faster card"? Generally no as your camera has a built in memory buffer. Faster cardsare better for those shooting HD video or those shooting many photos in bursts of 10-20 images.4
Storeage cards come in a variety of types and shapes, the most common are CompactFlash and SD cards. You should own at least 2 cards so you don't run out.7. Colour Space refers to the number of colours you camera will store. sRGB stands forsmall Red Green Blue which is the best setting for those shooting only JPG file format. AdobeRGB is a bigger colour space and is a better choice for those that process their own imagesusing Photoshop or other image editing program prior to having them printed. Images taken withsRGB look more vivid straight out of the camera because the camera processes the files for you.Adobe RGB colour space is better when you shoot RAW files, the images initially tend to look flatbut after processing with Adobe Photoshop can look better then JPG files. If you shoot RAW setyour camera to Adobe RGB, if you shoot just JPG files leave your camera on sRGB mode.8. Lenses and focal length. Focal length refers to the distance from the sensor to the center ofthe front lens element. Lenses with 40-50 mm focal length have a similar perspective as thehuman eye and are called normal lenses. Every time you double the focal length e.g. 100, 200 or300 mm you magnify the images 2X, 4X or 6X (divide the lens focal length/50mm to determinethe approx. magnification). Lenses with less then 40 mm e.g. 24 mm lens are considered wideangle lenses and are useful for interiors and landscapes - they also tend to make people lookthinner in your pictures.If you don't have a wide angle lens it is possible to take several overlapping pictures and stitchthem together using software like Photoshop to make a panorama out of them.If you only want to carry one lens, I recommend bying a 18-200 or 28-300 mm zoom lens which isideal lens for most types of photography. Macro lenses are special lenses which allow you tofocus very close to flowers, mushrooms, insects etc. Some zoom lenses have a macro featurebuilt in. Macro lenses come in different focal lengths such as 50, 100 and 200 mm. The longerfocal length lenses let you photograph your subjects form further away and still achieve a closeup picture. Many compact cameras offer macro mode that you allow you to get very close to yoursubjects - look for the flower icon to set your point and shoot camera to macro mode.5
Macro symbolVR (vibration reduction - Nikon) or IS (Image stabilization - Canon) lenses - are special lensesthat reduce vibration due to camera shake while hand holding. These are especially useful whenyou are using a telephoto lens which magnifies any movement or camera shake. Vibrationreduction is not particularly useful for wide angle lenses or when the camera is mounted on atripod (on a tripod you may get better results by turning IS off). If you are considering purchasinga telephoto lens that offers VR - it is worth it to pay extra for VR. Some compact cameras offershake reduction built in and it is useful when shooting indoors or under low light without a flash. Ifyour lens offers more then one type of vibration reduction - be sure to read your lens manual.9. Holding your Camera SteadySharp pictures are a result of holding your camera steady when you shoot. How steady you canhold the camera depends on a number of factors:1). Shutter speed, the faster it is the easier it is to get sharp pictures, generally you should not tryto hand hold a camera if the shutter speed is less then 1\30 of a second. If you use a telephotolens the rule is most folks can hand hold the slowest shutter speed of 1\focal length of the lens.In other words if you have a 300 mm lens 1\300 sec is the slowest shutter speed you should try tohand hold. Vibration reduction or image stabilization heps you steady your lens even more andthis is a great feature to have, but nothing beats a tripod for low light photography. To get fastershutter speeds have your lens set to its widest aperture and\or increase the camera ISO speed.Holding your camera properly can make a big difference - hold the camera close to your face withyour elbows tucked in, feet spread apart with one foot slightly forward. When you shoot hold yourbreath. If you lean on a wall, fence post or other object this can help you steady your camera.Otherwise there are tools such as bean bags, monopods and tripods that will allow you to supportyour camera and get sharper pictures. Professionals will often use a tripod when ever theyphotograph a landscape, take a macro photograph or shoot a group photo. Another accessoryused to reduce camera shake when the camera is on a tripod is a cable release, a remote controlrelease or you can even use the camera's self timer. Using a tripod and\or cable release takesmore time to set kup, but it often results in a better composed and sharper picture. At slow shutterspeeds between 1\4 and 1\15 of a second vibration can be introduced into a picture by the mirror"slap" during the exposure- the fix try to use a faster or slower (with tripod) shutter speeds.10. Filters - do you need them and if so which ones are Important?Most camera stores will try to sell you a UV or Skylight filter to protect your lens - and they doprotect it, but I don't feel they are necessary. Use your lens hood and lens cap to protect youlens. The only time I use a clear UV filter is when kayaking on salt water because it protects mylens coatings from the salt spray which can etch the lens coatings like acid.One filter that every SLR photographer should own for their wide angle or macro lenses is acircular polarizer - these filters reduce reflections and increase colour saturation. They alsoreduce the amount of light coming in through your lens by 2 F-stops or 2 shutter speeds so it is6
important not to use one on a telephoto lens used for wildlife. Polarizers are not just for sunnydays, but are effective in increasing colour saturation on overcast days especially after rain.Grad filters are used for landscape photography usually at sunrise or sunset - see my article onHow to use Grad filters - ers.html.11. White Balance - refers to the "colour" of the light you are shooting in. If you are shootingindoors th
All digital SLR cameras offer the ability to shoot a RAW file format, unfortunately only a few compact cameras offer this feature. RAW files are bigger then JPG files and the quality of the images after processing is better (more data and colours). RAW files, however must be processed in software before you can print the files. RAW files permit you to enlarge your images 200% or more and it is .File Size: 628KBPage Count: 12People also search forbooks for dummies free downloadfacebook for dummies freefor dummies free download pdfphotography for dummies free