Transcription
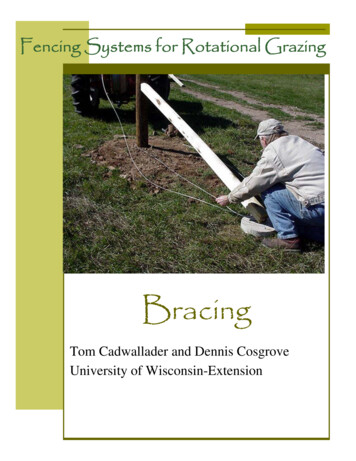
Fencing Systems for Rotational GrazingBracingBracingTom Cadwallader and Dennis CosgroveUniversity of Wisconsin-Extension1
Bracing the ends and cornersThere are lots of different methodsthat have been used for bracing theends and corner posts so they won’ttip over or pull out of the groundonce the wires are fastened on andpulled tight. If there isn’t muchtension on the post just burying it inthe ground good and deep andbackfilling with the right kind ofmaterial may be all that is needed;but even then, over the years theconstant pull of the fence can pull apost over. And ff tipped far enoughit won’t belong before it starts tocome out of the ground. We’regoing to cover three ways to braceend and corners that will work undermost fence systems intended forkeeping in domestic livestock; H andFloating braces for multi-wire fences,and a bed log brace for single wireor low tension fences.The H Brace:The H, or horizontal, brace has beenone of the most common brace designsin multiple wire fence construction foryears (Figure3.1) Whether thehorizontal brace support is put at thetop or more towards the middle of theposts the principals and effect are stillthe same. Where it is placed is a matterof personal preference for reasons otherthan the strength of the brace. Thebrace has four different parts: the endor corner post that is being braced, thebrace post that assists the end or corner,the horizontal brace that connects thetwo posts and the brace wire that tiesthe top of the brace post back to thebottom of the post it is bracing.Where do you put thebrace post?One of the challenges of workingwith H-braces is you don’t havemuch flexibility on where they canbe put. Not only do they need to belined up with the fence and they alsoneed to be far enough away fromthe post you are bracing to makethem effective. Generally they areplaced somewhere between 8 to 10feet away, depending on thehorizontal brace you’ve chosen towork with. Eight-foot posts are mostcommonly used for the horizontalbrace mainly because of theiravailability. If it is easy diggingputting the brace post in isn’t a bigproblem but in rocky terrain it canmake putting it where you need it togo a bit of a challenge.There are two measurements thatneed to be taken. First line the postup between the ends and/or cornersthat the fence is going to bestretched between. One of theeasiest ways to do this is to stretchsome twine between the posts anduse it as your straightline. Next, laythe brace down to set your distance.If you run into rocks you may have tocompromise on where to put thepost. Better to go a little bit furtherout than too close in.Does the distancebetween an end or corner2
and a brace post makeany difference onstrength?As far as strength goes, it’s alwaysbetter to go a little longer in distancefrom the post you are trying to brace.Eight feet seems to work just fine formost situation, but If for some reasonthere is more than normal tensionexpected than it may be better to putin a second brace post creating adouble H brace than going with alonger brace. These are usually morecommon in taller multi-wire fences,such as deer fenceIs there any differencebetween putting a bracepost in compared to anend or a corner?Not really. Since the brace postsaren’t going to be carrying the loadthat the ends and corners are youcan usually get by with a slightlysmaller diameter post but they stillneed to be in just as deep since theyalso need to stay put in order to beeffective. If you are digging theposts in they still need to bebackfilled properly but it’s usually notnecessary to put anything on themto keep them from pulling out of theground. The forces on the bracepost usually help keep them in theground. If they are being driven inthere isn’t any difference at all.How should thehorizontal brace befastened in?There are a few different ways thatare commonly used to fasten thehorizontal braces to the end orcorner post and the brace post. Oneof the most common ways is to use acombination of notching and nailing.The end or corner posts are notchedwith a saw and the brace is placed inthe notch. Once the brace is in placeit can be fastened to the posts with agood nail; such as six inch, temperedsteel, galvanized, ring shank nail,commonly called a pole barn nail.Another commonly used method forattaching the brace is with bracepins. Brace pins are usually quarterinch diameter pins about 5 incheslong. A hole is drilled in the end ofthe brace and the side of the postand the pin is slipped into the twoholes. Although brace pins can beused in conjunction with notchingmany fence contractors forgonotching altogether and dependentirely on the brace pin to keep thebrace in place. What keepseverything together is brace wire.How is the brace wireinstalled?The brace wire is the thing thatmakes the whole system work. Itruns from the top of the brace postto the bottom of the post that isbeing braced essentially tying thetop of the brace post to the groundusing the post that is being braced.That’s the reason the end or cornerneeds to be good and sturdy. Themore pressure that is put on it by thefence wires the more force that isexerted to the brace wire reachingback to its base.3
Here again there are several ways toinstall a brace wire. What is shown isa high-tensile wire system that iswrapped twice around the posts andtightened with a fence strainer. Startby putting two staples neat the topof the brace post on the oppositeside of the brace. Put two morestaples into the end or corner posts acouple of inches from the groundalso on the opposite side from thebrace. Go twice around the braceassembly twice with a single lengthof wire, feeding it through thestaples. After you make the secondloop cut the wire so the ends are justpast each other halfway betweenthe two posts. Install a fence strainerand tighten the wire up. Tighten thewire slowly pulling it periodically tomake sure the tension is equal alongthe entire length. Stop tighteningwhen the top of the end or cornerpost begins to be pushed back bythe brace.Figure 2 Drilling hole to attach bracesupportFigure 3 Attaching brace supportFigures 1 – 4 show some of the stepsin building an H-brace.Figure 4 Tightening brace wireFigure 1 Corner postThe Floating BraceThe Floating brace is a fairly newconcept in brace design and hasbecome very popular in electricfence construction. One of the4
major advantages of a floating braceis it only requires digging one hole.If you’re working in ground that iseasy to dig in it may not be thatimportant, but if rocks and clay soilsare a problem then only having toput a single post in the ground is areal plus. As far as strength goes,there is not much much difference.There are four basic components of afloating brace: the post that is beingbraced, the brace, a brace wire andthe brace pad. The only thing that ispermanently fixed is the end orcorner post that is being braced.Everything else is flexible andallowed to move with the changingconditions that the fence is putunder. The brace assembly works bydirecting the force that is put on theend or corner post down along thebrace right into the ground and backthrough the brace wire to thebottom of the buried post. It is calleda floating brace because the bracepad is “floating” so to say on top ofthe ground.Where should the bracebe placed on the post it isbracing?The brace is usually mounted on thepost it is bracing anywhere from 30inches from the ground to the top ofthe post. Assuming we are workingwith a multi-wire fence, there are acouple of factors that determine theheight. The first would be theplacement of the wires themselves.Since the most common multi-werefence is a three wire fence, the topwire is generally 39-40 inches high,the bottom wire is generally 8-10inches off the ground and themiddle wire, of course is somewherein between. This means the most ofthe wires are at or below the brace ifit is set at 30 inches.The second thing to consider is thelength of the brace. An 8 foot braceset at 30 inches and a 10 foot braceat 48 inches achieve nearly identicalangles, 30 degrees from the groundto the brace and 60 degrees fromthe post to the brace.How should the brace befastened to the end orcorner post?As it was with the H-brace there aretwo methods commonly used toattach the brace to the post,notching the post and fastening thebrace to it and using brace pins.Notching –For notching simple measure upfrom the ground to the desiredheight that the middle at the bracewill be set at and, if you are using a4-5 inch diameter brace, mark 2.5 to3 inches on either side of it. With achain or a hand saw cut into the postat the marks about a half inch deep.If you are using a chainsaw carefullyuse the tip of the chain saw tosmooth out the area between thetwo cuts. If you use a handsaw formaking the initial cuts a hammer andchisel will work just fine.After the post is notched then thebrace needs to be cut to fit into thenotch. But before cutting the bracecan be cut to fit in the notch if firstneeds to have the end that sits on5
the brace pad smoothed off so it sitsflat on the pad.Now we can cut the brace so it fitsinto the notch on the brace. Start bysetting the brace on the post padand into the notch. Next, use astraight edge to mark the properangle to cut the brace at. Cut alongthe mark), set it back into the notchand then fasten it with a 6 inchtempered and galvanized ring shanknail, commonly called a pole barnnail. Once the brace is set into placeand lined up along the fencelinethen it’s time to tie the whole thingtogether with the brace wire.Brace Pin –The only thing that is different abouta brace pin assembly is the notchitself. The brace and its placementare all measured and cut the samebut instead of cutting the notch, aholes are drilled in the brace and thepost and a brace pin is inserted tokeep the brace in place. Theweakness in this system is that overtime the brace pin can split the postif enough force is applied.of the brace and at the bottom of thepost being braced to help keep thebrace wire in place. The brace wireis then fed through the staples twotimes. The brace wire is cut so theends just run past each other abouthalfway between the post and theend of the brace. Next a fencestrainer is installed. But before thewire is tightened slip staples over thestaples placed in the brace and thepost between the wire and thewood. These staple help keep thewire from cutting into the wood.Once the staples are in place, slowlytighten up the brace wire by turningthe ratchet on the fence strainer andpulling up on the brace wire to makesure the tension is even along theentire length of the wire. Onlytighten until the top of the post ispushed back slightly. Finish thebrace off by tamping the soil aroundthe post one more time.Figures 5 – 13 show some of thesteps in building a floating brace.How is the brace wireinstalled?The brace wire is an extremelyimportant part of the floating bracesystem. Some of the original floatingbrace systems didn’t even depend onbrace wire but chose to use athreaded rod to act in place of thebrace wire. But with the high tensilewire and strainers available today abrace wire works just fine.Figure 5 Smooth end on padThe process begins by installing twogalvanized fencing staples in the end6
Figure 6 Placing notchFigure 9 Attaching brace wireFigure 7 Cutting braceFigure10 Attaching brace wireFigure 8 Attaching braceFigure 11 Adjusting brace wire7
Figure 12 Tightening brace wireTo install a Bed Log Brace start bydetermining which direction theforce will be coming from and dig ahole deep enough to have the top ofthe bed log a couple of inches belowthe ground. Figures 14 and 15 showboth two different types of woodbeing used as a bed log. Either willwork but something with a flat edgewill work better because it will needto push more dirt in order to get it tomove. Do not attach the bed log tothe post it is bracing. At ground levelit will just act as a tool to help heavethe post out of the ground. The Bedlog isn’t intended to keep the post inthe ground but to keep it from beingpulled over.Figure 13 Floating braceThe Bed Log BraceThe Bed Log Brace is by far thesimplest brace system for bracingand end or corner post. Although itwon’t hold up to the tension put onit by multiple wire fences it is ideal forsingle wire high tensile fences,multiple wire fences that are handstretched or even to assist insituations where a fence may bemaking a gentle bends where an Hor floating brace may not fit in.Where and how deepshould the bed log be putin?Figure 14 Deadman post supportFigure 15 Deadman post support8
Should the native soil beused?The answer to this question is thesame as it was for backfilling a post.If it is sand and/or gravel type soil goahead and use what you’ve got. Butif the soil is more clay or silt it’s betterto use a sand and gravel mix.9
Bracing the ends and corners There are lots of different methods that have been used for bracing the ends and corner