Transcription
www.diskgenius.comDiskGenius User GuideThe information in this document is subject to change without notice. This document isnot warranted to be error free.Copyright 2010-2021 Eassos Ltd. All Rights Reserved1 / 236
www.diskgenius.comCONTENTSIntroduction. 6Partition Management. 6Create New Partition . 6Active Partition (Mark Partition as Active) . 10Delete Partition . 12Format Partition . 14Hide Partition . 15Modify Partition Parameters . 17Resize Partition . 20Split Partition. 23Extend Partition . 26Add Free Space to Partition . 29Assign Drive Letter . 32Partition Backup . 34Restore Partition from Image File . 40Explorer Partition Image File . 42Clone Partition (Copy Partition). 46File Recovery . 51Save Scan Progress . 57Recover Files By Type . 62Load Current Partition Intelligently . 65Copyright 2010-2021 Eassos Ltd. All Rights Reserved2 / 236
www.diskgenius.comUnlock BitLocker . 66Set Volume Name . 68Convert Partition Type Between Primary and Logical . 70Erase Sectors . 72Erase Free Space . 754KB Partition Alignment Detection . 78Disk Operation . 79Partition Recovery . 79Rebuild MBR . 85Clone Disk . 86Backup and Restore Partition Table . 92Create Bootable USB Disk . 95System Migration . 101Check and Repair Bad Sectors . 108View S.M.A.R.T. Information . 112Quick Partition . 114Delete All Partitions . 117Copy Sectors . 119Clear Reserved Sectors . 130Convert Partition Table Style . 132Check and Correct Partition Table Error . 135Appoint Disk Geometry. 137Copyright 2010-2021 Eassos Ltd. All Rights Reserved3 / 236
www.diskgenius.comBatch Format USB Disk . 139Convert Dynamic Disk to Basic Disk . 142Safely Eject Disk . 143Set UEFI BIOS Boot Entries . 145Virtualize System into VMware Virtual Machine . 146Virtualize System into VirtualBox Virtual Machine . 155TRIM Optimization . 160Operate Windows Storage Pool and Storage Space . 164Virtual Disk and Image Files . 171Create VMware Virtual Disk File . 171Create Virtual PC Virtual Disk File. 172Create VirtualBox Virtual Disk File . 174Create Parallels Desktop Virtual Disk File . 176Create ".img" Image File . 178Virtual Disk File and Its Partitions . 181Convert Virtual Disk Format . 183Construct Virtual RAID. 185Disk Sector Editor . 189Summary. 189Sector Editor Common Functions . 192Shortcut Menu. 201File Operation . 209Copyright 2010-2021 Eassos Ltd. All Rights Reserved4 / 236
www.diskgenius.comBrowse Files . 209Copy Files From Partition . 212Write Files To Partition . 213Delete Files Directly . 215Delete Files Permanently . 217Create Folder. 219Preview Files . 220Others . 222Create WinPE Bootable USB Drive of DiskGenius. 222Reboot to DiskGenius WinPE Version . 225Reboot and Run DiskGenius DOS Version . 226Register DiskGenius . 228Technical Support . 236Copyright 2010-2021 Eassos Ltd. All Rights Reserved5 / 236
www.diskgenius.comIntroductionAbout DiskGeniusDiskGenius is a versatile program packed with comprehensive functions forpartition recovery, file recovery, disk management, data backup, disk utilities,etc. It manages storage space with high efficiency, recovers data lost due todisk corruption, formatting, deletion, virus attack, etc. and provides the easiestyet reliable backup solutions to let users say NO to data loss.Technical SpecificationRecommended Hardware requirement: 1 GHz x86 or compatible CPU, 512mbRAM memory, mouse and keyboardSupported file system: FAT12, FAT16, FAT32, exFAT, NTFS, EXT2, EXT3,EXT4Supported operating system: Windows 2000/XP/Vista/7/8/8.1/10, SmallBusiness Server 2011/2003/2008, Windows home server 2011, and WindowsServer 2003/2008/2008 R2/2012/2012 R2/2016/2019 (both 32bit and 64bit).Partition ManagementCreate New PartitionYou should decide partition type before creating new partition table. Thereare three types of partitions on an MBR disk, i.e. primary partition, extendedpartition and logical partition. Primary partition is created on hard driveCopyright 2010-2021 Eassos Ltd. All Rights Reserved6 / 236
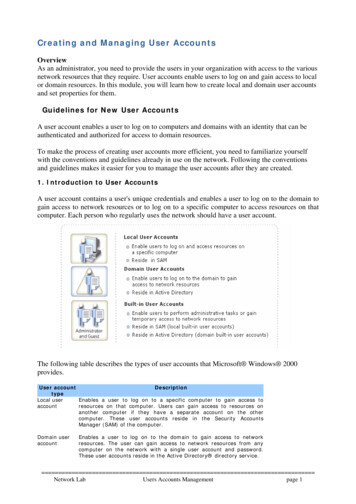
www.diskgenius.comdirectly, which is generally used to install and boot operating system. Due tothe limitation on MBR partition table, there can be 4 primary partitions atmost, or 3 primary partitions and 1 extended partition. Extended partition is akind of special primary partition, and it can contain several logical partitions.Logical partition is created on extended partition, and the number of logicalpartitions is not limited. A GPT disk does not have such limitations1. Create new partition on free disk spaceStep 1. Select free disk space on hard drive and click New Partition buttonfrom toolbar and Create New Partition window will pop up.Copyright 2010-2021 Eassos Ltd. All Rights Reserved7 / 236
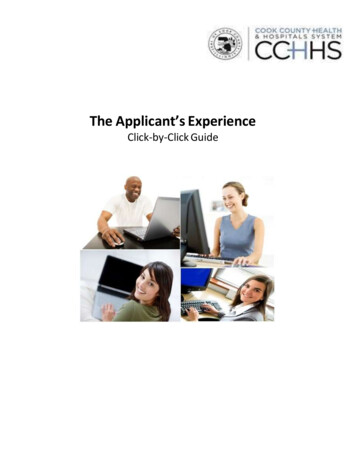
www.diskgenius.comStep 2. Select partition type, file system and partition size andclick OK button.To make sure the partition is 4K aligned you can select option "Align toIntegral Multiple of Sectors".Note: You can click Advanced button to set more parameters for thepartition, as follows:You can set partition's beginning and ending cylinder, beginning sectors andsector numbers. As to GUID partition table, more partition settings areavailable.Step 3. Click Save All button to save the partition to current partition tableand format the partition.The newly created partition is not saved to hard drive immediately, as it iscreated in memory for the moment. Thus, you need to save the partition tocurrent partition table manually before you can see it in Windows Explorer.Such approach is to prevent data loss caused by improper operation.Copyright 2010-2021 Eassos Ltd. All Rights Reserved8 / 236
www.diskgenius.com2. Create new partition on existing partitionDiskGenius is able to create a partition on existing partition by splitting onepartition into two without data loss.Step 1. Right-click on a partition and select Create New Partition fromcontext menu.Step 2. Enter partition size for these two partitions and click Start button.Copyright 2010-2021 Eassos Ltd. All Rights Reserved9 / 236
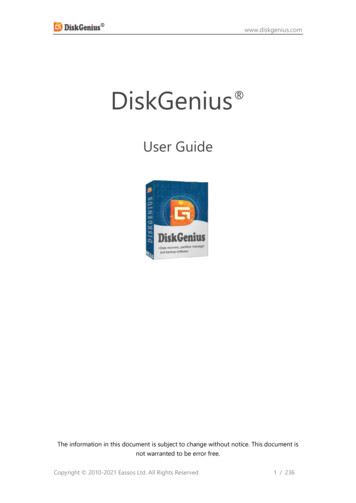
www.diskgenius.comActive Partition (Mark Partition as Active)An active partition is a primary partition on an MBR disk and set as thebootable partition that contains operating system. Only one partition on eachhard drive can be set as an active partition.Step 1. To active a partition, please right-click on the primary partition andselect "Mark Partition As Active" from context menu.Copyright 2010-2021 Eassos Ltd. All Rights Reserved10 / 236
www.diskgenius.comStep 2. Click Save All button to make the change into effect.If you want to remove Active mark for the partition, you can right-click on itand select "Remove Partition's Active Mark", as follows:Copyright 2010-2021 Eassos Ltd. All Rights Reserved11 / 236
www.diskgenius.comDelete PartitionIt's easy to delete a partition from hard drive, removable disk or virtual diskwith the help of DiskGenius.Step 1 Select the partition you want to delete and click Delete button fromtoolbar or right-click it to select "Delete Current Partition".Copyright 2010-2021 Eassos Ltd. All Rights Reserved12 / 236
www.diskgenius.comStep 2 Click Yes button when DiskGenius asks confirmation.Step 3 Click Save All button from toolbar to make the deletion take effect.Copyright 2010-2021 Eassos Ltd. All Rights Reserved13 / 236
www.diskgenius.comFormat PartitionA newly created partition should be formatted before it can be used to storedata. Currently, DiskGenius supports formatting partition to NTFS, FAT32,FAT16, exFAT, EXT2, EXT3 and EXT4 file system.Step 1. Select the partition you want to format and click Format button fromtoolbar, or right-click on the partition to choose Format Current Partition.Step 2. Select file system, cluster size, volume label and click Format button.Also, you can select "Surface Scan" which will scan the drive for bad sectorsduring formatting. However, surface scan takes long time and there is noneed to do so on most new hard drives.Copyright 2010-2021 Eassos Ltd. All Rights Reserved14 / 236
www.diskgenius.comAs to NTFS partition, you can select Enable Compression to enable NTFS filesystem's data compression feature.If the partition to be formatted is primary partition and file system is set asFAT32, FAT16 or FAT12, the option "Create DOS system" will be available. Ifit is selected, the formatting process will create a DOS system in this partition,which can be used to boot computer.Step 3. Click Yes when DiskGenius asks confirmation for the operation, andthe partition will be formatted quickly.Hide PartitionHide partitionA hidden partition does not have a drive letter and it cannot be seen inWindows Explorer, thus operating systems cannot access it. Files in hiddenpartition are not lost, but they cannot be accessed in normal method.Step 1. Right-click on the partition you want to hide and select"Hide/Unhide Current Partition" option from context menu.Copyright 2010-2021 Eassos Ltd. All Rights Reserved15 / 236
www.diskgenius.comStep 2. Click OK and the partition will be hidden.Though the hidden partition cannot be seen in Windows Explorer, you canuse DiskGenius to access it.Step 3. Click Save All button to save changes to partition table.Copyright 2010-2021 Eassos Ltd. All Rights Reserved16 / 236
www.diskgenius.comUnhide partitionStep 1. Right-click on the hidden partition and select "Hide/Unhide CurrentPartition" option from context menu.Step 2. Click OK button when you see following message box.Step 3. Click Save All button to save changes to partition table. Then thepartition will be assigned a drive letter automatically by operating system andyou can see it in Windows Explorer again.Modify Partition ParametersYou can change detailed parameters of a partition with this feature.Step 1. Select the partition you want to modify its parameters andclick Partition menu to choose Modify Partition Parameters.Copyright 2010-2021 Eassos Ltd. All Rights Reserved17 / 236
www.diskgenius.comStep 2. Set partition parameters such as system identifier, beginning cylinder,ending sector, etc. based on your needs and click OK.Copyright 2010-2021 Eassos Ltd. All Rights Reserved18 / 236
www.diskgenius.comNote:1. Changing system identifier does not change partition type or file systemtype.2. Partition size changed by this feature may damage data in partition.Incorrect settings may lead to corrupted partition.Copyright 2010-2021 Eassos Ltd. All Rights Reserved19 / 236
www.diskgenius.comResize PartitionDiskGenius is able to change the size of partition without data loss, and youcan use it to extend, shrink or split partition as you like.Step 1. Right-click on the partition you want to resize and click ResizePartition as follows:Step 2. Now the Resize Partition window pops up and you can set partitionsize here. Click Start button after setting partition size.Place mouse pointer on the edge of partition and you can drag it to changepartition size; also, you can enter exact number in the column below. TheCopyright 2010-2021 Eassos Ltd. All Rights Reserved20 / 236
www.diskgenius.comdisk space resized from the partition can be merged to other partitions, keptunallocated or created new partition.Step 3. DiskGenius prompts operations to be done in following message box.Click Yes to continue.Copyright 2010-2021 Eassos Ltd. All Rights Reserved21 / 236
www.diskgenius.comStep 4. Click Complete button when the program finishes resizing partition.Note: If the partition resizing process involves operating system, DiskGenius willprompts to enter DiskGenius WinPE edition to complete the task. If yourcomputer cannot boot to DiskGenius WinPE edition directly, you cancreate a bootable USB disk to boot computer. Please do not access the partition being resized in case of any unexpectedissues. The resizing process may take long time if there are too many files on thepartition. In that case, you can set operations after resizing finishes. Partition resizing may fail to complete or even cause data loss due to harddrive or partition errors, bad sectors, sudden power failure or systemCopyright 2010-2021 Eassos Ltd. All Rights Reserved22 / 236
www.diskgenius.comerrors. Thus, resizing partition is a risky action to some extent and databackup is necessary.Split PartitionDiskGenius is able to split one partition into two partitions without affectingdata on the drive.Step 1. Right-click on the partition you want to split and select SplitPartition, as follows:Step 2. Set partition size by dragging borders or entering exacting numberand click Start button.Copyright 2010-2021 Eassos Ltd. All Rights Reserved23 / 236
www.diskgenius.comStep 3. DiskGenius prompts operations to be done and things should benoted in the following message box. Click Yes to continue.Step 4. Wait for the process to finish, after which click Complete.Copyright 2010-2021 Eassos Ltd. All Rights Reserved24 / 236
www.diskgenius.comNote: If the partition resizing process involves operating system, DiskGenius willprompts to enter DiskGenius WinPE edition to complete the task. If yourcomputer cannot boot to DiskGenius WinPE edition directly, you cancreate a bootable USB disk to boot computer. Please do not access the partition being resized in case of any unexpectedissues. The resizing process may take long time if there are too many files on thepartition. In that case, you can set operations after resizing finishes. Partition resizing may fail to complete or even cause data loss due to harddrive or partition errors, bad sectors, sudden power failure or systemerrors. Thus, resizing partition is a risky action to some extent and databackup is necessary.Copyright 2010-2021 Eassos Ltd. All Rights Reserved25 / 236
www.diskgenius.comExtend PartitionThis guide will show you how to extend partition without data loss, which canbe used to enlarge any partition and fix low disk space issue in Windows.Step 1. Right-click on the partition you want to extend and select ExtendPartition option.Step 2. Select a partition that contains large amount of free space andclick OK.Copyright 2010-2021 Eassos Ltd. All Rights Reserved26 / 236
www.diskgenius.comStep 3. Set partition size you want to move between these two partitions andclick Start.Step 4. DiskGenius lists operations to be executed and things you should beaware. Click Yes to continue.Copyright 2010-2021 Eassos Ltd. All Rights Reserved27 / 236
www.diskgenius.comStep 5. Click Complete button when the partition is extended successfully.Note:Copyright 2010-2021 Eassos Ltd. All Rights Reserved28 / 236
www.diskgenius.com If the partition resizing process involves operating system, DiskGenius willprompts to enter DiskGenius WinPE edition to complete the task. If yourcomputer cannot boot to DiskGenius WinPE edition directly, you cancreate a bootable USB disk to boot computer. Please do not access the partition being resized in case of any unexpectedissues. The resizing process may take long time if there are too many files on thepartition. In that case, you can set operations after resizing finishes. Partition resizing may fail to complete or even cause data loss due to harddrive or partition errors, bad sectors, sudden power failure or systemerrors. Thus, resizing partition is a risky action to some extent and databackup is necessary.Add Free Space to PartitionDiskGenius can help you add unallocated or free disk space to any existingpartition without losing data. Unallocated disk space can be added to partitionno matter whether it is adjacent to the free space.Step 1. Locate and right-click on free disk space and select Allocate FreeSpace To option. Then you can choose the partition to which you want toadd the free space.Copyright 2010-2021 Eassos Ltd. All Rights Reserved29 / 236
www.diskgenius.comStep 2. DiskGenius shows operations to be done and things you should note.Click Yes and it starts to move disk space to specified partition.Copyright 2010-2021 Eassos Ltd. All Rights Reserved30 / 236
www.diskgenius.comStep 3. Wait for the process to complete and click Complete when theprocess is done.Note: If the partition resizing process involves operating system, DiskGenius willprompts to enter DiskGenius WinPE edition to complete the task. If yourcomputer cannot boot to DiskGenius WinPE edition directly, you cancreate a bootable USB disk to boot computer. Please do not access the partition being resized in case of any unexpectedissues. The resizing process may take long time if there are too many files on thepartition. In that case, you can set operations after resizing finishes. Partition resizing may fail to complete or even cause data loss due to harddrive or partition errors, bad sectors, sudden power failure or systemCopyright 2010-2021 Eassos Ltd. All Rights Reserved31 / 236
www.diskgenius.comerrors. Thus, resizing partition is a risky action to some extent and databackup is necessary.Assign Drive LetterDrive letter can be assigned, changed, or removed easily with the help of freepartition manager.Assign or change drive letterStep 1. Select the partition you want to assign or change drive letter andclick Assign New Drive Letter from Partition menu.Copyright 2010-2021 Eassos Ltd. All Rights Reserved32 / 236
www.diskgenius.comStep 2. Select a drive letter for the partition and click OK.Remove drive letterStep 1. Select the partition you want to delete drive letter andclick Partition - Remove Drive Letter.Copyright 2010-2021 Eassos Ltd. All Rights Reserved33 / 236
www.diskgenius.comStep 2. Click Yes and the drive letter will be deleted.Note: If drive letter is removed or deleted, the partition will be invisible toWindows.Partition BackupPartition backup is able to back up all data and settings of a partition into aspecified file which is usually called image file. With the backup file, you canrestore partition when the partition gets damaged, or data gets lost.DiskGenius provides three ways to backup partition.Sector-by-sector Backup: It allows you to create an image of all sectorson the selected partition, including sectors with data and blank sectors.Therefore, the process may take longer time than normal partition backup.The image file can be restored to source partition or other partition which hasthe exact same size.Backup partition by data storage structure: Back up valid data of thesource partition by file system structure to the image file without any change.Sine this mode only backs up valid data and it is the fasted. However, whenyou restore data from image file, the destination partition should have thesame size as the source partition.Copyright 2010-2021 Eassos Ltd. All Rights Reserved34 / 236
www.diskgenius.comBackup partition by file: Backs up all files and other valid data of source toimage file, which does not backup invalid data and takes shorter time. Theimage file can be restored to any partition whose capacity is able store thesefiles. Files restored from image file will be reorganized and there won't be filefragments.The backup file can be compressed, and you can set compression level fromFast, Normal and High Quality. In general, image file with higher compressionlevel is in smaller size but takes longer time. In most cases, Fast is the defaultand best choice.DiskGenius supports hot backup when backing up system related partitions,which is able to back up system when Windows is running without rebootingto WinPE or DOS environment.Backup type: Full backup and incremental backup.Full backup: Backs up all data no matter whether there is a backup.Incremental backup: Only backs up changed data or content.Step 1. Click Backup Partition button from toolbar or click Tools - ClonePartition To Image File to open backup window.Copyright 2010-2021 Eassos Ltd. All Rights Reserved35 / 236
www.diskgenius.comStep 2. Click Source Partition button to select the partition you want toback up and click Select Image File button to name the image file and set alocation to save it.Copyright 2010-2021 Eassos Ltd. All Rights Reserved36 / 236
www.diskgenius.comYou can click Settings button to configure advanced settings for the backup,such as select backup mode, compression level, exclude undesired files, etc.Copyright 2010-2021 Eassos Ltd. All Rights Reserved37 / 236
www.diskgenius.comStep 3. Click Start button and you can see following message box.If you choose Hot Backup button, and DiskGenius starts to back up systempartition directly without rebooting system; if you click Reboot toWinPE button, current system will automatically reboot to DiskGenius WinPEedition and continue backup.Copyright 2010-2021 Eassos Ltd. All Rights Reserved38 / 236
www.diskgenius.comStep 4. Want for the backup to complete and click Complete when partitionis backed up successfully.Copyright 2010-2021 Eassos Ltd. All Rights Reserved39 / 236
www.diskgenius.comRestore Partition from Image FileWhen partition gets damaged, corrupted or files in the partition gets lost, youcan try restoring partition from the backup image file to rescue data.Step 1. Click Tools menu and select Restore Partition From ImageFile option.Step 2. Click Select Image File button to find and select the backup imagefor the partition and click Target Partition button to select the partition youwant to restore. Then select a restore point for the partition andclick Start button.Copyright 2010-2021 Eassos Ltd. All Rights Reserved40 / 236
www.diskgenius.comStep 3. Click OK to continue when the following message box pops up.Note: Restoring partition will write data backed in image file to the targetpartition, which removes and overwrites all existing data in the partition.Please close all applications that are using the partition in advance.Step 4. Click Complete button after the partition is restored.Copyright 2010-2021 Eassos Ltd. All Rights Reserved41 / 236
www.diskgenius.comExplorer Partition Image FileDiskGenius is powerful data backup software which helps backup any partitionto an image file so that you can restore data when partition gets corrupted.Besides, this program supports browsing and extracting data in image filewithout restoring partition.Step 1. Click Tools menu and select Explorer Partition Image File.Copyright 2010-2021 Eassos Ltd. All Rights Reserved42 / 236
www.diskgenius.comStep 2. Browse your computer and locate the image files from which youwant to retrieve data and click Open.Copyright 2010-2021 Eassos Ltd. All Rights Reserved43 / 236
www.diskgenius.comStep 3. Select a time point you want to check and click Start button. Thenthe program starts to load files in the backup image.Copyright 2010-20
An active partition is a primary partition on an MBR disk and set as the bootable partition that contains operating system. Only one partition on each hard drive can be set as an active partition. Step 1. To active a partition, please right-click on the primary partition and select "Mark Partition As Active" from context menu.