Transcription
ESI Feature PhoneUser’s GuideFORWITHvoice mail0450-0467Rev. JVisit http://www.esiusers.com for up-to-date help.
About ESIESI (Estech Systems, Inc.) is a privately held corporation based in Plano, Texas, near the internationallyknown “Telecom Corridor.” Founded in 1987, ESI designs and builds innovative telecommunicationsproducts for businesses like yours. Because of their powerful combination of value and features,ESI products are consistently recognized by industry publications and leaders.Copyright 2005 ESI (Estech Systems, Inc.).Visit ESI on the Web at http://www.esi-estech.com.IVX is a registered trademark of ESI. Microsoft is a registered trademark of Microsoft Corporation. Intel is a registered trademark of Intel Corporation.Certain ESI products are protected by various U.S. Patents, granted and pending. Product information contained herein is subject to changewithout notice. ESI is an ISO 9001:2000-certified company.
Table of contentsIntroduction.A.148-Key Feature Phone .A.224-Key Feature Phone .A.412-Key Digital Feature Phone .A.5Connecting your ESI phone.A.6Help mode (Verbal User’s Guide).B.1User programming: An introduction.C.1User programming menu.C.1Voice mail operation .D.1Introduction.D.1Personal greetings.D.1Leaving messages . . .D.2Moving a message .D.2Off-premises “reach me”.D.3Message retrieval .D.3Live recording .D.6Off-premises message delivery .D.7Message Recycle Bin (un-delete).D.8Status indicator lamp .D.8Optional voice mail feature: Guest mailboxes .D.8Optional voice mail feature: Broadcast mailbox (500) .D.9Optional voice mail feature: Cascade paging mailboxes.D.10ESI Feature Phone operation.E.1Display .E.1Caller ID.E.1Keys.E.1Dial tone.E.3Basic phone use .E.4Direct station selection.E.5Transferring an outside call . . .E.6Conference calling.E.8Call forwarding.E.9Call waiting .E.10Hold/exclusive hold operation.E.12Paging.E.14Call pickup .E.14Optional features .E.15Special keys . F.1Esi-Dex . F.2Override ring. F.9Message monitor mode (live call screening) . F.10Personal greeting reminder . F.10Headset operation . F.10Outside dial tone preference. F.10Line keys. F.11Optional features . F.11Analog stations. G.1Placing calls. G.1Transferring calls . G.1Conference calling. G.2Call forwarding. G.2Call waiting . G.2Call hold. G.3Paging. G.3Call pick-up. G.3Voice mail operation from an analog station. G.4Analog station programming. G.6Select personal greeting. G.6Password. G.6Off-premises message delivery . G.7Off-premises message delivery . G.8Message Recycle Bin (un-delete). G.8Index
(This page included for pagination purposes only.)
User’s GuideIntroductionIntroductionAccessing the rich ESI feature set is simple and easy through the straightforward design of all the newESI feature phones. Each feature has been designed for ease of use while providing capabilitiesneeded in an advanced business phone.You will be able to learn many of the features by simply using your phone; and this IVX S-Class User’sGuide will introduce you to the wide variety of features offered by your ESI phone system and how touse your phone effectively to achieve maximum benefits.What it covers 48-Key Digital Feature Phone 24-Key Digital Feature Phone 12-Key Digital Feature Phone 60-Key Expansion Console (for use with the 48-Key Digital Feature Phone only)How it’s arranged Section A — Introduction and Phone Illustrations Section B — User help Section C — User programming Section D — Voice mail operation Section E — Phone operation Section F — Special keys and features Section G — Analog Stations IndexVoice mail optionsYour IVX S-Class phone system comes with ESI’s award-winning voice mail, including an automatedattendant and a dedicated mailbox for each station.The automated attendant provides up to 18 branches that conveniently route callers to their desiredextensions or departments, or even destinations outside the system.Some features are enabled by the Installer or System Administrator. Consult your System Administratorif you are unsure about what S-Class features are available.A.1
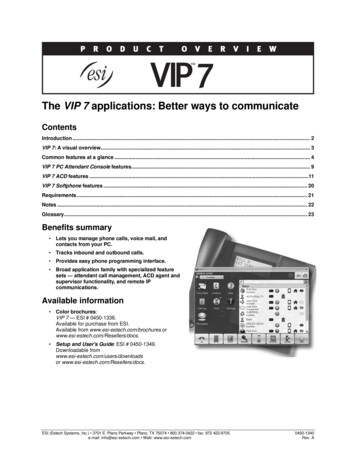
IntroductionUser’s Guide48-Key Feature PhoneThe 48-Key Feature Phone has a variety of programmable and built-in features. It comes in twoversions: Digital and TAPI. Additionally, it supports the optional 60-Key Expansion Console. Bothversions of the 48-Key Feature Phone offer the same basic features that are described throughout thisUser’s Guide. The 48-Key Feature Phone’s built-in voice mail features and voice prompts make it easyto program and use.Status indicatorlamp (pg. D.8)3-line, 56-character displayPROGRAMfeature key(pg. C.2)Volume/scroll keysESI-DEXfeature key(pg. F.1)HELP key foraccess to VerbalUser Guideand tutorial(pg. B.1)Context-specifickey to selectdisplayed optionsSpeakerVOICE MAILkey (pg. D.1)P/UP(pickup) key(pg. E.10)RECORD key(pg. D.6)30 programmablefeature keys(pg. C.2)Fixed feature keys(pg. E.1)Hint:A.2Microphone forbuilt-in speakerphonePAGE key(pg.E.10)You can perform direct programming by holding down a programmable feature key for at least twoseconds (similar to how you might program a car radio button). This isn’t applicable to the fixed-featurekeys which, as their name implies, are already programmed.
User’s GuideIntroductionOptional 60-Key Expansion Console for use with the 48-Key Feature PhoneThe 60-Key Expansion Console adds 60 more programmable feature keys to your 48-Key DigitalFeature Phone.You program the Expansion Console’s keys just as you do the programmable feature keys on your ESIFeature Phone, using either direct or traditional programming (see pages C.2).Note: Only one key can exist per extension, feature or operation. If you program a second key for the sameextension, feature or operation, this automatically erases the first key so programmed, thus making itavailable for a new extension, feature or operation.Hint:You may find it easier to write in the names on the overlay before you program the keys and attach theoverlay to the Console.60 programmablefeature keys(pg. C.2)in two banksof 30 eachHint:You can perform direct programming by holding down a programmable feature key for at least twoseconds (similar to how you might program a car radio button). This isn’t applicable to the fixed-featurekeys which, as their name implies, are already programmed.A.3
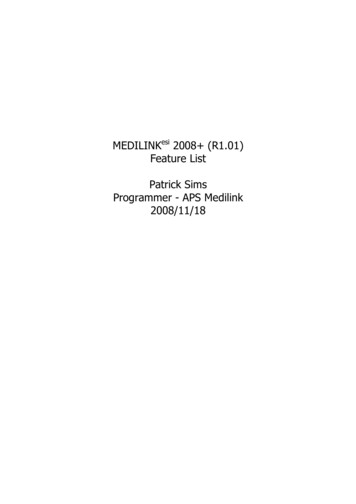
IntroductionUser’s Guide24-Key Feature PhoneThe 24-Key Feature Phone has a variety of programmable and built-in features. The 24-Key FeaturePhone’s built-in voice mail features and voice prompts make it easy to program and use.Volume/scroll keysStatus indicator light (pg. D.8)2-line, 32-character displayESI-DEX feature key(pg. F.1)12 programmable featurekeys (pg. C.2)SpeakerVOICE MAIL feature key(pg. D.1)P/UP (pickup) key(pg. E.10)PAGE key (pg. E.10)PROG/HELPfeature keyfor phone programmingas well as accessto Verbal User’s Guideand tutorial (pg. B.1)RECORD fixed feature key(pg. D.6)Microphone forbuilt-in speakerphoneFxed feature keys(pg. E.1)Hint:A.4You can perform direct programming by holding down a programmable feature key for at least twoseconds (similar to how you might program a car radio button). This isn’t applicable to the fixed-featurekeys which, as their name implies, are already programmed.
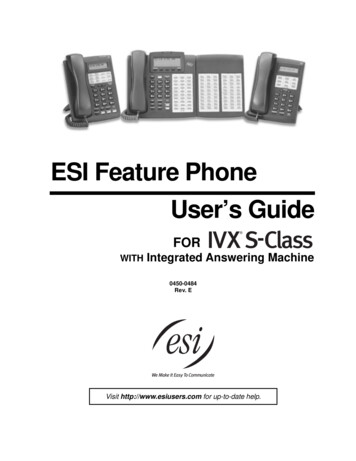
User’s GuideIntroduction12-Key Digital Feature PhoneThe 12-Key Digital Feature Phone includes the basic, most commonly used phone features.Volume/scroll keys1-line,16-character displaySpeaker9 programmable featurekeys (pg. C.2)P/UP (pickup) key(pg. E.10)PROG/HELPfeature keyfor phone programmingas well as accessto Verbal User’s Guideand tutorial (pg. B.1)PAGE key (pg. E.10)Fixed feature keys(pg. E.1)Notes: The following features are not available on the 12-Key Digital Feature Phone.Certain special features, see page F.11.Esi-DexA VOICE MAIL key, CONFERENCE key, and MUTE/DND key must be set on one of the nineprogrammable feature keys to utilize those features.Hint:You can perform direct programming by holding down a programmable feature key for at least twoseconds (similar to how you might program a car radio button). This isn’t applicable to the fixed-featurekeys which, as their name implies, are already programmed.A.5
IntroductionUser’s GuideConnecting your ESI phoneUse the diagram (below) to connect your ESI phone. The diagram represents the panel on thephone’s underside.Note: The “Top of phone” and “Bottom of phone” references in this diagram shows the correct verticalorientation of the phone — i.e., the part with the display is the top.12-Key Digital Feature Phone24-Key Digital Feature PhoneHandset Connects like a basic phone. Handset plugs into right-side jack. Line cord plugs into left-side jack.Line cordto wall[Headsetjack](TAPI)To PC48-Key Digital Feature PhoneIn addition to how the 24-Key Feature Phone connectsto the handset and line cord, note the following: Headset jack.1 TAPI version includes a cable for connecting to yourPC’s serial port.Line cordto wallTo 60-KeyConsoleHandset 60-Key Expansion Console cable (included with eachConsole) uses standard RJ-11 telephone connectors.Note: Use the wall mount hook (located under the handset) when the phone is in the furthest upright position.1If shipped after March 1, 2004.A.6
User’s GuideHelp mode (Verbal User’s Guide)Help mode (Verbal User’s Guide)Your ESI phone system’s Help mode (also called the Verbal User’s Guide) — a carefully conceivedcombination of spoken information, display readouts and even key illumination when appropriate — is apowerful tool to help you learn how to use the system’s many features.TutorialWhen your station is idle, press HELP, and then follow the spoken Help menu to: Learn how to use the phone Hear a description of how any key is used Learn how to use voice mail features Hear a complete tutorial on phone operationHelp during station programmingTo hear a detailed description of a function you wish to program, press HELP while programming it.Help during a callPress HELP while on a call and this will place the call on hold, whereupon you can use Help mode tohear a description of the function you wish to perform. When you exit Help mode, you will bereconnected to the call.While you are either in Help mode or programming your phone, your station will be temporarily placed inDND (see “MUTE/DND,” page E.2). Anyone calling your station while you are in DND will be forwardedto your mailbox (or other destination set by the installer).Exiting Help modeTo exit Help mode, simply hang up.Visit www.esiusers.com for up-to-date help.B.1
Help mode (Verbal User’s Guide)(This page included for pagination purposes only.)B.2User’s Guide
User’s GuideUser programming: An introductionUser programming: An introductionVoice prompts will play menu and sub-menu options to access the desired feature. You don't have to waitfor the entire prompt to be played. Therefore, once you’ve become familiar with the prompts (consult“User programming menu” on the next page), you can quickly set any frequently used feature.Programming helpDuring any of the programming steps, press HELP to hear a more detailed description of the featureand related programming options.Exiting programming modeTo exit programming mode, simply hang up.User programming menuOverview1Select personal greeting1 Record2 Delete3 Hear4Station audibles1 Station ring tone2 Station ring volume3 Message ring2Programmable feature keys(Station keys, line keys, speed-dial keys, otherfeature keys)53Station options1 Call waiting/background announce2 Personal greeting reminder13 Headset operation4 Outside dial tone preference5 Hands-free answer6 Message monitorPassword1 Enter2 Delete3 Hear4 Security level6External message notification1 Delivery options2 Phone delivery3 Pager notification7Personal Call Routing1 Entry settings2 Exit settings3 Quiet time settings9Un-delete2Note: Background announce and selections 3, 5, and 6 under Station Options are not available on a 12-KeyDigital Feature Phone.12Not necessary with Generation II system. If unsure which system you have, consult your System Administration.Available only if your phone system is using IVX Presence Management. If you’re not sure whether it is, consult your SystemAdministrator. For more information about IVX Presence Management, visit www.esi-estech.com/presence.C.1
User programming: An introductionUser’s Guide1 Select personal greetingSelect the desired greeting — 1, 2 or 3. The system will play the current greeting, followed by promptsto re-record, delete or hear again — or select the current greeting by pressing #.1 Record personal greetingBegin recording at the tone. Press 1 to stop. The new personal greeting automatically replaces theprevious greeting.2 Delete personal greetingWhen prompted, press 2 again to confirm deletion.Warning:Your mailbox is disabled if no personal greeting exists. Never delete all of your existing personalgreetings before you record at least one new one.3 Hear current personal greeting2 Programmable feature keysThere are two methods for programming of your phone: Direct programming — Select the key you want to program, and hold it down for at least twoseconds. This not only initiates programming but also lets you immediately program that specific key. Traditional programming — Press PROGRAM. The Verbal User’s Guide will speak to you, walkingyou through the full menu, during which you can choose the appropriate option.Direct programming example:You wish to set one of the keys to dial a co-worker, whose extension is 105. Hold down the key forat least two seconds. This automatically puts you in feature key programming. Follow the promptsto enter 1 0 5. (This has allowed you to skip two steps — pressing PROGRAM and selecting amenu option — that you’d have had to perform if using traditional programming.)How the programmable feature keys can be set Line keys — If a line number (1 through 12) is programmed, the programmable feature key becomesa line key providing the appropriate lamp information and manual outside-line access. Station keys — If the dialed digits input are a three-digit number, the programmable feature key willbecome a Station Key providing the appropriate lamp information and easy access or transfer.Three-digit numbers input can be:— User extensions (100–139 withGeneration II system, 100–129 withGeneration I system)1— Department numbers (290–299)— Guest/info mailboxes (300–309)— Cascade mailboxes (520–529)— System speed dial numbers (600–699) Speed-dial keys — In addition to programming a programmable feature key with a system speeddial number, you can create personal speed-dial keys for automatic dialing of frequently calledoutside numbers. If you program 9 (or 8 or 7) plus a phone number, the programmable feature keybecomes a speed-dial key. When you program a speed-dial key, there's no need to insert a pauseafter the 9 (or 8 or 7). The speed-dial number can be up to 24 characters long. Use the up scroll key( ) to enter special characters in a dial string (see Option 6 on page C.4). Other feature keys — If you enter feature codes, the programmable feature key will serve as anenable/disable key for that feature. The Installer may have programmed certain stations foraccessing additional features; consult the System Administrator for your access (refer to page F.11).1If unsure which system you have, consult your System Administration.C.2
User’s GuideUser programming: An introductionKeys’ LED activity during programmingKey type and LED indicationStation key orVirtual Mailbox KeyLine keyFeature keyor speed-dial keyCurrently being programmed andpreviously assignedFlashing redFlashing greenFlashing amberCurrently being programmed andpreviously unassignedFlashing redFlashing redFlashing redProgramming mode — Was assigned orviewed in current sessionBlinking redBlinking greenBlinking amberAssigned in a previous programming sessionand not yet viewed in current sessionSolid redSolid greenSolid amberNever assigned and not yet viewed in currentsessionOffOffOffMode3 Station optionsThe station options sub-menu (PROGRAM 3) lets you activate or deactivate several features yourstation can provide. At each option sub-menu, 1 enables the option and 0 disables it. (Each option listedbelow is explained elsewhere in this manual, as noted.)1Call waiting/background announceSee page E.10 for call waiting and page E.11 for background announce.2Personal greeting reminderSee page F.10.3Headset operationSee page F.10.14Outside dial tone preferenceSee page F.10.5Hands-free answerSee page E.2.6Message monitorSee page F.10.Note: Background announce and selections 3, 5, and 6 are not available on a 12-Key Digital Feature Phone.1Not necessary with Generation II system. If unsure which system you have, consult your System Administration.C.3
User programming: An introductionUser’s Guide4 Station audiblesThe station audibles programming provides control of the following audible items:1 Station ring toneYou can select from six possible tones to help distinguish it from other nearby ringing phones.Press or to select a tone, then press # to accept it.2 Station ring volumePressandto set the desired ringer volume (range: off to high), then press # to accept it.3 Message ringWhen enabled, this feature will periodically generate a short ring tone at your station as anadditional alert that you have new messages.5 Password1 Enter new passwordYour password may consist of 2–8 digits followed by # (0 cannot be the first digit). Entering only 0as the password will turn off the password requirement.2 Delete current passwordResets the password to the default password.3 Hear current passwordDisplays and plays back the current password.4 Password security levelSelectionResult0No password required for access from any phone1Password required only for remote access, either off-premises or from otherstations within the system2Password always required6 External message notification1 Delivery options1 Delivery to phone number only2 Notify pager only0 No off-premises deliveryC.4
User’s GuideUser programming: An introduction2 Phone delivery1 Enter phone numberEnter the phone number (24 digits, maximum) followed by #. Do not include an outside lineaccess code (i.e., don’t add 9, 8 or 7) before the number. To insert a special character, pressthe right scroll key ( ) to select the desired special code: # , , F or P. Press # to confirm theinserted character and continue. Press # # to complete the entry.Code# FPWhat it produces# DTMF tone DTMF toneFlash hook2-second pauseUse the down arrow key ( ) to backspace.Once the number is saved you can use the scroll keys to move back and forth to view thenumber. To edit the number, you must delete it and enter the correct number.2 Delete phone numberDeletes the currently programmed phone number.3 Display current phone numberDisplays the currently programmed phone number.3 Pager notification1 Enter pager numberEnter the pager number (24 digits, maximum) followed by #. Do not include an outside lineaccess code (i.e., don’t add 9, 8 or 7) before the number. To insert a special character, pressthe right scroll key ( ) to select the desired special code: # , , F or P. Press # to confirm theinserted character and continue. Press # # to complete the entry.Code# FPWhat it produces# DTMF tone DTMF toneFlash hook2-second pauseUse the down arrow key ( ) to backspace.Once the number is saved you can use the scroll keys to move back and forth to view thenumber. To edit the number, you must delete it and enter the correct number.2 Delete pager numberDeletes the currently programmed pager number.3 Display current pager numberDisplays the currently programmed pager number.C.5
User programming: An introductionUser’s Guide7 Personal Call RoutingFor details, consult the IVX Presence Management User’s Guide (ESI part # 0450-0793).Note: This function is available only if your phone system is using IVX Presence Management. If you’renot sure whether it is, consult your System Administrator. For more information about IVXPresence Management, visit www.esi-estech.com/presence.9 Message Recycle Bin (un-delete)Your most recently deleted messages (10 on a 30-hour system, five on a two-hour system1) will beplayed first. Press 9 to move to the next message. Press 8 to restore the message to your mailbox asan old message.1If unsure of your system’s capacity, consult your System Administration.C.6
User’s GuideVoice mail operationVoice mail operationIntroductionYour phone
Visit www.esiusers.com for up-to-date help. Help mode (Verbal User’s Guide) User’s Guide B.2 (This page included for pagination purposes only.) User’s Guide User programming: An introduction C.1 User programming: An introduction Voice prompts will play menu and sub-menu options to access the desired feature.File Size: 1MB