Transcription
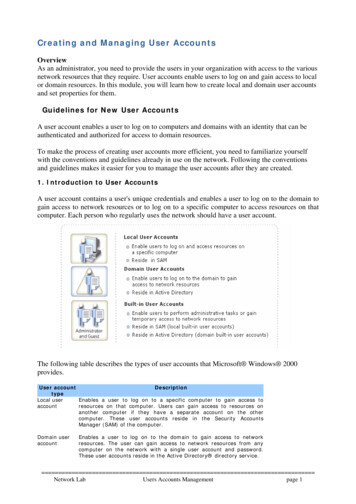
Creating and Managing User AccountsOverviewAs an administrator, you need to provide the users in your organization with access to the variousnetwork resources that they require. User accounts enable users to log on and gain access to localor domain resources. In this module, you will learn how to create local and domain user accountsand set properties for them.Guidelines for New User AccountsA user account enables a user to log on to computers and domains with an identity that can beauthenticated and authorized for access to domain resources.To make the process of creating user accounts more efficient, you need to familiarize yourselfwith the conventions and guidelines already in use on the network. Following the conventionsand guidelines makes it easier for you to manage the user accounts after they are created.1. Introduction to User AccountsA user account contains a user's unique credentials and enables a user to log on to the domain togain access to network resources or to log on to a specific computer to access resources on thatcomputer. Each person who regularly uses the network should have a user account.The following table describes the types of user accounts that Microsoft Windows 2000provides.User accountDescriptiontypeLocal userEnables a user to log on to a specific computer to gain access toaccountresources on that computer. Users can gain access to resources onanother computer if they have a separate account on the othercomputer. These user accounts reside in the Security AccountsManager (SAM) of the computer.Domain useraccountEnables a user to log on to the domain to gain access to networkresources. The user can gain access to network resources from anycomputer on the network with a single user account and password.These user accounts reside in the Active Directory directory service. Network LabUsers Accounts Managementpage 1
Built-in useraccountEnables a user to perform administrative tasks or to gain temporaryaccess to network resources. There are two built-in user accounts thatcannot be deleted: Administrator and Guest. The local Administratorand Guest user accounts reside in SAM and the domain Administratorand Guest user accounts reside in Active Directory.Built-in user accounts are automatically created during Windows 2000installation and the installation of Active Directory.1.1 Naming ConventionsThe naming convention establishes how user accounts are identified in the domain. A consistentnaming convention makes it easier to remember user logon names and locate them in lists. It is agood practice to adhere to the naming convention already in use in an existing network thatsupports a large number of users.Consider the following guidelines for naming conventions: User logon names for domain user accounts must be unique in Active Directory. Domainuser account full names must be unique within the domain in which you create the user account.Local user account names must be unique on the computer on which you create the local useraccount. User logon names can contain up to 20 uppercase and lowercase characters (the fieldaccepts more than 20 characters, but Windows 2000 recognizes only 20), except for thefollowing: " / \ [ ] : ; , * ? You can use a combination of special and alphanumericcharacters to help uniquely identify user accounts. If you have a large number of users, your naming convention for logon names shouldaccommodate employees with duplicate names. The following are some suggestions for handlingduplicate names:oUse the first name and the last initial, and then add additional letters from the last name toaccommodate duplicate names. For example, for two users named Judy Lew, one user accountlogon name could be Judyl and the other Judyle.In some organizations, it is useful to identify temporary employees by their user accounts. To doso, you can prefix the user account name with a T and a dash. For example, T-Judyl.1.2 Password GuidelinesTo protect access to the domain or a computer, every user account should have a complexpassword. This helps to prevent unauthorized individuals from logging on to your domain.Consider the following guidelines for assigning passwords to user accounts: Network LabUsers Accounts Managementpage 2
Always assign a complex password for the Administrator account to prevent unauthorizedaccess to the account. Determine whether you or the users will control passwords. You can assign uniquepasswords for the user accounts and prevent users from changing them, or you can allow users toenter their own passwords the first time that they log on. In most cases, users should control theirown passwords. Educate users about the importance of using complex passwords that are hard to guess:* Avoid using passwords with an obvious association, such as a family member'sname.* Use long passwords because they are harder to guess. Passwords can be up to 128characters. A minimum length of eight characters is recommended.* Use a combination of uppercase and lowercase letters and non-alphanumericcharacters.1.3 Account OptionsUser account options control how a user accesses the domain or a computer. For example, youcan limit the hours during which a user can log on to the domain and the computers from whichthe user can log on. You can also specify when a user account expires. This enables you tomaintain the security required by your network.Logon HoursYou can set logon hours for users who require access only at specific times. For example, youcan set logon hours for night shift workers to enable them to log on only during their workinghours.Computers from Which Users Can Log OnUsers can log on to the domain by using any computer in the domain by default. You canconfigure account options to specify the computers from which users can log on. For example,you can enable users, such as temporary workers, to log on to the domain only from theircomputer. This prevents these users from logging in to other computers and gaining access tosensitive information that is stored on other computers.Account ExpirationYou can set an expiration date on a user account to ensure that the account is disabled when theuser no longer requires access to the network. For example, as a good security practice, you canset user accounts for temporary workers to expire on the date when their contracts end.2. Creating Local User AccountsUse Computer Management to create a local useraccount. You can create local user accounts only oncomputers running Windows 2000 Professional andon stand-alone or member servers running Windows2000 Server or Windows 2000 Advanced Server.Characteristics of Local User AccountA local user account is used only in a smallernetwork environment, such as a workgroup, or onstand-alone computers that are not networked. Donot create local user accounts on computers that arepart of a domain because the domain does notrecognize local user accounts and as a result, the Network LabUsers Accounts Managementpage 3
user account would only be able to gain access to resources that are on the computer.Local user accounts reside in the SAM database, which is the local security account database ofthe computer on which you created the account. They are not stored in Active Directory for thedomain. In addition, local user accounts have fewer properties than domain accounts.To create a local user account, perform the following steps:1.Click Start, point to Programs, point to Administrative Tools, and then clickComputer Management.2.In Computer Management, expand Local Users and Groups.3.Right-click the Users folder, and then click New User.The following table describes the user information you provide for a local user account.OptionDescriptionUser nameThe user's unique logon name, based on your naming convention.Full nameThe user's complete name. Use this to determine to which person the local user accountbelongs.DescriptionA description that you can use to identify the user by job title, department, or officelocation. This field is optional.4.In the Password and Confirm Password boxes, type the user's password.5.Select the appropriate check box or check boxes to set the password restrictions.6.Click Create to create the user account.When you create a local user account, Windows 2000 does not replicate the local user accountinformation to domain controllers. A domain controller is a Windows 2000-based server that isrunning Active Directory. This is why you cannot use local user accounts to gain access toresources on other computers.After the local user account is created, the computer uses its SAM to authenticate the local useraccount, which allows the user to log on to that computer. The user can then gain access toresources that are available only on the local computer.3. Creating and Configuring Domain User AccountsDomain user accounts allow users to log on to a domain and gain access to resources anywhereon the network. You create a domain user account on a domain controller.Windows 2000 provides administrative tools to help you create and administer user accounts.Windows 2000 Administration Tools are installed on a domain controller by default. However,you can remotely manage a domain and its user accounts by manually installing the Windows2000 Administration Tools on a member server or a computer running Windows 2000Professional.Use Active Directory Users and Computers to create the domain user account and to configuredomain user accounts, such as setting password requirements (whether the users must changetheir passwords the next time they log on). In addition, you can create a home folder to provideusers with a central location in which they can store their data. Network LabUsers Accounts Managementpage 4
2.1 Installing Windows 2000 Administration ToolsInstall Windows 2000 Administration Tools to remotely manage a domain controller from anycomputer (client computers and member servers) that is running Windows 2000. Windows 2000Administration Tools is included on the Windows 2000 Server and Windows 2000 AdvancedServer compact discs.Note: You must have administrative rights on the domain controller to manage the domainremotely.Install Windows 2000 Administration Tools on a computer running Windows 2000 Professionalor on a stand-alone or member server running Windows 2000 Server or Windows 2000 AdvancedServer. To install Windows 2000 Administration Tools, open the I386 folder on the applicableWindows 2000 Server compact disc, and then double-click Adminpak.msi. The Windows 2000Administration Tools Setup wizard guides you through the process of installing Windows 2000Administration Tools. After Windows 2000 Administration Tools is installed, you can gainaccess to the administrative tools by clicking Start, pointing to Programs, and then pointing toAdministrative Tools.For security purposes, do not log on to the domain with administrative privileges. Instead, log onas a normal user and use the runas command when performing administrative tasks. The runascommand enables you to use administrative tools with administrative rights and permissionswhile you are logged on as a normal user.To use the runas command, on the Administrative Tools menu, hold the SHIFT key, right-clickActive Directory Users and Computers, and then click Run as. In the Run As Other User dialogbox, verify that Run the program as the following user is selected. Type the user name andpassword for your administrator account, type the domain, and then click OK. Network LabUsers Accounts Managementpage 5
2.2 Creating a Domain User AccountA domain user account resides on a domain controller and is automatically replicated to all otherdomain controllers. Create the domain user account in the default Users folder or in a separatefolder that you have created to hold domain user accounts. To create a domain user account,perform the following steps:1. Open Active Directory Users and Computers from the Administrative Tools menu, and thenexpand the domain in which you want to add the user account.2. Right-click the folder that will contain the user account, point to New, and then click User.The following table describes the options that you can configure.OptionFirst nameThe user's first name.DescriptionInitialsThe user's middle initials. This is not a required entry.Last nameThe user's last name.Full nameThe user's complete name. This name must be unique within the folder inwhich you create the account. Windows 2000 completes this option if youenter information in the First name or Last name box, and then displaysthis name in the folder where the user account is located in ActiveDirectory.User logon nameThe user's unique logon name, based on the naming conventions. This isrequired and must be unique within Active Directory.User logon name(pre-Windows2000)The user's unique logon name that is used to log on from previous versionsof Microsoft Windows. This is a required entry and must be unique withinthe domain. Network LabUsers Accounts Managementpage 6
Setting Password RequirementsThe following table describes the password requirements that you can configure when you assigna password to a domain user account.OptionDescriptionPasswordProvide the password that is used to authenticate the user. For greater security, youmust assign a complex password.The password is not visible when you type it. Instead, it is represented as a series ofasterisks (*).Confirm passwordConfirm the password by typing it a second time to ensure that it has been enteredcorrectly. This is a required entry.User must changepassword at nextlogonSelect this check box if you want the user to change his or her password the first timethat he or she logs on. This ensures that the user is the only person who knows thepassword.User cannot change Select this check box if you have more than one person using the same domain userpasswordaccount (such as Guest) or to maintain control over user account passwords. Thisallows only administrators to control passwords.Password neverexpiresSelect this check box if you never want the password to change-for example, for adomain user account that will be used by an application or a service in Windows 2000.Never enable Password never expires for Administrator accounts.Account is disabled Select this check box to prevent use of this user account-for example, for a newemployee who has not yet started.Note: The Password never expires option overrides the User must change password at nextlogon option.2.3 Managing User Data by Creating Home FoldersYou can provide a centralized network location for users to store their documents. This additionallocation is the user's home folder. Home folders are not part of a user profile, so they do not Network LabUsers Accounts Managementpage 7
affect the logon process. You can locate all users' home folders in a central location on a networkserver.Consider the following points when determining the home folder location: Back up and restore capabilityPreventing the loss of data is your primary responsibility. It is much easier to ensure that files arebacked up when they are located in a central location on a server. If users' home folders arelocated on their local computers, you will need to perform regular backups on each computer. Sufficient space on the serverIt is important that there is enough room on the server to allow users to store their data. Windows2000 provides more precise control of network-based storage with disk quotas, which enable youto monitor and limit the amount of hard disk space used by each user. Sufficient space on users' computersIf users are working on computers with very little disk space or no hard disks, home foldersshould be located on a network server. Network PerformanceThere is less network traffic if the home folder is located on the user's local computer.To create a home folder, perform the following tasks:1.2.3.Create and share a folder on a server.Grant the appropriate permission for the folder.Provide a path for the user account to the folder.2.4 Setting Properties for Domain User AccountsA set of default properties is associated with each domain user account that you create. After youcreate a domain user account, you can configure personal and account properties, logon options,and dial-up settings.You can use the properties that you define for a domain user account to search for users in ActiveDirectory. For example, you can search for a person by a telephone number, office location,manager's name, or last name. For this reason, you should provide detailed property definitionsfor each domain user account that you create.2.4.1 Setting Personal PropertiesThe Properties dialog box contains information about each user account. This information isstored in Active Directory. The more complete the information, the easier it is to search for usersin Active Directory. For example, if all of the properties on the Address tab are complete, you canlocate the user by using the street address as the search criteria. Network LabUsers Accounts Managementpage 8
To set personal properties, perform the following steps:1.Open Active Directory Users and Computers from the Administrative Tools menu, selectthe domain, and then click the appropriate folder to view available domain user accounts.2.Right-click the appropriate domain user account, and then click Properties.3.On the Properties dialog box, choose the appropriate tab for the personal properties thatyou want to enter or change, and then enter values for each property.The following table describes the tabs in the user Properties dialog box.TabPurposeGeneralDocuments the user's name, description, office location, telephone number, e-mail alias,and home page information.AddressDocuments the user's street address, post office box, city, state or province, postal zipcode, and country.AccountAssigns the user's logon name, set account options, and specify account expiration.ProfileAssigns the user's profile path and home folder.TelephonesDocuments the user's home, pager, mobile, fax, and Internet Protocol (IP) telephonenumbers, and allows you to type notes that contain descriptive information about theuser.OrganizationDocuments the user's title, department, company manager, and direct reports.Member OfSpecifies the groups to which the user belongs.Dial-inSets remote access permissions, callback options, and static IP address and routes.EnvironmentSpecifies one or more applications to start up and the devices to connect to when aTerminal Services user logs on.SessionsSpecifies Terminal Services settings.Remote controlSpecifies Terminal Services remote control settings.Terminal Services Sets the user's Terminal Services profile.Profile2.4.2 Setting Account PropertiesOn the Account tab of the Properties dialog box, you can configure settings that were specifiedwhen you created a domain user account, such as the user logon name and logon options. Youcan modify the password requirements by clearing or selecting the appropriate check box underAccount options. Network LabUsers Accounts Managementpage 9
In addition, you can use the Account tab to set an expiration date for a user account. This is thedate on which Windows 2000 will automatically disable the user account. By default, a useraccount never expires.To set an account expiration date, perform the following steps:1.Open the Properties dialog box for the appropriate user account.2.On the Account tab, under Account Expires, click End of. Select an expiration date fromthe list, and then click OK.2.4.3 Specifying Logon OptionsSetting logon options for a domain user account allows you to control the hours during which auser can log on to the domain, in addition to the computers from which a user can log on to thedomain. These are settings you gain access to from the Account tab.Setting Logon HoursBy default, users can connect to a server 24 hours a day, 7 days a week. In a high-securitynetwork, you may want to restrict the hours when a user can log on to the network. For example,you may want to restrict hours in the following types of environments: Where logon hours are a condition for security certification, such as in a governmentnetwork. Where there are multiple shifts. You can enable night shift workers to log on only duringtheir working hours.To set logon hours, perform the following steps:1.Open the Properties dialog box for the user account. On the Account tab, click LogonHours. A blue box indicates that the user can log on during the hour. A white box indicates thatthe user cannot log on.2.To allow or deny access, do one of the following, and then click OK:* Select the boxes on the days and hours that you want to deny access by clicking the starttime, dragging to the end time, and then clicking Logon Denied.* Select the rectangles on the days and hours that you want to allow access by clicking thestart time, dragging to the end time, and then clicking Logon Permitted. Network LabUsers Accounts Managementpage 10
Important: Connections to network resources on the domain are not terminated when theuser's logon hours expire. However, the user will not be able to make new connections toother computers in the domain.Setting the Computers from Which Users Can Log OnBy default, any user with a valid account can log on to the network from any computer runningWindows 2000, unless the computer is a domain controller. In a high-security network wheresensitive data is stored on the local computer, restrict the computers from which users can log onto the network. For example, User1 can only log on from the computer named Computer1. Youcannot specify the computer from which a user cannot log on.To specify the computers from which a user can log on, perform the following steps:1.Open the Properties dialog box for the user account, and then, on the Account tab, clickLog On To.2.Click The following computers. Add the computers from which a user can log on bytyping the name of the computer in the Computer name box, and then click Add. When you arefinished adding computers, click OK.2.4.4 Copying Domain User AccountsYou can copy an existing domain user account to simplify the process of creating a new domainuser account. When you copy an existing user account, many of the account properties are copiedto the new user account. This eliminates the need to configure all of the properties for the newuser account.Note: You cannot copy user accounts on a computer that is running Windows 2000Professional or on a Windows 2000 member server. You can only copy user accounts on adomain controller.Properties Copied to the New User AccountThe user properties are copied from the existing domain user account to the new domain useraccount as described in the following table.TabProperties copied to new domain user accountGeneralNone.AddressAll, except Street Address.AccountAll, except Logon Name, which is copied from the Copy Object - User dialog box.ProfileAll, except the Profile path and Home folder entries, which are modified to reflectthe new user's logon name.TelephonesNone.OrganizationAll, except Title.Member OfAll.Dial-inNone. Default settings apply to new user account.EnvironmentNone. Default settings apply to new user account.SessionsNone. Default settings apply to new user account. Network LabUsers Accounts Managementpage 11
Remote controlNone. Default settings apply to new user account.Terminal ServicesProfileNone. Default settings apply to new user account.Important: Rights and permissions that are granted to an individual user account are notcopied to the new user account.Copying an Existing User AccountTo create a new user account by copying an existing user account, perform the following steps:1.Open Active Directory Users and Computers, and then click the Users folder in theconsole tree.2.In the details pane, right-click the user account that you want to copy, and then clickCopy.3.In the Copy Object - User dialog box, type the user name and user logon nameinformation for the new user account, and then click Next.4.Type and confirm the password, set the password requirements (clear the Account isdisabled check box, if appropriate), and then click Next.5.Verify that the new user account information is correct, and then click Finish.Creating User Account TemplatesA user account template is a standard user account that you can create to contain the propertiesthat apply to users with common needs. For example, if all sales personnel require membership inthe Sales group, you can create a template that includes membership to that group.To create a template, create a new domain user account, or copy an existing domain user account.Assign a unique account name, and remember to select the Account is disabled check box whensetting the password requirements.Guidelines to consider when creating templates are: Make a template for each classification of employee, such as sales, accountants,managers, and so on. If you commonly have short-term or temporary network users, create a template withlimited logon hours, workstation specifications, and other necessary restrictions. Network LabUsers Accounts Managementpage 12
Tip: If you begin each template name with a nonalphabetic character, such as theunderscore character ( ), the template will always appear at the top of the list in thedetails pane of the Active Directory Users and Computers window.Creating a New User Account by Using a TemplateTo use a template to create a new user account, copy the template account, assign a user nameand password for the new user, and change the user account properties as necessary. Rememberto clear the Account is disabled check box.2.5 Customizing User Settings with User ProfilesIn Windows 2000, a user's computing environment is determined primarily by the user profile.For security purposes, Windows 2000 requires a user profile for each user account that has accessto the system.The user profile contains all of the settings that the user can define for the work environment of acomputer running Windows 2000, including display, regional, mouse, and sounds settings, inaddition to network and printer connections. You can set up user profiles so that a profile followsa user to each computer that the user logs on to.2.5.1 User Profile TypesA user profile is created when a user logs on to a computer for the first time. All user-specificsettings are automatically saved in the user's folder within the Documents and Settings folder(C:\Documents and Settings\User name). When the user logs off, the user's profile is updated onthe computer at which the user was logged on. Thus, the user profile maintains the desktopsettings for each user's work environment on the local computer. Types of user profiles include: Default user profile Local user profile Roaming user profile Mandatory user profile Default user profile. Serves as the basis for all user profiles. Every user profile begins as acopy of the default user profile, which is stored on each computer running Windows 2000Professional or Windows 2000 Server. Network LabUsers Accounts Managementpage 13
Local user profile. Created the first time a user logs on to a computer and is stored on thelocal computer. Any changes made to the local user profile are specific to the computer on whichthe changes were made. Multiple local user profiles can exist on one computer. Roaming user profile. Created by the system administrator and stored on a server. Thisprofile is available every time a user logs on to any computer on the network. If a user makeschanges to his or her desktop settings, the user profile is updated on the server when the user logsoff. Mandatory user profile. Created by the administrator to specify particular settings for auser or users and it can be local or roaming. A mandatory user profile does not enable users tosave any changes to their desktop settings. Users can modify the desktop settings of the computerwhile they are logged on, but these changes are not saved when they log off. Only systemadministrators can make changes to mandatory user profiles.2.5.2 Creating Roaming and Mandatory Roaming User ProfilesYou can store user profiles on a server so that they are available every time a user logs on to anycomputer on the network. Roaming and mandatory user profiles are stored centrally on a server inorder to provide users with the same working environment regardless of which computer they logon to.Creating a Roaming User ProfileTo set up a roaming user profile, perform the following tasks:1.Create a shared folder on a server and provide users with the Full Control permission tothe folder.Provide the path to the shared folder. Open Active Directory Users and Computers. In the detailspane, right-click the applicable user account, and then click Properties. On the Profile tab, underUser profile, type the path information to specify the shared folder in the Profile path box.
Introduction to User Accounts A user account contains a user's unique credentials and enables a user to log on to the domain to . Active Directory Users and Computers, and then click Run as. In the Run As Other User dialog box, verify that Run the program as the following user is selected. Type the user name and