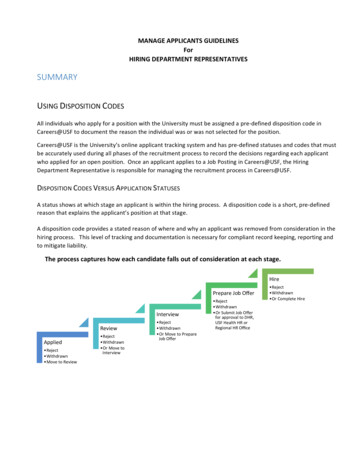
Transcription
Montgomery County Public SchoolsMCPS CareersApplicant Tracking System (ATS)Hiring Manager User GuideVersion 4.0Revised February 2012
TABLE OF CONTENTSLogging In . 3Navigating the Site . 4Center Stage . 4Managing Requisitions . 6Creating a Requisition . 6Viewing and Editing Requisitions . 15Using Quick Filters to Find Requisitions . 16Sorting and Moving Columns in the Requisition View . 18Managing Candidates . 19Viewing Candidates . 19Sorting and Filtering Candidates . 21Sorting and Moving Columns in the Candidate List View . 23Changing the Status and Sending Correspondence . 24Streamlining the Process. 29Personalizing Your View . 29Setting up Frequent Collaborators . 311
LOGGING INA hiring manager is the person responsible within MCPS for managing the vacant position andmaking the recommendation to hire a candidate to fill that position.A collaborator is the person responsible within MCPS for assisting the hiring manager inevaluating candidates who have applied to a vacancy.Hiring managers are granted more access in the system than collaborators. Hiring managers havethe option to create new requisitions, while collaborators do not.Hiring managers and collaborators will access the Hiring Manager Login page (also known asCenter Stage) through the MCPS Homepage For Staff tab For Administrators link (at thebottom, click More), or via the MCPS Office of Human Resources website.Users will log in using their Outlook username and password.3
NAVIGATING THE SITECenter Stage1. After logging in, users will come to a page view referred to as center stage. This simplifiedlanding page provides users with instant access to their current requisitions.The Home link will return users to center stage.The Resources link will allow users to access My Setup.(See section on Streamlining the Process)The Sign Out link will sign users out of the application.2. The default view for hiring managers is: Show information for requisitions I own orcollaborate on. This view can be changed using the dropdown menu as indicated in the imagebelow.4
3. Hovering over the title of any requisition will display the requisition title and the requisitionnumber. In the image below, the triangle icon in the Status column indicates that the list ofrequisitions is being sorted by Status.4. Click on any requisition to view information specific to that requisition. (See Working withRequisitions for more details)5. To access a more detailed requisition summary list, scroll to the bottom of the page and clickDetailed List.Detailed List5
MANAGING REQUISITIONSCreating a Requisition1. From the center stage view, click Create Requisition.2. In the Requisition Template field, enter the job title for the position. For teaching positions, enterTeacher and then specify the type (i.e. Teacher, elementary). The system will suggest positionsbased on the information entered.3. Select the job title from the auto fill list. You should see your job title underlined as indicated inthe image below. You can also search for job templates by using the job code on the MA-272report.6
4. If no value is populated in the dropdown list, open the selector tool.5. Use the Quick Filters to type and select a value. Use the refresh button to refresh your list.Type valueRefresh6. After verifying that there is an underline selection in each field, click Next.7. Type the name of the school in the Organization field. Select the correct school from the auto filldropdown list. If the position is in a central office location, type the word ‘Offices’ and thenselect the word ‘Offices’ from the dropdown list.7
8. Type the location of the school or office. Select the location name from the dropdown list.9. Verify that each value in the Organization, Primary Location and Job Field is underlined. Thiswill ensure that the value is ‘selected.’NOTE: Secondary teachingpositions should indicate the subject area in the Job Field. Seeimage below.10. Click Create to begin entering details on your requisition.8
11. The New Requisition window will appear. See image below for details.Hide Supporting ToolsDiagnostic ToolBasic Requisition Information(Supporting Tools)12. Edit the requisition title based on the instructions given. Using a consistent format will provideclarity for both the recruiter and the candidates.Title Format Instructions9
13. Indicate the number of openings. This number is generally left at the default of one.14. Enter the name of the recruiter. Begin by typing the last name of the recruiter, and then select thename from the dropdown list when it appears. For an updated list of staffing assignments, ts/personnel/about/recruitment.aspx15. Enter the name of the Hiring Manager Assistant (if any). The Hiring Manager Assistant canperform all of the tasks of a Hiring Manager. Begin by typing the last name, and then select thename from the dropdown list when it appears.16. A collaborator can assist the hiring manager by viewing resumes and other basic candidateinformation. A collaborator cannot create a requisition or change the status of a candidate. To adda collaborator to the requisition, click Modify. If you have already created your list of FrequentCollaborators, simply click Add Frequent Collaborators.10
17. In the name field, type the last name of your collaborator and click the refresh button. The list ofnames will update based on your criteria.Refresh18. Click the Select button next to the name of the desired collaborator, then click Done.2. Done1. SelectNOTE: To create a list of Frequent Collaborators, refer to the section titled: Streamliningthe Process.11
19. Now, you will see the name of your collaborator in the Collaborators section.20. Change the selected value for Schedule and Shift, if necessary. Enter a Target Start Date ifdesired. In most cases, the Target Start Date will be left blank.21. Enter additional Job Specific information, if desired.NOTE: It is critical to keep in mind the legal ramifications of wording used in the Job SpecificInformation. Avoid any reference to race, gender, religion, veteran status, marital status, citizenshipstatus, or proximity to workplace.22. Enter the FTE/Hours and Requisition Justification.23. Locate the 11-digit position number from your MA-272 report and enter it in the PositionNumber field.24. In the Req Complete field, select Ready for Posting. If, for some reason, you do not want therecruiter to post your requisition at this time, select Not Ready for Posting.**See image below for steps 22, 23, and 24.12
25. Optional: Use the Diagnostic Tool to verify that you have completed all the required fields.If there is a field that still needs to be completed, the text in the diagnostic tool will take you tothat field when clicked.Click doublearrows to openDiagnostic Tool.26. Click Save and Close. Your requisition will now be saved and ‘Ready for Posting.’ The assignedrecruiter will review and post your requisition.13
NOTE: It is no longer necessary to add an approver to your requisition. The recruiter will receiveyour requisition in DRAFT form and will make any necessary changes before posting. If, for any reason,you do not want your requisition posted at that time, please select, Not Ready for Posting, prior toclicking Save and Close.27. Use the Edit button to make any changes to the requisition. After posting, all changes to arequisition must be made by a recruiter. To return to your detailed list of requisitions,click the ‘Up to the requisition list’ button.EditUp to the requisition list14
Viewing and Editing Requisitions1. From Center Stage, click on the title of the requisition you would like to view.2. To edit the requisition click the Edit button. (The Edit button is only available if the requisitionhas not been posted.)15
3. Use the toolbar at the top of the requisition screen to perform the actions as indicated in the imagebelow:Requisition Action ButtonsDuplicate thisrequisitionPrint this requisitionOnly deleterequisitions thathave not beenposted.Add comments onthis requisitionDelete thisrequisitionCreate a duplicateof the current req,then edit based onnew vacancy4. Use the navigation buttons to return to your requisition list, or to go to another requisition.Return to Req listUsing Quick Filters to Find Requisitions1. From the quick filter window, click on the arrow next to the word Status to expand the filteroptions.16
2. Click in each of the boxes that contain the status of the requisitions you would like to view. Thescreen will automatically refresh, giving you requisitions with the status/statuses you haveselected.3. To find an individual requisition, or a requisition for a particular job field, type the ID Number,ID Name, or Job Field in the corresponding box, then click the Refresh button to update therequisition list.RefreshType value17
4. Clicking on the Title of a requisition will open the requisition.5. See table below for available actions on requisitions. Fewer options will be available forrequisitions that have already been posted.Requisition Action ButtonsDuplicate this requisitionPrint this requisitionAdd comments on thisrequisitionDelete this requisitionSorting and Moving Columns in the Requisition View1. To sort any column in the requisition view, click on the column header. The requisitions list willbe sorted in ascending order. If you click again, the list will then be sorted in descending order.2. To change the layout of columns, click and drag any column to the desired location. This changewill remain in effect for the current session only. (To personalize your view, see section titled:Streamlining the Process.)18
MANAGING CANDIDATESViewing Candidates1. To view candidates for a requisition from the requisition list, click on the number in theCandidate Count column.2. The candidate list provides a summary list of candidates for that position. To view anindividual candidate’s profile, simply click on the candidate name.3. To view or open a candidate’s attachments in the summary view, click once on the paperclip icon as shown below. Clicking on any of the attachments will open that attachment.Click to open19
4. To view candidates from within a requisition, first click on the requisition title, then,click on the number located in the Candidates for this Requisition box on the left sideof the screen in the Requisition Information window.5. To view an individual candidate, simply click on the candidate’s name.6. To view a candidate’s attachments from within the candidate’s profile, click on theAttachments tab.Attachments20
The table below displays icons available while in the Candidate View.Candidate List IconsInternal candidateACE candidateNew candidate orcandidate has beenmodified since lastviewedDisqualifiedCandidateTo be verifiedAttached File (click toopen)Sorting and Filtering CandidatesHiring managers have the ability to filter candidates within the Hiring Manager Review step bythe selection status.1. Click on the number of candidates to view the candidate list.View fromRequisition ListView from withinthe requisition21
2. In the Selection Workflow box, click on Hiring Manager Review. This will open a refreshedlist of all candidates in the Hiring Manager Review step.3. Click on the desired status to view only candidates within that status.22
4. Click on All to return to the complete list of all candidates in the Hiring Review Manager stepfor that requisition, or click the x to clear the filter.Sorting and Moving Columns in the Candidate List View1. To sort any column in the candidate list view, click on the column header. The candidate list willbe sorted in ascending order. If you click again, the list will then be sorted in descending order.2. To change the layout of columns, click and drag any column to the desired location. This changewill remain in effect for the current session only. (To personalize your view, see section titled:Streamlining the Process.)23
Changing the Status and Sending CorrespondenceA candidate’s status can be changed from the Candidate List view or from within the candidate profile.By using the Candidate List view, you are able to change the status of multiple candidates at one time.1. To change the status of multiple candidates at one time, use the candidate view list to selectthe check box next to the name of each candidate for whom you would like to change thestatus.2. Go to More Actions Change Step/Status24
3. Select the new status then click Save and Close. The Save and Continue option should onlybe used if you wish to send correspondence.4. To send correspondence while changing the status of one or more candidates, select the checkbox next to Send Correspondence, and then change the status as indicated above.25
5. Begin typing the name of the template you wish to send and use the dropdown list to selectyour template, or use the selector tool to select from a list of available templates. Then, clickNext.6. If prompted, enter a phone number for candidate to call, then click Next.7. Click Send and Close. **The send and continue option is only for use if you wish to makeanother change to the candidate’s status.To edit correspondence prior to sending, click Edit, and then follow the steps below:26
8. After clicking Edit, make any desired changes to the email. Click on Preview to see yournew correspondence. If you are dissatisfied with the email, click Edit to continue editing.Keep in mind that the email will be sent to all of the selected recipients.Once you are satisfied with your email, click Review All to check your message for spellingerrors. If you choose not to check your message for errors, click Send and Close to send yourmessage. Save and Continue is only for use if you wish to make another change to thecandidate’s status. (This will rarely be the case).9. After clicking Review All, click Send to send the correspondence. This will close thecorrespondence wizard and return you to the requisition.27
10. Sent correspondence can be found within the history tab of each candidate.28
STREAMLINING THE PROCESSPersonalizing Your View1. From the Detailed Requisition List, click the List Format Configuration icon.2. Select the pencil icon to begin creating a personal format list.3. Scroll through the list and select the boxes to determine the order and placement of thecolumns. Select the sort fields to determine how you would like your personalized list tobe sorted.4. Click Save29
5. Click Apply6. To change view, click on the List Format Configuration icon and select the desired listformat. Then click Apply.30
Setting up Frequent CollaboratorsSetting up a list of Frequent Collaborators will save you time if you consistently use the samepeople to assist you in the hiring process.1. From any screen, click on the Resources section My Setup1. Click on the Frequent Collaborators tab.2. Click on Modify to add names of collaborators to the list.3. Type the last name of the collaborator and click the refresh icon to display a refreshed listof available names.31
4. Click the select button next to the desired name to add it to the list of selectedcollaborators. Continue to add names until your Frequent Collaborator list is complete.5. Click Done*** Once you have created your Frequent Collaborators, you will be able to add all of them toa requisition with one click, as indicated in the image below.32
Applicant Tracking System (ATS) Hiring Manager User Guide Version 4.0 . The system will suggest positions based on the information entered. 3. Select the job title from the auto fill list. You should see your job title underlined as indicated in the image below. You can also search for job templates by using the job code on the MA-272