Transcription
Intel ESB2 SATA RAID Setup GuidelinesIntel ESB2 SATA RAID Setup GuidelinesAfter all the hardware has been installed, you must first configure Intel ESB2SATA RAID Settings before you install the Windows Operating System and othersoftware drivers.Important Notes to the User:Note 1: If you do not wish to configure onboard SATA RAID functions, pleasego directly to Section 2 for OS Installation.Note 2: This chapter describes RAID Configuration Instructions for the IntelESB2 RAID Controller designed for the Windows OS.1Introduction to Serial ATA and Parallel ATATo configure the SATA RAID functions, you must first use the Intel ESB2 SATA RAIDUtility program to configure the RAID Level that you choose before installing theWindows XP/2000/2003 operating system and other software drivers. (The necessary drivers are all included on the Supermicro CD that came packaged with yourmotherboard.) The current version of the ESB2 SATA RAID Utility can only supportWindows XP/2000/2003 Operating Systems.Serial ATA (SATA)Serial ATA (SATA) is a physical storage interface that uses a single cable with aminimum of four wires to create a point-to-point connection between devices. It is aserial link, which supports transfer rates up to 3.0 Gbps. Because the serial cablesused in SATA are thinner than the traditional cables used in Parallel ATA (PATA),SATA systems have better airflow and can be installed in smaller chassis than PATAsystems. In addition, the cables used in PATA are limited to a length of 40cm, whileSerial ATA cables can be up to one meter in length. Overall, SATA provides betterfunctionality than PATA.Introduction to the Intel ESB2 Serial RAID Controller HubLocated in the South Bridge of an Intel chipset, the I/O Controller Hub (ESB2)provides the I/O subsystem with access to the rest of the system. It supports an1-channel Ultra ATA/100 Bus Master IDE controller (PATA) and six Serial ATA (SATA)ports. The ESB2 supports the following PATA and SATA device configurations: theLegacy mode and the Native mode.Page 1
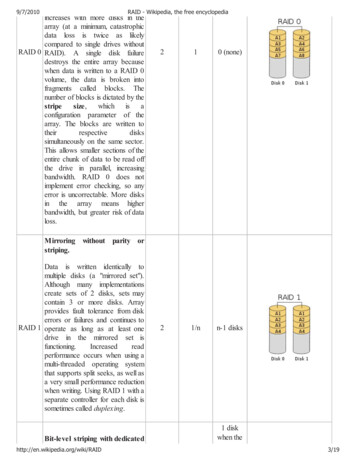
Intel ESB2 HostRAID Setup GuidelinesIntel HostRAID ConfigurationsThe following types of Intel HostRAID configurations are supported:RAID 0 (Data Striping): this writes data in parallel, interleaved ("striped") sectionsof two hard drives. Data transfer rate is doubled if a single disk is used.RAID1 (Data Mirroring): identical data from one drive is copied to another drive.The second drive must be the same size or larger than the first drive.RAID 10 (Striping & Mirroring): RAID 0 and 1 schemes are combined (withoutparity information) to get the benefits of both.RAID 5: both data and parity information are striped and mirrored across three ormore hard drives.Intel Matrix StorageIntel Matrix Storage, supported by the ESB2, allows the user to create RAID 0,RAID 1, RAID 10 and RAID 5 sets by using only six identical hard disk drives. TheIntel Matrix Storage Technology creates two partitions on each hard disk drive, andgenerate a virtual RAID 0, RAID 1, RAID 10 and RAID 5 sets. It also allows youthe change the HDD partition size without any data.Configuring BIOS settings for SATA RAID Functions (-theNative Mode)1. Press the Del key at system boot to enter the BIOS Setup Utility.Note: If it is the first time powering on the system, we recommend you loadthe Optimized Default Settings. If you have already done so, please skip toStep 3.2. Use the arrow keys to select the Exit Settings. Once in the Exit settings, Scrolldown to select "Load Optimized Default Settings", and press the Enter key. SelectOK to confirm the selection. Press the Enter key to load the default settings forthe BIOS.3. Use the arrow keys to select the Main section in the BIOS.4. Scroll down to "SATA Controller Mode" and press the Enter key to selectEnhanced.5. Scroll down to "SATA RAID Enabled" and press Enter . Then, select "Enabled."6. Scroll down to Exit. Select "Exit Saving Changes" from the Exit menu. Press the Enter key to save the changes and exit the BIOS.7. Once you've exited the BIOS Utility, the system will reboot.Page 2
Intel ESB2 SATA RAID Setup Guidelines8. At system boot, press the Ctrl and I keys simultaneously to run the IntelRAID Configuration Utility when prompted by the following message: Press Ctrl I for the Intel RAID Configuration Utility.Note: The Intel RAID Configuration Utility is only available for systems with twoor more drives installed. The Intel RAID Utility screen will not display in systemswith one drive installed.Using the Intel ESB2 SATA RAID Utility ProgramCreating, Deleting and Resetting RAID Volumes1. After the system exits from the BIOS Setup Utility, the system will automaticallyreboot. The following screen appears after Power-On Self Test (POST) routines.2. When you see the above screen, press the Ctrl and the I keys simultaneously to have the main menu of the SATA RAID Utility appear:Note: All graphics and screen shots shown in the manual are for reference only.The screen shots shown in the manual do not imply Supernicro's endorsementor non-endorsement on any 3rd party product. Your screen may or many notlook exactly the same as the graphics shown in this manual.Page 3
Intel ESB2 HostRAID Setup GuidelinesCreating a RAID 0 Volume1. Select "Create RAID Volume" from the main menu and press the Enter key.The following screen will appear:2. Specify a name for the RAID 0 set and press the Tab key or the Enter keyto go to the next field. (You can use the Esc key to select the previous menu.)3. When RAID Level item is highlighted, press the Up Arrow and Down Arrow keys to select RAID 0 (Stripe) and hit Enter .4. When the Disks item is highlighted, press Enter to select the HDD to configureas RAID. The following pop-up screen displays: (See the note on Page 3)5. Use the Up Arrow , Down Arrow keys to highlight a drive and press Space to select it. A triangle appears to confirm the selection of the drive.6. Use the Up Arrow , Down Arrow keys to select the stripe size, ranging from4 KB to 128 KB for the RAID 0 array, and hit Enter . Note: For a server, pleaseuse a lower stripe size, and for a multimedia system, use a higher stripe size. Thedefault stripe size is 128 KB.7. Press Enter when "Create Volume" is highlighted. A warning message displays.8. When asked "Are you sure you want to create this volume (Y/N), type "Y" to createthe RAID volume, or type "N" to go back to the Create Volume menu.Page 4
Intel ESB2 SATA RAID Setup GuidelinesCreating a RAID 1 Volume1. Select "Create RAID Volume" from the main menu and press the Enter key.The following screen will appear:2. Specify a name for the RAID 1 set and press the Tab key or the Enter keyto go to the next field. (You can use the Esc key to select the previous menu.)3. When RAID Level item is highlighted, press the Up Arrow , Down Arrow keysto select RAID 1 (Mirror) and hit Enter .4. When the Capacity item is highlighted, enter your RAID volume capacity and hit Enter . The default setting is the maximum capacity allowed.5. Press Enter when the Create Volume item is highlighted. A warning messagedisplays.6. When asked "Are you sure you want to create this volume (Y/N), type "Y" to createthe RAID volume, or type "N" to go back to the Create Volume menu.Page 5
Intel ESB2 HostRAID Setup GuidelinesCreating a RAID 10 (RAID 1 RAID 0)1. Select "Create RAID Volume" from the main menu and press the Enter key.The following screen will appear:2. Specify a name for the RAID 10 set and press Enter .3. When RAID Level item is highlighted, use the Up Arrow , Down Arrow keysto select RAID 10 (RAID1 RAID0) and hit Enter .4. When the Stripe Size is highlighted, use the Up Arrow , Down Arrow keys toselect the stripe size from 4 KB to 128 KB for your RAID 10 and hit Enter . Thedefault setting is 64 KB. (Note: For a server, please use a lower stripe size; for amultimedia system, use a higher stripe size.)5. When the RAID Volume Capacity item is highlighted, enter your RAID volumecapacity and hit Enter . The default setting is the maximum capacity allowed.6. Press Enter when the Create Volume item is highlighted. A warning messagedisplays.7. When asked "Are you sure you want to create this volume (Y/N), press "Y" tocreate the RAID volume, or type "N" to go back to the Create Volume menu.Page 6
Intel ESB2 SATA RAID Setup GuidelinesCreating a RAID 5 Set (Parity):1. Select "Create RAID Volume" from the main menu and press the Enter key.The following screen will appear:2. Specify a name for the RAID 5 set and press Enter .3. When the RAID Level is highlighted, use the Up Arrow , Down Arrow keysto select RAID 5 (Parity) and hit Enter .4. When the Disk item is highlighted, press Enter to select the HDD to configureas RAID. The following pop-up screen displays: (See the note on Page 3.)5. Use the Up Arrow , Down Arrow keys to highlight a drive and press Space to select it. A triangle appears to confirm the selection of the drive.6. Use the Up Arrow , Down Arrow keys to select the stripe size, ranging from4 KB to 128 KB for the RAID 5 array, and hit Enter . (Note: For a server, pleaseuse a lower stripe size; for a multimedia system, use a higher stripe size. Thedefault stripe size is 128 KB.)7. Enter your desired RAID volume capacity and press Enter when the capacityitem is highlighted. The default setting is the maximum capacity allowed.8 Press Enter when the Create Volume item is highlighted. A warning messagedisplays.9. When asked "Are you sure you want to create this volume (Y/N), type "Y" to createthe RAID volume, or type "N" to go back to the Create Volume menu.Page 7
Intel ESB2 HostRAID Setup GuidelinesDeleting RAID VolumeWarning: Be sure to back up your data before deleting a RAID set. You willlose all data on the disk drives when deleting a RAID set.)1. From the Main menu, select item2-Delete RAID Volume, and press Enter .2. Use the Up Arrow , Down Arrow keys to select the RAID set you want todelete and press Del . A Warning message displays.3. When asked "Are you sure you want to delete this volume (Y/N), press "Y" todelete the RAID volume, or type "N" to go back to the Delete Volume menu.Page 8
Intel ESB2 SATA RAID Setup GuidelinesResetting to a Non-RAID Setting or Resetting a RAID HDDWarning: Be cautious when you reset a RAID volume HDD to nonRAID or Resetting a RAID HDD. Resetting a RAID volume or a RAIDHDD will reformat the HDD, and delete the internal RAID structure onthe drive.1. From the main menu, select item3-Reset Disks to Non- RAID, and press Enter .The following screen will appear:2. Use the Up Arrow , Down Arrow keys to highlight the RAID set drive to resetand press Space to select.3. Press Enter to reset the RAID set drive. A Warning message displays.4. Press "Y" to reset the drive, or type "N" to go back to the main menu.Exiting the Intel Matrix Storage Manager Utility1. From the main menu, select item4-Exit, and press Enter . A warning messagewill appear.2. Press "Y" to reset the drive, or type "N" to go back to the main menu.Page 9
Intel ESB2 HostRAID Setup Guidelines2Installing the Windows XP/2000/2003 OS with RAIDFunctionsInstalling a New Operating System-the Windows XP/2000/2003OS1. Insert Microsoft's Windows XP/2000/2003 Setup CD in the CD Driver, and thesystem will start booting up from CD.2. Press the F6 key when the message-" Press F6 if you need to install a thirdparty SCSI or RAID driver" displays.3. When the Windows XP/2000/2003 Setup screen appears, press "S" to specifyadditional device(s) you want to select.4. Insert the driver diskette-"Intel AA RAID XP/2000/2003 Driver for ESB2 into DriveA: and press the Enter key.5. Choose the Intel(R) ESB2 SATA RAID Controller from the list indicated on theXP/2000/2003 Setup screen, and press the Enter key.6. Press the Enter key to continue the installation process. (If you need to specifyany additional devices to be installed, do it at this time.) Once all devices arespecified, press the Enter key to continue with the installation.7. From the Windows XP/2000/2003 Setup screen, press the Enter key. TheXP/2000/2003 Setup will automatically load all device files and then, continuethe Windows XP/2000/2003 installation.8. After Windows XP/2000/2003 Installation is completed, the system will automatically reboot.Note: the current version of the ESB2 SATA RAID Utility can only support theWindows XP/2000/2003 Operating System.Page 10
RAID 10 (Striping & Mirroring): RAID 0 and 1 schemes are combined (without parity information) to get the benefits of both. RAID 5: both data and parity information are striped and mirrored across three or more hard drives. Intel Matrix Storage Intel Matrix Storage, supported by the ESB2, allows the user to create RAID 0,