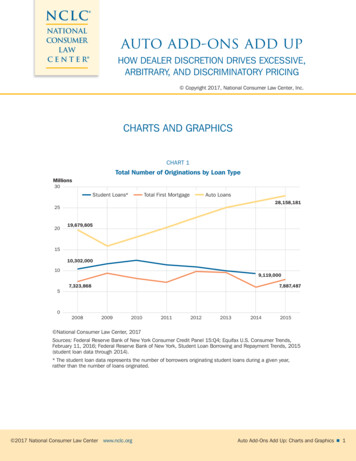
Transcription
QuickBooks Add-on v1.0 User GuideProductCart is a Registered Trademark of Early Impact LLC. All Rights Reserved.This document was last updated on Friday, June 09, 2005
Table of ContentsOverview3What It DoesWhat It Doesn’t DoGlossarySystem RequirementsLicense TermsSource Code Editing RightsAbout Early ImpactCopyright Information33455555Step 1 – Configuring QuickBooks6OverviewCreating a New CompanyEditing an Existing CompanyAdding Necessary Items to the QuickBooks Item ListStep 2 – Installation667710Transferring the files to your Web serverUpdating the databaseStep 3 – Importing or Exporting Products101112Choose Your ScenarioImporting Products from ProductCart into QuickBooksImporting Products from QuickBooks into ProductCart121314Step 4 – Running the Setup Wizard 16OverviewImporting & Synchronizing CustomersSynchronizing Individual Customer AccountsSynchronizing to a Generic Customer AccountImporting & Synchronizing Products and ItemsSynchronizing Miscellaneous ItemsStep 5 – Exporting Orders to QuickBooksOverviewExporting OrdersImporting Orders into QuickBooksFrequently Asked Questions1616171920242626262930ProductCart – QuickBooks Add-on User Guide - Page 2 of 31 - Copyright 2001-2005 Early Impact LLC – All Rights Reserved.
OverviewWhat It DoesThe QuickBooks Add-On adds to ProductCart the ability to export order information in an organized,time-saving manner to the popular accounting package published by Intuit. For more information aboutQuickBooks, visit: http://quickbooks.intuit.com/By allowing you to import the Chart of Accounts, Item List and Customer List from your QuickBookscompany file, the QuickBooks Add-on can help you synchronize product and customer informationbetween your online store and your accounting package, thus ensuring that order data is correctly assignedto the proper accounts when exported from ProductCart and imported into QuickBooks.When designing this Add-on, Early Impact took into account a variety of scenarios based on whether youhave a new or existing ProductCart store, and a new or existing QuickBooks company file. Depending onyour scenario, a recommended setup procedure will be presented.What It Doesn’t DoAt Early Impact we believe that it is very important to set the right expectations from the first momentsomeone starts using one of our software products. This is exactly the purpose of this section, which ismeant to clarify the fact that the QuickBooks Add-On does not automatically synchronize yourQuickBooks company file with your online store.Specifically, please note that You will have to manually synchronize customer accounts, when and if needed.If you want an order placed by customer XYZ to be assigned to customer XYZ in yourQuickBooks company file, you will have to manually map these two customer accounts.Although this can very easily be done with the QuickBooks Add-on, you should note that thistask is manually performed for each account. Therefore, it can be time consuming if the numberof customer accounts that need to be synchronized is high.However, in most cases this task will not be necessary. Most companies do not maintain differentcustomer accounts in their QuickBooks company file for orders placed over the Internet, just likea retail store does not normally keep a separate customer account in their accounting file for eachwalk-in customer, but rather assigns those sales to a generic account (e.g. “Store Sales”).If there are customers that you track individually in your accounting file (e.g. resellers, distributors,preferred customers, etc.), then you can map those customers to corresponding accounts in yourProductCart database (if they exist and if those customer buy online), and assign any othercustomer to a generic customer account. This can make this task much quicker to complete. Youwill learn more about importing and synchronizing customers later in this User Guide. You may have to manually synchronize product accounts.Let’s assume your store database contains 100 products and that your QuickBooks’ Item Listcontains 200 items (i.e. not all of your products and services are sold online). How can you makesure that product information contained in orders that are exported from ProductCart intoQuickBooks will match the corresponding items in your Item List? You have three options:o Map Individual Products. The QuickBooks Add-on Setup Wizard will guide youthrough a series of steps during which you will import your Item List into ProductCart.After importing your Item List, you will be able to map individual items to individualProductCart – QuickBooks Add-on User Guide - Page 3 of 31 - Copyright 2001-2005 Early Impact LLC – All Rights Reserved.
products in your ProductCart store. Although time consuming, this is certainly a way tomake sure that products and items are correctly synchronized.o Auto-Map Products. When you import your Item List into ProductCart, the system willtry to automatically find matches for the imported items. ProductCart will compare theQuickBooks’ Description field for each of the imported items with the name of each of theproducts that are already in your store database. If it finds a match, it will map that item tothe corresponding product for you.Note that if you export products from ProductCart to QuickBooks to create a new ItemList (i.e. this is a new QuickBooks company file and so the Item List is empty), when youimport the Item List back into ProductCart, all products will be automatically mapped astheir names will match by definition. This is definitely the recommended course of actionif you don’t currently have product information stored in your QuickBooks company file.You can at once populate the Item List and map all the items to the products stored inyour ProductCart database.o No (or Partial) Product Mappings. Assume you import your Item List into ProductCartand the auto mapping feature does not find any matches (or only a few matches). Asmentioned above, you can decide to individually map the remaining products, whichensures that when orders are exported to ProductCart, each product will be correctlymatched to the corresponding item in the Item List when creating invoices or salesreceipts.However, if you are dealing with a large number of products, manually mapping each ofthem may be too time consuming. In this scenario, ProductCart will ask you to assign allof these products to an income account from your imported Chart of Accounts. When theseproducts are exported to QuickBooks as part of an order, they will be matched to existingitems. If no match is found, a new item will be created. The new item will be assigned tothe income account mentioned above. You will have to manually export orders, whenever you wish to do so.When new orders are placed on your store, they will not be automatically exported to yourQuickBooks company file. In other words, the QuickBooks Add-on does not create a “live” linkbetween your store and your accounting software. However, once the QuickBooks Add-on hasbeen setup and you have become familiar with it, exporting the latest orders from ProductCartinto QuickBooks will only take a few moments.GlossaryPlease note the following definitions: Products: The products and services that you are selling on your ProductCart-powered Internetstore and that have been added to the ProductCart database. Items: The products and services listed in your QuickBooks Item List. Miscellaneous Items: Other miscellaneous entries listed in your QuickBooks Item List that arerelevant to orders exported from ProductCart. For example: shipping and handling charges,payment fees, discounts, etc. Accounts: Entries in your QuickBooks Chart of Accounts. Customers: Customer information stored in your ProductCart database. Customer Accounts: Customer information stored in your QuickBooks company file.ProductCart – QuickBooks Add-on User Guide - Page 4 of 31 - Copyright 2001-2005 Early Impact LLC – All Rights Reserved.
System RequirementsIn order to install the QuickBooks Add-On, your store must be running ProductCart.Although we always recommend that you are running the latest version of ProductCart, the QuickBooksAdd-on will work with earlier versions of our shopping cart software. We recommend that you arerunning ProductCart v2.5 and above.Thanks to the fact that this Add-on does not overwrite any files in your store, there will be no file conflictswhen you install the QuickBooks Add-on. Therefore, you do not have to worry about modifications thatmight have been made to your installation of ProductCart.License TermsA license to use the ProductCart QuickBooks Add-On can be purchased from the Early Impact softwarestore. The QuickBooks Add-on is licensed on a per-store basis: each implementation of the QuickBooksAdd-on requires a previous or concurrent purchase of a ProductCart license. Each license is grantedaccording to the terms of the ProductCart End User License Agreement, which can be found in Chapter1 of the ProductCart User Guide.Source Code Editing RightsYou have the rights to make changes to ProductCart’s source code within the terms of the End UserLicense Agreement, which can be found in Chapter 1 of the ProductCart User Guide.About Early ImpactEarly Impact is a software development company focused on delivering powerful, yet user-friendlyelectronic commerce applications to small- and medium-sized businesses. Early Impact’s goal is to buildunique, cutting-edge e-commerce software that allows businesses to effectively use the Internet as a saleschannel for their products and services.Founded in 2001, Early Impact is a Limited Liability Corporation (LLC), privately owned andheadquartered in San Francisco, California. For more information, please visit the company’s Web sitelocated at: http://www.earlyimpact.comCopyright InformationCopyright 2001-2005 Early Impact, LLC. All rights reserved.ProductCart is a registered mark of Early Impact, LLC.ProductCart, its source code and graphical interface, the ProductCart logo, this document, Early Impact,the Early Impact logo are property of Early Impact, LLC and are protected by US and Internationalcopyright laws.Except as permitted under the Copyright Act of 1976, no part of this document may be reproduced ordistributed in any form or by any means, or stored in a database or retrieval system, without the priorwritten permission of Early Impact, LLC.ProductCart – QuickBooks Add-on User Guide - Page 5 of 31 - Copyright 2001-2005 Early Impact LLC – All Rights Reserved.
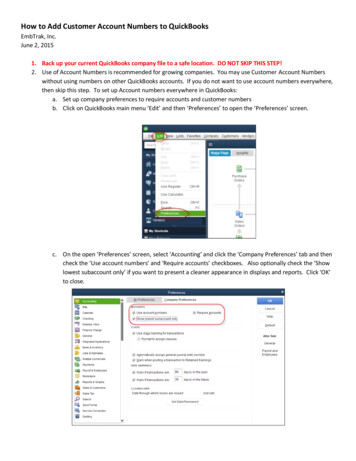
Step 1 – Configuring QuickBooksOverviewBefore you can start using the QuickBooks Add-on and successfully import orders from yourProductCart-powered store into QuickBooks, there are a few steps that need to be taken to make surethat data exported from ProductCart will find a proper match. Please carefully review the followingparagraphs. You will be asked to confirm that certain items exist in your QuickBooks Item List, or createnew ones.If you are new to QuickBooks and have not yet setup your company file, that’s where you need to start.So let’s begin with a few instructions on how to do so. If you have been using QuickBooks, you don’tneed to create a new company and you can skip the next section.Note that this User Guide was written using QuickBooks Pro 2004 as a reference. Menu items and featurenames used in this document may be different in earlier or more recent version of QuickBooks. Weapologize for the inconvenience that this may create.Creating a New CompanyTo create a new company file in QuickBooks, start the application and click on Create a New Company.QuickBooks’ EasyStep Interview will take you through several, intuitive screens in which you will be asked toprovide general company information. Simply follow the instructions on the screen as you fill outinformation about your company’s name, address, basic tax information, and more.Here are a few things to note as you answer questions during the EasyStep interview: Select type of business – Unless one of the selections from the list is a direct match to yourparticular business, we recommend that you select: Retail: General. After this step,QuickBooks will create your company’s data file. Income and Expense Accounts. You will be presented a predefined list of income and expenseaccounts, which is partially based on the type of business that you chose in the previous step.If you are unsure which accounts you will need or not need, then accept the default settings.You can always add, edit or remove accounts at a later time. Preferences. When going through the third section of the EasyStep interview, please note thefollowing:o Sales Tax. Select Yes. The sales tax option must be turned on in QuickBooks beforeimporting orders from ProductCart, even if you do not collect sales tax in yourbusiness.o Sales Tax Information Single or multiple sales tax. In most cases, you’ll select the first option. Enter a short name for the sales tax. E.g. “State Tax”. Enter a sales tax description to be printed on invoices. E.g. “Sales Tax” Enter the name of the government agency to which you pay sales tax. E.g. “State Boardof Equalization”Complete the rest of the interview by following the instructions on the screen. When you are done, skipthe next section and go to the section entitled Adding Necessary Items to the QuickBooks Item List.ProductCart – QuickBooks Add-on User Guide - Page 6 of 31 - Copyright 2001-2005 Early Impact LLC – All Rights Reserved.
Editing an Existing CompanyIf you have just created a new company file, skip this section. If you are using an existing company file,note that even if you don’t charge sales taxes, your company file has to be setup to allow for sales taxes.To check that this is the case, open your QuickBooks company and select Preferences from the Edit menu.From the left-side navigation, select Sales Tax. On the window that appears, click on the Company Preferencestab. Look at the following settings: Do You Charge Sales Tax?. Select Yes. The sales tax option must be turned on in QuickBooksbefore importing orders from ProductCart, even if you do not collect sales tax in yourbusiness. Sales Tax Items. Make sure you have at list one item listed in the drop-down menu (e.g. “SalesTax”).Adding Necessary Items to the QuickBooks Item ListThe next step is to review your existing Item List to make sure that a number of required items are listed. Itis important to set up the following items in QuickBooks prior to using the ProductCart QuickBooksAdd-On. This is true regardless of whether you just created a brand-new company file or are using anexisting company file.Carefully review each of the following items. Your QuickBooks company file must contain a separate itemfor each of the following. All of these items must belong to income accounts in your Chart of Accounts. Ifany of the following do not exist in your QuickBooks company file, add them now.The actual item names (Item Name/Number field) can be different from the ones listed below, but the ItemType must be the one specified, and the Account must always be an income account.Shipping ChargesDoes you company file already have an Item in the Item List that is used for shipping or deliverycharges? If yes, make sure that it has the properties listed below, and then skip to the next item. Ifno, add it now by following these instructions: Select Item from the Icon Bar or Item List from the Lists menu.Click on the Item button at the bottom of the page and select New.As the Item Type, select: “Other Charge”.As the Item name/Number, enter “Shipping Charges”.As the Description you may enter anything you wish.ProductCart – QuickBooks Add-on User Guide - Page 7 of 31 - Copyright 2001-2005 Early Impact LLC – All Rights Reserved.
Leave the Amount field set to 0.Under Tax Code, specify whether this item is taxable or not. Shipping charges are often nontaxable.As the Account, make sure to select an income account. For example, by default QuickBookscreates an account named Sales: Shipping and Handling. If this account doesn’t exist, either useanother income account or add it to your Chart of Accounts by selecting Add New from theAccount drop-down on the New Item window.Handling FeesDoes you company file already have an Item in the Item List that is used for handling fees? If yes,make sure that it has the properties listed below and then skip to the next item. If no, add it now byfollowing these instructions. As you know, in ProductCart handling fees can be calculated separatelyfrom shipping charges, and therefore you need a separate account in your QuickBooks company file. Select Item from the Icon Bar or Item List from the Lists menu.Click on the Item button at the bottom of the page and select New.As the Item Type, select: “Other Charge”.As the Item name/Number, enter “Handling Fees”.As the Description you may enter anything you wish.Leave the Amount field set to 0.Under Tax Code, specify whether this item is taxable or not. Handling fees are typically taxed.As the Account, make sure to select an income account. For example, by default QuickBookscreates an account named Sales: Shipping and Handling. If this account doesn’t exist, either useanother income account or add it to your Chart of Accounts by selecting Add New from theAccount drop-down on the New Item window.Rewards PointsDoes you company file already have an Item in the Item List that is used for Reward Points (whichmight be named differently in your store)? If yes, make sure that it has the properties listed belowand then skip to the next item. If no, add it now by following these instructions: Select Item from the Icon Bar or Item List from the Lists menu.Click on the Item button at the bottom of the page and select New.As the Item Type, select: “Discount”.As the Item name/Number, enter “Reward Points” or the name you use for Reward Points onyour online store.As the Description you may enter anything you wish.Leave the Amount field set to 0.As the Account, make sure to select an income account. For example, by default QuickBookscreates an account named Sales: Discounts Given (or Sales Discounts and Allowances). If thisaccount doesn’t exist, either use another income account or add it to your Chart of Accountsby selecting Add New from the Account drop-down on the New Item window.Under Tax Code, enter Tax as the discount is given before tax.Discounts/Gift CertificatesDoes you company file already have an Item in the Item List that is used for discounts and/or giftcertificates? If yes, make sure that it has the properties listed below and then skip to the next item. Ifno, add it now by following these instructions: Select Item from the Icon Bar or Item List from the Lists menu.ProductCart – QuickBooks Add-on User Guide - Page 8 of 31 - Copyright 2001-2005 Early Impact LLC – All Rights Reserved.
Click on the Item button at the bottom of the page and select New.As the Item Type, select: “Discount”.As the Item name/Number, enter “Discounts/Gift Certificates”.As the Description you may enter anything you wish.Leave the Amount field set to 0.As the Account, make sure to select an income account. For example, by default QuickBookscreates an account named Sales: Discounts Given (or Sales Discounts and Allowances). If thisaccount doesn’t exist, either use another income account or add it to your Chart of Accountsby selecting Add New from the Account drop-down on the New Item window.Under Tax Code, enter Tax as the discount is given before tax.Payment/Processing FeesDoes you company file already have an Item in the Item List that is used for payment and/orprocessing fees? If yes, make sure that it has the properties listed below and then skip to the nextitem. If no, add it now by following these instructions: Select Item from the Icon Bar or Item List from the Lists menu.Click on the Item button at the bottom of the page and select New.As the Item Type, select: “Other Charge”.As th
QuickBooks Add-on v1.0 User Guide . Add-on will work with earlier versions of our shopping cart software. We recommend that you are running ProductCart v2.5 and above. Thanks to the fact that this Add-on does not overwrite