Transcription
S t a r t u pG u i d eQuickBooksPOS forRetailOverview21. InstallingQuickBooks52. InstallingQuickBooks POSfor RetailAdministrator73. Setting upSales TerminalHardware94. InstallingQuickBooks POSfor Retail115. Setting upElectronicProcessing ofCredit and DebitTransactions136. Entering Creditand Debit CardTransactions167. Completingthe End-of-dayProcess19Appendix 1 Working withBarcodes20Appendix 2 Setting up newtouch-screenbuttons22Quic k Bo o k s POS fo rRetail Startup GuideThis startup guide will help you get your POS system,including electronic processing of credit and debittransactions, up and running. Follow the sevenmajor steps laid out in the following sections andyou’ll be ready for business!CHAPTER 11
OverviewA typical retail store’s POS system is set up using two or more computers. One computer isplaced in a non-public, back-office area of the store. The other computer(s) are set up asterminals in the public area of the store where you and your customers carry outtransactions.On your back-office computer1. Installing QuickBooks . Page 52. Installing QuickBooks POS for Retail Administrator. Page 7On your register/terminal computer3. Setting up Sales Terminal Hardware . Page 94. Installing QuickBooks POS for Retail. Page 115. Setting up Electronic Processing of Credit and Debit Transactions . Page 136. Entering Credit and Debit Card Transactions . Page 167. Completing the End-of-day Process . Page 192QuickBooks POS for Retail 3.0 Startup Guide
Hardware and software requirementsHardware/SoftwareQuickBooksPOS for RetailAdministratorPOS for RetailRequiredIBM Compatible200 MHzPentium Processor64 MB RAMIBM Compatible200 MHzPentium Processor64 MB RAMIBM Compatible200 MHzPentium Processor64 MB RAMRecommendedIBM Compatible350 MHzPentium II Processor96 MB RAMIBM Compatible350 MHzPentium II Processor96 MB RAMIBM Compatible300 MHzPentium Processor64 MB RAM*Free Hard DiskSpace205 MB220 MB105 MBCD-ROM2x (double-speed) orfaster2x (double-speed) orfaster2x (double-speed) orfasterMonitor256 Color VGA or SVGAvideo or better, 800x600resolution or higher withsmall fonts256 Color VGA or SVGAvideo or better, 800x600resolution or higher withsmall fonts256 Color VGA or SVGAvideo or better, 800x600resolution or higher withsmall fontsPrinterAny printer supported byyour operating systemAny printer supported byyour operating systemAny printer supported byyour operating systemSupportedOperating SystemsWindows 98, ME, 2000,NT 4.0 (with Service Pack6a), or XPWindows 98, ME, 2000,NT 4.0 (with Service Pack6a), or XP**Windows 98, ME, 2000,NT 4.0 (with Service Pack6a), or XP***WebBrowserMicrosoft InternetExplorer 6.0 or higherMicrosoft InternetExplorer 6.0 or higherMicrosoft InternetExplorer 5.5 or higher* Microsoft Internet Explorer 6.0 can be installed from the POS installation CD and requiresan extra 70 MB of disk space. Adobe Acrobat Reader can be installed from the QuickBooksinstallation CD and require an extras 10 MB of disk space.** For more information see ‘Using an IP connection for your credit and debit transactions’*** Microsoft Internet Explorer 5.5 or greater is required to install and operate QuickBooksPOS for Retail. Microsoft Internet Explorer 6.0 can be installed from the POS installation CDat \Ie60\ie6setup.exe.Overview3
Connection requirements for electronic processing oftransactionsUsing a dial-up connection for your credit and debittransactionsIf you are using a dial-up connection for your electronic processing of credit and debit cardtransactions, you will need at least three COM ports, one for you receipt printer, one foryour PINpad, and one for your modem (this may be an internal COM port if you have anexisting modem). If your PC has less than three COM ports, you can purchase a COM portsplitter (PCI card) from most computer hardware retailers.If you are using a dial-up connection for electronic processing of transactions, it is stronglyrecommended that you have a US Robotics modem installed on your computer.QuickBooks POS for Retail only supports US Robotics modems.Using an IP connection for your credit and debittransactionsIf you are using an IP connection for your electronic processing of credit and debittransactions, you cannot use Windows 98 or ME as your operating system. Windows 98,ME and previous versions of Windows 9x do not support IP VPN connections.If you are using an IP connection for electronic processing of transactions, it isrecommended that you have a high-speed internet connection.For more information regarding electronic processing of transactions using an IPconnection, contact Intuit technical support.Contacting Intuit CanadaPhone SupportYou can contact Intuit Canada at 1-800-250-9845 from 8 am to 8pm EST, Mon. through Fri.POS customers are entitled to 30 days of unlimited setup support for FREE. For a 30 dayperiod from the time you register, you can call back as many times as needed to get yourPOS system up and running.Website supportFor the latest information about QuickBooks, please visit our online support web rt.shtml4QuickBooks POS for Retail 3.0 Startup Guide
1. Installing QuickBooksYou must install QuickBooks and create your company file before you can install POS forRetail Administrator.If you do not own QuickBooks or own a previous version(QuickBooks 2002 or earlier)If you have purchased the QuickBooks Point-of-Sale Complete Solution for Retailershardware bundle, you have already purchased QuickBooks 2003 and can go to step 2.1 To purchase the latest version of QuickBooks, contact Intuit Canada by phone at 1-888333-8580 or visit your local software retailer.When you have received your copy of QuickBooks:2 Place your QuickBooks 2003 CD into your CD ROM drive. The QuickBooks Windowsinstallation should automatically start. If it does not, navigate to your CD-ROM driveand double-click ‘setup.exe’.3 Follow the on-screen steps to install QuickBooks. For full QuickBooks installationinstructions, refer to the QuickBooks Startup Guide on Page 1.4 Once you have installed QuickBooks 2003, open QuickBooks and select Register QuickBooks from the File menu. The Product Registration dialog appears.5 Choose how you would like to register by clicking ‘Online’ or ‘Phone’. Follow the stepson the screen to complete your QuickBooks registration.If you have purchased, installed, and registered QuickBooks2003For optimal usability and functionality, QuickBooks 2003 R5 or greater should be installedon your back-office computer. To check which release of QuickBooks you have, open QuickBooks and press CTRL 1.The Product Information dialog appears. Make a note of what appears in the ‘Product’line.If you have QuickBooks 2003 and the release number is R5 or greater or you have one ofthe QuickBooks Premier 2003: Custom Editions (for example, Retail or ProfessionalServices), you are ready to create a company file. If your release number is R4 or less you caneither:1. Installing QuickBooks5
Automatically update QuickBooksThis process requires an internet connection.1 Open QuickBooks.2 From the File menu, select Update QuickBooks. The ‘Update QuickBooks’ browserwindow appears.3 Click the ‘Update’ button on the bottom right corner of the window.4 Click the ‘Get Updates’ button. The status bar at the bottom of the window shows thestatus of the update. When complete, the status bar displays ‘Update Complete’.5 Shut down and restart QuickBooks to install the update. You are now ready to create acompany file.Install QuickBooks R5 from the POS 3.0 InstallationCDIf you do not have an internet connection, you should install the latest QuickBooks releasefrom the POS for Retail 3.0 installation CD.1 Insert your POS 3.0 CD into your CD-ROM drive.2 Navigate to the CD-ROM drive in Windows Explorer. Open the folder ‘QBooks’ anddouble-click ‘setup.exe’.3 Follow the on-screen instructions to install QuickBooks 2003 R5. When prompted toenter your installation key code (IKC), use the IKC that was provided with your originalQuickBooks 2003 purchase. When the R5 installation is complete, you are ready tocreate a company file.Creating a company fileIt is necessary to create a company file in QuickBooks before installing and setting up POSfor Retail Administrator. Without a QuickBooks company file the POS for RetailAdministrator installation will fail.For more information about creating a company file, see ‘Setting up a new company’ onpage 31 of the QuickBooks Startup Guide.It is necessary to setup QuickBooks inventory before using POS forRetail.For more on setting up QuickBooks inventory, see “QuickBooks - Inventory”on page 20 of the POS User’s Guide.6QuickBooks POS for Retail 3.0 Startup Guide
2. Installing QuickBooks POS for RetailAdministratorInstalling POS for Retail AdministratorNote: It's important that you set up your QuickBooks company file before you go on.1 Shut down all running programs and any virus protection software you may have.(Some virus protection software can interfere with the Installer.)2 If the POS for Retail CD isn’t in your computer's CD-ROM drive, insert it now. Theinstaller should start in a few moments.Note: If the Installer doesn't start automatically, from the Windows Start menu,select Run. Type the drive letter associated with your CD-ROM drive, thentype :\autorun.exe and click OK (for example, d:\autorun.exe).3456In the Welcome to POS for Retail window, click Install POS for Retail Administrator.In the Welcome to POS for Retail Setup Wizard window, click Next to begin.In the End User License Agreement window, click Yes after reading the agreement.In the Select Install Location window, click Next to select the default folder or clickBrowse to navigate to the folder you want.7 From the Start Copying Files window, click Next to begin copying the necessary POSfor Retail Administrator files to your computer.8 Click Finish and when you are prompted to reboot your computer, click Yes.9 Once your computer has rebooted, follow the steps below to register and setup POS forRetail Administrator.2. Installing QuickBooks POS for Retail Administrator7
Running POS for Retail Administrator for the first timeBefore configuring terminal hardware and/or installing POS for Retail, you'll need to set upa few options in POS for Retail Administrator. To run POS for Retail Administrator:1 On your Windows desktop, double-click the POS for Retail Administrator icon. TheWelcome to POS for Retail Administrator window appears.2 Click Next. The POS for Retail Administrator License Key window appears.3 Enter your License Key and click Next. You can find your license key on the License KeyCard. When you click next the POS for Retail Administrator Registration Numberwindow appears.4 To obtain a registration number, contact Intuit Canada (1-800-250-9845). When youhave received your registration number, enter it into the Registration Number field.5 Click Next. The POS for Retail Database Location window appears.6 Click Next to accept the default POS for Retail Administrator database file (POS forRetail.PDB) or if you have an existing database file, click Find to automatically locate iton your hard drive.7 In the QuickBooks Data Location window, type the path for your QuickBooks companyfile (.QBW) or click Find to automatically locate it on your hard drive.8 Click Next to continue. The Select a Province window appears. Select the province thatyour company does business in.Note: The province selected here should be the same as the province selected inyour QuickBooks company file.9 Click Next to continue. The ‘Build the POS for Retail Database’ window appears.10 Click Next to build the POS for Retail database. Items and accounts are added to theQuickBooks data file for POS for Retail to use and the ‘POS for Retail.PDB’ is createdusing data from your QuickBooks company file.11 When the database is built, click Finish. The ‘Transfer Data from QuickBooks’ windowappears.12 Click Next to continue. The ‘Select Transfer Information’ appears.13 Click Next to transfer the data from QuickBooks. POS for Retail Administrator transfersthe listed files from QuickBooks to populate the ‘POS for Retail.PDB’ database file. Bydefault all of the Transfer Information is selected.14 When the file transfer is complete, click Finish. The POS for Retail AdministratorOptions screen appears to allow you to configure some necessary options for POS forRetail.15 For a detailed explanation of all options, see “POS for Retail Administrator Functions”on page 62 of the ‘Point-of-Sale User’s Guide’. It isn't mandatory to set all optionsbefore installing POS for Retail.16 When you are finished setting the POS for Retail Administrator options, close POS forRetail Administrator.8QuickBooks POS for Retail 3.0 Startup Guide
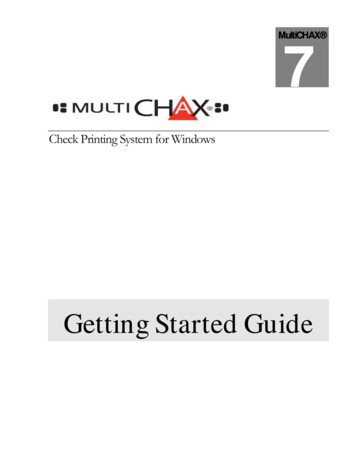
3. Setting up Sales Terminal HardwareThe following setup instructions are for the sales terminal hardware shipped with the‘QuickBooks Point-of-Sale Complete Solution for Retailers’ product. If you have purchasedyour terminal hardware separately, these setup instructions may not apply.Before you startMake sure your computer is turned off prior to connecting the new sales terminal hardware.Welch Allyn Imageteam 3220 Barcode ScannerBefore starting, disconnect the keyboard from the computer.1 Plug the keyboard into the barcode scanner cord.2 Plug the free end of the barcode scanner cord into the keyboard slot on the back of yourcomputer.Fig. 1For information about configuring your barcode scanner in POS for Retail see ‘The Scannertab’ on page 95 of the POS for Retail User’s Guide.3. Setting up Sales Terminal Hardware9
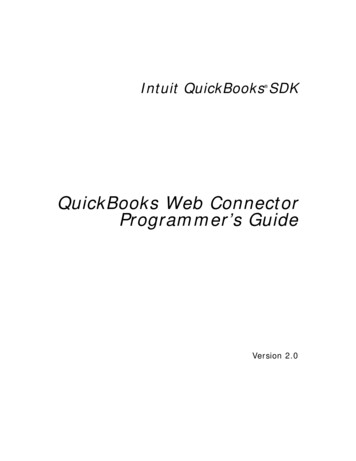
Star TSP600 Thermal Receipt PrinterConnect the receipt printer to the computer with the enclosed serial cable. One end of theserial cable connects to the back of the receipt printer and the other end connects to theserial (COM) port on the back of the computer. The adapters at either end of the serial cableare designed to only fit one way.Plug one end of the power supply into the back of the receipt printer and plug the otherend into the power source.Fig. 2For information about configuring your receipt printer in POS for Retail see ‘The ReceiptPrinter tab’ on page 98 of the POS for Retail User’s Guide.MS Generic Cash DrawerThe cash drawer connects to the receipt printer. The cash drawer’s connection looks like aphone jack. One end is already connected to the back of the cash drawer and the other endplugs into the back of the receipt printer.Fig. 3For information about configuring your cash drawer in POS for Retail see ‘The Cash Drawertab’ on page 100 of the POS for Retail User’s Guide.10QuickBooks POS for Retail 3.0 Startup Guide
4. Installing QuickBooks POS for RetailTo install POS for Retail on a single terminal1 Shut down all running programs and any virus protection software you may have.(Some virus protection software can interfere with the Installer.)2 If the POS for Retail CD isn’t still in your computer's CD-ROM drive from installing POSfor Retail Administrator, put it in. The installer should start in a few moments.Note: If the Installer doesn't start automatically, from the Windows Start menu,select Run. Type the drive letter associated with your CD-ROM drive, thentype :\autorun.exe and click OK (for example, d:\autorun.exe).3456In the Welcome to POS for Retail window, click Install POS for Retail.In the Welcome to POS for Retail Setup Wizard window, click Next to begin.In the End User License Agreement window, click Yes after reading the agreement.In the Select Install Location window, click Next to select the default folder or clickBrowse to navigate to the folder you want7 From the Start Copying Files window, click Next to begin copying the necessary POSfor Retail files to your computer.8 Click Finish. Click Yes to reboot your computer.9 Follow the steps in the next section to run and setup POS for Retail.Running POS for Retail for the first timeBefore running POS for Retail, you'll need to set up a few options.To run POS for Retail:1 On your Windows desktop, double-click the POS for Retail icon. The Welcome to POSfor Retail window appears.2 Click Next. The POS for Retail License Key window appears.3 Type your License Key, then click Next. You can find your license key either on yourPOS for Retail CD case or on the back of your POS for Retail User Guide.4 To obtain your registration and activation numbers, contact Intuit Canada (1-800-2509845). When you have received your registration and activation numbers, enter theminto the corresponding fields.Note: For each computer that requires POS for Retail, you will need to acquire aunique registration and activation number.5 In the POS for Retail Terminal ID window, click Next to accept the default ID or type anew ID. The default ID is your computer name.4. Installing QuickBooks POS for Retail11
6 In the POS for Retail Database Location window, type the path for your POS for Retaildatabase (POS for Retail.PDB) or click Find to automatically locate it on the hard driveof the computer where POS for Retail Administrator is installed.POS for Retail needs to point to the POS for Retail.PDB (POS Database) for all thenecessary information (for example, Inventory).7 Click Next to continue.8 Click Finish to complete this step. POS for Retail opens the QuickBooks POS for RetailOptions window.For more information on all the options, see “Setting Up POS for Retail” on page 86 in theUser Guide.To install POS for Retail on a NetworkImplementing POS for Retail on a network may require the expertise of your computersupplier or a network administrator.In order for POS for Retail to perform correctly, files need to be shared between computers.This is a task for an expert. If you are an expert PC user then you will have no problemdefining the network drives on each PC. If you are not an expert PC user, ask your supplierto configure the network and software for you.Note: QuickBooks and POS for Retail Administrator must be installed on the samemachine.To set up one or more terminals in your store1 Ensure that all of your machines (the back-office computer and all terminal computers)are on the same network.2 Share the drive containing the ‘POS for Retail.PDB’ database file and map this drive onthe other machines. We recommended that the drive be on the back-office computer.3 Map a drive on the back terminal to each front terminal.4 Make the back office machine the designated QuickBooks and QuickBooks POS forRetail Administrator computer.5 On your terminal computers map a drive to the back office computer and install POSfor Retail on each terminal. When you are prompted to locate the ‘POS for Retail.PDB’it will be found on the mapped drive (on the back office computer).12QuickBooks POS for Retail 3.0 Startup Guide
5. Setting up Electronic Processing of Creditand Debit TransactionsHaving Electronic Processing of Credit and Debit Transactions available at your retailterminal reduces the possibilities of credit card and debit card fraud. It is faster, easier, moresecure and less prone to operator error.To get Electronic Processing of Credit and Debit Transactions working for you, you need torent a swipe PINpad and apply for Moneris Solutions’ Electronic Credit and DebitTransaction Processing service.Contact Moneris Solutions1 To apply for Moneris Solutions’ Electronic Processing of Credit and Debit Transactionsservice, call 1-866-681-4119. When you call Moneris Solutions, you will need toprovide them with several important pieces of information so that they can determineif they are able to provide their service to you. This information includes businessname, address, and which types of cards you wish to accept via electronic processing.2 Once approved, you are registered with Moneris Solutions and sent four items:a)A Welcome letter - This letter is sent by fax or mail and contains your 13 digitmerchant number and Moneris Solutions’ service/support phone number.b)Electronic Processing Setup Letter - This letter is sent by fax or mail andcontains the following information about your electronic processingconnection:-Host dial-up Telephone Number-13 digit Merchant Number-Debit Terminal ID-Credit Terminal IDc)Electronic Processing Start-up Kit - This kit contains electronic processingdocumentation, credit card carbon copy slips and the terms and conditions ofyour agreement with Moneris Solutions.d)Your PINSmart PINpad.If approved, you should receive the above items within seven to ten business days ofapplying with Moneris Solutions.Installing and Configuring your PINSmart PINpadThe PINSmart PINpad provided by Moneris Solutions comes with a three-way cable:1 Connect the end of the cable that looks like a phone jack plug to the PINpad.2 Plug the PINpad into an electrical outlet and attach the free end of the cable to a COMport on your retail terminal computer.3 Open POS for Retail on the retail terminal that you have the PINpad connected to.5. Setting up Electronic Processing of Credit and Debit Transactions13
4 From the Tools menu, select Options. The Options dialog appears.5 Select the ‘Elec. Processing’ tab. and select the ‘Enable Electronic Processing of Creditand Debit Transactions’ checkbox.6 Select the COM port that your PINpad is connected to from the ‘Connected to’ dropdown list.Configuring Electronic Processing1 Open POS for Retail. From the Tools menu, select Options. The Options dialog appears.2 Select the ‘Elec. Processing’ tab and click Settings. The Electronic Processing Settingsdialog appears.3 If you are using a dial-up connection for your electronic processing of transactions,select ‘Dial (Private)’ from the ‘Line Type/Protocol’ drop-down list. If you are using anIP connection for your electronic processing of transactions, select ‘TCP/IP’ from the‘Line Type/Protocol’ drop-down list.Note: Before you begin setting up your TCP/IP connection in POS, you must set up aWindows VPN connection. Please call an Intuit customer support representative at 1800-250-9845 for help with this process4 If you are using a dial-up connection for your electronics processing of transactions,enter the phone number provided by Moneris Solutions into the Telephone Numberfield. If you are using an IP connection for your electronic processing of transactions,enter the IP Address and Port number in the given fields.5 In the General tab of the Electronic Processing Settings dialog, enter the 13-digitMerchant Number, Debit Terminal ID and Credit Terminal ID provided by MonerisSolutions in the given fields.6 Select your primary language of business from the ‘Default Language’ drop-down list.7 Select the ‘Card Types’ tab. By default Bank Card / Debit, VISA, and MasterCard areselected. If, when you applied with Moneris Solutions you purchased support forAmerican Express, Enroute / Diners, or Discover credit cards, select the correspondingcheckbox here. If you would like to purchase electronic processing capability servicesfor any of these cards, contact Moneris Solutions.8 Select the ‘Cardholder Agreement’ tab. If you would like to edit the text that is printedon the bottom of your electronic processing receipts, you can do so here.9 Select the ‘Modem and PINpad’ tab.10 The default PINpad configuration is for the PINSmart PINpad provided by MonerisSolutions. Ensure that the ‘PINpad Port’ field is set to the COM port that your PINpadis connected to.11 The default modem configuration is for a US Robotics modem. If you are using a dialup connection, ensure that the ‘Modem Port’ field is set to the COM port that yourmodem is connected to.12 Click OK to save your electronic processing settings and return to the Options dialog.Click OK to save your options and return to POS for Retail.14QuickBooks POS for Retail 3.0 Startup Guide
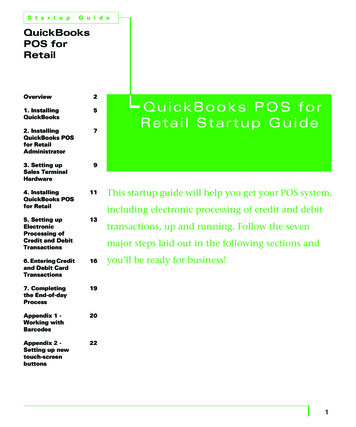
Updating your POS touch-screenUsing electronic transactions in POS requires that you have electronic transaction (Visa,Mastercard, Debit Transaction etc.) buttons on your POS touch-screen. Follow these stepsto import a customized screen:1 Ensure that the POS Installation CD is in your CD-ROM drive.2 From the Tools menu, select Options. The Options dialog opens.3 Select the Keyboard tab and press ‘Copy Layout’ in the ‘Touch Keyboard’ section. TheCopy Layout dialog opens.4 Select the ‘From Disk’ tab and click Browse.5 Navigate to the CD-ROM drive and open the ‘Support’ folder. Select ‘electronicprocessing.tkz’ and press ‘Open’.6 Click OK to close the ‘Copy Layout’ dialog. Click OK to close the Options dialog. Acustomized POS touch-screen should now be on your screen.Fig. 4For more information about setting up buttons for electronic processing of transactions see“Appendix 2 - Setting up new touch-screen buttons” on page 22.5. Setting up Electronic Processing of Credit and Debit Transactions15
6. Entering Credit and Debit Card TransactionsInitializing your electronic transaction host connection1 From the Tools menu select Options. The Options dialog appears.2 Select the Elec. Processing tab. If the ‘Enable Electronic Processing of Credit and DebitTransactions’ checkbox is not selected, select it now.3 Press OK. If your connection settings have been configured correctly, it is initialized. Ifyou are using a dial-up connection, you will be connected twice and if the initializationis successful, your receipt printer prints ‘Electronic Processing Initialized’. If there areany errors in the initialization, your receipt printer will print ‘Electronic ProcessingInitialization Failed’ followed by a description of the error.If you are encountering technical difficulties or problems initializing, please contact anIntuit customer service representative at 1-800-250-9845.Performing Electronic Credit and Debit TransactionsThe following section shows you how to carry out some basic electronic transactions inQuickBooks POS for Retail.Performing a typical electronic transaction1 Enter the items to be purchased, and then press the appropriate credit or debit cardbutton to accept an electronic payment. For example, press the VISA button for a VISAtransaction.2 For debit transactions, your customer should now follow the instructions displayed onthe PIN pad, such as swiping the card and selecting the account type.3 If the transaction is approved, the electronic transaction is processed by Moneris Solutions, the receipt printer prints the receipt, and the transaction is complete.4 If the issuing bank declines the transaction, a message is displayed on your screen.Choose another form of payment or press Cancel on the POS keyboard or touch screento cancel the sale altogether.Performing an electronic transaction with cash outBefore giving cash back to a customer on an electronic debit transaction, you mustconfigure your ‘Debit Card’ button to allow cash out.Configuring your Debit Card button to allow cash out1 From the Tools menu select Options.2 Select the Keyboard tab and click ‘Design Touch Keyboard Layout’.3 Select the ‘Debit Card’ button or any other button you want to enable cash out for andclick ‘Show Functions’.16QuickBooks POS for Retail 3.0 Startup Guide
4 Select the ‘Allow Cash Out’ checkbox and click ‘Cash Out Options’.5 Select your ‘Asset Account Decreased’ and ‘Asset Account Increased’ accounts and pressOK. For more detail about the ‘Allow Cash Out’ option see “Appendix 2 - Setting upnew touch-screen buttons” on page 22 of this startup guide.6 Click OK to save these options and return to POS for Retail Options dialog. Click OK inthe Options dialog to return to POS for Retail.Performing an electronic transaction with cash out1 Enter the items to be purchased.2 Enter an amount equal to the purchase total plus the amount of cash out, then pressthe ‘Debit Card’ button on your touch-screen.For example, if the sale totals 10.00, and the customer requires 20.00 cash, enter 30.00 and press the ‘Debit Card’ button.3 For debit transactions, your customer should now follow the instructions displayed onthe PIN pad, such as swiping the card and selecting the account type.4 If the transaction is approved, the electronic transaction is processed by Moneris Solutions, the receipt printer prints the receipt, and the transaction is complete.5 If the issuing bank declines the transaction, choose another form of payment or pressCancel on the POS keyboard or touch screen to cancel the sale altogether.Entering an Electronic Transaction refund1 For each item to be returned, click Refund on the keyboard or touch screen and thenenter the item to be returned.2 Press the appropriate debit or credit card button to refund the amount by electronictransaction.3 For debit transactions, your customer should now follow the instructions displayed onthe PIN pad, such as swiping the card and selecting the account type.If your Electronic Debit or Credit transaction timesoutAfter you press a debit or credit card button, the PIN pad sits in a waiting mode forapproximately 50 seconds until the user responds to the prompts. If there is no activitywithin that period, the PINpad cancels the transaction that was sent.If this happens, press the credit or debit card button to send the amount to the PINpadagain. Similarly, if an electronic debit or credit transaction is cancelled on the PINpad, youmust also press the Cancel key on the POS keyboard or touch screen.6. Entering Credit and Debit Card Transactions17
Manually entering credit cardsCaution: Card could be counterfeitIf anything about the shopping pattern or the cardholder is suspicious, a Code10 call should be made. If comfortable with the sale, an imprint of the creditcard must be taken.If a customer's card won't swipe or you receive an order by phone or mail, you can manuallyenter the credit card number before you can process it ele
If you have purchased the QuickBooks Point-of-Sale Complete Solution for Retailers hardware bundle, you have already purchased QuickBooks 2003 and can go to step 2. 1 To purchase the latest version of QuickBooks, contact Intuit Canada by phone at 1-888-333-8580 or visit your local software retailer.