Transcription
Technical ReportNetApp AltaVault Cloud-IntegratedStorage ApplianceSolution Deployment: AltaVault with Commvault IntelliSnapfor NetAppMike Braden, NetAppJuly 2017 TR-4457AbstractThis solution deployment guide outlines how easy it is to deploy and use a NetApp AltaVault cloud-integrated storage appliance with Commvault IntelliSnap for NetAppsoftware. The AltaVault appliance provides a simple, efficient, and secure way to move dataoff site to either public or private cloud storage providers. Using advanced deduplication,compression, and encryption, AltaVault enables organizations to eliminate reliance on older,less reliable data protection solutions while improving backup windows and disaster recoverycapabilities.
TABLE OF CONTENTS1AltaVault Overview . 41.1 Executive Overview . 41.2 Commvault IntelliSnap for NetApp Architecture Overview . 41.3 AltaVault Appliance Overview . 52Deploy and Configure AltaVault with Commvault IntelliSnap for NetApp . 72.1 AltaVault Solution Configuration Topography . 72.2 Hardware and Software Prerequisites . 73Configuring Commvault IntelliSnap for NetApp . 83.1 Add a Disk Library to the MediaAgent . 83.2 Tuning the Disk Library Settings . 113.3 Create a Storage Policy . 143.4 Perform a Test Backup . 223.5 Monitor the Backup. 243.6 Restore a Backup . 244Solution Recommendations and Best Practices. 274.1 Commvault IntelliSnap for NetApp Best Practices . 274.2 Windows Best Practices. 28Version History . 29LIST OF TABLESTable 1) Commvault IntelliSnap for NetApp best practices. . 27LIST OF FIGURESFigure 1) Typical Commvault IntelliSnap for NetApp network view. 5Figure 2) AltaVault appliance. . 5Figure 3) AltaVault ecosystem. . 7Figure 4) Library and drive configuration. . 8Figure 5) Select MediaAgent. 9Figure 6) Add a disk library. . 10Figure 7) Library name selection. . 10Figure 8) Shared Mount Path identification. . 11Figure 9) Library properties. . 12Figure 10) Mount Paths Allocate Number of Writers. 12Figure 11) Device Paths Allocate Number of Writers. . 13Figure 12) Device Controller Details. . 132NetApp AltaVault Cloud-Integrated Storage Appliance Solution Deployment:AltaVault with Commvault IntelliSnap for NetApp 2017 NetApp, Inc. All rights reserved.
Figure 13) Create New Storage Policy. . 14Figure 14) Storage Policy Name entry. . 14Figure 15) Library selection. 15Figure 16) MediaAgent selection. . 15Figure 17) Retention selection. . 16Figure 18) Retention selection. . 16Figure 19) Deduplication selection. . 17Figure 20) OnCommand setting. . 17Figure 21) Review selections. . 18Figure 22) Policy properties. . 18Figure 23) Enable backup copy. . 19Figure 24) Snapshot catalog warning. . 19Figure 25) Create new copy. . 20Figure 26) Copy properties. . 20Figure 27) Copy properties media agent selection. . 20Figure 28) Copy retention properties. . 21Figure 29) Storage policy. . 22Figure 30) Backup action. . 23Figure 31) Advanced options . 23Figure 32) Backup options. . 24Figure 33) Job controller . 24Figure 34) Recovery initialization. . 25Figure 35) Client and MediaAgent selection. 25Figure 36) Browse and restore options. . 263NetApp AltaVault Cloud-Integrated Storage Appliance Solution Deployment:AltaVault with Commvault IntelliSnap for NetApp 2017 NetApp, Inc. All rights reserved.
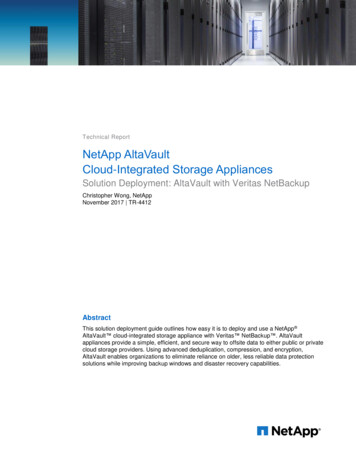
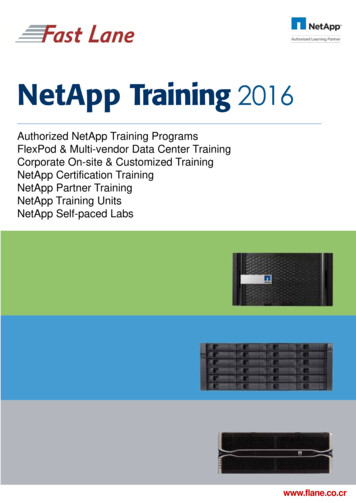
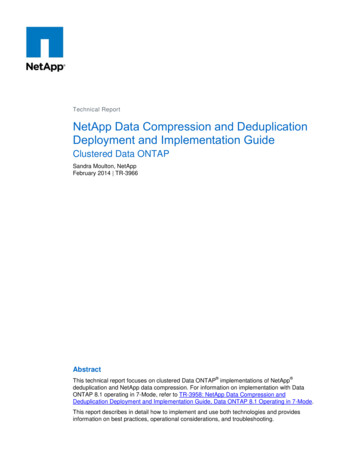
1 AltaVault Overview1.1Executive OverviewNetApp AltaVault storage enables customers to securely back up data to any cloud at up to 90% less costcompared to that of on-premises solutions. AltaVault gives customers the power to tap into cloudeconomics while preserving investments in existing backup infrastructure and meeting backup andrecovery SLAs. AltaVault appliances act as a NAS target within a backup infrastructure. Having thiscapability enables organizations to eliminate their reliance on tape infrastructure and all of its associatedcapital and operational costs while improving backup windows and disaster recovery capabilities.It is simple to set up the AltaVault appliance. You can start moving data to the cloud in as little as 30minutes; setting up tape or other disk replication infrastructures can take days. By leveraging industryleading deduplication, compression, and WAN optimization technologies, AltaVault appliances shrinkdataset sizes by 10 to 30 times. They also substantially reduce cloud storage costs, accelerate datatransfers, and store more data within the local cache, speeding recovery.Security is provided by encrypting data on site, in flight, as well as in the cloud using 256-bit AESencryption and SSL v3/TLS v1. AltaVault appliances provide a dual layer of encryption that prevents anydata moved into the cloud from being compromised, and it creates a complete end-to-end securitysolution for cloud storage.Because an AltaVault appliance is an asymmetric, stateless appliance, no hardware is needed in thecloud. You can also recover the last known good state of a broken or destroyed AltaVault appliance to anew AltaVault appliance. AltaVault appliances provide flexibility to scale cloud object storage as businessrequirements change. Organizations avoid all of the capital expenditure planning required with tape anddisk replication–based solutions, saving up to 90%.1.2Commvault IntelliSnap for NetApp Architecture OverviewCommvault IntelliSnap for NetApp, with its revolutionary single-platform architecture, liberates companiesfrom the expense and chaos of legacy data protection software not designed to handle today's ITrealities. Modern data management is a tightly integrated blend of snapshot, replication, and persistentcopies that are securely managed and accessible through a single, unified platform.Commvault IntelliSnap for NetApp is application, operating system, and disk aware. The software quicklycreates consistent copies by integrating and leveraging NetApp Snapshot copies in the NetApp DataONTAP operating system. After a consistent Snapshot copy is created, data is efficiently moved to asecondary storage controller using the market-leading replication technologies of NetApp SnapMirror and NetApp SnapVault software.Commvault IntelliSnap for NetApp utilizes software modules called iData Agents that share a common setof back-end services to talk through the common platform. Backups always start with a Data ONTAPSnapshot copy. Then they can be directed to alternate storage locations such as a replication targetstorage appliance or disk-based libraries where the destination is a cloud object storage serviceleveraging AltaVault. The following figure provides an overview of a typical Commvault IntelliSnap forNetApp deployment.4NetApp AltaVault Cloud-Integrated Storage Appliance Solution Deployment:AltaVault with Commvault IntelliSnap for NetApp 2017 NetApp, Inc. All rights reserved.
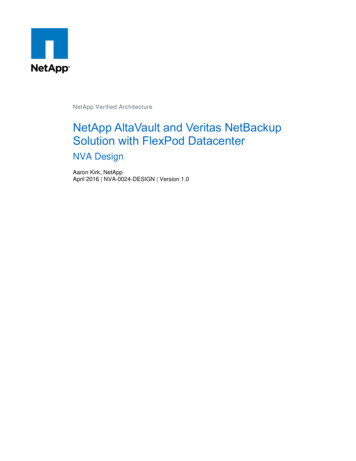
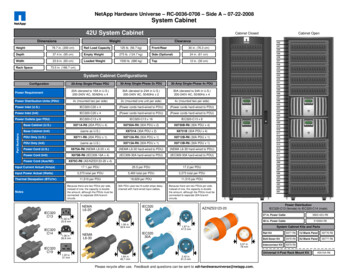
Figure 1) Typical Commvault IntelliSnap for NetApp network view.With Commvault IntelliSnap for NetApp, all backup operations start with a Snapshot copy. When usingAltaVault to move data to the cloud, Commvault IntelliSnap for NetApp uses a MediaAgent to access theSnapshot copy and stream the data to a disk library on an AltaVault share. The Snapshot copy can be onthe primary storage controller or it can be on a secondary storage controller. This flexibility enablesbacking up from either a second data center or nonprimary storage so that there is no impact onapplications using primary storage during the backup operation.Commvault IntelliSnap for NetApp uses storage policies to determine the operations to perform for abackup. The initial Snapshot copy operation is followed by one or more copy operations. Transferring thedata to AltaVault happens in a copy operation and can use a different type of retention than that of theSnapshot copy. The retention can be either a basic retention or extended retention rules that can assign adifferent retention period to some backup copies, such as weekly or quarterly backups.1.3AltaVault Appliance OverviewFigure 2) AltaVault appliance.AltaVault appliances are optimized and purpose built for data protection. AltaVault appliances easilyintegrate into your existing backup infrastructure and favorite cloud storage provider. Setup andinstallation are easy because backup applications allow you to add an AltaVault appliance as a commontarget within its existing infrastructure. The backup server connects to the AltaVault appliance usingstandard CIFS or NFS protocols.When you back up to an AltaVault device, it performs inline, variable-segment-length deduplication,compression, and encryption of the backup data to minimize storage consumption and transmissiontimes. AltaVault appliances also use their local disk cache for fast recovery of recent backups, providingLAN performance for the most likely restores. The AltaVault appliance then securely writes the5NetApp AltaVault Cloud-Integrated Storage Appliance Solution Deployment:AltaVault with Commvault IntelliSnap for NetApp 2017 NetApp, Inc. All rights reserved.
deduplicated backup data to cloud storage and accelerates restores from the cloud by moving onlyneeded segments of deduplicated data over the WAN. An easy-to-use graphical management consoleenables you to manage one or more AltaVault appliances through a web browser interface.6NetApp AltaVault Cloud-Integrated Storage Appliance Solution Deployment:AltaVault with Commvault IntelliSnap for NetApp 2017 NetApp, Inc. All rights reserved.
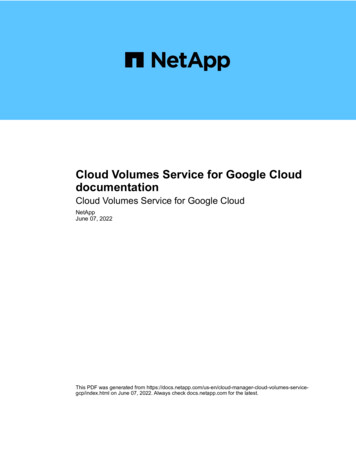
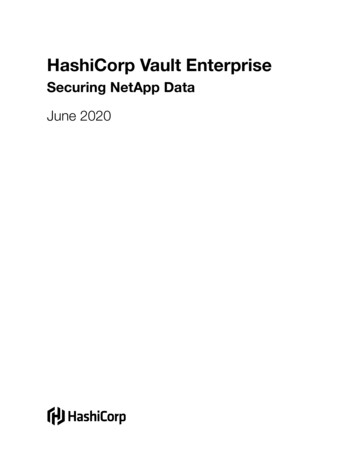
2 Deploy and Configure AltaVault with Commvault IntelliSnap forNetAppCommvault IntelliSnap for NetApp with AltaVault appliances provides you with a flexible, easy-toconfigure-and-use solution that can be deployed with major cloud storage providers. See the “AltaVaultDeployment Guide” for the detailed steps required to deploy an AltaVault appliance.2.1AltaVault Solution Configuration TopographyFigure 3) AltaVault ecosystem.2.2Hardware and Software PrerequisitesTo properly deploy AltaVault into a backup environment, be sure that the following prerequisiterequirements have been met before installing and deploying AltaVault.1. You need at least one server that acts as the CommServe and MediaAgent server. Check the NetAppSupport site and related compatibility lists where applicable.2. The Commvault IntelliSnap for NetApp solution requires NetApp OnCommand Unified Manager aswell as a data source on a Data ONTAP storage system, such as a NetApp FAS array.3. You must have server systems and related software media supported by Commvault IntelliSnap forNetApp and the AltaVault appliance.4. A physical AltaVault appliance or a virtual AltaVault appliance needs to be online and connected tothe physical network infrastructure. A minimum of two IP addresses must be available for AltaVault.5. You must procure and set up all necessary software licenses from each vendor using vendor-specificguidelines. This includes obtaining cloud storage credentials from your designated cloud storageprovider.6. Perform physical stacking and racking of equipment at each site. All cabling and power must beoperational.7. Verify that all LAN and WAN connections are functioning to and from Internet and cloud storageproviders.8. If applicable, have available a Windows Active Directory Domain Services.7NetApp AltaVault Cloud-Integrated Storage Appliance Solution Deployment:AltaVault with Commvault IntelliSnap for NetApp 2017 NetApp, Inc. All rights reserved.
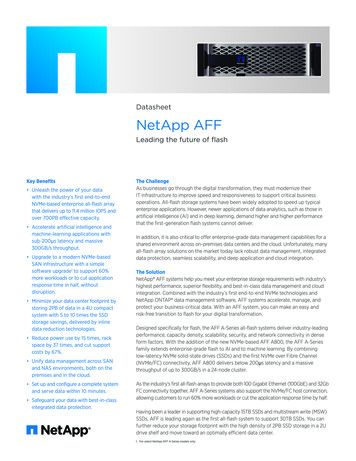
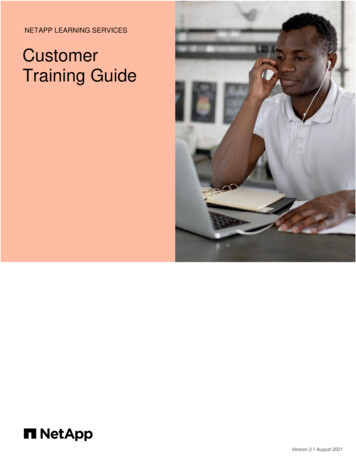
3 Configuring Commvault IntelliSnap for NetAppWhen adding an AltaVault appliance to a Commvault IntelliSnap for NetApp environment, two primarytasks are required. The first is to add a disk library to the MediaAgent that points to AltaVault. The secondis to modify the storage policy so that client backups are directed to use the new disk library target.In these examples a single disk library is created. It is also possible to have additional disk libraries, eachon separate shares on the AltaVault appliance. Additionally, it is possible to have more MediaAgents,each with disk libraries writing to the same AltaVault appliance. In such a case NetApp recommendsusing a share for each MediaAgent and disk library combination.It is possible to tune AltaVault’s cache on a per-share basis. Depending on the source data type it mightbe beneficial to have a disk library and share for each source data type. For example, when backing upVMs they could be sent to one disk library and share. The catalogs could be backed up to a different disklibrary and share on the same AltaVault appliance.It is also possible to write the Commvault IntelliSnap for NetApp DR backups to AltaVault. When you doso, NetApp recommends creating a separate AltaVault share and disk library that is dedicated to DRbackups so that they are separate from other backup data.Schedule policies are not described in this guide. These policies are described in the CommvaultIntelliSnap for NetApp documentation and apply to the Snapshot backup job as well as the backup copyjob. See the Commvault IntelliSnap for NetApp online documentation for information about creatingschedules.3.1Add a Disk Library to the MediaAgentA library is used by a MediaAgent to communicate and store backup data on a specific device. For thepurposes of this configuration, the library created will be configured to point to an AltaVault CIFS share,rather than to a local disk volume.1. Select the Storage tab from the top menu, and then click Expert Storage Configuration.Figure 4) Library and drive configuration.2. Identify the MediaAgent to use and click the Add button to select it. Click OK to continue.8NetApp AltaVault Cloud-Integrated Storage Appliance Solution Deployment:AltaVault with Commvault IntelliSnap for NetApp 2017 NetApp, Inc. All rights reserved.
Figure 5) Select MediaAgent.3. When the Library and Drive Configuration panel appears, select the Libraries icon, right-click it, andselect Add Disk Library.4. Click OK at the Information dialog9NetApp AltaVault Cloud-Integrated Storage Appliance Solution Deployment:AltaVault with Commvault IntelliSnap for NetApp 2017 NetApp, Inc. All rights reserved.
Figure 6) Add a disk library.5. Identify the library name you want to use, then click OK.Figure 7) Library name selection.6. Provide a base folder name in which to store the data. In the Sharing Folder Properties section:— If the AltaVault appliance is configured with local permissions, provide the fully qualified CIFSshare name to the AltaVault target in the Local Path section.— If the AltaVault appliance is configured with Active Directory, select the Network Path sectioninstead. Provide Windows login credentials and the fully qualified SMB share name to the AltaVaulttarget.10NetApp AltaVault Cloud-Integrated Storage Appliance Solution Deployment:AltaVault with Commvault IntelliSnap for NetApp 2017 NetApp, Inc. All rights reserved.
Figure 8) Shared Mount Path identification.7. Click OK to complete library creation.3.2Tuning the Disk Library SettingsIt Is recommended to do some performance tuning for most environments. There are several ways thattuning can be performed with the goal of optimizing data transfer for backup jobs as well as completingbackups within allocated windows.From the AltaVault aspect, it is possible to set the number of writers allowed for each disk library andeach media agent. The goal should be to start with a low number of simultaneous writers to spread thebackups throughout the backup window. Increasing the number of writers as needed up to the maximumnumber of concurrent streams the AltaVault supports. Going beyond the supported concurrent streamlimit will result in write failures with jobs failing.For the most current recommendations on the number of concurrent streams and recommendations forthe number of media agents refer to TR-4414 AltaVault Best Practices Guide for Backup Applications.1. From the main console view, expand Storage Resources Libraries. Right-click the library justcreated. Select Properties. When the Properties window appears, select the Mount Paths tab and setthe Allocate Number of Writers value.11NetApp AltaVault Cloud-Integrated Storage Appliance Solution Deployment:AltaVault with Commvault IntelliSnap for NetApp 2017 NetApp, Inc. All rights reserved.
Figure 9) Library properties.Figure 10) Mount Paths Allocate Number of Writers.Allocate Number of Writers This value establishes how many writes are allowed by data protection clients. NetApp recommendssetting an initial value of 5 and increasing this value based on network and resource availability.2. Now expand the selected library and select the mount path for the library. Right-click it and selectProperties. In the Allocation Policy tab, set the Allocate Number of Writers value to 5.12NetApp AltaVault Cloud-Integrated Storage Appliance Solution Deployment:AltaVault with Commvault IntelliSnap for NetApp 2017 NetApp, Inc. All rights reserved.
Figure 11) Device Paths Allocate Number of Writers.3. Select the Sharing tab, then select the mount path created and click Edit. In the Device ControllerDetails window, edit the Allocate Number of Writers value to 5.Figure 12) Device Controller Details.13NetApp AltaVault Cloud-Integrated Storage Appliance Solution Deployment:AltaVault with Commvault IntelliSnap for NetApp 2017 NetApp, Inc. All rights reserved.
3.3Create a Storage PolicyStorage policies act as the primary channels through which data is included in data protection and datarecovery operations. A storage policy forms the primary logical entity through which a subclient orinstance is backed up. The policy’s chief function is to map data from its original location to a physicalmedia. For Commvault IntelliSnap for NetApp servers with existing storage policies to which you wouldlike to add AltaVault, you can modify the existing policy and create a copy that uses the previouslycreated disk library that is located on AltaVault. In this example, we create a new storage policy.1. Use the Policies section of the CommCell console and select Storage Policies. Right-click and selectNew Storage Policy.Figure 13) Create New Storage Policy.2. Provide a unique storage policy name and click Next.Figure 14) Storage Policy Name entry.14NetApp AltaVault Cloud-Integrated Storage Appliance Solution Deployment:AltaVault with Commvault IntelliSnap for NetApp 2017 NetApp, Inc. All rights reserved.
3. Select the previously created library to use for this storage policy and click Next.Figure 15) Library selection.4. Select the MediaAgent from the drop-down list and click Next.Figure 16) MediaAgent selection.5. Choose the appropriate retention type and period. For Retain by Jobs, this setting will retain thatnumber of Snapshot copies on the volume.15NetApp AltaVault Cloud-Integrated Storage Appliance Solution Deployment:AltaVault with Commvault IntelliSnap for NetApp 2017 NetApp, Inc. All rights reserved.
Figure 17) Retention selection.6. Make sure Software Encryption is not checked and click next.Figure 18) Retention selection.7. When prompted regarding deduplication, clear the Yes checkbox to disable deduplication.16NetApp AltaVault Cloud-Integrated Storage Appliance Solution Deployment:AltaVault with Commvault IntelliSnap for NetApp 2017 NetApp, Inc. All rights reserved.
Figure 19) Deduplication selection.8. Select the OnCommand Unified Manager system for this policy.Figure 20) OnCommand setting.9. Review the summary and click Finish to complete the storage policy creation.17NetApp AltaVault Cloud-Integrated Storage Appliance Solution Deployment:AltaVault with Commvault IntelliSnap for NetApp 2017 NetApp, Inc. All rights reserved.
Figure 21) Review selections.10. Right-click the storage policy created in the previous step and choose Properties.Figure 22) Policy properties.11. Click the Snapshot tab.12. Click Enable Backup Copy to allow streaming of the Snapshot copies.18NetApp AltaVault Cloud-Integrated Storage Appliance Solution Deployment:AltaVault with Commvault IntelliSnap for NetApp 2017 NetApp, Inc. All rights reserved.
Figure 23) Enable backup copy.13. A warning message is shown to confirm the action. Click the Yes button to accept.Figure 24) Snapshot catalog warning.Next, create a storage policy operation to copy the Snapshot copy data to the disk library created for theAltaVault appliance.14. Click the storage policy created previously, select All Tasks, then select Create New Copy.19NetApp AltaVault Cloud-Integrated Storage Appliance Solution Deployment:AltaVault with Commvault IntelliSnap for NetApp 2017 NetApp, Inc. All rights reserved.
Figure 25) Create new copy.15. Enter a name for the copy.16. Check the box next to Enable Inline CopyFigure 26) Copy properties.17. From the drop-down menus choose the MediaAgent that will perform the copy.Figure 27) Copy properties media agent selection.20NetApp AltaVault Cloud-Integrated Storage Appliance Solution Deployment:AltaVault with Commvault IntelliSnap for NetApp 2017 NetApp, Inc. All rights reserved.
Optionally set the retention specifics for the copy stored on the AltaVault appliance (in the cloud). You canalso set extended retention specifics for certain copies such as Monthly Full. For more information seethe Commvault IntelliSnap for NetApp documentation.Figure 28) Copy retention properties.The following screenshot shows the completed storage policy with the primary Snapshot copy and theAltaVault (cloud) copy.21NetApp AltaVault Cloud-Integrated Storage Appliance Solution Deployment:AltaVault with Commvault IntelliSnap for NetApp 2017 NetApp, Inc. All rights reserved.
Figure 29) Storage policy.3.4Perform a Test BackupTo test Commvault IntelliSnap for NetApp with the AltaVault appliance, run a manual backup of a clientthat uses a storage policy configured in the previous step.1. Expand the client to back up. In this case, the appliance contains the NAS volume to back up. Openthe defaultBackupSet to show the subclients.2. Right-click the file subclient to back up and select Backup. Use the defaults of Full Backup andImmediate job initiation.22NetApp AltaVault Cloud-Integrated Storage Appliance Solution Deployment:AltaVault with Commvault IntelliSnap for NetApp 2017 NetApp, Inc. All rights reserved.
Figure 30) Backup action.3. Click the Advanced button4. Uncheck Skip Catalog Phase5. Check Create Backup Copy Immediately, leave Start Backup Copy job based on Storage PolicyRules selectedFigure 31) Advanced options6. Click OK to close the Advanced Backup Options dialog.7. Click OK to initiate the backup.23NetApp AltaVault Cloud-Integrated Storage Appliance Solution Deployment:AltaVault with Commvault IntelliSnap for NetApp 2017 NetApp, Inc. All rights reserved.
Figure 32) Backup options.3.5Monitor the BackupUse the Job Controller view within the left tree of the CommCell console to monitor and control backupjobs. The current running backup jobs are reported under the right panel of the window and you canaccess a detailed view by right-clicking on the job name and selecting Details.Figure 33) Job controller3.6Restore a BackupYou can use the CommCell console to perform restores of backup data for clients. In this example, we setthe copy precedence to 3, which is the copy job to AltaVault as specified in the Storage Policy we createdearlier.1. Click on the Browse and Restore button from the CommCell console menu to launch the recoverytool.24NetApp AltaVault Cloud-Integrated Storage Appliance Solution Deployment:AltaVault with Commvault IntelliSnap for NetApp 2017 NetApp, Inc. All rights reserved.
Figure 34) Recovery initialization.2. Provide the options you want to use when selecting what to recover.Figure 35) Client and MediaAgent selection.3. Click the Advanced Options tab. Select Browse from copy precedence and enter 3 for the
3. You must have server systems and related software media supported by Commvault IntelliSnap for NetApp and the AltaVault appliance. 4. A physical AltaVault appliance or a virtual AltaVault appliance needs to be online and connected to the physical network infrastructure. A minimum of two IP addresses must be available for AltaVault. 5.