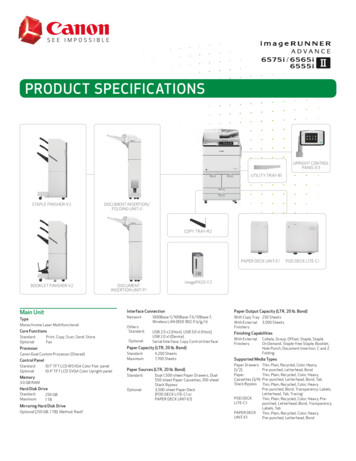
Transcription
Administration GUIDEVirtual Server iDataAgent (VMware)Published On: 11/19/2013V10 Service Pack 4APage 1 of 225
User Guide - Virtual Server iDataAgent (VMware)Table of ContentsSystem RequirementsSupported FeaturesLicense RequirementsGetting StartedOverviewDeploymentConfigurationAutomatic DiscoveryBackupRestoreAdvanced OptionsConfiguring User Access to the CommCell Console, vCenter, and Web ConsoleConfigurationBackupRestoreBrowse and RestoreFind DataProtect a vCenter ServerAdditional CommCell OperationsOnline Help LinksVM ser CasesRelated TopicsCommand LineBackupRestoreVM Lifecycle ManagementOverviewPrerequisitesPublished On: 11/19/2013V10 Service Pack 4APage 2 of 225
Setup VM ProvisioningAdvanced OptionsVM File Recovery Plug-In (Administrator)OverviewPrerequisitesSetupAdvanced OptionsRestore Files Using vSphere ClientTroubleshootingVirtual Machine End User TasksRecover Virtual Machines or VM Files - Web ConsoleUser OperationsUser TroubleshootingBest PracticesFrequently Asked QuestionsTroubleshootingPublished On: 11/19/2013V10 Service Pack 4APage 3 of 225
System Requirements - Virtual Server Agent for VMwareSystem RequirementsSupported FeaturesLicense RequirementsThe following requirements are for the Virtual Server iDataAgent:VMware ESX ServerVMware ESX / ESXi 4.x, 5.xBefore configuring backup of any ESXi servers, ensure that you are using Essentials licensing level or higher. The vStorage APIs for Data Protection (VADP) are notprovided with the free version of ESXi.VMware vSphereVMware vSphere 5.5VDDK 5.5VDDK 5.5 is installed automatically with SP4B or higher. Customers can also update the VDDK to Version 5.5manually. This is a supported process for V10 only. Do not place the VDDK files in the VDDK installation in theCommVault base directory.With VDDK 5.5, 32-bit libraries and binaries are no longer supported. For proxies with 32-bit operating systems,VDDK 5.1.1 is automatically installed instead of VDDK 5.5.Virtual Machine HardwareVersion 4.0, 7.0, 8.0, 9.0, 10.0Virtual Machine Operating SystemsAll Guest Operating Systems supported by VADP and VCBVMware Tools on Virtual MachinesThe latest version of VMware Tools supported by the host should be installed on each virtual machine. At a minimum, the version of VMware tools on virtual machinesmust be supported on the host; unsupported versions must be upgraded.Proxy Computer Operating SystemsMicrosoft Windows Server 2012 x64 EditionsMicrosoft Windows Server 2008 x64 EditionsVM Lifecycle ManagementThe following conditions must be considered when utilizing VM Lifecycle Management:zVMware vCenter 4.1 or above is requiredzA version of VMware Tools that is supported by the host must be installed on templates (preferably the latest supported version)zWindows Server 2008, Windows 7, and Linux (RedHat5) are supportedHard Drive100 GB recommended.If performing backups with the granular recovery option enabled, the location of the Job Results folder should contain additional space to accommodate at least 2percent of the total amount of data being backed up.Memory4 GB RAM recommendedProcessorAll Windows-compatible processors supportedMiscellaneousAllocation Unit Size of the NTFS VolumesPublished On: 11/19/2013V10 Service Pack 4APage 4 of 225
The cluster size or the allocation unit size of an NTFS volume in a virtual machine must be multiple of 1024 bytes. You can set the cluster size before formatting avolume. The default cluster size is 4096 bytes.Microsoft Visual C Microsoft Visual C 2010 and 2008 Redistributable Packages are automatically installed. Note that these Visual C Redistributable Packages can co-exist with otherversions of this software.DISCLAIMERMinor revisions and/or service packs that are released by application and operating system vendors are supported by our software but may not be individually listed in ourSystem Requirements. We will provide information on any known caveat for the revisions and/or service packs. In some cases, these revisions and/or service packs affect theworking of our software. Changes to the behavior of our software resulting from an application or operating system revision/service pack may be beyond our control. The olderreleases of our software may not support the platforms supported in the current release. However, we will make every effort to correct the behavior in the current or futurereleases when necessary. Please contact your Software Provider for any problem with a specific application or operating system.Additional considerations regarding minimum requirements and End of Life policies from application and operating system vendors are also applicablePublished On: 11/19/2013V10 Service Pack 4APage 5 of 225
Supported Features - Virtual Server Agent for VMwareSystem RequirementsSupported FeaturesLicense RequirementsThe following table lists the features that are supported by this Agent.FeatureAdvanced Backup/Archive OptionsSub-FeatureSupport CommentsData tab - CatalogData tab - Verify Synthetic FullJob Retry tabMedia tab - Allow other Scheduleto use Media SetMedia tab - Mark Media Full onSuccessMedia tab - Reserve ResourcesBefore ScanMedia tab - Start New MediaStartup tabVaultTracking tabCommentsAutomatic File System MultiAdvanced File System iDataAgent StreamingOptionsOn Demand Data ProtectionOperationRestore by JobsRestore Data Using a Map FileCommentsGlobal AlertsAlerts and MonitoringJob-Based Alerts*Automatic UpdatesBackup/Archive OptionsCommentsAutomatic UpdatesCommentsDifferential BackupFull BackupIncremental BackupOther Backup TypesSynthetic Full BackupBackward CompatibilityCommentsVersion 8Version 9BrowseCommentsBrowse from Copy PrecedenceBrowse the Latest DataBrowse Using FiltersExclude Data BeforeFindFull Backup Transparent BrowseImage BrowseNo Image BrowsePage SizePublished On: 11/19/2013V10 Service Pack 4APage 6 of 225
Specify Browse PathSpecify Browse TimeSubclient BrowseUse MediaAgentView All VersionsCommentsClusteringCommand Line InterfaceCommCell MigrationContent IndexingData AgingFind is supported for VMware backups with Granular Recovery option enabled.Unix ClusterWindows - Microsoft Cluster(MSCS)Windows - Non-Microsoft ClusterCommentsCommand Line InterfaceCommentsCommCell MigrationCommentsOffline Content IndexingCommentsBasic Retention RulesDeleting a JobExtended Retention RulesRetaining a JobData CompressionUnique Data Aging RulesCommentsClient CompressionHardware CompressionMediaAgent CompressionData EncryptionData MultiplexingCommentsData Encryption SupportThird-party Command LineEncryption ta Multiplexing is not supported for more than one stream to a single tapedrive within a job. Multi-streaming is supported, but each stream must use adifferent tape drive. The data on a tape drive can be multiplexed with a differentjob, but not with another stream of the same job.MediaAgent DeduplicationSource DeduplicationErase Backup/Archived DataGlobal FiltersInstallationCommentsErase Data by BrowsingErase StubsCommentsGlobal FiltersCommentsCustom PackageDecoupled InstallRemote InstallRestore Only AgentsSilent InstallCommentsPublished On: 11/19/2013V10 Service Pack 4APage 7 of 225
Installing 32-bit Components on aMicrosoft Windows x64 PlatformJob Restart - Data ProtectionInstall 32-bit On x64CommentsNot RestartableRestarts from the BeginningRestarts from the Beginning ofthe DatabaseRestarts from the Point-ofFailureJob Restart - Data RecoveryWhen you restart the job, the virtual machine which failed to backup will bebacked up from the beginning. However, the virtual machines which aresuccessfully backed up, will not get backed up again.CommentsNot RestartableRestarts from the BeginningList MediaRestarts from the Beginning ofthe DatabaseRestarts from the Point-ofFailureCommentsList Media Associated with aSpecific Backup Set or InstanceList Media Associated with IndexMulti InstancingList Media Associated withSpecific Files and/or FoldersList Media Associated withSpecific JobsCommentsMulti InstanceCommentsOptimized ScanPre/Post ProcessesRestore/Recover/RetrieveDestinationsMulti Instancing is not supported for IntelliSnap Backup.Optimized ScanCommentsPre/Post Process with DataProtection and RecoveryCommentsCross-Application Restores(Different Application version)Cross-Platform Restores Different Operating SystemCross-Platform Restores - SameOperating System - DifferentVersionIn-place Restore - Same path/destination - Same ClientOut-of-place Restore - Differentpath/ destinationOut-of-place Restore - Samepath/ destination - DifferentClientRestore Data Using a Map FileRestore to Network Drive /NFSMounted File SystemCommentsAutomatic Detection of RegularRestore/Recover/Retrieve Options ExpressionsFilter Data From RecoverOperationsRename/ Redirect Files onRestoreRestore Data Using WildcardExpressionsRestore Data with Pre/PostProcessesRestore from CopiesSkip Errors and ContinueUse Exact IndexUse MediaAgentCommentsPublished On: 11/19/2013V10 Service Pack 4APage 8 of 225
Restore/Recover/RetrieveOverwrite OptionsOverwrite FilesOverwrite if file on media isnewerRestore only if target existsUnconditional OverwriteUnconditionally overwrite only iftarget is a DataArchiver stubCommentsSchedule PolicyUnconditional Overwrite for existing messages.Agent Specific Data ProtectionSchedule PolicyAll Agent Types Schedule PolicyStorage PoliciesCommentsIncremental Storage Policy*Standard Storage PoliciesSubclient PoliciesUpgradeCommentsSubClient PolicyCommentsNetware - LocalUnix - Remote (Push)Unix/Linux - LocalUnix/Linux - SilentUnix/Linux/Macintosh - LocalUnix/Linux/Macintosh - SilentUpgrade from CommCellConsoleWindows - LocalUser Administration and SecurityWindows - Remote (Push)Windows - SilentCommentsBackup Set/Archive SetInstanceSubclientCommentsAdditional features are listed below:Activity ControlAuxiliary CopyCommCell ConsoleGridStorLog FilesOperation windowIntelliSnap BackupVaultTracker EnterpriseCloud StoragePublished On: 11/19/2013Deconfigure/Reconfigure ComponentsLanguagesMediaAgentSchedulingSnapshot EnginesVaultTrackerRestore/Recover/Retrieve - Other OptionsJob Restart - Data CollectionV10 Service Pack 4APage 9 of 225
Overview - Virtual Server Agent for VMwareOverviewDeploymentConfigurationAutomatic DiscoveryBackupRestoreTable of ContentsIntroductionKey FeaturesVirtualization ClientAutomatic Protection for All Virtual Machines in a vCenterCustomized DiscoveryCustomized FiltersReportsvCloud Backup and RestoreIntelliSnap BackupBlock Level DeduplicationTerminologyIntroductionThe Virtual Server iDataAgent for VMware provides a unified protection and recovery vehicle for all virtual machine data in your vCenter. In addition to completeprotection of entire virtual machines for disaster recovery, the Virtual Server iDataAgent provides more granular backup and recovery options. Options such ascustomized automatic discovery, deduplication, and reporting ensure all your virtual machine data is easily traceable and retrievable whenever the need arises.The Virtual Server iDataAgent for VMware is also referred to as the Virtual Server Agent (VSA) for VMware,The following illustration displays components and data flows for the Virtual Server iDataAgent:Key FeaturesThe Virtual Server iDataAgent offers the following key features:Virtualization ClientThe Virtualization client serves a single point of administration for all proxies. The proxy computer can be any computer where Virtual Server iDataAgent is installed. Alladministration activities such as backups, restores, schedules, reports etc can be performed from the Virtualization Client.The virtualization client also enables proxy teaming. The proxy teaming ensures the fault tolerant backup. It will be useful when you want to perform the backup for alarge number of virtual machines in a limited backup windowAutomatic Protection for All Virtual Machines in a vCenterOnce you configure the Virtual Server iDataAgent for a vCenter, all the virtual machines in the vCenter are automatically selected for backup. This behavior is designedto ensure all virtual machines are backed up.Customized DiscoveryIf you want to backup only specific virtual machines in a vCenter, you can set criteria to search the virtual machines and automatically select them for backup. This isuseful in environments where virtual machines are frequently added, or removed . You can easily browse and select vCenter objects such as hosts, datastores,resource pool etc. to set criteria for automatic discovery.Customized FiltersYou can exclude specific virtual machines or disks on the virtual machines from the backup. You can add filters for the virtual machines or disks.ReportYou can view a detail report about each backed up virtual machine. It contains information such as name of the proxy which performed the backup of the virtualmachine, size of the backup data, type of backup etc. You can view all this information from the CommCell console when the backup job is running. It appears on theClient Status tab of the View Job Details dialog box.vCloud Backup and RestoreYou can protect the vCloud-specific attributes of a virtual machine and restore it back to a vCloud.Published On: 11/19/2013V10 Service Pack 4APage 10 of 225
IntelliSnap BackupIntelliSnap Backup enables you to create a point-in-time snapshot of a virtual machine by temporarily quiescing the data, taking a snapshot, and then resuming liveoperations. IntelliSnap backups work in conjunction with hardware snapshot engines.Block Level DeduplicationDeduplication provides a smarter way of storing data by identifying and eliminating the duplicate items in a data protection operation.Deduplication at the data block level compares blocks of data against each other. If virtual machines contains blocks of data that are identical to each other, block leveldeduplication eliminates storing the redundant data and reduces the size of the data in storage. This dramatically reduces the virtual machine backup data copies onboth the disk and tapes.Changed Block Tracking (CBT) is a VMware feature that can be used to optimize backups of virtual machines by reading only the allocated and modified portions of avirtual disk. CBT is automatically enabled for virtual machines running on hardware version 7 or higher.TerminologyThe Virtual Server iDataAgent documentation uses the following terminology:Proxy ComputerVirtual ClientVirtual ServeriDataAgentBackupsetSubclientDiscoveryGuest HostGuest OSVendorPublished On: 11/19/2013A physical computer separate from the host computer on which the iDataAgent is installed. This computer facilitates most of the datamovement from the host computer to the backup media. In some cases, this computer may be a virtual machine installed on the hostcomputer. Such computers are referred to as a Proxy.A logical entity which serves as single point of administration for all proxies.A software module that performs backup and restore of virtual machine data.A group of subclients which includes all of the data backed up by the iDataAgent.A logical entity that uniquely defines a unit of data to be backed up.Searching Virtual Machines in the vCenter based on a specific criteriaA virtual machine.The operating system running on the virtual machine (such as Windows or Linux).The virtualization software being used (such as VMware).V10 Service Pack 4APage 11 of 225
Deployment - Virtual Server Agent for VMwareOverviewDeploymentConfigurationAutomatic DiscoveryBackupRestoreWhere To InstallInstall the software on a windows computer. This can be a physical computer or a virtual machine. This computer is called as proxy.In a clustered environment, install the software on the physical computer.Follow the steps given below to install the Virtual Server iDataAgent.The computer will be added as a client in the CommCell as soon as the installation completes successfully.Before You BeginSystem RequirementsVerify that the computer in which you wish to install the software satisfies the minimum requirements specified in System Requirements.Download Software PackagesDownload the latest software package to perform the install.InstallationThe software can be installed using one of the following methods:Method 1: Remote Install Using CommCell ConsoleUse this procedure to install remotely on a client computer.Method 2: Interactive Install - StandardUse this procedure to install the software using the standard installation options.Method 3: Interactive Install - CustomUse this procedure to install the software by specifying installation settings and options.Method 1: Remote Install Using CommCell Console1.Open CommCell Console:{Click Start and point to All Programs.{Click HDPS .{Click Backup and Recovery Administrative Console.2.From the CommCell Browser, click Tools Add/Remove Software Install Software.3.Click Next.Published On: 11/19/2013V10 Service Pack 4APage 12 of 225
4.Click Next.5.Click Manually Select Computers.Click Next.6.Enter the fully qualified domain name of the client computer.For example: mycomputer.mydomain.mycompany.comClick Next.Published On: 11/19/2013V10 Service Pack 4APage 13 of 225
{Do not use space and the following characters when specifying the Host Name:\ ! @# % &*() /?,[]{}:;'"7.8.Choose one of the following:{Click Next if you want to use the default cache location{Click Override Software Cache and specify a new location in the Software Cache box and then click NextzThe software cache is the location from where the remote install program installs the software.zThis screen will not appear if the remote cache is not configured. For more information, see Managing Cache Remote Cache.Specify the User Name and Password that must be used to access the client computer, and then click Next.zThe user must be an Administrator or a member of the Administrator group on that computer.zAccount information is required while performing remote installs for the first time on a client. For subsequentremote installs on that client, click Next without specifying the account information.Published On: 11/19/2013V10 Service Pack 4APage 14 of 225
9.Click VirtualServer Agent.Click Next.10.Select the following:{Select a client group from the available Client Groups, and then click Add.{From the Global Filters list, select one of the following: Use Cell level Policy to inherit the global filter policy configuration set for the CommCell. Always use Global Filters to apply the global filters policy to the default subclient regardless of the policy set for the CommCell. Do not use Global Filters if you plan to define specific filters for the Agent.{From the Storage Policy To Use list, select a storage policy.{Click Next.This screen will not be displayed if Client Groups are not configured in the CommCell Console. For more information,see Client Computer Groups.Published On: 11/19/2013V10 Service Pack 4APage 15 of 225
11.Click Next.If necessary you can select additional options. Click the Help button to get more information on the available options.12.Click Next.If necessary you can select optional settings. Click the Help button to get more information on the available options.13.Select one of the following:{If firewall configuration is not required, click Next.Published On: 11/19/2013V10 Service Pack 4APage 16 of 225
{If this computer and the CommServe is separated by a firewall, click Configure firewall services.For firewall options and configuration instructions, see Firewall Configuration and continue with the installation.14.Select Immediate.Click Next.15.Click Finish.This screen will reflect the components you selected for install, and may look different from the example shown.Published On: 11/19/2013V10 Service Pack 4APage 17 of 225
16.You can track the progress of the job from the Job Controller window of the CommCell console.{From the Home menu, click Job Controller.Once the job is complete, view the job details from the Admin Job History.17.{Right-click the CommServe , point to View and then click Admin Job History.{Click Select Install/Upgrade/Remove/Repair Software.{Click OK.{You can view the following by right-clicking the job: Details of the job Option to Resubmit the job Events associated with the job Logs associated with the job Option to send the Logs associated with the jobIf you have installed on a clustered computer, make sure to install the software on all the physical nodes and then follow the steps described in ClusterConfiguration.Published On: 11/19/2013V10 Service Pack 4APage 18 of 225
18.To create a storage policy, you must have configured a library in the CommCell.zIf you do not already have a library configured, go to Disk Library Creation.zIf you have a library configured, go to Storage Policy Creation.DISK LIBRARY CREATION:1.From the CommCell Browser, navigate to Storage Resources, right-click the Libraries, point to Add and then click Disk Library.Alternatively, you can also navigate to MediaAgents, right-click MediaAgent , point to All Tasks Create Library and then click Disk Library.2.From the Add Disk Library dialog box, specify the following: In the Name box, specify name of the disk library. From the MediaAgent list, select the MediaAgent.Perform one of the following: Select Local Path if you wish to specify a local path in the MediaAgent computer.In the Disk Device box, type the name of the folder in which the disk library must located or click button to select the folder.Select Network Path, if you wish to specify a network path as the target share.In the Connect As box, type the user name.In the Password and Verify Password box, type the password to access the network share.In the Folder box, type the mount path or click 3.button to select a mount path.Click OK.The newly created disk library will be displayed under Libraries node.This will create a library and Storage Policy. Clickto proceed to the Configuration section.Storage Policy Creation1.From the CommCell Browser, navigate to Policies.2.Right-click the Storage Policies and then click New Storage Policy.3.Follow the prompts displayed in the Storage Policy Wizard. The required options are mentioned below: Select the Storage Policy type as Data Protection and Archiving and click Next. Enter the name in the Storage Policy Name box and click Next. From the Library list, click the name of a disk library to which the primary copy should be associated and then click Next.Ensure that you select a library attached to a MediaAgent operating in the current release. From the MediaAgent list, click the name of a MediaAgent that will be used to create the primary copy and then click Next. For the device streams and the retention criteria information, click Next to accept default values. Select Yes to enable deduplication for the primary copy. From the MediaAgent list, click the name of the MediaAgent that will be used to host the Deduplication Database (DDB).In the Location box, type the name of the folder in which the DDB must be located or click the Browse button to select the folder and then click Next. Review the details and click Finish to create the Storage Policy.This will create a storage policy. ClickPublished On: 11/19/2013to proceed to the Configuration section.V10 Service Pack 4APage 19 of 225
Several additional options are available for remotely installing the software from CommCell Console, refer to Install Software from the CommCell Console (RemoteInstall) for more information.Method 2: Interactive Install - Standard1.Log on to the client computer as an Administrator or as a member of the Administrator group on that computer.2.Run SetupAll.exe from the Software Installation Discs.3.Click I accept the terms in the license agreement.Click Next.4.Click Standard.Click Next.Published On: 11/19/2013V10 Service Pack 4APage 20 of 225
5.Click Join an Existing CommCell.Click Next.6.Click Virtualization.Click Next.7.Verify the default location for software installation.Click Next.If necessary, click Browse. to change the default location.{Do not install the software to a mapped network drivePublished On: 11/19/2013V10 Service Pack 4APage 21 of 225
8.{Do not use the following characters when specifying the destination path: / : * ? " #{It is recommended that you use alphanumeric characters onlyClick Install.The Summary on your screen should reflect the components you selected for install, and may look different from theexample shown.9.Click Yes.10.Click Next.Published On: 11/19/2013V10 Service Pack 4APage 22 of 225
11.Select one of the following:{If firewall configuration is not required, click Next.{If this computer and the CommServe is separated by a firewall, click Configure firewall services.For firewall options and configuration instructions, see Firewall Configuration and continue with the installation.12.Enter the fully qualified domain name of the CommServe in the CommServe Host Name box.{Do not use space and the following characters when specifying the CommServe Host Name:\ !@# % &*() /?,[]{}:;'"Click Next.Published On: 11/19/2013V10 Service Pack 4APage 23 of 225
13.Enter the following:{The local (NetBIOS) name of the client computer is displayed in the Select a Client name list.If necessary you can also type a new (friendly) name for the client in this box. This name will be used in the CommCell and will also be displayed in theCommCell Console.Do not use spaces when specifying a new name for the client.{The default network interface name of the client computer is displayed if the computer has only one network interface (NIC card).If the computer has multiple network interfaces, select the interface name that is preferred for communication with the CommServe.Click Next.If a component is already installed on this computer, this screen will not be displayed; instead, the install program willuse the same name as previously specified.14.Select one of the following options:{If you do not want to disable Windows Firewall, click Next.{If you want to disable Windows Firewall for all profiles, click Yes, disable Windows Firewall for all profiles and then click Next.You will get this screen if you did not configure the firewall settings in step 11.15.Select a Client Group.Click Next.This screen will not be displayed if Client Groups are not configured in the CommCell Console. For more information,see Client Computer Groups.Published On: 11/19/2013V10 Service Pack 4APage 24 of 225
16.Select a storage policy from the Storage Policy list.Click Next.If you do not have a Storage Policy, the list will not be displayed. You can create the Storage Policy later in step 18.17.Click Finish.This screen will reflect the components you selected for install, and may look different from the example shown.If you already have a storage policy selected in step 16, clickto proceed to the Configuration section.If you do not have Storage Policy created, continue with the following step.Published On: 11/19/2013V10 Service Pack 4APage 25 of 225
18.To create a storage policy, you must have configured a library in the CommCell.zIf you do not already have a library configured, go to Disk Library Creation.zIf you have a library configured, go to Storage Policy Creation.DISK LIBRARY CREATION:1.From the CommCell Browser, navigate to Storage Resources, right-click the Libraries, point to Add and then click Disk Library.Alternatively, you can also navigate to MediaAgents, right-click MediaAgent , point to All Tasks Create Library and then click Disk Library.2.From the Add Disk Library dialog box, specify the following: In the Name box, specify name of the disk library. From the MediaAgent list, select the MediaAgent.Perform one of the following: Select Local Path if you wish to specify a local path in the MediaAgent computer.In the Disk Device box, type the name of the folder in which the disk library must located or click button to select the folder.Select Network Path, if you wish to specify a network path as the target share.In the Connect As box, type the user name.In the Password and Verify Password box, type the password to access the network share.In the Folder box, type the mount path or click 3.button to select a mount path.Click OK.The newly created disk library will be displayed under Libraries node.This will create a library and Storage Policy. Clickto proceed to the Configuration section.Storage Policy Creation1.From the CommCell Browser, navigate to Policies.2.Right-click the Storage Policies and then click New Storage Policy.3.Follow the prompts displayed in the Storage Policy Wizard. The required options are mentioned below: Select the Storage Policy type as Data Protection and Archiving and click Next. Enter the name in the Storage Policy Name box and click Next. From the Library list, click the name of a disk library to which the primary copy should be associated and then click Next.Ensure that you select a library attached to a MediaAgent operating in the current release. From the MediaAgent list, click the name of a MediaAgent that will be used to create the primary copy and then click Next. For the device streams and the retention criteria information, click Next to accept default values. Select Yes to enable deduplication for the primary copy. From the MediaAgent list, click the name of the MediaAgent that will be used to host the Deduplication Database (DDB).In the Location box, type the name of the folder in which the DDB must be located or click the Browse button to select the folder and then click Next. Review the details and click Finish to create the Storage Policy.This will create a storage policy. ClickPublished On: 11/19/2013to proceed to the Configuration section.V10 Service Pack 4APage 26 of 225
19.If you have installed on a clustered computer, make sure to install the software on all the physical nodes and then follow the steps described in ClusterConfiguration.D
CommVault base directory. With VDDK 5.5, 32-bit libraries and binaries are no longer supported. For proxies with 32-bit operating systems, . Overview - Virtual Server Agent for VMware The Virtual Server iDataAgent for VMware provides a unified protection and recovery vehicle for all virtua l machine data in your vCenter. In addition to complete