Transcription
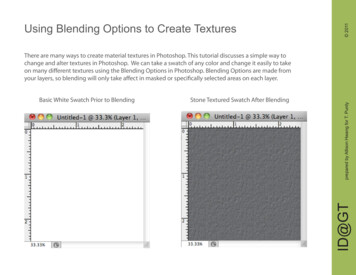
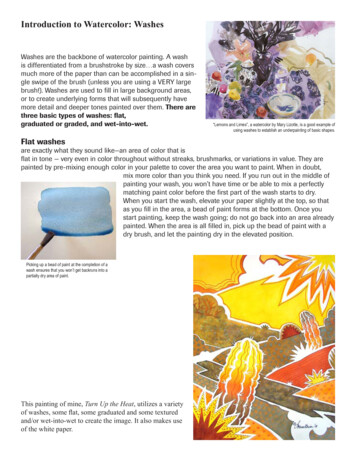
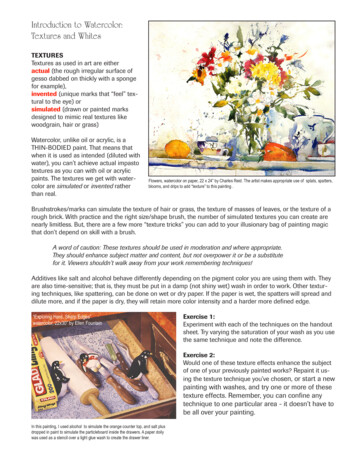
Introduction to Watercolor:Textures and WhitesTEXTURESTextures as used in art are eitheractual (the rough irregular surface ofgesso dabbed on thickly with a spongefor example),invented (unique marks that “feel” textural to the eye) orsimulated (drawn or painted marksdesigned to mimic real textures likewoodgrain, hair or grass)Watercolor, unlike oil or acrylic, is aTHIN-BODIED paint. That means thatwhen it is used as intended (diluted withwater), you can’t achieve actual impastotextures as you can with oil or acrylicpaints. The textures we get with watercolor are simulated or invented ratherthan real.Flowers, watercolor on paper, 22 x 24” by Charles Reid. The artist makes appropriate use of splats, spatters,blooms, and drips to add “texture” to this painting .Brushstrokes/marks can simulate the texture of hair or grass, the texture of masses of leaves, or the texture of arough brick. With practice and the right size/shape brush, the number of simulated textures you can create arenearly limitless. But, there are a few more “texture tricks” you can add to your illusionary bag of painting magicthat don’t depend on skill with a brush.A word of caution: These textures should be used in moderation and where appropriate.They should enhance subject matter and content, but not overpower it or be a substitutefor it. Viewers shouldn’t walk away from your work remembering techniques!Additives like salt and alcohol behave differently depending on the pigment color you are using them with. Theyare also time-sensitive; that is, they must be put in a damp (not shiny wet) wash in order to work. Other texturing techniques, like spattering, can be done on wet or dry paper. If the paper is wet, the spatters will spread anddilute more, and if the paper is dry, they will retain more color intensity and a harder more defined edge.“Exploring Hard, Sharp Edges”watercolor, 22x30” by Ellen FountainExercise 1:Experiment with each of the techniques on the handoutsheet. Try varying the saturation of your wash as you usethe same technique and note the difference.Exercise 2:Would one of these texture effects enhance the subjectof one of your previously painted works? Repaint it using the texture technique you’ve chosen, or start a newpainting with washes, and try one or more of thesetexture effects. Remember, you can confine anytechnique to one particular area - it doesn’t have tobe all over your painting.In this painting, I used alcohol to simulate the orange counter top, and salt plusdropped in paint to simulate the particleboard inside the drawers. A paper doilywas used as a stencil over a light glue wash to create the drawer liner.
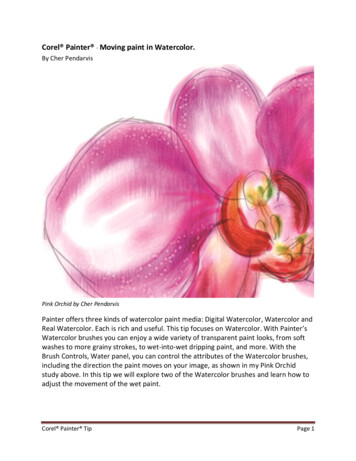
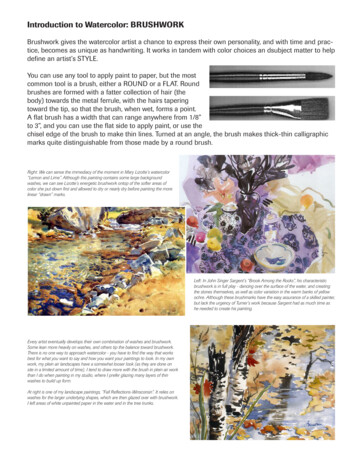
Textures for Watercolor:There are a variety of techniques you can use to introduce the illusion of texture into your watercolorpaintings. Because watercolor is a thin-bodied medium, you can’t ever create the kind of dimensioaltextures possible with oil or acrylic, but you can get some wonderful imitations of texures.Some of these textures rely on things that you place directly into a damp or wet wash of color.They include: wax paper - creates a wonderful mottled texture which can be controlled within a shape plastic wrap - creates a random, rather geometric pattern salt - creates lighter, snoflake-like speckles that vary in size depending on the dampness of the washwhen the salt is added. rubbing alcohol - creates a mottled lighter area which may have either a darker or lighter edge, depending on the pigment it is used with.Other textures involve manipulating the wash using the handle end of your brush or other tool.They include: scraping - leaves a lighter line when done correctly scratching - leaves a darker line when done correctlyStill other textures use various tools to imprint, drip, spatter or splash paint on your paper: sponges stencils and toothbrushes stamps free spattering/dripping with paintbrushes, toothbrushes, spray bottles, squirt bottles, etc.See the following pages for illustrations of the above effects.Textures from lifting materials:While we commonly use lifting techniques to remove damp or wet paint, what you use to lift the paintcan also create a texture. Try textured paper towel, sponges, pieces of fabric, or anything else that isabsorbent. This will lighten an area, but may also leave behind a “textured” imprint if you simply pressand remove, rather than drag or rub an area of paint. Lifting while paint is wet/damp allows more removal of staining pigments than lifting paint when it is dry.Crumpled paper towel/tissueTwisted paper towel/tissueHousehold sponge edgeNatural sponge
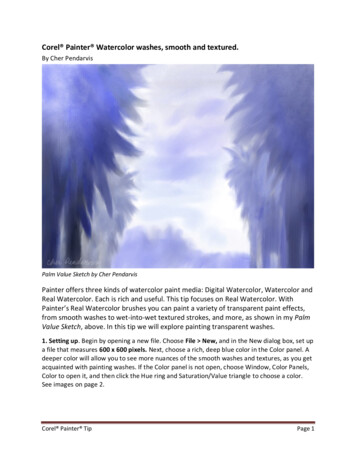
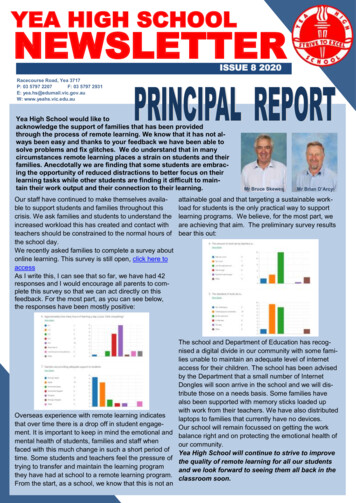
Wax Paper:In both cases, allow the paint to dry before removing the wax paper. You can introduce additional color under the edges ofthe wax paper while the paint is wet for multi-colored effects.Crumpled, smoothed out; laid into wet washCut or torn into a shape; laid into a wet washPlastic Wrap:Allow the paint to dry before removing the plastic wrap. You can introduce additional color under the edges of the wax paper while the paint is wet for multi-colored effects. You can protect areas you don’t want to have affected with a mask.Stretched horizontally; laid into wet washCrumpled loosley; laid into a wet washA variation of this is to use any non-absorbent material with a texture. All create interesting effects when laid in wet washes.Bubble wrap; laid into wet washSalt:Allow the paint to dry before removing any excess undissolved salt crystals. Use this technique sparingly - salt is corrosive.The effect varies with the dampness of the paper when the salt is sprinkled on it, and with the pigment used. Experiment.Paper barely damp; no shinePaper damp; shine JUST gonePaper fairly wet; still some shine
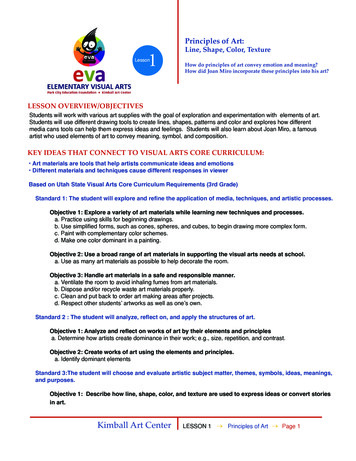
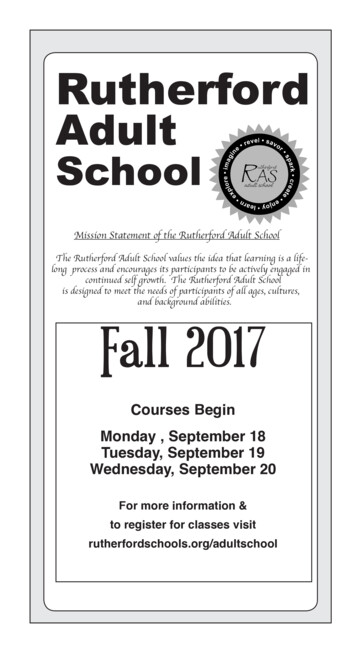
Rubbing Alcohol:Allow the paint to just lose its shine before spattering in the alcohol. Timing is everything here, and the pigment you use withthe alcohol also makes a difference. Some pigments react more strongly to this than others. You can repeat this treatmentas a glaze, using different colors each time to create really rich mottled surfaces.Alcohol dropped into one damp washAlcohol with orange first; then light green glazed over thatof ultramarine blueand alohol dropped into the green wash.Scraping and Scratching:These are “drawing” or “mark making” effects you use the plastic chisel end of your flat aquarelle brush to make. The difference between the two:A scrape leaves a LIGHTER mark, and is done holding the brush parallel to the paper and using the side of the chisel endto push/scrape just barely damp paint. Allow the shine to JUST disappear before you do a scrape.A scratch leaves a DARKER mark, and is done holding the brush perpendicular to the paper and using the end of the chiselto draw/engrave marks/lines into a WET wash. Your paint needs to be wet enough so that when you make a groove/indentation in the paper, the paint particles will concentrate in this groove and create a darker mark when ry.
Other textural effects can be created with a wide variety of tools/techniques:Fabric pressed into a damp washRubbings w/ watercolor pencilStencils-toothbrush applied paintSpattering in a damp washWax paper laid in glazed wet washCarpet pad laid in wet washStamps (hand-cut or commercialSpattering/dripping/blown paint-dry paperSponge-wrap laid in wet wash
WHITES & LIGHTSMediums that use water to thin the paint are known collectively as water-based mediums. They includeinks, colored dyes, acrylic, gouache (opaque watercolor), and transparent watercolors. Generally, whenthe term “watercolor” is used, it describes tube or pan paints that are transparent to semi-transparentand painted thinly on paper. If you are a watercolor “purist”, you only use the white of the paper for yourwhites, never an opaque white paint. Some watercolor painters stick to transparent pigments exceptat the very end of their painting, when they use Chinese White (an opaque white watercolor) to addhighlights only. John Singer Sargent is famous for masterful brushwork, but he also used opaque whiteto add highlights at the end of his transparent watercolor work.Today, almost anything goes as far as watercolor is concerned, including painting on Yupo, which is apolyester film rather than paper. But since there are still some watercolor groups around the countrythat prohibit the use of any opaque paints, you should know how to keep or regain whites or lights.Maintaining or RegainingLiftingWHITES & LIGHTS:Transition fromPositive to NegativeNegative Painting(Painting around thewhite shapes)LiftingNegative PaintingIn the painting above by Zoltan Szabo, he uses negative painting to pull out thelight tree trunks and branches, and also lifting to pull out some of the smallerbranches (See the detail at right)Scraping OutThis won’t give youpure white.LiftingLifting OutThis works bestwith non-stainingpigmentsExercise 3:On one of the small paintings or samples you’vedone, go back and do some LIFTING OUT frompassages of paint that are dark or very saturated.Exercise 4:Find a very pastel area where you can do some NEGATIVE PAINTING to pull out some additionalshapes by painting an area around the pastel area a darker (or different) color.Exercise 5:Find a place where you can glaze a second or third wash of fairly saturated color. When the wash justbarely loses its shine, scrape into it to reveal the color underneath. Scraping not only works to give younear white areas (if done in the first washes you apply to the white paper) but also can reveal dry colorwashes when you paint over them and then do your scraping. Remember that highly staining pigmentcolors nearly instantly infiltrate the paper surface. They won’t lift back to white paper, nor will they scrapeback to white. If you need PURE white paper, paint around white areas or protect them with masking.
be all over your painting. Flowers, watercolor on paper, 22 x 24" by Charles Reid. The artist makes appropriate use of splats, spatters, blooms, and drips to add "texture" to this painting . In this painting, I used alcohol to simulate the orange counter top, and salt plus dropped in paint to simulate the particleboard inside the drawers.