Transcription
Principles of Art:1LessonLine, Shape, Color, TextureHow do principles of art convey emotion and meaning?How did Joan Miro incorporate these principles into his art?LESSON OVERVIEW/OBJECTIVESStudents will work with various art supplies with the goal of exploration and experimentation with elements of art.Students will use different drawing tools to create lines, shapes, patterns and color and explores how differentmedia cans tools can help them express ideas and feelings. Students will also learn about Joan Miro, a famousartist who used elements of art to convey meaning, symbol, and composition.KEY IDEAS THAT CONNECT TO VISUAL ARTS CORE CURRICULUM: Art materials are tools that help artists communicate ideas and emotions Different materials and techniques cause different responses in viewerBased on Utah State Visual Arts Core Curriculum Requirements (3rd Grade)Standard 1: The student will explore and refine the application of media, techniques, and artistic processes.Objective 1: Explore a variety of art materials while learning new techniques and processes.a. Practice using skills for beginning drawings.b. Use simplified forms, such as cones, spheres, and cubes, to begin drawing more complex form.c. Paint with complementary color schemes.d. Make one color dominant in a painting.Objective 2: Use a broad range of art materials in supporting the visual arts needs at school.a. Use as many art materials as possible to help decorate the room.Objective 3: Handle art materials in a safe and responsible manner.a. Ventilate the room to avoid inhaling fumes from art materials.b. Dispose and/or recycle waste art materials properly.c. Clean and put back to order art making areas after projects.d. Respect other students’ artworks as well as one’s own.Standard 2 : The student will analyze, reflect on, and apply the structures of art.Objective 1: Analyze and reflect on works of art by their elements and principlesa. Determine how artists create dominance in their work; e.g., size, repetition, and contrast.Objective 2: Create works of art using the elements and principles.a. Identify dominant elementsStandard 3:The student will choose and evaluate artistic subject matter, themes, symbols, ideas, meanings,and purposes.Objective 1: Describe how line, shape, color, and texture are used to express ideas or convert storiesin art.Kimball Art CenterLESSON 1 Principles of Art Page 1
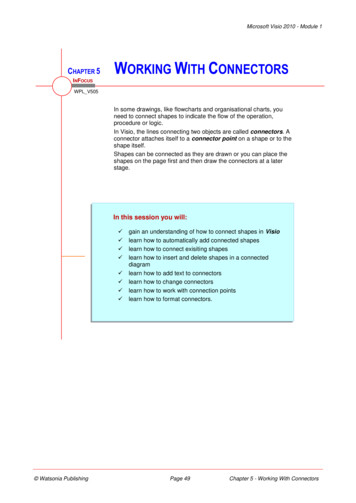
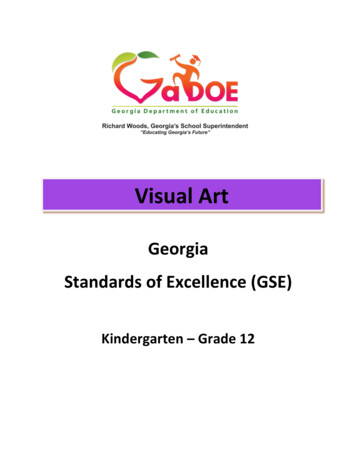
INSTRUCTIONAL OBJECTIVES:Students will: Identify ways artists use a variety of media and tools to communicate ideas and emotions. Understand that different art materials convey different ideas and emotions. Experiment with various media and tools to communicate ideas and emotions. Learn about the artist Joan Miro and his work. Learn about composition, symbols. Learn about elements of art.FOR THE TEACHERIf possible, set up stations in your room where students can work in groups of four or five. Have enough materials at each station to allow each student to experiment with all of the materials. If there are not enough materialsfor this set up, arrange each station according to media (one for watercolor, one for markers and crayons, etc.)and have students take turns at each station.Make an art exploration sheet in advance that you can show to students as an example.After familiarizing students with shapes, lines, design principles, and color, the teacher will explain that thebasic elements of painting and art making is understanding and using these principles and elements. Show thestudents the artist examples of Miro who uses line, shape and color for his compositions. Explain that once thestudent gains a basic understanding of these elements that they then have the freedom to create whatever theywould like.For the project, give each student a large piece of white art paper plus several smaller sheets of paper forexperimentation. The teacher will then narrate instructions to the students one shape to draw on their paper ata time. For example: Draw a line across your paper, draw a circle, draw a cone, draw a square, etc. Make surethe students keep their eyes on their own papers so that each student has to come up with their own layout ofshapes on their paper. Let them decide on how big or small they draw the shapes and lines, whether they overlap or not etc. Next, instruct the students to color in each outlined space using one of the color schemes/theoriesthey learned i.e. using two complementary colors, monochromatic, primary colors etc.After students learn about Miro, they will create a piece of art and explore color as well as the elements andprinciples of art and design.VISUALSJoanMiroKimball Art CenterLESSON 1 Principles of Art Page 2
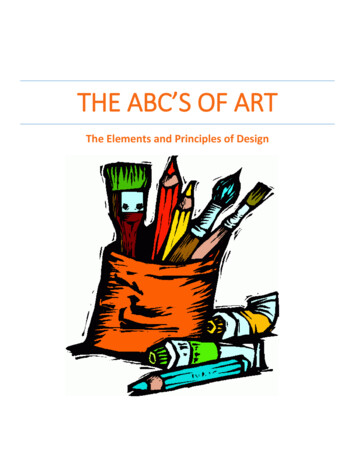
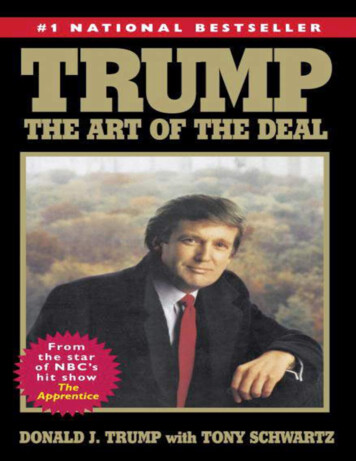
The Red SunKimball Art CenterLESSON 1 Principles of Art Page 3
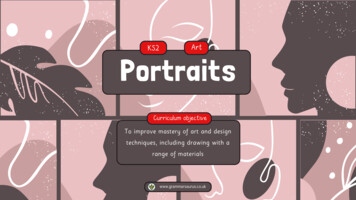
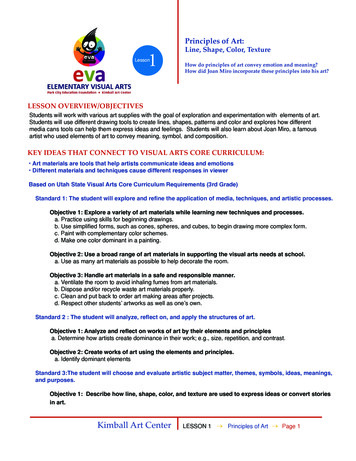
“The Farm”Kimball Art CenterLESSON 1 Principles of Art Page 4
SUPPLIES Images and art samples of Miro presented in this lesson Color Wheel Chart - to remain in classroom or accessible for students World Map - to remain in classroom or accessible for students Art pencils H& B, crayons, colored pencils (Prismacolor), charcoal, markers, oil pastels Large drawing paper (16” x 20” or 11” x 17” or 8.5” x 11”). One large sheet and several smaller sheets of paperper student Watercolor paints and/or watercolor pencils Different sizes and styles of paint brushes (bristle, foam, sponge, etc.)VOCABULARY Surrealism: A 20th-century art form in which an artist or writer combines unrelated images or events in a verystrange and dreamlike way. Abstract: Artwork presented in a highly stylized manner that stresses the elements and principles of art. This artworkis based on recognizable objects, but often the objects are so distorted they are almost nonrepresentational. Elements of ArtLine: A line is the path between two points. Lines define the edges of shapes and forms.Shape: Shape is an area enclosed by line. It is two dimensional and can be geometric or organic.Form: Forms are 3-Dimensional. They occupy space or give the illusion that they occupy the space.Color: Color is the most expressive element of art and is seen by the way light reflects off a surface.Value: Value is the lightness or darkness of a surface. It is often referred to when shading but value is alsoimportant in the study of color.Texture: Texture is the actual surface feel or the simulated appearance of roughness, smoothness, etc.Space: Space is the illusion of objects having depth on the 2-dimensional surface. Linear and aerialperspective are used. Art Techniques: Have students experiment with each technique and then try them in various combinations, such asa rubbing with crayon resist. Watercolor and plastic wrap: Use a big brush to fill a sheet of paper with different colored washes of watercolorpaint. Make sure the paint on the paper is very wet. Cut a sheet of plastic wrap that is a bit larger than the paper andplace on top of the paper. Bunch it up to create lines and textures on the paper. Let the paper dry completely beforeremoving the plastic wrap. It might take a few days for the paper to dry. If it is wrinkled, place dry paper between booksfor a few days to flatten it. Watercolor and salt: Use a big brush to fill a sheet of paper with different colored washes of water-color paint.Sprinkle salt on the wet watercolor and watch as textures form. Let the paper dry. Flatten it between books if it iswrinkled. Crayon resist: Make a quick drawing or series of patterns and textures with crayons. Paint over the crayon withwatercolor paint and see how the wax of the crayon resists the watercolor paint. Experiment with different colors ofcrayons and watercolor. Try drawing with a white crayon on white paper and add watercolor on top. Rubbings: Try making rubbings from different surfaces around the room. Experiment with different drawing tools(crayon, pencil, colored pencil, and charcoal) to see what kind of effect each creates.Kimball Art CenterLESSON 1 Principles of Art Page 5
INSTRUCTIONAL PLANQuick Writing and/or discussionTell students they will learn about a famous artist named Joan Miro, and they will also be experimenting with different artmaterials and elements of art and design. Before the begin, ask the students to respond to the following:For me, experimenting meansI get good ideas when IWhen I try new things I feelFor me, design meansIntroductionTell students that their job is to experiment with different art materials Their job is to experiment with different art materialsto see how they can use them to explore the elements of art—color, line, shape, form, space, value, and texture. Tell students they are to use every material that is available to fill a sheet of paper with different kinds of lines, shapes, textures,and patterns, and to experiment showing value and form, labeling all of their drawings and marks. Then they will continueto experiment with different techniques—drawing, watercolor, rubbings, and crayon resist—to create patterns and textureson new sheets of paper.About the ArtistJoan Miró i Ferrà is a famous Catalan Spanish painter, sculptor and ceramicist born in Barcelona, Spain on April 20. 1893.He died at the age of 90 on December 25, 1983. A famous artist, Miro felt that conventional painting techniques supportedthe bourgeois (wealthy/elite) society so he supported upsetting visual elements of established painting and created hisown style. Over the years, event though he experimented with and was influenced by a number of art forms and stylesincluding Surrealism, Cubism, Abstract Art, and Collage, Miro retained his own personal style and distinct form in most ofthe art work that he distributed and exhibited. Miro is most known for the work he created at the end of his career. At thispoint he focused more on the symbol and the message that was being portrayed, as opposed to the actual image, and theexacting and realistic features which were created in these works. He did this with elements and principles of design andart. Not only did he take a distinct approach to creation, he focused on a number of mediums and forms during his career.This has made Joan Miro one of the most celebrated Spanish artists, and one who has created a unique style which manyfollowed years after his death in 1983.TAKE AWAYS: Miro used elements and principles of art and design to create symbols and messages vs. realisticpaintings.Observe: Look and DiscussShow the images of Miro’s work and ask questions similar to these: Can you identify dominant elements in Miro’s work ofart? What color scheme does he use? What principles of design does Miro use in his work? Does Miro’s use of form andshapes give his composition a symmetrical or asymmetrical feel? How does color give emphasis to certain parts of hiscomposition? What makes an abstract painting? How does Miro’s art express feeling and emotion?Show the different materials to students and explain how they are meant to be used. Demonstrate several of the techniques, such as watercolor, crayon resist, and rubbings, and show students an example of an art exploration sheet—alarge sheet of paper filled with many different kinds of drawing marks and media combinations, labeled with the tools andmedia.Kimball Art CenterLESSON 1 Principles of Art Page 6
Create: Art Exploration Sheets1. Review examples of lines and shapes with students. Ask students to come to the board and draw Straight, Curvy,Wavy, Diagonal, Zig Zag lines (or any others they can think of). Have students draw geometric and organic shapes onthe board, explain the differences.2. Give each student a large sheet of paper and several sheets of smaller paper. Give students these guidelines tofollow while exploring materials: Label each mark with the name of the tool they used to make it. Add any other details that will help themremember how to make it again, such as “heavy line with crayon.” With drawing tools like crayons, pencils, charcoal, etc., try drawing by moving just their wrists. What kinds oflines do they get? Then try again, this time moving just their elbows, then shoulders. How are the lines different? Try thiswith other drawing tools. Try making a hard line by holding the crayon or pencil firmly. Then press lightly for a soft line. Draw a shapeand fill with a gradation going from hard to light. Notice that the flat shape begins to look more like a three-dimensionalform. Make as many different kinds of lines (straight, curvy, zigzag, hard, light, twirly, etc.) as they can.Experiment with unique kinds of lines or combination of materials.3. After practicing, read the instructions, one at a time below. There are 12 steps, for younger grades, K - 2 you don’thave to do all of the instructions.Instructions: Using one or more of the mediums provided:1. Draw a straight line that touches 2 sides of your paper.2. Draw another straight line that touches the other 2 sides of your paper.3. Draw your favorite Geometric Shape Large.4. Write/Draw a vowel largely.5. Draw your favorite kind of line and have it go through one of your shapes.6. Draw a large organic shape.7. Draw a line that touches 3 sides of your paper.8. Draw a shape inside of a shape.9. Draw 3 shapes largely that overlap and intersect.10. Draw a straight line that is parallel to another line.11. Draw a straight line that is intersecting with another line.12. Write/Draw a large consonant.13. Write/Draw a large even, odd, prime, decimal (choose depending on grade) number.14. Add one shape or line that you feel is missing (free choice).As you read each of these steps instructor should be pausing between each instruction and pacing room to see whatthe students are drawing. When you see that all students have completed each step, move to the next instruction, untilcomplete.4. Once drawing is complete have all students hold up their drawings. Explain that we all listen and learn differently,and creativity is unique and has many solutions. They have each interpreted the instructions on their own and createdsomething on their own! Students will look at each others paintings and be excited that they are different.5. Talk to students about colors and shading. Depending on grade level, introduce concepts such as monochrome,complementary, primary, secondary, tertiary colors. We recommend:Grade K & 1 - Primary ColorsGrade 2- Secondary ColorsGrade 3 - Complementary colorsGrade 4 - Monochromatic colorsGrade 5 - Tertiary Colors* Discuss how to properly hold a pencil, how to control shading, direction of shading, color scale, etc. based on gradelevel. Encourage students to stay in the lines.Kimball Art CenterLESSON 1 Principles of Art Page 7
6 Talk to students about the Principles and Elements of Design.Elements: Line, Shape, Color, Size, Space, Texture, ValuePrinciples: Balance, Contrast, Emphasis, Pattern, Proportion, GradientUsing these together in artwork will make a great CompositionHave students add texture, value, pattern and contrast to their pieces through the coloring process.7. Allow students the rest of class to work on finishing their pieces. When finished, students should write their name,age, grade, teacher name and school name on the back of the art work from the label provided. Students must assistinstructor with proper clean up.8. Hang artwork in hallway for display.ReflectArrange students’ work on tables or desks and give them a few minutes to look at each other’s work. As a group, discuss the different technique experiments. What do some of the examples bring to mind? Doany evoke different kinds of weather, natural scenes or landscapes, emotions, or events such as fireworks or celebrations? What else do the students see or notice in their work? Can they imagine how they might use these processes inother artworks they might create?Have students respond to one of the following prompts in their journals. The best thing about this activity was . It was hard for me when I had to . Next I would like to experiment with .Lesson ExtensionsVisual Arts and Writing Ask students to choose one of their experimental sheets and describe the emotion or idea it communicates. Encourage students to continue working with one of the media techniques in their journals or on an additional sheet ofpaper. Have students write a poem, lyric, or short piece based on something they created in this lesson.ScienceIn science class, students often compare the physical properties of various liquids and solids. Artists make similarcomparisons of their artistic materials. Both use the same skills of observation, reflection, and discussion, as well as theformation of conclusions about the materials. Have students create a chart or guide to compare the physical properties of materials and characteristics of differentart media like watercolor, tempera, crayons, and oil pastels. They can experiment with the drying speed of certain paintsor their opaqueness or transparency. Students can record their findings and refer back to the guide to help them choosethe best materials for their projects throughout the year. Have students experiment with the different media on different kinds of paper—poster board, copier paper, construction paper, watercolor paper, tracing paper, kraft paper, etc. Which media work best on which papers? Does water-based media work well on all papers? Do colors look brighter on some paper than on others? Have students recordtheir observations; they can refer back to this information throughout the year as they create their own projects.Kimball Art CenterLESSON 1 Principles of Art Page 8
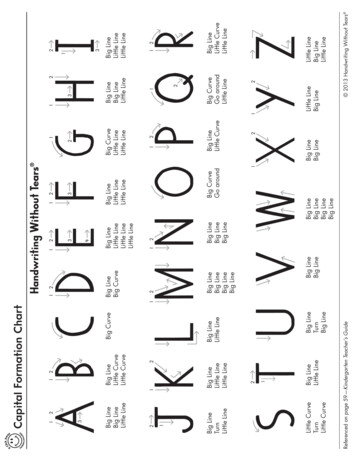
Supplemental MaterialsElements of Art Line Shape/form Color Value Texture Space/perspectivePrinciples of Design Pattern Rhythm/movement Proportion/scale Balance Unity EmphasisColor Color Wheel Primary Colors Secondary Neutrals Complementary Monochromatic AchromaticColor WheelKimball Art CenterLESSON 1 Principles of Art Page 9
Organic Shapes and LinesKimball Art CenterLESSON 1 Principles of Art Page 10
Color Value Scale – GreenMonochromatic Image: PurpleKimball Art CenterLESSON 1 Principles of Art Page 11
Kimball Art CenterLESSON 1 Principles of Art Page 12
Supplemental ResourcesVideo:Joan Miro: http://www.youtube.com/watch?v s/2013/07/Color-Wheel.pdfThings to do: Draw your self made out of lines and shapes. Draw a creature made out of lines and shapes. Draw as many lines as you can on one paper what did you make? We dare you to doodle! Draw your self in your favorite shape or line. Draw a page full or lines or shapes that over lap and intersect.School/ Teacher Participation: Create a lines with students that surrounds your school. Make a line with students that is straight, zigzag, curvy, diagonal etc. Students use themselves to create a line(up to 4 or as entire class). Use students to make lines then connect to make geometric or organic shapes. Thiscan be done in math class, too. How long of a line would you need to go to the bathroom? School Lunch? To the principal’s office? Where do we see lines and or shapes? Name places you see lines and shapes.- Line to the Lunch Room or Library or on your way to ART!- Lines of traffic- Lines on the ground that create patterns in tile or carpet- Shape of the clock – Circle- Shape of your desk – square or rectangle- Apple on teacher’s desk – organic shapeKimball Art CenterLESSON 1 Principles of Art Page 13
If it is wrinkled, place dry paper between books for a few days to flatten it. Watercolor and salt: Use a big brush to fill a sheet of paper with different colored washes of water-color paint. Sprinkle salt on the wet watercolor and watch as textures form. Let the paper dry. Flatten it between books if it is wrinkled.