Transcription
inPixio Photo StudioRetouching, cut-out, photomontageand digital eraserGuide to getting started0
inPixio Photo Studio - ContentsContentsNew and improved features . 5Perspective Tool.5Histogram and Metadata . 6RAW Images .6Selective Retouching.7User Interface . 8Help and Support. 9Backgrounds and Creative Content. 9Photo Transfer App .10Required configuration . 11Installation . 11Introduction. 12User Interface. 13Menus and the toolbar.13Auto correction .15The workspace .15The navigator.15The filmstrip .15Tabs.17Getting started. 18Cropping a photo. 21Choosing a new format. 22Rotating and/or straightening a photo .22Saving a retouched photo . 22Working with Photo Editor . 23Auto Correction.23Presets .24Applying a preset. 24Creating a new preset . 24Import a preset . 25Adjustments.251
inPixio Photo Studio - ContentsAdjusting brightness and colors .25Adjusting a photo's tone scale.27Selective retouching . 27Linear gradient .27Radial gradient .28The Paintbrush .29Targeted settings for Selective Retouching.29Corrections . 30Red Eye Correction .30Sharpness .31Denoise .32Dehaze .33Perspective tool.34Effects. 36Color Balance.36Creative Blur.36Film Grain.38Vignetting .38Styles (LUTS) . 39Apply a LUT style .39Import a LUT style .40Frames . 40Textures. 40Text and stickers . 41Inserting text.41Add text samples.42Apply a sticker .43Histogram and metadata . 44How to read the histogram .44Organizing your photos .46Working with Photo Cutter. 47Cutting out with Photo Cutter. 47Creating a photomontage . 49Customizing your photomontage. 49Text .49Stickers.51inPixio cut-out objects .51Preparing your cut-out objects. 52Cut out your own objects.53Add to your library .53Working with Photo Eraser . 55Erasing with Photo Eraser . 55Using the Correction Patch. 57Replacing a selected area (Destination) .582
inPixio Photo Studio - ContentsSelection mode. 59Make an identical copy of a selected area (Source) . 60Cloning part of your photo . 62Working with Photo Maximizer - Ultimate only . 65Enlarge a photo . 65Retouch a photo .66Working with Photo Focus - Ultimate only. 67Sharpen a photo in 1 click . 67Retouch a photo .68For more information. . 69inPixio online .69InPixio support. 69Compatibility . 69Copyright . 693
inPixio Photo Studio - Contents4
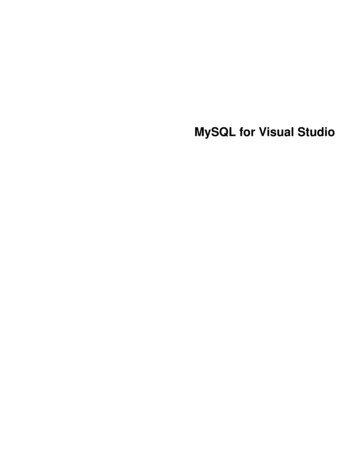
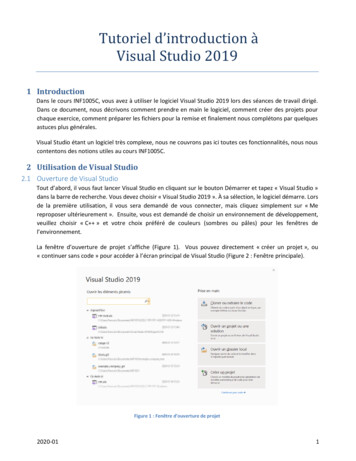
inPixio Photo Studio - New and improved featuresNew and improved featuresThe latest version of Photo Studio comes with a range of new features and updates for even more photoediting possibilities.Perspective ToolThe Perspective tool corrects photos of buildings and architecture that look tilted or distorted. A commonexample is photographs of tall buildings shot from below, where the building looks like it is leaning awayfrom you. The automatic settings instantly correct both horizontal and vertical perspective in your photos.All you have to do is click and watch the scene straighten up before your eyes. A manual option is alsoavailable, to give you full control over the adjustments.Learn how to use the Perspective tool5
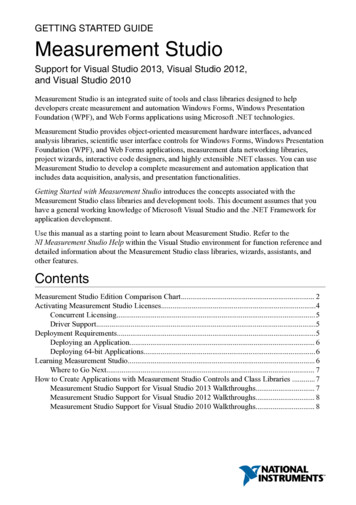
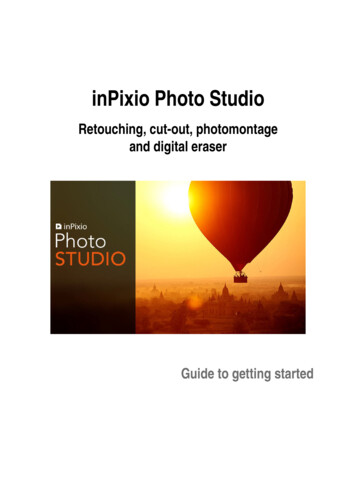
inPixio Photo Studio - New and improved featuresHistogram and MetadataPhoto Studio now provides more image data to help you edit and organize your photos. The histogramenables you to view information on exposure in an image, giving you a clearer idea of the levels of lightand dark in your photos. You can now also view and edit EXIF/IPTC/XMP metadata, and use this to filterand organize your photos.Learn more about the Histogram and metadataRAW Images6
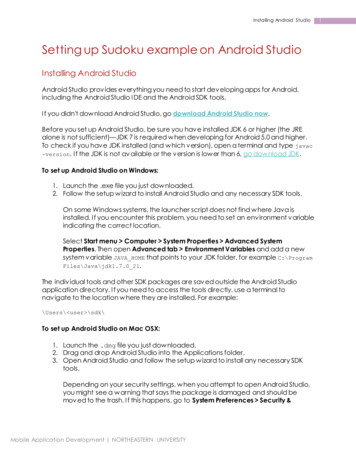
inPixio Photo Studio - New and improved featuresYou can now open RAW format images in Photo Studio. Raw images are unprocessed, uncompressedimages taken with a digital camera. Some photographers like to work with raw images as it gives themmore flexibility and control with the editing process.Selective RetouchingIn the latest Photo Studio you can do even more detailed and targeted editing thanks to improvements tothe Selective Retouching tools. With new sliders for hue, whites, blacks, dehaze, sharpness and noisereduction you can apply precise adjustments to specific areas of your photo. This is great if you want tohighlight or alter one aspect of a photo without changing the overall image.Learn more about Selective retouching tools7
inPixio Photo Studio - New and improved featuresUser InterfaceThe new version features multiple improvements to the User Interface, including: New clearer startup menu New shortcut menu for filmstrip images in Photo Editor Right click to change background color in Photo CutterThese improvements are designed to make using Photo Studio even smoother and more intuitive.Learn more about the inPixio User Interface8
inPixio Photo Studio - New and improved featuresHelp and SupportFor this new version, we have improved access to inPixio support from within Photo Studio. You can nowaccess full video tutorials for the main tools, as well as other support resources directly from the PhotoStudio interface. We have also increased the number of mini videos available to guide you through thedifferent tools in Photo Studio.Backgrounds and Creative Content9
inPixio Photo Studio - New and improved featuresPhoto Studio now comes with even more original backgrounds to use in your pictures andphotomontages. New customizable stickers are also available to add a personal touch to your photos.Learn more about Creating a photomontagePhoto Transfer AppThe inPixio Photo Transfer app makes it easier to transfer photos from your smartphone to yourcomputer so that you can edit them with Photo Studio.With this complimentary app you can copy your smartphone photos to your PC or Mac without the needfor a cable, cloud service or software. All you need to do is connect to Wi-Fi in order to view anddownload your photos on your computer.You can download the inPixio Photo Transfer app free from the App Store or Google Play.10
inPixio Photo Studio - Required configurationRequired configurationThe required configuration for optimal use of inPixio photo products is as follows: Windows 7, Windows 8 and Windows 10 (32-bit & 64-bit) Intel Pentium 1 GHz processor or equivalent 4 GB of RAM - (8 recommended) 700 MB of free disk space, mouse and keyboard Internet connectionInstallationYou have purchased an inPixio photo product for download. Please download the application on yourcomputer then double-click the downloaded file to install it.A setup wizard guides you step by step through the various stages of installation.Once the installation is complete, the application's icon is placed on your Desktop by default.11
inPixio Photo Studio - IntroductionIntroductioninPixio photo products are photo retouching and enhancing applications for optimizing or re-creating aphoto.It is easy to get started thanks to the graphical intuitive user interface organized into modules. Dependingon the product you choose, you can run different modules from the start screen: Photo Eraser is like a digitaleraser. This module erases unwantedelements on a photo (an overlycurious passer-by or a road sign thatspoils a landscape, for instance).Defects can be corrected in just a fewclicks. Photo Cutter works like digitalscissors. This module lets youperfectly cut out objects or people inyour photos and make creativemontages by selecting a new decorfrom among your photos or by usingbackgrounds or cut-out objectsprovided by inPixio. Photo Editor is a comprehensivetoolbox with which you can give yourphotos a professional qualityappearance or transform them intoworks of art.Note: Certain features mentioned in this guide are only available in the inPixio Photo Studio Pro andUltimate versions. Photo Maximizer is a program for enlarging your photos without quality loss. Thanks to the powerfulzoom function, you can magnify images by up to 1000% while maintaining clarity and sharpness. Photo Focus helps you to sharpen photos. You can use this program to turn blurred photos into clear,high-resolution pictures, as well as add custom effects. zoom function, you can magnify images by upto 1000% while maintaining clarity and sharpness. Eclipse HDR is a HDR editor that brings the light back to dull images by improving brightness,contrast, and saturation. inPixio Photo Transfer is a free mobile app that allows you to transfer photos from smartphone to PCor Mac using Wi-Fi. You can download this app from Google Play and the Apple Store. For moreinformation, please visit the inPixio Photo Transfer website.12
inPixio Photo Studio - User InterfaceUser InterfaceThe user interface is designed to simplify the managing and retouching of your photos:The menu and the toolbar:Includes the main functionsneeded to manage yourphotos: Open, Save,Share, Print.The Save button:This button confirmsyour settings and savesyour retouched photo.The filmstrip:Includes display options andlets you navigate through yourfolders.Auto correction:Improves the quality of aphoto in 1 click byautomatically adjustingcolors and luminosity.The workspace:Lets you view the alterationsyou have made to yourphoto.The navigator:Lets you move around andzoom in and out in theimage.Tabs:Tabs group together thevarious tools you needto retouch your photos.Menus and the toolbarThe toolbar includes the following functions:Menu:Takes you back to the Home screen, lets you access the application's Options or the main functions youneed to manage your photos.Revert to the original:Lets you restore your original photo at any time13
inPixio Photo Studio - User InterfaceCancel:Cancels your last action on your photo.Redo:Redoes the canceled action.Save.:Prompts you to save your retouched photo.Print.:Prints your original or retouched photo on paper.Single View:Displays the alterations you have made to your photo in the preview window.Switch between before and after views:Provides a complete or split Before/After view as shown below.Share/Import/Send:Lets you share your work or continue retouching: Publish your photo on social media, Share easily by e-mail, Use other modules to cut out or erase elements on your photo.14
inPixio Photo Studio - User InterfaceAuto correctioninPixio Photo Clip features smart technology that improves the quality of a photo in 1 click. See sectionWorking with Photo Editor.The workspaceBy default, the workspace displays your photo in a Single view.The alterations you have made to your photo are displayed simultaneously in the preview window.Choose one of the views proposed on the view options toolbar to better judge your retouching work in thephoto.The navigatorDisplays a precise zone of a photo.The navigator also lets you move around in the image and display the desired zone in the workspace.The zoom options let you adjust the amount of zoom depending on what you want to see: a full view or adetailed view of your photo.The filmstripThe filmstrip toolbar offers the following options:Navigation in your folders:Displays all the images from the selected folder. Click on an image to open it in the workspace.Favorites:15
inPixio Photo Studio - User InterfaceLets you add folders to your Favorites so that you can find them quickly.Sort:Sets the display order of the photos in the filmstrip. You can sort them by Name, Date or Size.In the Photo Editor module, the filmstrip contains additional options for editing and organizing yourphotos. You can use the filmstrip to apply edits to individual photos, without opening them in the mainworkspace.To do this, go to the filmstrip and right click on the photo you want to edit. This opens the shortcutmenu. You can choose from the following options:Shortcut menu:Apply edits andannotations to yourphotos.Filters:Filter the photos in a folder: date takenrating, portrait/landscape, lens,camera, etc.Adjustments:Auto-correct the selected photo or delete previous adjustmentsShow in Explorer:Open the image folderRotate:Rotate the selected photo or create a mirror imageMetadata:Reset or sync metadataRating / Flag/ Color label:Add a rating, flag or label to your photo to help organize and filter your images.16
inPixio Photo Studio - User InterfaceTabsThe tabs let you open different tools to retouch yourphotos.For more information on the settings of each module,consult the sections:Working with Photo EditorCropping a photoWorking with Photo CutterCreating a photomontageWorking with Photo EraserUsing the Correction PatchCloning part of your photo17
inPixio Photo Studio - Getting startedGetting startedUsing each of the inPixio products’ modules is easy and consistent.Step 1: On the start screen, click the program you want to use.Step 2: Select the photo you want to retouch with the Open button.Feel free to click Tutorials (this function is available for Photo Cutter and Photo Eraser) to see a practicalexample of retouching.Step 3: Retouch your photo using the setting bars and tools in the tabs.18
inPixio Photo Studio - Getting startedEach tool now includes a mini-video for easy understanding of all editing and retouching options.Note: You can disable the display of mini-videos at any time. To do so, click Menu Options to displaythe Options window then uncheck the Use video tooltips box in the Interface section.Step 4: Save your creation by clicking the Save button.For more details on the procedure for saving your reworked photo, see section Saving a retouchedphoto.In each of its modules, inPixio has an option for cropping your photos. For more information, see sectionRotating and/or straightening a photo.19
inPixio Photo Studio - Getting started20
inPixio Photo Studio - Cropping a photoCropping a photoPhotos are sometimes taken quickly to capture a moment, without much thought to framing. WhicheverinPixio module you are in, you can crop your photos.1. On the right-hand panel, click the Crop tab. Handles are displayed on your image.2. Click a predefined format to automatically apply this to your photo.OrClick Custom and use the handles to manually crop your photo to the dimensions of your choosing3. Click the Crop button to confirm the cropping of your photo.4. To save the cropped photo, click the Save button. See section Saving a retouched photo.You can also create a new crop format, a mirror image, rotate 90 or change the angle of your photo.21
inPixio Photo Studio - Saving a retouched photoChoosing a new format1. From the Crop tab, click the New button. The New W/H Ratio dialog box is displayed.2. Use the arrows to define your desired cropping proportions then click OK.The newly defined format is automatically applied and added to the list of available predefined formats.3. Click the Crop button to confirm your cropped photo then the Save button.Rotating and/or straightening a photo1. From the Crop tab, use the Angle slider to adjust the angle of your photo or use the Rotate options torotate your photo 90 clockwise or counterclockwise.2. Click the Crop button to confirm your cropped photo then the Save button.Saving a retouched photoBy default, the program prompts you to rename your retouched photo as Photo InPixio.jpg and save itin your PC’s Pictures folder.1. You can choose a new name and location if you so wish.2. Click OK to confirm your choice.3. Adjust the slider in the window that pops up to define the quality of your photo then click Save.22
inPixio Photo Studio - Working with Photo EditorWorking with Photo EditorPhoto Editor provides a wide range of effects, frames, textures and powerful editing tools so you caneasily correct defects in your photos.You can also crop your photos in Photo Editor. For more information, see section Cropping a photo.Why not open a photo and experiment!Auto CorrectionPhoto Clip features smart technology that automatically improves the quality of any photo.1. Click the Auto correction slider to instantly enhance your image.Click Switch between before and after views to compare your photo before and after correction2. If necessary, move the Amount slider to the right to increase the level of correction, or to the left toreduce it.23
inPixio Photo Studio - Working with Photo EditorPresetsApplying a presetYou can experiment with the different artistic filters available and choose a new look for your photo.1. On the right-hand panel, click the Presets tab.2. Click the triangle icon to expand the category of effects you wish to view, Popular for instance.3. Then click the desired effect, Cross Process in the example below.4. To save the applied effect, click the Save button. See section Saving a retouched photo.If you wish to re-use this effect for your other photos, feel free to create a preset. For more information onpresets, see the sections below.Creating a new presetOnce you have found the right settings for a photo you can save them for use on other photos.Photo Editor lets you save your adjustments as a Preset. Once saved, you can apply your preset to newphotos with just one click.1. From the Presets tab, click Create Preset. The New Preset window is displayed.2. Enter a name for your preset.3. Use the Selection menu to choose the settings that you want to save, or check the boxes for settingsthat you want to apply to your photos.4. Click Create.24
inPixio Photo Studio - Working with Photo EditorImport a preset1. In the bottom toolbar, click Import.2. Select the file of the preset that you want to upload to Photo Studio3. Click Import.The User Presets category appears in the Presets tab: your preset is automatically added to this newcategory.To apply this preset to another photo: Open the photo you want to rework. In the Presets tab, expand the User Presets category by clickingon the small triangle, then click the preset you want to apply to your new photo.AdjustmentsAdjust brightness or colors and correct defects in a photo. On the right-hand panel, click the Adjustments tab.Adjusting brightness and colorsIn the Adjustments tab, adjust the sliders for the different settings to optimize the appearance of yourphoto:Temperature:Move the slider to the left for cooler colors, or to the right for warmer colors.Hue:Move the slider left to add green to the photo, or move it right to add magenta. This setting acts like afilter.Practical example: The light from the candles can tint a photo red; add a green hue to counteract thiseffect and make the photo look more natural.Exposure:Refine the overall exposure of an image by adjusting the exposure value.25
inPixio Photo Studio - Working with Photo EditorBlacks:Move the slider left to reduce the brightness of dark tones, or right to increase it.Contrast:Move the slider left to intensify dark tones, or right to intensify light tones.The following example contains multiple adjustments: reduced Shadows, lower Contrast, increasedClarity and increased Saturation.Shadows:Move the slider left to reduce the luminosity of dark tones, or right to increase it.Highlights:Move the slider left to reduce the luminosity of light or overexposed tones, or right to increase it.Whites:Move the slider left to reduce the brightness of light tones, or right to increase it.Saturation:Move the slider left to reduce color saturation, or right to increase it.Clarity:Move the slider left to reduce contrast and sharpness, or right to increase them.Practical example for landscapes: You can reduce blur in a photo by selecting a positive value onthe Clarity slider. This adjustment is particularly effective when applied to a landscape photo.Practical example for portraits: Selecting a negative value on the Clarity slider creates a softeningeffect. This is particularly useful when applied to a portrait, as it smooths the skin tones.To save the setting(s) applied to your photo, click the Save button. See section Saving a retouchedphoto.26
inPixio Photo Studio - Working with Photo EditorAdjusting a photo's tone scale On the right-hand panel, click the Adjustments tab.1. Click the Tone Curves tool2. Adjust the curve by clicking and dragging it to alter the Red, Green and Blue tones.3. To save the Tone Curves applied to your photo, click the Save button. See section Saving a retouchedphoto.Selective retouchingThis type of retouching is useful for modifying a specific area of an image. On the right-hand panel, click the Selective retouching tab to display the three associated tools.Linear gradientThis tool is ideal for applying a linear gradient filter between a starting point and an end point.1. Click the Linear gradient tool.2. Place the gradient on your photo by holding down the left mouse button to draw your gradient area andstretch it to the desired size.3. Adjust the sliders for the different settings to optimize the appearance of your photo. For more information,see section Targeted settings for Selective Retouching.4. If needed, move your linear gradient using the handles.27
inPixio Photo Studio - Working with Photo EditorRadial gradientThis tool is ideal for applying a circular gradient filter between a starting point and an end point.1. Click the Radial gradient tool.2. Place the gradient on your photo by holding down the left mouse button to draw a circular shape andstretch it to the desired size.3. Adjust the sliders on the different settings to optimize the appearance of your photo. For moreinformation, see section Targeted settings for Selective Retouching.4. If needed, move your radial gradient using the handles.28
inPixio Photo Studio - Working with Photo EditorThe additional options are: Feather: increases or reduces the depth of the gradient. Invert Mask: excludes the previo
Photo Studio now provides more image data to help you edit and organize your photos. The histogram enables you to view information on exposure in an image, giving you a clearer idea of the levels of light and dark in your photos. You can now also view and edit EXIF/IPTC/XMP metadata, and use this to filter