Transcription
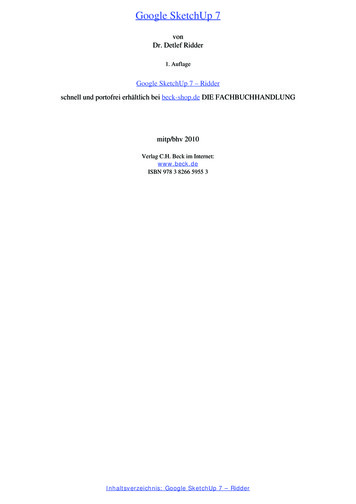
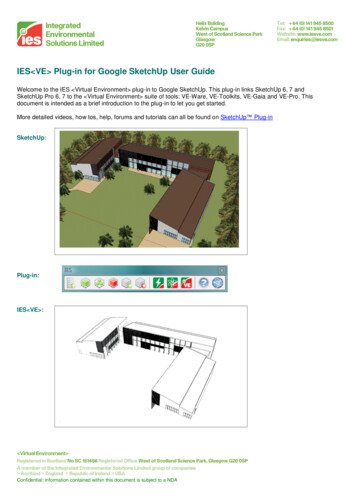
Google SketchUpArt / History Project:Grades 6 - 9This project works in any version of SketchUp.SketchUp can be used for projects in almost any subject. And with somany classes combining subjects, SketchUp fits right in.This project involves finding paintings on the Internet and placing themon the walls of an art museum. This sort of project could be great for aclass learning about periods in art history, or studying a series ofpaintings by a particular artist. The art placed on the walls can even be the students’ own work, if it’s in digitalformat.If you need some basic information on downloading Google SketchUp, or about its user interface and basic tools,please see our printable “Intro to SketchUp” PDF.The PC version is at www.3dvinci.net/SketchUp Intro PC.pdf.The Mac version is at www.3dvinci.net/SketchUp Intro MAC.pdf.The first step is to find the painting we want to “hang” on the walls. Each painting will be placed in a frame andsaved in its own file. Then when all the paintings are ready, we’ll build the museum and bring the paintings to thewalls.1.The easiest way to find a painting is via a web search. Both Google or Yahoo provide a separate link just forimage searching.www.www.3dvinci.netPage 1
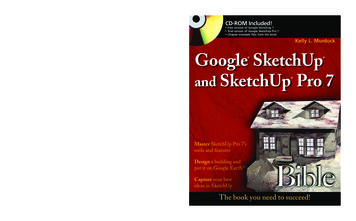
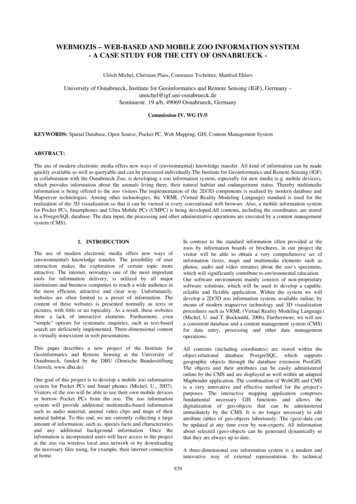
Google SketchUp Teacher GuideGoogle SketchUp Art / History Project: Grades 6 - 92.Enter the name of the artist or painting in the Image Search field.3.The search results will show thumbnails of all relevant images. When you save an image from here, you wantto be sure to save the largest resolution available. So click on the thumbnail to see the larger version.4.When you get to the largest version of the image, right-click on it and choose Save Picture As. (On the Mac,choose Save Image, or Save Image to the Desktop.) Save it somewhere you will remember!www.3dvinci.netPage 2
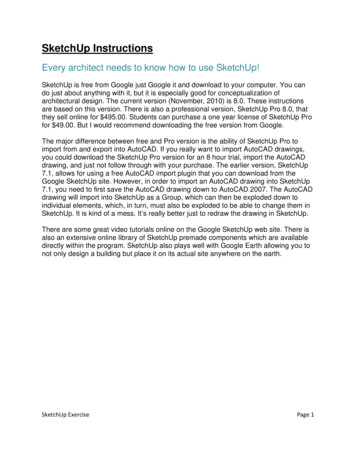
Google SketchUp Teacher GuideGoogle SketchUp Art / History Project: Grades 6 - 95.Now open a new SketchUp file, and choose File / Import. Make sure you are looking for image files, andcheck Use as image. Browse to the folder where you saved your painting image, and click Open.6.The image comes in attached to your cursor. Place one corner at the origin. While you’re sizing the imagerectangle, watch the Width or Height value in the box below the SketchUp window. This number doesn’thave to be exact, but it should be logical (a 40-foot tall painting won’t fit on many walls!).7.To make a SketchUp face out of this image, right-click on it and choose Explode.www.3dvinci.netPage 3
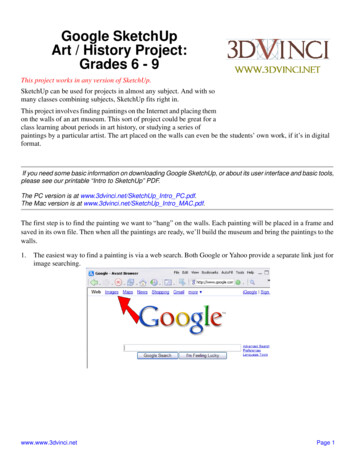
Google SketchUp Teacher GuideGoogle SketchUp Art / History Project: Grades 6 - 98.It’s not recommended to keep the painting face flat, because it won’t look quite right when you place it on awall (both the painting and the wall will be in the same exact spot, so SketchUp can’t tell which should be infront). So Push/Pull the painting up a small amount.9.We could save the painting like this, but it’s more interesting to give it a frame. Use the Offset tool on the backface of the painting to make a slightly larger rectangle.10. Then use Push/Pull to make the frame, and color it.www.3dvinci.netPage 4
Google SketchUp Teacher GuideGoogle SketchUp Art / History Project: Grades 6 - 911. Here’s a very important step when you’re making a model you’ll be using later in another model. We need todetermine how this painting will align when it’s imported into the museum. So choose Window / Model Info,and open the File page. Next to Glue to, choose Any. This means when it’s imported, the painting will alignto any face, whether the face is vertical or horizontal or sloped.12. Before saving, make sure there’s nothing in the file except for the painting. (If you have a person componentin your file, erase it.) Then use File / Save As to save the model.13. Do the same for the other painting images you found online, saving each painting and frame in its own file.You can make frames as fancy as you want - in this example I used Offset twice to make two frame rectangles,and pulled each one up by a different amount.The Follow Me tool is great for creating frames, using any kind of cross-section you want.www.3dvinci.netPage 5
Google SketchUp Teacher GuideGoogle SketchUp Art / History Project: Grades 6 - 914. If you don’t want to create your own painting models, there are many models like this in Google’s 3DWarehouse. The Warehouse is a place where anyone can upload any model (within reason), and any modelcan be downloaded by anyone. To enter the warehouse, go to http://sketchup.google.com/3dwarehouse. Enterwhat you’re looking for, such as “painting,” “frame,” or the name of an artist or painting.15. Here’s one I found - a portrait of Thomas Jefferson. To save it, click Download Model.You need to be careful with models you get from the Warehouse, because the quality is not guaranteed. Forexample, this model is located far from the origin, and is vertical (the ones we made ourselves are flat on theground).www.3dvinci.netPage 6
Google SketchUp Teacher GuideGoogle SketchUp Art / History Project: Grades 6 - 916. So be sure to “fix up” your Warehouse model before saving it. For this one, I moved and rotated it so that itmeets the origin, and the vertical side is parallel to the green axis. I also made sure the image wasn’t flat onthe ground, and changed the Model Info window to glue to Any face.17. When you have enough paintings, start a new file for the museum building. Mine will be just one big room,shaped like a hexagon. I used the Polygon tool, and entered 6 for the number of sides. Then I used the Offsettool to create another hexagon, to make a set of walls around the hexagon.You would probably want to make a larger museum (at least with more than a single room), and perhaps withmore than one floor.www.3dvinci.netPage 7
Google SketchUp Teacher GuideGoogle SketchUp Art / History Project: Grades 6 - 918. Leave off the roof (for now), and add an opening for a door.19. To bring in the first painting, choose File / Import. Make sure this time you’re searching for SketchUp files.www.3dvinci.netPage 8
Google SketchUp Teacher GuideGoogle SketchUp Art / History Project: Grades 6 - 920. Models brought in this way are actually components. And because the painting models are set to glue to anyface, they should be vertical when placed on a wall.If the painting looks too big or small, you can use the Scale tool to change its size.21. Bring in each painting the same way, and we’re done!Here are some ways to expand on this project idea: Group paintings from the same period (or artist, or painting “school”) in their own rooms. Make separate collections for paintings from different regions of the world. Use digital images as the paintings (images can be of students, nature, architecture, etc.) Take actual student paintings and scan them, and use the digital images as the paintings.www.3dvinci.netPage 9
Google SketchUp Teacher GuideGoogle SketchUp Art / History Project: Grades 6 - 9Another excellent way to expand on a museum project is to make a slide show, or animation. SketchUp has a fewtools you can use to “walk through” a model: Walk, Look Around, and Position Camera. It’s hard to explain inwriting how to use these - the best way to get to know these tools is simply to play with them.When you have a view you want to save, you record it as a “Scene.” Open Window / Scenes, and click the “plus”sign to save a scene.Create a scene for each view you want to save. The scenes appear as tabs at the top of the screen.To play the animation of these scenes, choose View / Animation / Play. The view scrolls from one scene to thenext, in order. To change how fast the scenes transition, use the Animation page of the Model Info window.www.3dvinci.netPage 10
Google SketchUp Teacher GuideGoogle SketchUp Art / History Project: Grades 6 - 9If you like this project, please check out the books below, part of 3DVinci's ModelMetricks ml). These books teach all you need to know about using digitalimages in both 2D and 3D, as well as how to create other museum-worthy models.And if you want to receive three ready-to-use projects like these each month, sign up for our SketchUp Projectsof the Month subscription l of the models in the Teacher Guide can be downloaded from Google’s 3D Warehouse:http://sketchup.google.com/3dwarehouse. Click this link to see the entire Warehouse collection of models used in the Teacher Guide. Click this link to locate this exact museum model in the Warehouse. This model has seven scenes - to playthem as a slide show, choose View / Animation / Play.If you’re reading this as a printed PDF and can’t click on the links, here’s how to find the Teacher Guide models:1.Open the 3D Warehouse.2.In the Search field, type “teacher guide” and click Collection. Then press Enter or click the Search button.3.Open this link:4.In the collection, find the model you want, and open or download it.www.3dvinci.netPage 11
Google SketchUp Teacher Guide Google SketchUp Art / History Project: Grades 6 - 9 www.3dvinci.net Page 10 Another excellent way to expa nd on a museum projec t is to make a slide show, or animation. SketchUp has a few tools you can use to "w alk through" a model: Walk, Look Around, and Position Camera. It's hard to explain in