Transcription
SKETCHUP DRAWING EXERCISES1. Open up Sketch Up.2. Go to FILE OPEN3. On the LEFT side, double click on COMPUTER and then on the J: drive (VOL1(\\HAL9000)(J:))4. Double click the STUDENTFILES folder SHEA folder 7th Grade Technologyfolder Sketch Up 5. Open up the following file: SKETCHUP-Drawing Exercises(name).skp***.SKP is always a SKETCHUP file extension. ***Immediately, perform a SAVE AS and save the file to your P: drive.**Make sure to replace the area in the parentheses with your last name. **1. Go to FILE SAVEAS2. On the LEFT side, double click on COMPUTER and then on your P: drive(TSHEA (\\HAL9000\VOL\FACULTY)(P:)3. Create a ‘7th Grade Technology’ Folder if one does not already exist and saveyour file to that folder.Some areas to get familiar with: MEASUREMENTS: Used to make drawings asexact as desired. This field will display the sizes oflines, shapes, etc., that are being drawn. Type in the size you want to get exactdimensions. TOOLBARS: To turn Toolbars on and off go to the top dropdown menu, selectVIEW TOOLBARS and select the tool bars you want to display.7th Grade TechnologyKittatinny Regional High SchoolC28Mr. SheaTShea@KRHS,net973-383-1800x 6699SKETCHUP Drawing Activities.docPage1 AXES: Use as a reference for stright lines, rotating objects,ect., on the X, Y, Z axises.o Red is the X axiso Green is the Y axiso Blue is the Z axisA Magenta guide may appear while drawing to help line upitems or lines.
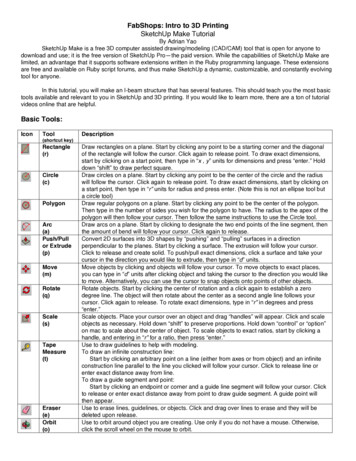
Some keyboard keys to get familiar with: ENTER: Ends a command/ completes a selection/ repeats the previouscommand ESC: Cancels out of the existing command orDEL or BACKSPACE: Erases the objects that are selected SHIFT: When held down, it can be used to deselect unwanted objectsthat have been selected. CTRL Z: Undo. CTRL Y: Redo CTRL X: Cut CTRL C: Copy CTRL V: PasteCAMERA TOOLBAR ORBIT – Hold down the LEFT mouse BUTTON and move and turn aroundyour drawing. This can also be done without selecting the orbit button andsimply holding down the MOUSE ROLLER BUTTON and moving the mousearound. ZOOM– Hold down the LEFT mouse BUTTON to zoom in and out on yourdrawing. Move the mouse up to zoom in, move the mouse down to zoom out.This can also be done without selecting the zoom button and simply holdingdown the MOUSE ROLLER BUTTON and moving the mouse around. ZOOM WINDOW – Use to create a window that your view will zoom to. PREVIOUS & NEXT – Use to go back and forth between the previous viewand the next views that you have chosen with other Camera tools.7th Grade TechnologyKittatinny Regional High SchoolC28Mr. SheaTShea@KRHS,net973-383-1800x 6699SKETCHUP Drawing Activities.docPage2 PAN – Hold down the LEFT mouse BUTTON to scan/pan around your drawing.This is good when moving around your drawing without zooming in or out.
ZOOM EXTENTS – Zooms to the outer most portions of your drawing. Hittingthis button allows you to see everything that is drawn within your screen.VIEWS TOOLBAR VIEW TOOLBAR VIEWS Use these standardized views to look at different areas of your drawings.IsometricTopFront Right Back Left(3 Views at once)PRINCIPAL TOOLBAR SELECT – Used to select objects throughout the drawing Click and hold onthe drawing screen to create a selection window. Hold down the CNTL buttonto click on and select multiple objects. MAKE COMPONENT – Creates components out of lines, shapes, othercomponents, etc. Components are useful when it is needed to group a bunchof objects together. (Ex: All the lines and geometries that make up a piece offurniture in a room). It is also useful when having an object that is repeatedmultiple times within a drawing. Components can be editted any time bydouble clicking on them. Reminder: Any change made on one component willbe updated and changed on every other component of the same name.The pull down menu allows you to apply different texturesor colors from a bunch of different categories to give yourdrawing a more realistic quality.Use the EDIT tab to change the color, size, or image used to create thetexture. ERASER – Used to delete LINES and COMPONENTS thatare no longer wanted in the drawing. To delete planes orsurfaces in a drawing, select the surface and hit the DELETE button.7th Grade TechnologyKittatinny Regional High SchoolC28Mr. SheaTShea@KRHS,net973-383-1800x 6699SKETCHUP Drawing Activities.docPage3 PAINT BUCKET – Used to add color/ texture/ ortransparency to an object. This tool makes drawings seemmore lifelike and less cartoony. When clicking on this icon,the MATERIALS window opens. Using this window, you canselect the type of ‘paint’ you would like to use on thesurfaces that you will click on.
DRAWING TOOLBAR RECTANGLE – Used to create squares or rectangles. Click on the button thenclick to sert the first corner point. For an approximate rectangle, click to markthe point on the opposite corner. To make an exact rectangle/square, click tomark the first point of the shape, type in the dimensions separated by acomma (ex: 4’0”,3’0”), then press ENTER.Draw some squares/ rectangles in EXERCISE #1, try to draw one exactly 4’ x3’. (In the measurements bar type: 3’,4’).Use the Paint Bucket tool to color the rectangle red. LINE – Used to draw lines. Simply click to set the first point, and click to setthe second point. For more exact lines, click to set the first point; move themouse in the exact direction of the second point; type in the dimensions; pressENTER. Hit the ESC button to end a string of lines. Be careful to make sure thepoints on each line are where you want them to be in 3D space.Draw some squares/ rectangles in EXERCISE #2. NOTICE what happens whenyou join a string of lines back to its original starting point. CIRCLE – Used to draw circles. Click the button and then click to set thecenter point. Click again to set the radius point of the circle. To make the circlean exact size, click to set the center point, then type in the radius of the circleand press ENTER.Draw some circles in EXERCISE #3. Draw a circle that has a radius of 1’-6”.Use the Paint Bucket tool to color the circle green.Draw some arcs in EXERCISE #4. Draw a circle that has a radius of 6’. POLYGON – Allows you to draw shpaes with multiple sides. Like a circle, clickthe button and then click to set the center point. Specify the number of sidesdesired for the polygon on the keyboard and press ENTER. Click again to setthe radius point of the polygon. To make the polygon an exact size, click to setthe center point, then type in the radius of the polygon and press ENTER.Draw some polygons in EXERCISE #5. Make sure to try objects with a differentnumber of sides.7th Grade TechnologyKittatinny Regional High SchoolC28Mr. SheaTShea@KRHS,net973-383-1800x 6699SKETCHUP Drawing Activities.docPage4 ARC – Used to draw arcs. Click the button and then use the mouse to set thetwo end points of the arc. Click again to set the radius point of the arc. Tomake the arc an exact size, click to set the two end points, then type in theradius of the arc and press ENTER.
Draw a dodecahedran with a radius of 5’. Use the Paint Bucket tool to paint theshape with a brick tecture. FREEHAND – Lets you create unique shapes by drawing them with themouse. Click on the button to activate the tool, clisk in the drawing to begindrawing freehand, then draw your shape. Hit ESC to end the freehand line.Practice drawing freehand in the box EXERCISE #6.MODIFICATION TOOLBAR MOVE – Allows you to move lines, objects, shapes, and components usingyour mouse. Click on the object with the mouse and then click to put it whereyou want it to go. You can use the arrow keys to lock certain objects to specificaxes which can make it easier and more accurate to move.Practice moving some of the shapes around in the box EXERCISE #7. Noticewhat happens when you move an object and hold down the CTRL button. PUSH/PULL – Allows you to create 3-dimensional objects by pushing andpulling their surfaces to a desired length/ height. To push/pull a surface andexact amount, select the surface, and move it. While holdnig the mouse, inputthe dimension you wish to move into the MEASUREMENTS field.Practice push/pulling objects in the box EXERCISE #8. Notice how you canpush pull different objects on the same plane if they are drawn separately. ROTATE – Allows you to rotate selected lines, objects, shapes, andcomponents using your mouse. First, set the axis that you want to rotate theobject around (note that the circle will change color to match one of the axeson the origin, a black circle indicates a rotation on a axes that is not X, Y, or Z.Practice drawing freehand in the box EXERCISE #9. Practice rotating themaround different axes using the grip on the side. FOLLOW ME – Allows you to extrude or extend a shape along a specifiedpath. You can select the shape first or the path. Then select the button and theother variable. It is more controllable to select the shape first and then slidethat shape along the path.Practice using the Follow Me tool in the box EXERCISE #10.7th Grade TechnologyKittatinny Regional High SchoolC28Mr. SheaTShea@KRHS,net973-383-1800x 6699SKETCHUP Drawing Activities.docPage5Create a surface and Puah/ Pull it to 6’ tall. Use the paintbucket tool to paint ita Translucent color.
---In the first setup, select the FOLLOW ME button. After that, pull thequadrelateral along the path. In this procedure, you can adjust how faralong the path you want the shape to go. NOTICE the red guideline thatextends alone the lineto show you where it is going.In the second setup, select the path, then the FOLLOW ME button. Afterthat, select the circle. In this procedure, the program extrudes the sahpealong the entire path.In the third setup, try to make a bowl. SELECT the circle, then the FOLLOWME button. After that, select the ‘C’ shape. It should extrude all the wayaround the circle and creating a bowl. SCALE (MIRROR) – Allows you to scale your drawings up or downproportionately.Select the objects that you want to scale, and choose the SCALEbutton. You will notice a box appears around your shapes withgreen grips around it. You can grab any of those grips andpush/pull the selection to make it smaller/ larger.-Grabbing a green grip that connects all three axes, allowsyou to scale in all three directions proportionately.Grabbing a green grip between two surfaces, allows you toscale those two axes proportionately.Grabbing a green grip on any of the faces allows you to scalein only that direction.You can also scale your objects exactly by typing in the desired scale in theMEASUREMENTS toolbar. You can only one number will scale all axesproportionately, or you can input multiple numbers separated by commas fordifferent scales on each axis. OFFSET – Allows you to create lines/ shapes parallel to other linee/ shapes.First, select the line/ surface that you want to make your line. Shape parallelto, select the OFFSET button and drag that line/shape to the desired size. Fora more exact offset, you can input the diesired dimension in theMEASUREMENTS toolbar.Practice OFFSETTing the triangular lines, hexagon, and circle in box EXERCISE#12.STYLES TOOLBARth7 Grade TechnologyKittatinny Regional High SchoolC28Mr. SheaTShea@KRHS,net973-383-1800x 6699SKETCHUP Drawing Activities.docPage6Practice scaling the objects in box EXERCISE #11.
Use these standardized styles to give your renderings different )(Back Edges)(Hidden Line)(Shaded with Textures) Use these styles and notice how the scene changes in EXERCISE #14 as youselect / deselect them.WALKTHROUGH TOOLBAR Use these tools to help you move around your model as if it were in real life.These tools help you move and look around without changing the height of theeye/camera. ***BE CAREFUL*** If you use the PAN, ZOOM, or ORBIT tools,they will change the eye height that has been set by any of these tools. POSITION CAMERA – After clicking this button it allows you to choose apoint that you would like to set your eye/ camera. Notice after you set theposition, the camera zooms into that location and the eye height is displayedin the MEASUREMENTS toolbar. WALK – Allows you to move around as if you were ‘walking’ in yourdrawing. Click the left mouse button and hold while moving the mouse tomove forward and backward. ***BE CAREFUL*** If you use the PAN, ZOOM,or ORBIT tools, they will change the eye height that has been set by any ofthese tools. LOOK AROUND – Allows you to look around as if you were standing still inyour drawing and turning your head. Click the left mouse button and holdwhile moving the mouse to move forward and backward. ***BE CAREFUL***GOOGLE TOOLBAR GET MODELS – Allows you to access Google’s Sketchup 3D Warehouse.Through that, you can import components to help enhance your rendering.Simply search and browse to find something that fits with your design andimport it into your drawing. **BE CAREFUL** to make sure the the scale androtation are in line with your drawing.7th Grade TechnologyKittatinny Regional High SchoolC28Mr. SheaTShea@KRHS,net973-383-1800x 6699SKETCHUP Drawing Activities.docPage7If you use the PAN, ZOOM, or ORBIT tools, they will change the eye heightthat has been set by any of these tools.
EXERCISE #14. Create a room using the RECTANGLE tool. After drawing arectangle, OFFSET it inside by 5”. PUSH/PULL the outer ring up 8’. Carve out doorsand windows by drawing RECTANGLEs on the walls and PUSH/PULLing themthrough the walls.EXERCISE #15. Furnish the empty room with funriture / objects of your choice.Download the objects from the 3D Warehouse, scale and arrange them asnecessary.GRADINGThe teacher will view the progress you have made on these exercises by viewingthe file on your P: drive. The following, is a breakdown of the grading:5 points1 point each.3 points each20 pointsSKETCHUP Drawing Activities.docPage8Saving the file in the correct location:Exercises 1-12Exercise 14TOTAL7th Grade TechnologyKittatinny Regional High SchoolC28Mr. SheaTShea@KRHS,net973-383-1800x 6699
7th Grade Technology Kittatinny Regional High School C28 Mr. Shea TShea@KRHS,net 973-383-1800x 6699 c ge 1 SKETCHUP DRAWING EXERCISES 1. Open up Sketch Up. 2. Go to FILE OPEN 3. On the LEFT side, double click on COMPUTER and then on the J: drive (VOL1 (\\HAL9000)(J:)) 4. Double click the STUDENTFILES folder SHEA folder 7th Grade Technology