Transcription
Getting Started with Raspberry Pi Picoand CircuitPythonCreated by Kattni ith-raspberry-pi-pico-circuitpythonLast updated on 2022-01-04 02:36:07 PM EST Adafruit IndustriesPage 1 of 93
Table of ContentsOverview5 Other Required Hardware9Pinouts12Using Adafruit AR with Raspberry Pi Pico14 To get started:MicroPython or CircuitPython? CircuitPython is a 'fork' based on MicroPythonSo what's different?Why Use MicroPython?It's great to know both!To get started quick:14161717181818What is CircuitPython?19 CircuitPython is based on Python Why would I use CircuitPython?1920Installing CircuitPython CircuitPython Quickstart Flash Resetting UF2Installing the Mu Editor Download and Install Mu Starting Up Mu Using MuCircuitPython Programming Basics2021222323242425 Indentation and Code Loops Conditionals and Variables2729CircuitPython Pins and Modules31 313233343536CircuitPython Pinsimport boardI2C, SPI, and UARTWhat Are All the Available Names?Microcontroller Pin NamesCircuitPython Built-In ModulesBlinky and a Button The Built-In LEDAn External LEDUsing a Button as an InputControl an External LED with a ButtonTraffic Light and Pedestrian Crossing Parts UsedWiring the Traffic LightProgramming the Traffic LightTraffic Light and Pedestrian Crossing Adafruit Industries36374043454748484951Page 2 of 93
Wiring the Pedestrian Crossing Programming the Traffic Light and Pedestrian CrossingReaction Game Parts UsedWiring the Reaction GameProgramming the Reaction GameTwo Players Makes It More FunWiring the Two Player Reaction GameProgramming the Two Player Reaction GameBurglar Alarm Wiring the Basic Motion SensorProgramming the Basic Motion SensorBurglar AlarmWiring the Burglar Alarm with LightProgramming the Burglar Alarm with LightWiring the Burglar Alarm with Light and SoundProgramming the Burglar Alarm with Light and SoundWiring the Extended Burglar Alarm with Light and SoundProgramming the Extended Burglar AlarmPotentiometer and PWM LED Reading a Potentiometer Using PWM to Fade an perature Gauge80Data Logger81 Data Logger Wiring Programming the Temperature Data Logger Data Logger Without Wiring828384NeoPixel LEDs Wiring the NeoPixel LED Strip Installing the Adafruit CircuitPython NeoPixel Library Programming NeoPixel LEDsFAQ and Troubleshooting FAQboard.I2C(), board.SPI(), and board.UART() do not exist. What should I do?Should I use pin GP15?Is pulseio supported?858686879292929292CircuitPython Essentials92Downloads92 Adafruit IndustriesPage 3 of 93
Adafruit IndustriesPage 4 of 93
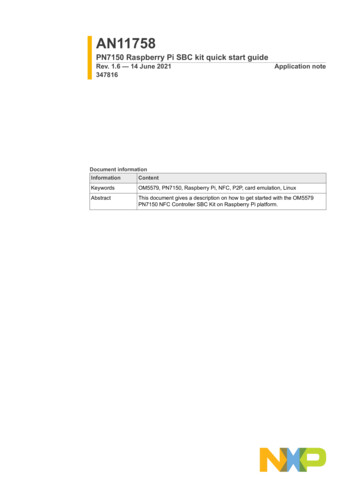
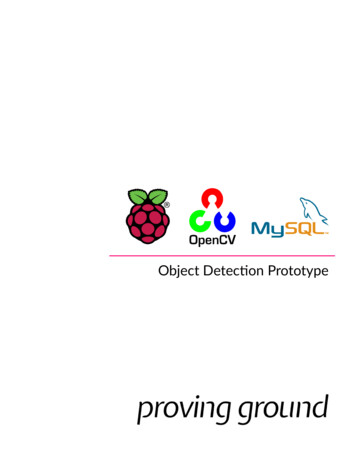
OverviewThe Raspberry Pi foundation changed single-board computing when they releasedthe Raspberry Pi computer (https://adafru.it/Qa1), now they're ready to do the same formicrocontrollers with the release of the brand new Raspberry Pi Pico. This low-costmicrocontroller board features a powerful new chip, the RP2040, and all the fixin's toget started with embedded electronics projects at a stress-free price.The Pico is 0.825" x 2" and can have headers soldered in for use in a breadboard orperfboard, or can be soldered directly onto a PCB with the castellated pads. There's20 pads on each side, with groups of general purpose input-and-output (GPIO) pinsinterleaved with plenty of ground pins. All of the GPIO pins are 3.3V logic, and are not5V-safe so stick to 3V! You get a total of 25 GPIO pins (technically there are 26 but IO#15 has a special purpose and should not be used by projects), 3 of those can beanalog inputs (the chip has 4 ADC but one is not broken out). There are no trueanalog output (DAC) pins. Adafruit IndustriesPage 5 of 93
On the slim green board is minimal circuitry to get you going: A 5V to 3.3V powersupply converter, single green LED on GP25, boot select button, RP2040 chip withdual-core Cortex M0 , 2 MegaBytes of QSPI flash storage, and crystal.Inside the RP2040 is a 'permanent ROM' USB UF2 bootloader. What that means iswhen you want to program new firmware, you can hold down the BOOTSEL buttonwhile plugging it into USB (or pulling down the RUN/Reset pin to ground) and it willappear as a USB disk drive you can drag the firmware onto. Folks who have beenusing Adafruit products will find this very familiar - we use the technique on all ournative-USB boards. Just note you don't double-click reset, instead hold downBOOTSEL during boot to enter the bootloader!The RP2040 is a powerful chip, which has the clock speed of our M4 (SAMD51), andtwo cores that are equivalent to our M0 (SAMD21). Since it is an M0 chip, it does nothave a floating point unit, or DSP hardware support - so if you're doing somethingwith heavy floating point math, it will be done in software and thus not as fast as anM4. For many other computational tasks, you'll get close-to-M4 speeds! Adafruit IndustriesPage 6 of 93
For peripherals, there are two I2C controllers, two SPI controllers, and two UARTs thatare multiplexed across the GPIO - check the pinout for what pins can be set to which.There are 16 PWM channels, each pin has a channel it can be set to (ditto on thepinout).You'll note there's no I2S peripheral, or SDIO, or camera, what's up with that? Wellinstead of having specific hardware support for serial-data-like peripherals like these,the RP2040 comes with the PIO state machine system which is a unique and powerfulway to create custom hardware logic and data processing blocks that run on theirown without taking up a CPU. For example, NeoPixels - often we bitbang the timingspecific protocol for these LEDs. For the RP2040, we instead use a PIO object thatreads in the data buffer and clocks out the right bitstream with perfect accuracy. Same with I2S audio in or out, LED matrix displays, 8-bit or SPI based TFTs, even VGA (https://adafru.it/Qa2)! In MicroPython and CircuitPython you can create PIO controlcommands to script the peripheral and load it in at runtime. There are 2 PIOperipherals with 4 state machines each.At the time of launch, there is no Arduino core support for this board. There is great C/C support (https://adafru.it/Qa3), an official MicroPython port (https://adafru.it/Sjc),and a CircuitPython port (https://adafru.it/Em8)! We of course recommendCircuitPython because we think it's the easiest way to get started (https://adafru.it/cpy-welcome) and it has support with most our drivers, displays, sensors, and more,supported out of the box so you can follow along with our CircuitPython projects andtutorials. Adafruit IndustriesPage 7 of 93
While the RP2040 has lots of onboard RAM (264KB), it does not have built in FLASHmemory. Instead that is provided by the external QSPI flash chip. On this board thereis 2MB, which is shared between the program it's running and any file storage usedby MicroPython or CircuitPython. When using C/C you get the whole flash memory,if using Python you will have about 1 MB remaining for code, files, images, fonts, etc.RP2040 Chip features: Dual ARM Cortex-M0 @ 133MHz 264kB on-chip SRAM in six independent banks Support for up to 16MB of off-chip Flash memory via dedicated QSPI bus DMA controller Fully-connected AHB crossbar Interpolator and integer divider peripherals On-chip programmable LDO to generate core voltage 2 on-chip PLLs to generate USB and core clocks 30 GPIO pins, 3 of which can be used as analogue inputs Peripherals 2 UARTs 2 SPI controllers 2 I2C controllers 16 PWM channels USB 1.1 controller and PHY, with host and device support 8 PIO state machines Adafruit IndustriesPage 8 of 93
Other Required HardwareThe following list of hardware, or some equivalent thereof, is required to completethis guide.Half-size breadboardThis is a cute half-size breadboard, goodfor small projects. It's 2.2" x 3.4" (5.5 cm x8.5 cm) with a standard double-strip in themiddle and two power rails on both.https://www.adafruit.com/product/64Premium Male/Male Jumper Wires - 40 x6" (150mm)Handy for making wire harnesses orjumpering between headers on PCB's.These premium jumper wires are 6"(150mm) long and come in a 'strip' of 40 (4pieces of each of.https://www.adafruit.com/product/758Premium Female/Male 'Extension' JumperWires - 40 x 6" (150mm)Handy for making wire harnesses orjumpering between headers on PCB's.These premium jumper wires are 6"(150mm) long and come in a 'strip' of 40 (4pieces of each of.https://www.adafruit.com/product/826 Adafruit IndustriesPage 9 of 93
Tactile Switch Buttons (12mm square,6mm tall) x 10 packMedium-sized clicky momentary switchesare standard input "buttons" on electronicprojects. These work best in a PCB buthttps://www.adafruit.com/product/1119Diffused 5mm LED Pack - 5 LEDs each in5 Colors - 25 PackNeed some indicators? We are big fans ofthese diffused LEDs. They are fairlybright, so they can be seen in daytime,and from any angle. They go easily into abreadboard and will ole Resistors - 220 ohm 5%1/4W - Pack of 25ΩMG! You're not going to be able to resistthese handy resistor packs! Well, axially,they do all of the resisting for you!This is a25 Pack of.https://www.adafruit.com/product/2780Any resistors with a value of 220Ω-1.0KΩ will work. The higher the value, the dimmeryour LEDs will be! Adafruit IndustriesPage 10 of 93
Piezo BuzzerPiezo buzzers are used for making beeps,tones and alerts. This one is petite butloud! Drive it with 3-30V peak-to-peaksquare wave. To use, connect one pin toground (either one) and.https://www.adafruit.com/product/160Breadboard trim potentiometerThese are our favorite trim pots, perfectfor breadboarding and prototyping. Theyhave a long grippy adjustment knob andwith 0.1" spacing, they plug intobreadboards or.https://www.adafruit.com/product/356PIR (motion) sensorPIR sensors are used to detect motionfrom pets/humanoids from about 20 feetaway (possibly works on zombies, notguaranteed). This one has an adjustabledelay before firing it NeoPixel LED Strip with 3-pin JSTConnector - 1 meterPlug in and glow, this Adafruit NeoPixelLED Strip with JST PH Connector has 30total LEDs and is 1 meter long, in 01 Adafruit IndustriesPage 11 of 93
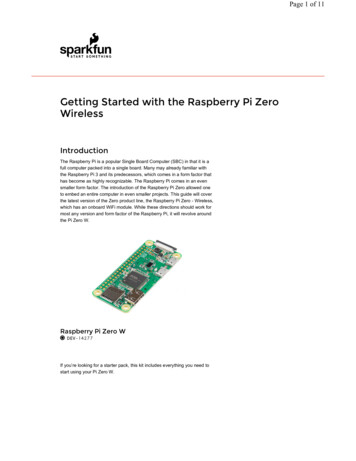
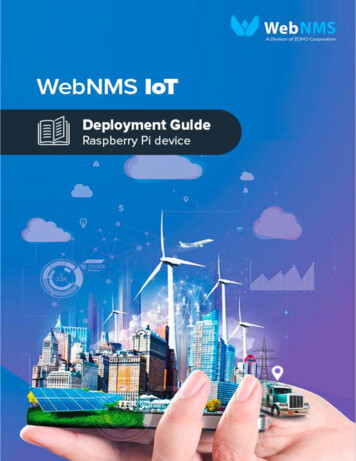
PinoutsThis is a top view of the pinouts on the Raspberry Pi Pico. The pin labels are on thebottom of the board. See the Downloads (https://adafru.it/QTd) page for a papertemplate you can put underneath the Pico to label the pins.There are two I2C peripherals available, I2C0 and I2C1, two SPI peripherals, SPI0 andSPI1, and two UART peripherals, UART0 and UART1. You can assign any of these tothe pins on which they are available. So for example, you can use GP0/GP1 for I2C0,and simultaneously use GP2/GP3 for I2C1, but you cannot use GP0/GP1 together withGP4/GP5 for I2C use, because they are both usable only with I2C0.In CircuitPython, you don't need to specify exactly which peripheral is used. As longyou choose valid pins, CircuitPython will choose a free peripheral.No Default board DevicesThe Pico does not label specific pins as the defaults to use for I2C, SPI, or UARTconnections. So CircuitPython running on the Pico does not provide board.I2C() , board.SPI() , or board.UART() , since it's not immediately obvious what they wouldcorrespond to. For example: Adafruit IndustriesPage 12 of 93
import boardi2c board.I2C()# Does not work on the Pico.Instead, use the busio (https://adafru.it/Qsf) module to create your bus and thenspecify the specific pins you want to use. To do so, use the pinout diagram above tofind available pins, for example I2C0 SDA is on GP0 (as well as other locations). Youthen use the board.GPx pin name when creating the bus.Here are some specific examples.I2C ExampleTo setup an I2C bus (https://adafru.it/Qsf), you specify the SCL and SDA pins beingused. You can look for "SCL" and "SDA" in the pin names in the pinout diagram above. I2Cx SCL SCL I2Cx SDA SDAFor example, here is how you would setup an I2C bus to use GP1 as SCL and GP0 asSDA:import boardimport busioi2c busio.I2C(scl board.GP1, sda board.GP0)SPI ExampleTo setup a SPI bus (https://adafru.it/Qsf), you specify the SCK, MOSI (microcontrollerout, sensor in), and MISO (microcontroller in, sensor out) pins. The Pico uses adifferent naming convention for these: SPIx SCK SCK SPIx TX MOSI SPIx RX MISOSo use that mapping to help find available pins.Here's an example: Adafruit IndustriesPage 13 of 93
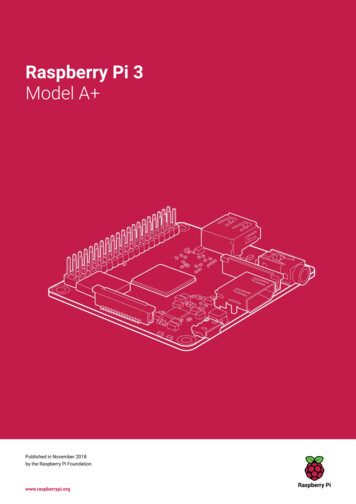
import boardimport busiospi busio.SPI(clock board.GP2, MOSI board.GP3, MISO board.GP4)UART ExampleTo setup a UART bus (https://adafru.it/Qsf), you specify the TX and RX pins. Be sure touse the UARTx pins and not the similarly named SPIx ones.Here's an example:import boardimport busiouart busio.UART(tx board.GP4, rx board.GP5)Using Adafruit AR with Raspberry Pi PicoWith this new Adafruit AR update, you’re able to scan your Raspberry Pi Pico todisplay an overlay of the boards pinouts and power pins. Here we'll show you how toget started.To get started:Before downloading this app, make sure your mobile device is running iOS 14 orgreater.Download Adafruit AR from the Apple App Adafruit IndustriesPage 14 of 93
Adafruit AR on the App Store (https://adafru.it/Ptb)Please note - the Adafruit AR app is currently only available for iOS.Once you’ve opened the app use the boards scanner mode to start.With your Raspberry Pi Pico, scan the front of the board.Due to the small size of the Raspberry Pi Pico, you’ll need to scan the board a bitclosely. Your device should be ideally 3 inches away from board to be recognized. Adafruit IndustriesPage 15 of 93
For the best practice to scan your board - make sure you are scanning in a well litarea and avoid light glare while scanning.MicroPython or CircuitPython?Now that you have a Pico you're probably wondering why most Adafruit tutorials arefor CircuitPython why the official Python is called MicroPython?Whats the difference, why use one or the other? Adafruit IndustriesPage 16 of 93
CircuitPython is a 'fork' based on MicroPythonCircuitPython code is gonna look a lot like MicroPython because they're based on thesame Python implementation. There are some minor differences becauseCircuitPython is focused on beginners, education, and getting folks started super fast.If you already know MicroPython, 95% of what you know will work just the same!CircuitPython is also available for the Pico and generally RP2040 boards. You load itjust like loading MicroPython.While CircuitPython is based on MicroPython, there are some key differences why youmay want to use CircuitPython instead of MicroPython.So what's different?There's a few differences and they're all documented here (https://adafru.it/tB7),however for Pico users who have tried or are following MicroPython guides the mostimportant are.CircuitPython was designed to have a USB disk drive that appears when you plug inthe board. That disk drive is small (on the order of MB!) and holds your code and files.You can treat it just like a disk drive - drag and drop files, delete and copy them. Youdo not need to use Thonny to 'upload' a file - simply drag any file you want to the USBdrive.CircuitPython will restart your code when you save files to the disk drive. That meanswhen you write Python code, whenever you save it will auto-reload the code for you,for instant gratification. This is a little unusual for programmers who are used to 'editsave-compile-upload-reset-run' - we go straight to 'edit-save-run'.CircuitPython has a consistent API across all boards. That means that whether you'reusing a Pico, or an nRF52840 or an ESP32-S2 or SAMD51 for your project, the codefor your hardware is identical. (Other than pin names which may vary depending onhow many there are on the board itself and what they're called).CircuitPython has a lot of examples and support!There are 260 libraries for the standard CircuitPython API. Most of these will alreadywork. Listed here (https://adafru.it/QaO) Adafruit IndustriesPage 17 of 93
Tons of guides and tutorials at https://learn.adafruit.com/category/circuitpython (https://adafru.it/Ew6)Most CircuitPython libraries also work on Raspberry Pis via the Blinka library (https://adafru.it/BSN). That means you can write code that works on both!Why Use MicroPython?You may want to use MicroPython for:1) Advanced APIs such as interrupts and threading.2) Complete PIO API (CircuitPython's support is incomplete)3) Using existing MicroPython codeIt's great to know both!To get started quick:Download CircuitPython for the Pico from circuitpython.org: https://circuitpython.org/board/raspberry pi pico/ (https://adafru.it/QaP)For now, click "Absolute Newest", then click your language code such as "en US", andfinally download the UF2 file at the top. That will be the latest and greatest version ofCircuitPython. As support matures, the download page will stable releases. You canalso choose a beta release but many features and fixes are being added on a dailybasis, so "Absolute Newest" will be the best for a while.After dragging the CircuitPython UF2 to RPI-RP2 bootloader the chip will reset andshow a CIRCUITPY drive.See the Welcome to CircuitPython (https://adafru.it/AlP) and CircuitPython Essentials (https://adafru.it/BX8) guides for CircuitPython basics. API Docs are here (https://adafru.it/Bvz) though they won't include RP2040 specific modules until support ismerged in. A Pico specific guide that will grow in time is here (https://adafru.it/QaQ).Join the Adafruit Discord () for #help-with-circuitpython and feel free to mention@tannewt for RP2040 specific questions. Adafruit IndustriesPage 18 of 93
What is CircuitPython?CircuitPython is a programming language designed to simplify experimenting andlearning to program on low-cost microcontroller boards. It makes getting startedeasier than ever with no upfront desktop downloads needed. Once you get yourboard set up, open any text editor, and get started editing code. It's that simple.CircuitPython is based on PythonPython is the fastest growing programming language. It's taught in schools anduniversities. It's a high-level programming language which means it's designed to beeasier to read, write and maintain. It supports modules and packages which means it'seasy to reuse your code for other projects. It has a built in interpreter which meansthere are no extra steps, like compiling, to get your code to work. And of course,Python is Open Source Software which means it's free for anyone to use, modify orimprove upon.CircuitPython adds hardware support to all of these amazing features. If you alreadyhave Python knowledge, you can easily apply that to using CircuitPython. If you haveno previous experience, it's really simple to get started! Adafruit IndustriesPage 19 of 93
Why would I use CircuitPython?CircuitPython is designed to run on microcontroller boards. A microcontroller board isa board with a microcontroller chip that's essentially an itty-bitty all-in-one computer.The board you're holding is a microcontroller board! CircuitPython is easy to usebecause all you need is that little board, a USB cable, and a computer with a USBconnection. But that's only the beginning.Other reasons to use CircuitPython include: You want to get up and running quickly. Create a file, edit your code, save thefile, and it runs immediately. There is no compiling, no downloading and nouploading needed. You're new to programming. CircuitPython is designed with education in mind.It's easy to start learning how to program and you get immediate feedback fromthe board. Easily update your code. Since your code lives on the disk drive, you can edit itwhenever you like, you can also keep multiple files around for easyexperimentation. The serial console and REPL. These allow for live feedback from your code andinteractive programming. File storage. The internal storage for CircuitPython makes it great for datalogging, playing audio clips, and otherwise interacting with files. Strong hardware support. There are many libraries and drivers for sensors,breakout boards and other external components. It's Python! Python is the fastest-growing programming language. It's taught inschools and universities. CircuitPython is almost-completely compatible withPython. It simply adds hardware support.This is just the beginning. CircuitPython continues to evolve, and is constantly beingupdated. Adafruit welcomes and encourages feedback from the community, andincorporate it into the development of CircuitPython. That's the core of the opensource concept. This makes CircuitPython better for you and everyone who uses it!Installing CircuitPythonCircuitPython (https://adafru.it/tB7) is a derivative of MicroPython (https://adafru.it/BeZ)designed to simplify experimentation and education on low-cost microcontrollers. Itmakes it easier than ever to get prototyping by requiring no upfront desktop softwaredownloads. Simply copy and edit files on the CIRCUITPY drive to iterate. Adafruit IndustriesPage 20 of 93
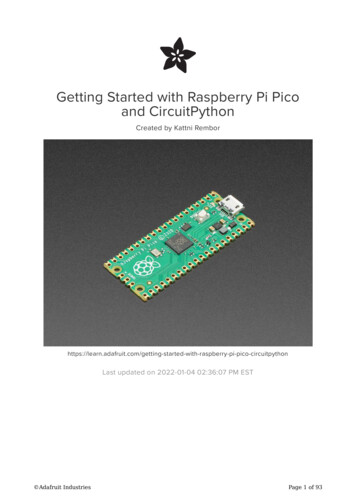
CircuitPython QuickstartFollow this step-by-step to quickly get CircuitPython working on your board.Download the latest version ofCircuitPython for the Raspberry PiPico from circuitpython.orghttps://adafru.it/QaPClick the link above and download thelatest UF2 file.Download and save it to your desktop (orwherever is handy).Start with your Pico unplugged from USB.Hold down the BOOTSEL button, andwhile continuing to hold it (don't let go!),plug the Pico into USB. Continue to holdthe BOOTSEL button until the RPI-RP2drive appears!If the drive does not appear, unplug yourPico and go through the above processagain.A lot of people end up using charge-onlyUSB cables and it is very frustrating! Somake sure you have a USB cable youknow is good for data sync. Adafruit IndustriesPage 21 of 93
You will see a new disk drive appearcalled RPI-RP2.Drag the adafruit circuitpython etc.uf2file to RPI-RP2.The RPI-RP2 drive will disappear and anew disk drive called CIRCUITPY willappear.That's it, you're done! :)Flash Resetting UF2If your Pico ever gets into a really weird state and doesn't even show up as a diskdrive when installing CircuitPython, try installing this 'nuke' UF2 which will do a 'deepclean' on your Flash Memory. You will lose all the files on the board, but at least you'llbe able to revive it! After nuking, re-install CircuitPythonflash nuke.uf2 Adafruit IndustriesPage 22 of 93
https://adafru.it/QAJInstalling the Mu EditorMu is a simple code editor that works with the Adafruit CircuitPython boards. It'swritten in Python and works on Windows, MacOS, Linux and Raspberry Pi. The serialconsole is built right in so you get immediate feedback from your board's serialoutput!Mu is our recommended editor - please use it (unless you are an experiencedcoder with a favorite editor already!).Download and Install MuDownload Mu from https://codewith.mu (https://adafru.it/Be6).Click the Download link for downloadsand installation instructions.Click Start Here to find a wealth of otherinformation, including extensive tutorialsand and how-to's.Windows users: due to the nature of MSI installers, please remove old versions ofMu before installing the latest version. Adafruit IndustriesPage 23 of 93
Starting Up MuThe first time you start Mu, you will beprompted to select your 'mode' - you canalways change your mind later. For nowplease select CircuitPython!The current mode is displayed in thelower right corner of the window, next tothe "gear" icon. If the mode says"Microbit" or something else, click theMode button in the upper left, and thenchoose "CircuitPython" in the dialog boxthat appears.Mu attempts to auto-detect your boardon startup, so if you do not have aCircuitPython board plugged in with aCIRCUITPY drive available, Mu will informyou where it will store any code you saveuntil you plug in a board.To avoid this warning, plug in a boardand ensure that the CIRCUITPY drive ismounted before starting Mu.Using MuYou can now explore Mu! The three main sections of the window are labeled below;the button bar, the text editor, and the serial console / REPL. Adafruit IndustriesPage 24 of 93
Now you're ready to code! Let's keep going.CircuitPython Programming BasicsTo get you started with how to program your Pico in CircuitPython, especially forthose who may have started out with the official MicroPython setup, we've 'ported'the Getting Started with MicroPython on Pico book (https://adafru.it/QkD) examples toCircuitPython. The book is awesome, please download/purchase it to supportRaspberry Pi Press (https://adafru.it/QkD)!Now that you've installed CircuitPython, it's time to begin your first program. If youhaven't already, plug in your Raspberry Pi Pico to your computer via USB. Then, openyour favorite Python editor.Click the Serial button in Mu to open the serial console. Click anywhere in the serialoutput window at the bottom of Mu, and press CTRL C on your keyboard. This willbring you to the REPL. At the REPL prompt ( ), type the following code followed bythe ENTER key:print("Hello, world!")Immediately upon pressing enter, the code is executed. Python responds by printingthe message. Adafruit IndustriesPage 25 of 93
The REPL, or the Read-Evaluate-Print-Loop, allows you to run individual lines of code,one at a time. You can run multiple lines of code in sequence to execute a longerprogram. It's great for testing a program line by line to determine where an issuemight be. It's interactive, so it's excellent for testing new ideas.It is, however, important to remember that the REPL is ephemeral. Any code you writethere is not saved anywhere. If you'd like to save your code, you can easily do so withCircuitPython and Mu.Once installed, CircuitPython presents your Pico board as a USB drive called CIRCUITPY. Your code and any necessary libraries live on this drive. With a freshCircuitPython install, you'll find a code.py file containing print("Hello World!")and an empty lib folder. If your CIRCUITPY drive does not contain a code.py file, youcan easily create one and save it to the drive. CircuitPython looks for code.py andexecutes the code within the file automatically when the board starts up or resets.Following a change to the contents of CIRCUITPY, such as making a change to the code.py file, the board will reset, and the code will be run. You do not need to manuallyrun the code. Note that all changes to the contents of CIRCUITPY, such as saving anew file, renaming a current file, or deleting an existing file will trigger a reset of theboard.In Mu, if the file currently open is not code.py, click Load in the Mu button bar,navigate to your CIRCUITPY drive, and open code.py. If there is no code.py file,create a new file by clicking New in the Mu button bar, then click Save, navigate toyour CIRCUITPY drive, and save the file as code.py.Note that the code in code.py is not running while you are actively in the REPL. To exitthe REPL, simply type CTRL D at the REPL prompt ( ).You must exit the REPL for the code found in code.py to be run.In the code.py file, click in the Mu text editor, and add the same simple line of code asabove (if it's not already there). Save the file. The code will run automatically, and themessage will be printed in the serial console! Adafruit IndustriesPage 26 of 93
Indentation and Code LoopsCircuitPython runs the same as a standard Python program, typically running from topto bottom, executing each line. However, you can control the flow of a program usingindentation. Delete the current contents of your code.py file and replace them withthe following code:"""Example of definite loop."""print("Loop starting!")for i in range(10):print("Loop number", i)print("Loop finished!")Loop is referring to a section of code that runs repeatedly - in this instance, thefor i in range(10): . This is called a definite loop, a loop that runs a set numberof times, in this case, 10.Your code.py should look like this:Save the file, and check out the serial output. Adafruit IndustriesPage 27 of 93
Indentation is crucial to flow control in code, but is also a very common cause ofsyntax errors, which causes the code to fail to run. If your code fails with a syntaxerror, be sure to check your indentation.There are also indefinite loops in CircuitPython, that is, a loop that continuesindefinitely. Update your code.py to the following. Be sure to delete the existing code!Your code.py file should only include the following code."""Example of infinite loop. Final print statement is never reached."""print("Loop starting!")while True:print("Loop running!")print("Loop finished!")Keep an eye on the serial console and click save. You should see the LoopStarting! message posted once initially, and then the Loop running! messagerepeated indefinitely.The Loop Finished! message will never show up because it is not "inside" theloop. When there is a while True: in Python code, everything indented under it willrun repeatedly - when the end of the loop is reached, it will begin again at thebeginning of the loop. Adafruit IndustriesPage 28 of 93
Conditionals and VariablesIn CircuitPython, like Python, you can create variables. You can think of variables as aname attached to a specific object. To create a variable, you simply assign it and startusing it. You use to assign a variable name to the desired object.Update your code.py to the following."""Example of assigning a variable."""user name input("What is your name? ")Save the file.Click into the serial output. Type your answer to the question and press ENTER onyour keyboard.You've saved your name to the user name variable! Now you can do something withit.Update code.py to the following. Note that when Mu sees that your code needs to beindented, it will do it automatically. Therefore, if your next line of code does not needto
Jan 04, 2022 · The Raspberry Pi foundation changed single-board computing when they released the Raspberry Pi computer (https://adafru.it/Qa1), now they're ready to do the same for microcontrollers with the release of the brand new Raspberry Pi Pico. This low-cost microcontroller board feature