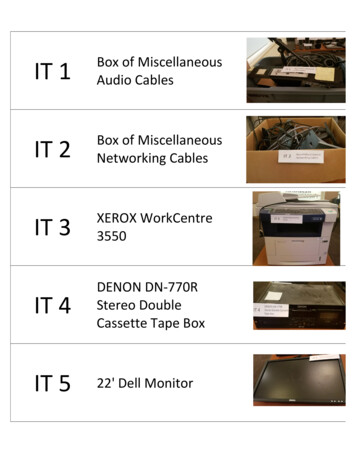
Transcription
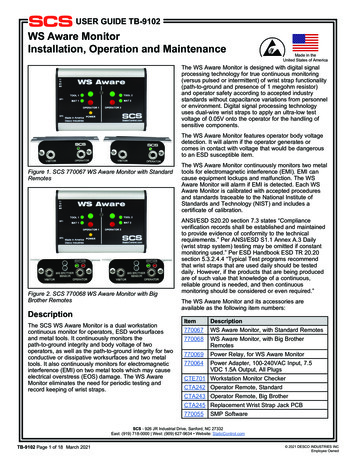
Care and use guideStay connected 24/7.Monitor, data logand remotely viewpH, conductivity andtemperature readings.Only one connectstick required formultiple devices
ContentsEnglishpagepagepH calibration8Bluelab Guardian Monitor Connect 3Placement of probes10What’s in the box?4Set alarms (optional)11IMPORTANT - Bluelab pHProbe care5Cleaning the conductivity/temperature probe13Mounting the GuardianMonitor ConnectCleaning the pH probe146Hydrating the pH probe14Install correct plug adaptor6Troubleshooting guide15Features3Connect power adaptorand Bluelab pH Probe6Technical specifications16Power up7Associated products17Select the desiredconductivity unit7Bluelab limited warranty18Contact details19Select the desiredtemperature unit7Select the desired brightnesslevel of the LED displays7Congratulations onpurchasing theGuardian Monitor ConnectThe Guardian Monitor Connect isnot only a consistent indicator of thedesired levels of pH, conductivity andtemperature of your nutrient solution, italso data logs these critical parametersto your computer for you.2
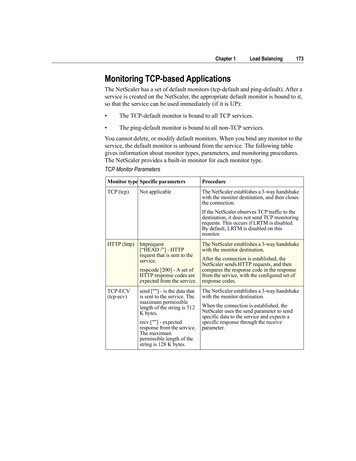
FeaturesCompatible with Bluelab Connect Stick andBluelab Connect Range ExtenderView data and current status remotely viaGoogle Docs (A computer with permanentinternet access is required)Free Bluelab Connect Software availableonline‘Plant Safe’ green LED displayVisual alarm for both high and low settingsLarge easy to read displaysNo calibration required for conductivity ortemperatureSelectable units for conductivity andtemperatureSimple push button pH calibrationWater resistant designGreater tolerance to RF/electronicinterference providedEnglishData logging capability (ONE BluelabConnect Stick is required, sold separately)International power supplyAdjustable display brightnessSettings retained when power lostReplaceabledouble junction pH probeWhat is Plant Safe? Green LED’s are safe forcontinuedduring a plant’s fruiting(nonvolatile growthmemory)stage when hours of darkness are required.Guardian Monitor pH ProbeConductivitydisplayConductivityunits eunits buttonTemperatureLEDspH displaypH calibrationLEDspH calibrationbuttonAlarm on LEDConductivity/temperatureprobe shroudAlarm buttonpH probestorage capDisplaybrightnessbuttonPower inputUp buttonpH probe BNCconnectorDown buttonKeep your pH probe tip wet3at all times to avoid permanent damage
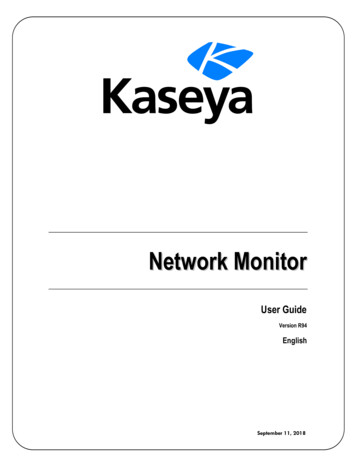
PLEASE FOLLOW THE MANUAL STEP BY STEP BEFORE FIRST USE BEGINSEnglish1.0What’s in the box?Please verify the box contents from the information below.5678910123411121 Guardian Monitor Connect8 UK plug adaptor2 B luelab pH Probe with storage cap9 European plug adaptor3 Bluelab Conductivity/Temperature Probe10 4 x mounting fasteners4 Bluelab standard pH Probe holder with suction cup11 2 x cable ties5 5V DC power supply12 pH 7.0, pH 4.0 and EC 2.77 singleuse calibration solution sachets6 N orth American plug adaptor4137 NZ / Australian plug adaptor13 Guardian Monitor ConnectGetting Started Guide
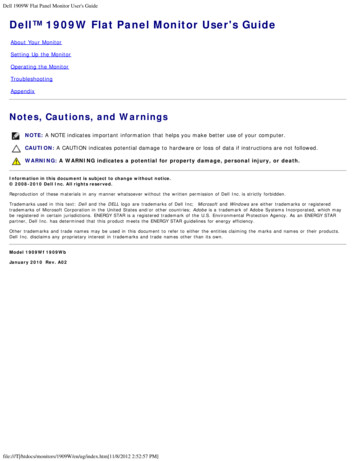
English2.0IMPORTANT - Bluelab pH Probe careThe Bluelab pH Probe is the only part of the Guardian Monitor Connect that shouldever require replacing. pH probes DO NOT last forever. They age through normal useand will eventually fail. The life time of a pH probe depends on the environment it isused in and the way that it is treated. To receive a long life from your pH probe, pleaseensure you follow the guide below.pH probes contain glass and are therefore FRAGILE. With good care, they willgive a long service life.Bluelab pH ProbepH probe holdersuction cuppH probe tipBNC connectorpH probestorage capGlass tube insideplastic barrelGlass bulbDO NOT let the pH probe tip dry. IF IT DRIES IT DIES!DO NOT bend the probe; this will break its internal glass tube.DO NOT knock the probe; this will break its internal glass tube or external glass bulb.DO NOT plunge a cold pH probe into a hot liquid - sudden temperature changes can crack theglass and permanently damage the probe.DO NOT immerse in oils, proteins or suspended solids that will leave a coating on the glass bulb.DO NOT ‘kink’ or bend the lead sharply.DO NOT attempt to lengthen the lead on the pH probe.DO NOT wet the BNC connector at the end of the lead.Always remove pH probe storage cap before use1. Grip the top of the cap and gently twist the base one rotationclockwise to loosen slightly.2. Next slowly slide the cap off the pH probe. DO NOT completelyremove the base of the cap from the top of the cap.3. Store the storage cap in a safe place.Storing the pH probeWhen storing the pH probe, the pH probe tip must be kept moist.To prepare the pH probe for storage, add enough Bluelab pH Probe KCl StorageSolution to the storage cap so the probe tip is covered. Then replace the capand store in a secure place. DO NOT use RO (Reverse Osmosis), Distilled orDe-ionized water. Pure water changes the chemistry in the reference, causingthe probe to die.Removing pH probestorage capIf the pH probe has been accidentally allowed to dry out;5The pH probe must be ‘hydrated’ for 24 hours in KCl storage solution (never useRO, Distilled or De-ionized water). Following this; carry out a calibration to check ifthe probe has already suffered permanent damage.Ensure probe tip is covered bythe KCl storage solution in cap
Please follow these steps before mounting yourGuardian Monitor ConnectEnglishA Note the 4 character KEY CODE on the rear of your Guardian Monitor Connect.CFollow steps 3.0 to 12.0 to mount and operate your Guardian Monitor Connect.3.012Mounting the Bluelab Guardian Monitor Connect if wall mountingOption 1Select a suitable location that is less than 2 meters fromyour reservoir, and less than 1.5 meters from an electricalmains outlet. NOTE: Avoid placing the Guardian MonitorConnect where it can be damaged by direct sunlight, wateror nutrient salts.Mounting keyholes top and bottomOption 1a) Install two fasteners (top and bottom) to the wall172mm / 6.¾” apart.b) Slide the Guardian Monitor Connect onto the fastenersusing the keyholes.Option 2a) Fix the four fasteners through each mounting hole ineach corner of the case.3.1Option 2Mounting holes top and bottomMounting the Bluelab Guardian Monitor if mounting on a support or bar1Select a suitable location that is less than 2 meters fromyour reservoir, and less than 1.5 meters from an electricalmains outlet. NOTE: Avoid placing the Guardian MonitorConnect where it can be damaged by direct sunlight, wateror nutrient salts.2Fix each of the cable ties provided through the smallmounting holes in the top of the case and wrap aroundthe support or bar and secure.4.0Cable ties fixed through smallmounting holes around asupport or bar.Install correct plug adaptor1Select the appropriate mains plug adaptor for your country.2Connect the plug adaptor to the power supply.5.06key code: abcdB Follow the getting started instructions supplied with the Bluelab Connect Stick to install theBluelab Connect Stick, Bluelab Connect Software and add your Guardian Monitor Connectto your computer.Connect power adaptor and Bluelab pH Probe1Connect the power adaptor into the base of theGuardian Monitor Connect where ‘Power Input’ islabelled. Plug the adaptor into mains power supply.2Connect the pH probe to the Guardian MonitorConnect by lining up the lugs of the BNC fittings.Fasten securely by pushing the pH probeconnector on and twisting one quarter turn.InsertingTwistingAttached
English6.0Power up1Switch on power adaptor at the mains.2When power is applied the Guardian Monitor Connect will complete a display testsequence.7.0Select the desired conductivity unitConductivity readings can be displayed in EC, CF, TDS or ppm 700. The selected unit isindicated by one of the 3 LEDs next to the conductivity window. When the EC/CF LED ison, the Guardian Monitor Connect is displaying conductivity in units of EC or CF.If there is a decimal point present in the conductivity display, the units are EC. If thereis no decimal point the units are CF.1Press and hold the conductivity unitbutton and after 3 seconds it willchange to the next unit indicated bythe glowing LED.2Release.3Repeat steps 1 and 2 until the desiredunit is selected.8.0Select the desired temperature unitTemperature readings can be displayed in either degrees celsius ( C) or degreesfahrenheit ( F). The selected unit is indicated by one of the two LEDs next to thetemperature window.1Press and hold the temperature unitbutton and after 3 seconds it willchange to the next unit indicated by theglowing LED.2Release.3Repeat steps 1 and 2 until the desiredunit is selected.9.0Select the desired brightness level of the LED displaysThese can be adjusted to best suit the light levels of the environment. There are8 levels of ‘brightness’ that can be selected.17Press and hold the brightness buttonand at the same time press eitherthe up or down buttons to change thebrightness. Brightness levels are shownin the pH window.1 least bright, 8 brightest
10.0CalibrationEnglishpH calibration is required before first use to ensure that the first reading is accurate. The Bluelab Conductivity/Temperature Probe DOES NOT require calibration. The pH of the Guardian Monitor Connect DOES require calibration.For accurate pH readings the pH probe is cleaned and recalibrated when: The reading is different to what you were expecting. The Guardian Monitor Connect is reset to factory default. The pH probe is replaced with a new one. It has been a month since the last successful calibration and the calibration indicatorlights are flashing.When calibrating the pH after first use the pH probe needs to be cleaned. See pH probecleaning in section 14.0.For best pH calibrationpH reading accuracy is dependant on the accuracy and age of the calibrationsolutions used, and use and cleanliness of the pH probe tip. Ensure the pH probe has been cleaned and rinse the pH probe with clean waterbetween calibration solutions to reduce contamination of the pH solutions. Only fresh uncontaminated solutions should be used. Calibrate the pH at the same temperature as the solution to be measured. ALWAYS calibrate the pH probe with pH 7.0 then pH 4.0 or pH 10.0.NOTE: The conductivity/temperature probe does not need to be calibrated, but must becleaned to remove any build up of nutrient salts. See Section 13.0.The pH calibration involves cleaning the pH probe tip and then calibrating in TWOSOLUTIONS.If a reading below pH 7.0 is expected, use pH 7.0 and pH 4.0 calibration solutions.If a reading above pH 7.0 is expected, use pH 7.0 and pH 10.0 calibration solutions.Follow the steps on the following page for Guardian Monitor Connect pH calibration.Storage and use of calibration solutions Always place the lid back onto the bottle after use or evaporation will occur renderingthe solution useless. DO NOT measure directly into the bottle. Tip a smallamount into a clean container and discard after use. Never add water to solutions. Store in a cool place.pH reading accuracy is dependant on the accuracyand age of the calibration solutions used, and useand cleanliness of the pH probe tip.8
10.0pH calibration cont.EnglishTo calibrate the pH1Clean pH probe tip.See section 14.0 (the pH probe does notrequire cleaning before the first use).2pH 7.0 calibrationa) Prepare a small amount of pH 7.0calibration solution in a container.b) Ensure the Guardian Monitor Connectis plugged in and in operation mode.c) Rinse the pH probe tip in fresh water,shake off excess water and place in thepH 7.0 calibration solution. Wait at leastone minute for reading to stabilize.d) Press and hold the pH cal button for a fewseconds until ‘PH’ and ‘CAL’ appear in thewindows, then release the pH cal button.The ‘7’ LED will glow green. All threewindows will return to monitoring modewith all current values being displayed.e) If ‘Err’ is displayed see thetroubleshooting guide on section 16.0.clean the pH probepH 7.0calibrationsolutionrinse in tap waterpH 4.0 orpH 10.0calibrationsolution39pH 4.0/10.0 calibrationa) Prepare a small amount of pH 4.0 orpH 10.0 calibration solution in a container.b) Rinse the pH probe tip in fresh water,shake off excess water and place ineither pH 4.0 or pH 10.0 calibrationsolution. Wait at least one minute forreading to stabilize.c) Press and hold the pH cal button for a fewseconds until ‘PH’ and ‘CAL’ appear in thewindows, then release the pH cal button.The 4/10 LED will glow green. All threewindows will return to monitoring modewith all current values being displayed.d) If ‘Err’ is displayed see thetroubleshooting guide on section 16.0.e) The Guardian Monitor Connect is nowcalibrated and ready for use.Successful pH 7 and pH 4 calibration
10.0pH calibration cont.pH calibration LEDsEnglishThe LEDs next to the pH window will let you know thestatus of calibration. See the table below.NOTE: The pH probe and hence calibration will eventuallyfail due to; Contamination and age of pH probe. pH probe used to measure solutions at temperatures above 50 C (122 F) orbelow 0 C (32 F). pH probe exposed to aggressive chemicals. Internal damage to the pH probe from rough treatment. Damage to the cable of the pH probe from rough treatment. pH probe repeatedly drying out. Moisture getting inside the BNC connector on the pH probe cable.pH LEDsUsing factory default calibration values. Both LEDs off.Readings may be unreliable.pH 7 calibrated OK. Using factory default for pH 4/10. pH 7calibrated OK. Using factory default for pH 4/10. Readingsmay be unreliable.pH 7 and pH 4 or pH 10 calibrated OK.30 days passed since last full calibration - calibration due.If 7 is flashing and 4/10 is off, calibration is also required as4/10 was never calibrated.11.0Placement of probesBoth the Bluelab pH Probe and Bluelab Conductivity/Temperature Probe requiresubmersion in the liquid for a measurement to occur. Do not pour concentrated nutrient solution or pH adjuster directly onto probeswhen in the reservoir, as very strong acid may damage the probes or your alarms(if set) may trigger.101Fit the (optional) pH probe holder to the stem of thepH probe using a gentle twisting motion.2Place the pH probe into the reservoir and push thesuction cup onto the side of the reservoir but farenough down so the pH probe tip is in the solution.The holder prevents damage to the pH probe frombanging onto the side of the reservoir with movementof the solution.Place the conductivity/temperature probe into thereservoir selected.3
English12.0Set alarms (optional)The alarm function warns you when the solutiondeviates from the desired levels you have chosenfor each measurement.When an alarm condition is present, the displayof the affected measurement will flash.If the measurement changes back to within thelimits you have chosen, the flashing will stop.Even though the resolution of the Guardian is 10 ppm / TDS, the alarms will set onlyin 50 ppm and 70 ppm increments.There are two ways to set the alarm, ‘quick-set’ or ‘detailed-set’.Alarm ‘quick-set’This allows you to quickly set the ‘alarm HIGH’ and ‘alarm LOW’ values for all of thethree measurements. The table below shows the values that are pre-set when ‘quickset’ is used.NOTE: Before you use the quick-set function, the solution in the tank/reserviormust be adjusted to the desired/actual levels for all three parameters and thelevels displayed in each of the windows. If this is not done you should use the alarm‘detailed-set’.Alarm lowAlarm highConductivityactual value –2 CF / 0.2 EC100 TDS140 ppmactual value 2 CF / 0.2 EC100 TDS140 ppmTemperatureactual value –3 C / 5 Factual value 3 C / 5 FpHactual value –0.5 pHactual value 0.5 pHTo activate the ‘quick-set’ alarm;111Press and hold the alarm button until ‘AL H’is displayed in all three windows.Release the alarm button.2Press the brightness button once.3All three windows will display Auto for1 second and then SAVE will be displayed inthe conductivity window. The alarms are nowauto set and the alarm mode will be turnedon. The alarm LED will glow.
12.0Set alarms (optional) cont.Turn alarm ON/OFFEnglishPress the alarm button to change between alarm ON and alarm OFF.When the alarm is ON the alarm LED will glow.NOTE: If you press and hold the alarm button you will enter thealarm setting mode.Alarm ‘detailed-set’To set the detailed ‘alarm HIGH’ and ‘alarmLOW’ values;121Press and hold the alarm button until ‘AL H’ isdisplayed in all three windows.2Release the button and the current ‘alarmHIGH’ values are displayed in each window.3To set conductivity alarm high value, press theconductivity unit button then the up and downbuttons to change its value.4To set temperature alarm high value, press thetemperature unit button then the up and downbuttons to change its value.5To set pH alarm high value, press the pHunit button then the up and down buttons tochange its value.6Press the alarm button to now select the lowalarm values.7Set the low alarm values the same way as youdid the high alarms.8Press the alarm button. SAVE is brieflydisplayed in the conductivity window and theGuardian Monitor Connect will return to itsnormal monitoring mode.NOTES:To review current alarm settings withoutchanging the values, repeatedly press the alarmbutton to step through the high and low alarms.If you want to exit the alarm settings modewithout keeping any changes you have madeDO NOT press any keys. The Guardian MonitorConnect will ‘timeout’ and return to its normalmonitoring mode without saving any changesafter 1 minute.The software will prevent you from setting lowalarm values higher than the high alarm values.
13.0 Cleaning the conductivity/temperature probeCleaning the Bluelab Conductivity/Temperature ProbeEnglishCleaning the conductivity/temperature probe periodically ensures accurate readings.The conductivity/temperature probe is cleaned using the Bluelab Conductivity Probe Cleaner, or “Jif”a trade name for a liquid scourer cream used in home bathrooms and kitchens. Similar products arecalled “Liquid Vim”, “Soft Scrub”, “Cif cream”, or “Viss”. Never use scented varieties as they containoils that contaminate the conductivity/temperature probe.Follow the steps below to clean the conductivity/temperature probe.1Remove shroud.Warm the shroud in your hand for a few seconds to help with removal. Hold thebody and pull the shroud off.2Clean the conductivity probe face.Place one or two drops of BluelabConductivity Probe Cleaner onto the probeface and rub with the Bluelab Chamois oryour finger firmly a nd vigorously.3Rinse the conductivity probe face. Rinse off all traces of cleaner underrunning tap water while scrubbing theprobe face with t he other side of theBluelab Chamois or the same finger.45Check that the water forms a smoothfilm on the probe face. Ensure you havea clean, smooth film without any beadsof water.If you have beads of water, repeat steps 2and 3.Refit the shroud and test in 2.77 EC Conductivity Standard Solution toensure adequate cleaning. Place the probe tip into the solution, waitfor t he reading to stabilize to a constantvalue. This can take a few minutes whilethe probe adjusts to the temperature ofthe solution.Repeat the cleaning process if the readinggiven is not within 0.1 EC, 1 CF, 50 ppm or70 ppm of the values in the table below.1233clean, smoothfilm of wateruneven beadsof water52.77 EC ConductivityStandard SolutionTesting the Bluelab Conductivity/Temperature ProbeThe conductivity/temperature probe is tested in either2.77EC/27.7CF/1385 ppm or 1940 ppm solutionUnitchosendepending on the unit of conductivity chosen.Solution13Use the standard solutions in the table to therequiredright. Bluelab solutions are recommended.NOTE: The shroud MUST be left on the probe when taking readings.ppmEC CF ppm500 7002.77 27.7 1385 1940
English14.0 Cleaning the Bluelab pH ProbeTo ensure accurate readings the pH probe tip needs to be rinsed in water after each useand cleaned prior to calibration using the following instructions.The storage cap must always be put back on after cleaning. Always ensure it containsenough Bluelab pH Probe KCl Storage Solution to cover the probe tip.1Remove storage cap from pH probe.Hold the top of the storage cap, twist the cap toloosen then remove.2Rinse pH probe tip under fresh tap water. Never use RO (Reverse Osmosis), Distilled or Deionized water.3Fill a small plastic container with clean tap water. Add a small amount of Bluelab pH Probe Cleaneror mild detergent (dishwashing liquid).4Gently stir the probe tip in the mixture.Ensure that you do not ‘knock’ the soil pH probeon the side of the container as this may causedamage to the probe.5If the probe tip requires removal of heavycontamination: Gently brush around theglassware with a few drops of Bluelab pH ProbeCleaner or mild detergent (dishwashing liquid) anda soft toothbrush.6Rinse well under fresh running tap water toremove all traces of the detergent mixture.7Calibrate pH probe after cleaning, see section10.0 After calibration, store pH probe in thestorage cap, ensuring there is enough KCl StorageSolution to cover the probe tip.123456715.0 Hydrating the pH probeHydrate the pH probe in Bluelab pH Probe KCl Storage Solution when: the probe tip has not always been stored in KCl storage solution, to improve thereading response speed. the probe tip has been accidentally allowed to dry out.Never use RO (Reverse Osmosis), De-ionized or Distilled water. Pure water changes the chemistry in the reference,causing the probe to die.141Loosen, then remove the storage cap. Place the pH probeupright in a plastic container.2Clean the pH probe tip. Ensure the probe tip is cleanedbefore hydrating. See section 14.0 for instructions.3Add enough Bluelab pH Probe KCl Storage Solution to aplastic container to submerge the pH probe tip.4Leave to soak for at least 24 hours. After hydration, alwayscalibrate the pH probe to ensure accuracy, see section 10.0.Bluelab pHProbe KClStorageSolution
16.0 Troubleshooting guideTroubleReasonCorrectionContaminated conductivity/temperatureprobe.Clean conductivity/temperature probe (seesection 13.0) .Temperature of conductivity/temperatureprobe and solution different.Wait 5-10 minutes for conductivity/temperatureprobe to reach solution temperature.Temperature of conductivity/temperatureprobe different to solution temperature.Wait 5-10 minutes for conductivity/temperatureprobe to reach solution temperature.Contaminated pH probe / glassware notclean.Clean pH probe (see Section 14.0); thencalibrate (see Section 10.0).Using factory default calibration.Calibrate pH probe (see section 10.0).Calibration old.Calibrate pH probe (see section 10.0).Broken glass bulb, tube or connector.Check pH probe for damage.pH probe damaged or old.Replace pH probe.An attempt was made to calibrate withpH 4.0 or pH 10.0 calibration solutionmore than one hour after calibration withthe pH7.0 solution.Calibrate to pH 7.0 again then do pH 4.0 / pH10.0 calibration within one hour.Old or contaminated solutions used forcalibration.Use fresh calibration solutions.Dirty or contaminated pH probe.Clean pH probe (see section 14.0).pH probe tip been allowed to dry.Hydrate pH probe (see section 15.0).pH probe damaged or old.Replace pH probe.No displayMains not switched on.Power adaptor not plugged into theGuardian Monitor Connect.Switch mains power on.Plug power adaptor into the base of theGuardian Monitor Connect labeled ‘Power Input’.pH displays ‘or’pH displays ‘ur’Over range pH.Under range pH.Solution 14.0 pH.Solution 0.0 pH.Check pH probe connection. pH probe couldbe faulty. Guardian Monitor Connect could bewet inside.temp displays ‘or’temp displays ‘ur’Over range temperature.Under range temperature.EnglishNutrient reading lowTemperature readinginaccuratepH reading inaccurateDisplay shows ‘Err’during calibrationconductivity displays ‘or’ Over range conductivity/nutrient.A display showsEC and pH cannot be determined astemperature range is over/under.(see technical specification range section17.0).Test pH probe in calibration solutions andconductivity/temperature probe in a knownconductivity standard solution to eliminate theseas a cause of this problem. Check solution tank/reservoir for problems.Device doesn’t add toConnect SoftwareDevice authentication code incorrectEnter correct 4 charactor key code on rear ofproduct into software.Device doesn’t add toConnect SoftwareWeak signal and/or device is outsideconnect stick rangeMove device closer to stick. Also refer topositioning your devices document on www.getbluelab.comDevice doesn’treconnect when I moveit to its locationDevice outside connect stick rangeMove device closer to stick. Also refer topositioning your devices belowDevice may be connected throughDevice loses connectionanother device, if the closest devicewhen it’s signaldrops out all connected devices alsostrength is gooddrop out15Solution 51 C / 122 F.Solution 0 C / 32 F.Conductivity/temperature probe or GuardianMonitor Connect faulty.Over range conductivity 9.9 EC, 99 CF, 1990ppm. Conductivity/temperature probe orGuardian Monitor Connect faulty.Increase the signal strength of the deviceconnected to the stickFor customer support go to go to our Support Centre at bluelab.com
17.0 Technical specificationspHConductivityTemperature0.0 – 14.0 pH0 – 5.0 EC,0 – 50 CF,0 – 2500 TDS(ECx500),0 – 3500 ppm(ECx700)0 – 50 C32 - 122 FResolution0.1 pH0.1 EC,1 CF,10 TDS,10 ppm1 C1 FAccuracy at25 C/77 F 0.1 pH 0.1 EC, 1 CF 50 TDS, 70ppm 1 C 2 FCalibrationTwo point(pH 7.0 andpH 4.0 orpH 10.0)Not required(factorycalibrated)Not required(factorycalibrated)Yes(if conductivity/temperatureprobe is in samesolution as t0 - 50 C / 32 - 122 FPower SourceInput: 100-240 Vac, 50-60 Hz, 5 VA,4 interchangeable plug types (USA, Euro, UK, NZ/AUS)Output: 5VDC 1AmpSignal RangeIndoor / Urban: 66 feet / 20 metersOutdoor / RF line-of-sight: 164 feet / 50 metersFrequency BandSystemRequirementsCerts16User ManualLanguagesAvailable2.4 GHz ISMMicrosoft Windows XP or greater for Bluelab ConnectSoftware. Internet connection for remote access & datalogging to the cloudCE, FCC, IC. Contains Model XBEE2 Radio,IC: 4214A-XBEE2, FCC ID: OUR-XBEE2English
Bluelab Connect StickEnglishThe Bluelab Connect Stick receives wireless data fromone or more Bluelab connect devices. Your data can thenbe logged to your local computer and/or to the cloud.One Connect Stick will receive data from multipleBluelab Connect devices.You can add other Bluelab Connect devices to yourConnect Software at the click of a button.Bluelab Connect Range ExtenderA Bluelab Connect Range Extender boosts thedata signal strength.Extend the wireless range by positioning a rangeextender between your Bluelab Connect devicesand your connect stick.Using the Bluelab Connect Range Extender requires youto already have a connect stick and one or more BluelabConnect enabled devices.Bluelab pH Probe replacementHigh Presure pH Probe - used with In-LineThe Bluelab pH Probe is the only part of theBluelab pH Meter that requires replacing.pH probes do not last forever. They agethrough normal use and will eventually fail.pH ProbeTo ensure you receive a long life from your pHprobe, please read the instructions provided with it.When the time comes to replace your BluelabpH Probe all you have to do is order a replacement from your supplier!Bluelab Probe Care Kit - pH and ConductivityThe instrument is only as accurate as the probe is clean!Probe cleaning is one of the most important parts of owningand operating any Bluelab meter, monitor or controller.If the probe is contaminated (dirty) it affects the accuracy of thereading displayed.The kit contains instructions and all the tools you need to clean theGuardian Monitor Connect probes.Bluelab pH Probe KCl Storage SolutionThe perfect solution to store and hydrate your Bluelab pH products.17Bluelab pH Probe KCl Storage Solution is designed to increase responsetime and maximize the life of Bluelab pH pens and pH probes.For best results, use the KCl solution to store the pH pen/probe after use andhydrate monthly. Instructions are on the label of the bottle.
Bluelab limited warrantyEnglishBluelab Corporation Limited (Bluelab) provides a warranty on its products(Bluelab Guardian Monitor Connect ) under the following terms and conditions:How Long Does Coverage Last?Bluelab warrants the Bluelab Guardian Monitor Connect (Product) for a period of 24-months from date ofpurchase by original purchaser or consumer. Proof of purchase, to Bluelab’s sole satisfaction, is required for thewarranty to be effective (store sales receipt for Product showing model number, payment and date of purchase).This warranty is non-transferable and terminates if the original purchaser/consumer sells or transfers theProduct a third party.What is Covered?Bluelab warrants the Product against defects in material and workmanship when used in a normal manner, inaccordance with Bluelab instruction manuals. If Bluelab is provided with valid proof of purchase (as definedabove) and determines the Product is defective, Bluelab may, in its sole discretion either (a) repair the Productwith new or refurbished parts, or (b) replace the Product with a new or refurbished Product.Any part or Product that is replaced by Bluelab shall become its property. Further, if a replacement part or Productis no longer available or is no longer being manufactured, Bluelab may at its sole discretion replace it with afunctionally-equivalent replacement part or product, as an accommodation in full satisfaction of the warranty.What is NOT covered?This warranty does not apply to equipment, component or part that was not manufactured or sold by Bluelab ,and shall be void if any such item is installed on a Product. Further, this warranty does not apply to replacement ofitems subject to normal use, wear and tear and expressly excludes: Cosmetic damag
Getting Started Guide 7 13. English 5 2.0 IMPORTANT - Bluelab pH Probe care The Bluelab pH Probe is the only part of the Guardian Monitor Connect that should ever require replacing. pH probes DO NOT last forever. They age through normal use and will eventually fail. The