Transcription
ESI Feature PhoneUser’s GuideFORWITH0450-0467Rev. NFor on-line help, visit www.esiusers.com.voice mail
About ESIESI (Estech Systems, Inc.) is a privately held corporation based in Plano, Texas, near the internationallyknown “Telecom Corridor.” Founded in 1987, ESI designs and builds innovative telecommunicationsproducts for businesses like yours. Because of their powerful combination of value and features,ESI products are consistently recognized by industry publications and leaders.Copyright 2007 ESI (Estech Systems, Inc.).Visit ESI on the Web at http://www.esi-estech.com.IVX is a registered trademark of ESI. Microsoft is a registered trademark of Microsoft Corporation. Intel is a registered trademark of Intel Corporation.Certain ESI products are protected by various U.S. Patents, granted and pending. Product information contained herein is subject to changewithout notice. ESI is an ISO 9001:2000-certified company.
Table of contentsIntroduction.A.148-Key Feature Phone .A.224-Key Feature Phone .A.412-Key Digital Feature Phone .A.5ESI Cordless Handsets .A.6Connecting your ESI phone.A.7Help mode (Verbal User’s Guide).B.1User programming: An introduction.C.1User programming menu.C.1Voice mail operation .D.1VOICE MAIL key .D.1Personal greetings.D.1Leaving messages . . .D.2Moving a message .D.3Off-premises “reach me”.D.3Message retrieval .D.3Live recording .D.6Off-premises message delivery .D.7Message Recycle Bin (un-delete).D.8Status indicator lamp .D.8Optional voice mail feature: Guest mailboxes .D.8Optional voice mail feature: Broadcast mailbox (500) .D.10Optional voice mail feature: Cascade notification mailboxes.D.11ESI Feature Phone operation.E.1Display .E.1Caller ID.E.1Keys.E.1Dial tone.E.3Basic phone use .E.4Direct station selection.E.5Transferring an outside call . . .E.5Transferring an internal call . . . .E.7Conference calling.E.8Call forwarding.E.9Call waiting . E.11Hold/exclusive hold operation.E.12Paging.E.14Call pickup .E.14Optional features .E.15Special keys . F.1Esi-Dex . F.2Override ring. F.9Message monitor mode (live call screening) . F.10Personal greeting reminder . F.10Headset operation . F.10Outside dial tone preference. F.11Line keys. F.11Optional features . F.12Analog stations. G.1Caller ID. G.1Placing calls. G.1Transferring calls . G.2Conference calling. G.2Call forwarding. G.3Call waiting . G.3Call hold. G.3Paging. G.4Call pick-up. G.4Voice mail operation from an analog station. G.4Analog station programming. G.7Index
(This page included for pagination purposes only.)
User’s GuideIntroductionIntroductionAccessing the rich ESI feature set is simple and easy through the straightforward design of ESI DigitalFeature Phones and the ESI Digital Cordless Handset. Each feature has been designed for ease of usewhile providing capabilities needed in an advanced business phone.You will be able to learn many of the features by simply using your phone; and this IVX S-Class User’sGuide will introduce you to the wide variety of features offered by your ESI phone system and how touse your phone effectively to achieve maximum benefits.What it covers 48-Key Digital Feature Phone 24-Key Digital Feature Phone 12-Key Digital Feature Phone ESI Digital Cordless Handset 60-Key Expansion Console (for use with the 48-Key Digital Feature Phone only)How it’s arranged Section A — Introduction and phone illustrations Section B — User help Section C — User programming Section D — Voice mail operation Section E — Phone operation Section F — Special keys and features Section G — Analog Stations IndexVoice mail optionsYour IVX S-Class phone system comes with ESI’s award-winning voice mail, including an automatedattendant and a dedicated mailbox for each station.The automated attendant provides up to 18 branches that conveniently route callers to their desiredextensions or departments, or even destinations outside the system.Some features are enabled by the Installer or System Administrator. Consult your System Administratorif you are unsure about what S-Class features are available.A.1
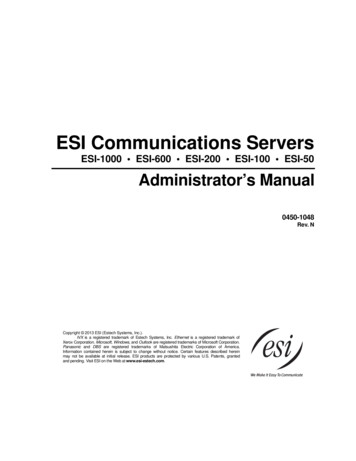
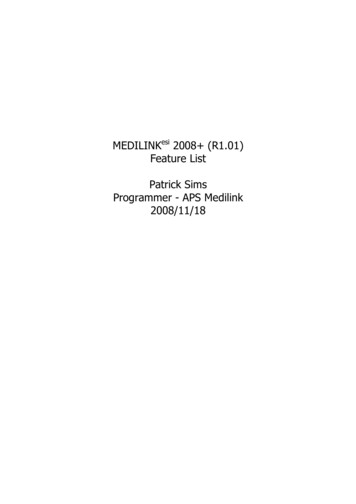
IntroductionUser’s Guide48-Key Feature PhoneThe 48-Key Feature Phone has a variety of programmable and built-in features. It comes in twoversions: Digital and TAPI. Additionally, it supports the optional 60-Key Expansion Console. Bothversions of the 48-Key Feature Phone offer the same basic features that are described throughout thisUser’s Guide. The 48-Key Feature Phone’s built-in voice mail features and voice prompts make it easyto program and use.Status indicatorlamp (pg. D.8)3-line, 56-character displayVolume/scroll keysPROGRAMsoft feature key(pg. C.2)ESI-DEXsoft feature key(pg. F.2)HELP key foraccess to VerbalUser Guideand tutorial(pg. B.1)Context-specifickey to selectdisplayed optionsVOICE MAILkey (pg. D.1)SpeakerRECORD key(pg. D.6)P/UP (pickup) key(pg. E.14)30 programmablefeature keys(pg. C.2)PAGE key(pg. E.14)Fixed feature keys(pg. E.1)Hint:A.2Microphone forbuilt-in speakerphoneYou can perform direct programming by holding down a programmable feature key for at least twoseconds (similar to how you might program a car radio button). This isn’t applicable to the fixed-featurekeys which, as their name implies, are already programmed.
User’s GuideIntroductionOptional 60-Key Expansion Console for use with the 48-Key Feature PhoneThe 60-Key Expansion Console adds 60 more programmable feature keys to your 48-Key DigitalFeature Phone.You program the Expansion Console’s keys just as you do the programmable feature keys on your ESIFeature Phone, using either direct or traditional programming (see pages C.2).Note: Only one key can exist per extension, feature or operation. If you program a second key for the sameextension, feature or operation, this automatically erases the first key so programmed, thus making itavailable for a new extension, feature or operation.Hint:You may find it easier to write in the names on the overlay before you program the keys and attach theoverlay to the Console.60 programmablefeature keys(pg. C.2)in two banksof 30 eachHint:You can perform direct programming by holding down a programmable feature key for at least twoseconds (similar to how you might program a car radio button). This isn’t applicable to the fixed-featurekeys which, as their name implies, are already programmed.A.3
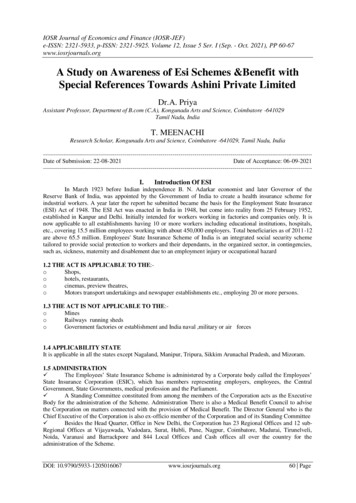
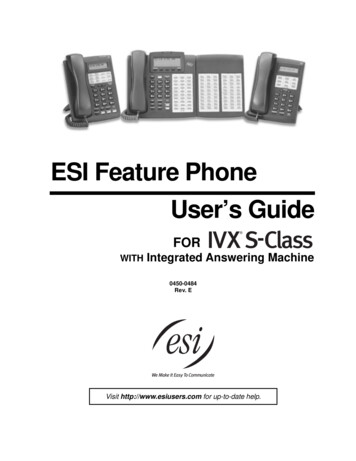
IntroductionUser’s Guide24-Key Feature PhoneThe 24-Key Feature Phone has a variety of programmable and built-in features. The 24-Key FeaturePhone’s built-in voice mail features and voice prompts make it easy to program and use.Volume/scroll keysStatus indicatorlamp (pg. D.8)ESI-DEX key (pg. F.2)2-line, 32-character displaySpeaker12 programmablefeature keys (p. C.2)P/UP (pickup) key(pg. E.14)VOICE MAIL key (pg. D.1)PROG/HELP combo keyfor phone programming(pg. C.2) and access toVerbal User Guideand tutorial (pg. B.1)PAGE key (pg. E.14)RECORD key (pg. D.6)Microphone forbuilt-in speakerphoneOther fixed feature keys(pg. E.1)Hint:A.4You can perform direct programming by holding down a programmable feature key for at least twoseconds (similar to how you might program a car radio button). This isn’t applicable to the fixed-featurekeys which, as their name implies, are already programmed.
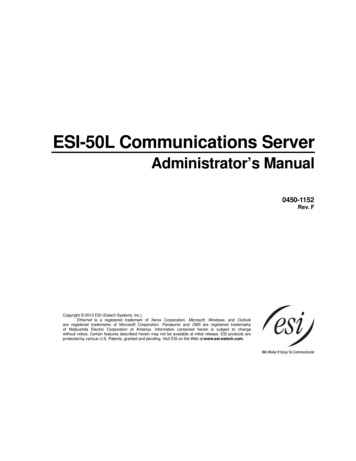
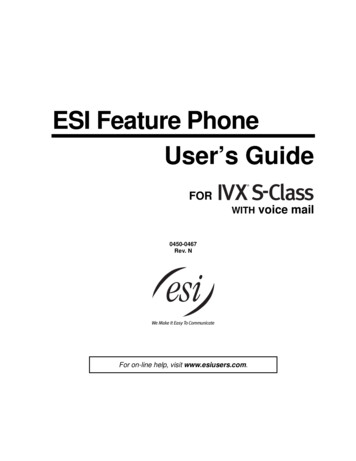
User’s GuideIntroduction12-Key Digital Feature PhoneThe 12-Key Digital Feature Phone includes the basic, most commonly used phone features.Volume/scroll keys1-line,16-character displaySpeaker9 programmablefeature keys (pg. C.2)P/UP (pickup) key (pg. E.14)PAGE key (pg. E.14)PROG/HELP combo keyfor phone programming(pg. C.2) and access toVerbal User Guideand tutorial (pg. B.1)Fixed feature keys(pg. E.1)Notes: The following features are not available on the 12-Key Digital Feature Phone. Certain special features (see page F.12). Esi-Dex. Speakerphone.A VOICE MAIL key, CONFERENCE key, and MUTE/DND key must be set on one of the nineprogrammable feature keys to utilize those features.Hint:You can perform direct programming by holding down a programmable feature key for at least twoseconds (similar to how you might program a car radio button). This isn’t applicable to the fixed-featurekeys which, as their name implies, are already programmed.A.5
IntroductionUser’s GuideESI Cordless HandsetsESI’s Digital Cordless Handsets come in two models — small and large — but each offers the samefeatures. Note that they do not have the following features found on some ESI desktop phones:speakerphone, Esi-Dex support (or ESI-DEX key), Caller ID key, Virtual Mailbox Key support, or VerbalUser Guide (or HELP key). Each model comes with a charger/AC adapter, base station, belt clip,battery pack, and wall mount.Two-line, 32-character display;third line contains status iconsVOICE MAIL key (pg. D.1)Other fixed feature keys (pg. E.1)CHANNEL keyTALK keyFour programmable feature keys (pg. C.2)Compact modelA.6Heavy-duty model
User’s GuideIntroductionConnecting your ESI phoneUse the diagram (below) to connect your ESI phone. The diagram represents the panel on thephone’s underside.Note: The “Top of phone” and “Bottom of phone” references in this diagram shows the correct verticalorientation of the phone — i.e., the part with the display is the top.12-Key Feature Phone24-Key Feature PhoneHandset Connects like a basic phone. Handset plugs into right-side jack. Line cord plugs into left-side jack.Line cordto wallToheadset(TAPI)to PC48-Key Digital Feature PhoneIn addition to how the 24-Key Feature Phone connectsto the handset and line cord, note the following: TAPI version includes a cable for connecting to yourPC’s serial port. 60-Key Expansion Console cable (included with eachConsole) uses standard RJ-11 telephone connectors.To 60-Key Line cord HandsetConsole to wallConnectors on bottom of48-Key Digital Feature Phone(headset jack shown)Note: Use the wall mount hook (located under the handset) when the phone is in the furthest upright position.A.7
IntroductionUser’s Guide60-Key Expansion Console connectionNotes: The 60-Key Expansion Console can be connected to only a 48-Key Feature Phone.1. The 60-Key Expansion Console (right) includes an expansion cable.Connect one end of the expansion cable to the appropriate connectoron the bottom of the Feature Phone (below).Then, connect the other end of the expansion cable to the 60-KeyExpansion Console.2. To keep cabling out of the way, thread the expansion cable into theslots on the bottom of the phone and 60-Key Expansion Console.3. Program the keys on the 60-Key Expansion Console using the sameprocedure as with the Digital Feature Phone (press PROGRAM 2).4. If necessary, remove the clear plastic overlay from the keys on theExpansion Console.5. For maximum convenience, label the paper overlay to show howthe keys are programmed (your Installer or System Administrator can do this with ESI software).6. Install the labeled paper overlay on the 60-Key Expansion Console.7. Install the clear plastic overlay over the paper overlay, to protect it. 8. Use the provided Velcro tape to attach the left side of the 60-Key Expansion Console to the rightside of the 48-Key Feature Phone.Toheadset(TAPI)to PCTo 60-Key Line cord HandsetConsole to wallConnectors on bottom of48-Key Digital Feature Phone(headset jack shown)A.8
User’s GuideIntroductionESI Cordless Handset connectionEach ESI Cordless Handset comes with: A charger/cradle to charge the Handset. An AC adapter for use with only the charger. A base station to provide a digital interface between the ESI phone system and ESI CordlessHandset. This base station is line-powered and thus needs no AC power. Wall-mount(s), a belt clip, and a Quick Reference Guide.Base station installationDue to each site’s unique characteristics, the range and distance information we’ll provide herein isonly approximate.Characteristics that positively affect performance: The base station should be installed so it has a clear line-of-sight with the Cordless Handset. The base station antenna should always be pointed in its uppermost vertical position.Don’t install the base station: Close to a wall, especially one with metal studs. Next to a device that emits RFI1 or EMI2 — e.g., a television, radio, computer, computer printer,flourescent light fixture, or fax machine. Next to any other 900 MHz device — e.g., a hand-held inventory control device. In a ceiling that has foil-backed insulation. Behind doors that typically are closed, tinted windows, one-way glass, or other areas that limit orcut off transmission to the Cordless Handset.Base stations must be installed at least 10 feet apart, regardless of whether the base station is for thesmall-model or large-model Cordless Handset. Don’t install more then six base stations in one area(such as a network room). Choose a location at least 30 feet away if more than six base stations areneeded in a building. A base station requires only a line cord to the phone system; AC power isn’tneeded because the base station receives power from the phone system via the line cord.Once the base stations are installed and the Cordless Handsets charged, change each Handset’schannel by pressing its CH key. Each Handset should have its own channel. There are 30 availablechannels on the small Cordless Handset and 10 on the large Cordless Handset.Note: Feedback may result if the Cordless Handset is within three inches of an ESI desktop Feature Phone.12Radio frequency interference.Electromagnetic interference.A.9
IntroductionUser’s Guide(This page included for pagination purposes only.)A.10
User’s GuideHelp mode (Verbal User’s Guide)Help mode (Verbal User’s Guide)Your ESI phone system’s Help mode (also called the Verbal User’s Guide) — a carefully conceivedcombination of spoken information, display readouts and even key illumination when appropriate — is apowerful tool to help you learn how to use the system’s many features.Notes: As explained on page E.1, each of the two smaller Feature Phones, 12-Key and 24-Key, has a comboPROG/HELP key.The ESI Cordless Handsets have no access to the Verbal User Guide and, therefore, no HELP key.TutorialWhen your station is idle, press HELP, and then follow the spoken Help menu to: Learn how to use the phone Hear a description of how any key is used Learn how to use voice mail features Hear a complete tutorial on phone operationHelp during station programmingTo hear a detailed description of a function you wish to program, press HELP while programming it.Help during a callPress HELP while on a call and this will place the call on hold, whereupon you can use Help mode tohear a description of the function you wish to perform. When you exit Help mode, you will bereconnected to the call.While you are either in Help mode or programming your phone, your station will be temporarily placed inDND (see “MUTE/DND,” page E.3). Anyone calling your station while you are in DND will be forwardedto your mailbox (or other destination set by the installer).Exiting Help modeTo exit Help mode, simply hang up.Visit www.esiusers.com for up-to-date help.B.1
Help mode (Verbal User’s Guide)(This page included for pagination purposes only.)B.2User’s Guide
User’s GuideUser programming: An introductionUser programming: An introductionVoice prompts will play menu and sub-menu options to access the desired feature. You don't have to waitfor the entire prompt to be played. Therefore, once you’ve become familiar with the prompts (consult“User programming menu” on the next page), you can quickly set any frequently used feature.Programming helpDuring any of the programming steps, press HELP to hear a more detailed description of the featureand related programming options.Exiting programming modeTo exit programming mode, simply hang up.User programming menuOverview1Select personal greeting1 Record2 Delete3 Hear2Programmable feature keys(Station keys, line keys, speed-dial keys, otherfeature keys)3Station options1 Call waiting/background announce2 Personal greeting reminder13 Headset operation4 Outside dial tone preference5 Hands-free answer6 Message monitor27 Power-saving mode4Station audibles1 Station ring tone2 Station ring volume3 Message ring4 Secondary ring tone5 Secondary ring volume5Password1 Enter2 Delete3 Hear4 Security level6External message notification1 Delivery options2 Phone delivery3 Pager notification7Personal Call Routing1 Entry settings2 Exit settings3 Quiet time settings9Un-delete3Note: Background announce and selections 3, 5, and 6 under Station Options are not available on the12-Key Feature Phone. Option 7 is available on only the ESI Cordless Handset.123Not necessary with Generation II system. If unsure which system you have, consult your System Administration.For use with only ESI Cordless Handsets.Available only if your phone system is using ESI Presence Management. If you’re not sure whether it is, consult your SystemAdministrator. For more information about ESI Presence Management, visit www.esi-estech.com/presence.C.1
User programming: An introductionUser’s Guide1 Select personal greetingSelect the desired greeting — 1, 2 or 3. The system will play the current greeting, followed byprompts to re-record, delete or hear again — or select the current greeting by pressing #.1Record personal greetingBegin recording at the tone. Press 1 to stop. The new personal greeting automatically replacesthe previous greeting.2Delete personal greetingWhen prompted, press 2 again to confirm deletion.Warning:32Your mailbox is disabled if no personal greeting exists. Never delete all of your existingpersonal greetings before you record at least one new one.Hear current personal greetingProgrammable feature keysThere are two methods for programming of your phone: Direct programming — Select the key you want to program, and hold it down for at least twoseconds. This not only initiates programming but also lets you immediately program that specific key. Traditional programming — Press PROGRAM. The Verbal User’s Guide will speak to you,walking you through the full menu, during which you can choose the appropriate option.Direct programming example:You wish to set one of the keys to dial a co-worker, whose extension is 105. Hold down the keyfor at least two seconds. This automatically puts you in feature key programming. Follow theprompts to enter 1 0 5. (This has allowed you to skip two steps — pressing PROGRAM andselecting a menu option — that you’d have had to perform if using traditional programming.)C.2
User’s GuideUser programming: An introductionHow the programmable feature keys can be set1 Line keys — Programming a line number (1 through 12) into a programmable feature key makes ita line key, which provides the appropriate lamp information and manual outside-line access. Station keys — If the digits entered constitute a three-digit number, the programmable featurekey will become a station key, providing the appropriate lamp information and easy access ortransfer. Three-digit numbers entered can be:— User extensions (100–139 with— Cascade mailboxes (520–529)Generation II system, 100–129 withGeneration I system)2— Department numbers (290–299)— System speed-dial numbers (600–699)3— Guest/info mailboxes Speed-dial keys — In addition to programming a programmable feature key with a systemspeed-dial number, you can create personal speed-dial keys for automatic dialing of frequentlycalled outside numbers. If you program 9 (or 8 or 7) plus a phone number, the programmablefeature key becomes a speed-dial key. When you program a speed-dial key, there's no need toinsert a pause after the 9 (or 8 or 7). The speed-dial number can be up to 24 characters long.Use the up scroll key ( ) to enter special characters in a dial string. Other feature keys — If you enter a feature code, the programmable feature key will serve asan enable/disable key for that feature. The Installer may have programmed certain stations foraccessing additional features (see “Optional features,” page F.12); consult your SystemAdministrator to determine your access.Keys’ LED activity during programmingKey type and LED indicationStation key orVirtual Mailbox KeyLine keyFeature keyor speed-dial keyCurrently being programmed andpreviously assignedFlashing redFlashing greenFlashing amberCurrently being programmed andpreviously unassignedFlashing redFlashing redFlashing redProgramming mode — Was assigned orviewed in current sessionBlinking redBlinking greenBlinking amberSolid redSolid greenSolid amberOffOffOffModeAssigned in a previous programming sessionand not yet viewed in current sessionNever assigned and not yet viewed incurrent sessionNote: Each ESI Cordless Handset has only one LED color — red — with similar blinking rates.1231–16 on IVX S-Class Generation II; 1–12 on IVX S-Class Generation I. If un
For on-line help, visit www.esiusers.com. About ESI ESI (Estech Systems, Inc.) is a privately held corporation based in Plano, Texas, near the internationally known “Telecom Corridor.” Founded in 1