Transcription
Adobe Premiere Pro CC Tutorial
G ETTI NG S T A RT EDAdobe Premiere Pro CC is a video layout software that can be used to create videos as well asmanipulate video and audio files. Whether you plan to put a video together or alter video and audiowith the use of effects, Premiere Pro offers all the tools needed to produce professional videos foreven a beginner. This tutorial will take you through some of the basic uses of Premiere Pro CC.TABLE O F C O N T ENTSIn this tutorial, you will learn the following:1. Getting StartedPg. 32. Setting Up a New ProjectPg. 33. Work SpacePg. 44. ToolbarPg. 65. Toolbar DescriptionPg. 66. Importing Files into PremierePg. 77. SequencePg.78. TitlesPg. 89.Video MotionPg. 910.Video OpacityPg. 1011. Transitions PanelPg. 1112. Effects PanelPg. 1113. Color CorrectionPg. 1214. Adjusting Video SpeedPg. 1315. Saving Your ProjectPg. 1416. Exporting Your VideoPg. 1417. ConclusionPg. 152
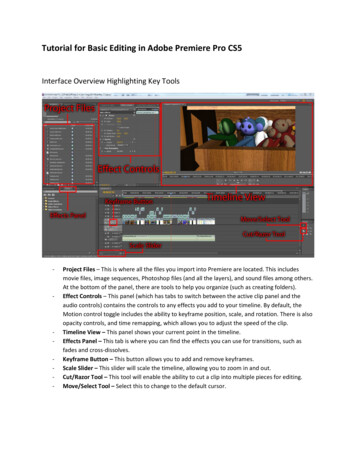
1 . G ETT I NG S TA RT EDBegin by opening Adobe Premiere Pro CC.On a PC, click Start All Programs Adobe Adobe Premiere Pro CC, or click onthe Premiere Pro short cut on the desktop. (Figure 1)On a Mac, click Applications Adobe Premiere Pro CC, or click the Premiere Proicon in the Dock. (Figure 2)Figure 2Figure 12. S E TTI NG U P A NEW P RO J EC TSetting up your project correctly from the start will make your job much easier as you workthrough your project. When starting your project, you are going to set up your general video settings andyour scratch disks. This will tell premiere where exactly you want everything to be saved and the videosgeneral settings.Figure 33
2. S ETTI NG UP A NEW P RO J EC T C O NT .1. When starting Premiere Pro CC, you will be prompted to start a new project. To create a new projectwithin Premiere Pro CC, click File New Project. This will open the Project Settings dialog box.Here you will be able to set the duration and size of your composition. Options include, but are notlimited to:Name: This is the name your project will be saved as.Location: By clicking browse, you can navigate to the place in which you choose to have yourproject file save to.General: This is where you set up the formats of each part of your project.You set the videodisplay, audio display, and capture display settings.NOTE: when you drag your video clips into your project sequence later, premiere sets all ofthese settings for you.Scratch Disks: This is where you set the destination for premiere to save the captured video,captured audio, video previews, audio previews, and project auto save files.NOTE: Make a folder for your project and create a folder within that titled “cache”. Save allyour scratch disks to the “cache” folder that you created.2. When you have entered all of your composition settings, click OK.NOTE: If you enter incorrect information in the Project Settings dialog box, or if you need toadjust any of this information while you are working, you can make changes any time by clicking File Project Settings General.3 . WORK S P A C EThe Work Space is the entire area of premiere. It is broken into different panels which all serve adifferent purpose for creating a video. When starting premiere, all the panels will be blank until youbring video and audio files into the program. See Figure 4 for an example of a new Work Space.Figure 44
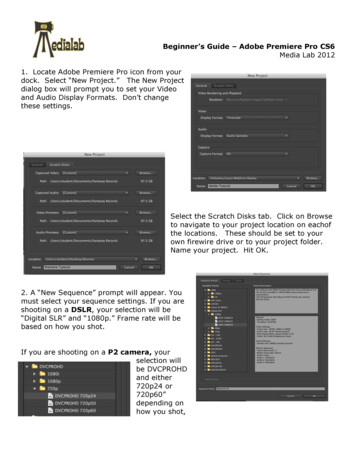
3 . WO R K S P A C E C O NT .The workspace is filled up with many different panels. Each one has its own purpose that helpscreate a video. Figure 5 shows you the different panels of the premiere workspace:Exploring the Work Space:A. Project Video DisplayB. Selected Clip DisplayC. Project PanelD. Project TimelineE. ToolbarEFigure 5Project Video Display: This area is where you see your project timeline displayed. The point yourmarker is placed on the timeline is what will show up in this window. If you play your project, thisis the window where you will see it played in real time.Selected Clip Display: This is the area where a selected clip will be displayed.You can select a clipfrom your project timeline or your project panel and it will show up in this window. Along with the clipview, you can select the effect controls tab in this panel to display video and audio effects you cancontrol such as video sizing, video blending modes, and volume controls.Project Panel: The project panel is where you import all your files.You can import video files, audiofiles, and pictures.You can group your files together using a folder system called bins. Your sequencesalso show up as files in this panel.Project Timeline: This is where the timeline of your project is displayed.Your project timeline isreferred to as a sequence.You can have multiple sequences in a project and they can be selected fromthe project panel. Within the project timeline, you can layout your project files.You can get files intoyour project timeline by dragging and dropping files from the project panel to the project timeline.Toolbar: This is where all the different tools you can use are located. They all have various usefulpurposes that are covered in the next section.5
4. TOOLBARWhen working in Premiere Pro, you will utilize the toolbar often. (Figure 6) Eachdifferent tool within the tool bar has a distinct different purpose. Utilizing all ofthe toolbar’s capabilities will help save on time and efficiency when creating yourvideo.Figure 65 . TO O LB O X DES C RI P T I O NSelection Tool (V)This is the most used tool. It can select a clip by clicking on a clip in the timeline.You can also resize theclip length by hovering over either end of the clip and then click and drag left or right.Track Select Forward Tool (A)This allows you to click on a clip and it selects everything from that point forward in your timeline.Ripple Edit Tool (B)Click and drag the edge of a clip to change length and it moves the rest of the files in your timeline.Type Tool (T)Allows you to add text wherever you click on the composition.Razor tool (C)Use to cut a clip by hovering over a clip and clicking. It cuts the clip into two different pieces.Slip tool (Y)Select a clip and simultaniously change the in and out points of the clip without changing its length.Pen Tool (P)Use this to set or select keyframes. Also used to adjust connector lines in a timeline.6
5 . TO O L DE S C RI P T I O N C O NT .Hand Tool (H)This is used to move the viewing area of your timeline by clicking and dragging right or left.6. IMPO RTI NG FI LES I NTO P REM I ERE1. To import files into Premiere Pro, click File Import or double click the project panel. Thiswill open the Import File dialog box. Here you will be able to navigate to and select the file(s) that youwould like to bring into your project.Common File Types:AVI - Video file typeMP4 - Video file typeMOV - Quicktime video formatJPG- Image/Photo fileMP3- Music/audio track2. After you have chosen the file(s) that you would like to import, click Import.7 . S E Q U ENC E1. When working in Premiere Pro, your project time line is refered to as a Sequence. To start a newsequence, click File New Sequence. Figure 7 shows the new sequence dialog box that lets youpick your sequence settings and name your sequence.Figure 77
7 . S E Q U ENC E C O NT.2. After starting a sequence, you can drag and drop video files, audio files, and photos into the sequence.Figure 8 shows a sequence with files in it. The top half of the sequence timeline is video file layers labeledas V1,V2, etc. The bottom half is audio file layers labeled as A1, A2, etc.Figure 83. There are some helpful buttons to use in a sequence’s layer sidebar. The most used are:Track Output: turns the visibility of the layer on and off in the project display window.Lock: locks a layer from being editable.Mute: mutes an audio layer from being heard during playback.8 . TI T L ES1. Create a new Title by going to File New Legacy Title2. This will bring up the New Title window. Figure 10 shows the New Title window. Here is where youcan set the size of your title screen and name it.Figure 98
8 . T I T L ES C O NT.3. After choosing your settings, a Title Editing window will come up. Figure 11 shows the window and allthe different areas within it.ABA - Title editing areaB - Tool BarC - Title PropertiesD - Title StylesCTitle Editing Area: this is the areathat you make your title screen.Youcan make shapes, put down text, andmany other things.Tool Bar: this is where all the toolsare located to use for your title. Themost commonly used are the TypeTool and the Shapes Tools.Figure 10. Title editing windowDTitle Properties: this window shows the properties of a selected item in your editing window.Common things you can adjust in this window:Figure 11. Font style editing boxFigure 12. Stroke editing boxFigure 13. Shadow editing boxFont Styles: here you can chose the font family and font style ofyour textStroke: you can use this to outline your text. Inner Stroke willoutline the inside of your text and Outer Stroke will outline theoutside of your text.Drop Shadows: here you can add a shadow behind your text.Color: changes the color of the shadowOpacity: changes the transparency of the shadowAngle: changes to angle in which the shadow is castDistance: changes how far the shadow is from the textSize: changes the size of the shadowSpread: changes how far the shadow spreads outTitle Styles: this window has presets for typography styles. By selecting a style in thiswindow and clicking in the editable area, you can use the font presets.9
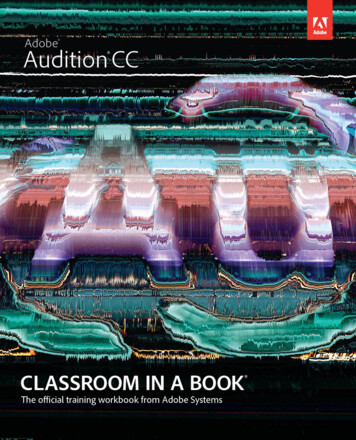
9 . V I DEO M O TI O N1. The Video Motion panel allows you to adjust very basic elements of your video. To find it, select thevideo that you want to adjust on your timeline. Then look at the window at the top left of your screen.Select the Effect Controls tab. Then click the Motion drop down arrow.Figure 14Position: moves your video left/right or up/down.Scale: increases or decreases the size. If you wanted your video to scale only horizontally or vertically,you can uncheck Uniform Scale and have access to those adjustments.Rotation: adjusts your 2d-rotation of the video left or right, depending on the direction you drag thenumber.Anchor Point: adjust the point from which your video scales, moves, or rotates.Anti-flicker Filter: allows you to eliminate flicker that tends to occur when putting images in yourtimeline that have sharp lines.10
1 0 . V I DEO O P A C I T Y1. The Video Opacity panel allows you to adjust other very basic elements of your video. It is locatedunder the same Effect Controls panel that “Motion” was under. Click the “Opacity” drop down arrow.Figure 152. Mask: a system allows you to draw shapes that hide or reveal footage relative to that shape. TheCircle and Rectangle buttons draw those respective shapes in your footage. The pen tool allows you todraw your own shape. By default, the mask you drew will reveal footage only within that mask. If youwould like it to hide footage inside of it, the Inverted checkbox will make that happen.Mask Path: allows you to drag the mask elsewhere on the footage.Feather: option softens the edge of your mask.Opacity: adjusts the visibility of the footage inside of your mask.Expansion: allows you to detract or add space inside or outside of the shape you drew.3. Opacity: allows you to adjusts the overall visibility of your footage.Blend Mode allows you to change how pixels in the image are affected by other layers below it.11
1 1 . TRAN S I T I O NS P A NEL1. Transitions allow you to make seamless crossovers from one clip to another, be it audio or video. Tofind the transitions, look to the bottom left of your workspace and click the Effects tab. Within thistab there are two different types of transition folders. One labeled Video Transitions and the otherlabeled Audio Transitions.Video TransitionsAudio Transitions2. To apply the transitions, open one of the folders, grab the transition you want and drag it onto theedges of the two clips you want a transition between. The dissolve folder would contain transitions thatmost people are used to seeing for videos.1 2 . E FF EC T S P A NEL1. Effects allow you to make adjustments to your clips that range from distorting your clips, to reducinghums in the background of your audio, to adding a drop shadow to your video. To access these effects,look to the bottom left of your workspace and select the Effects tab. Within this tab, there are twofolders that involve effects:Video EffectsAudio Effects12
1 2 . E FFEC T S P A NEL C O NT .2. To apply the effects, open one of the folders, grab the effect you want and drag it onto the clip thatyou want. You can change how the effect changes your video under the Effect Controls panel at thetop left of your workspace.Figure 16. Effect Controls Panel1 3 . CO LO R C O RREC T I O N1. There are multiple ways to color correct your video. Among the most popular effects for this task arethe RGB curves, and Tint. To access these effects, look to the bottom left portion of your workspaceand Click on Effects Video Effects Color Correction. A drop down list will contain the abovestated effects.Figure 17. Color Correction Dropdown13
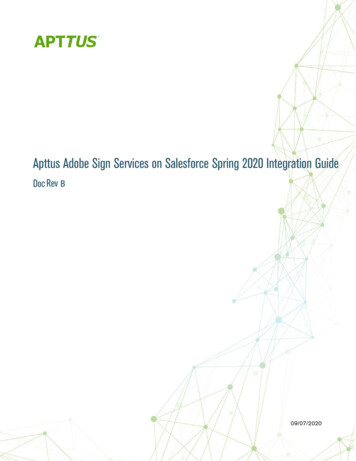
1 3 . CO LO R CO RREC TI O N C O NT .3. Curves is a useful tool to make minor adjustments to your color. It contains a Red, Green, Blue, andMaster adjustment. To raise the brightness of a color, you would simply click on the diagonal line of thatcolor, and raise it up. To remove that color from the image, you would simply pull that line downards.The Master channel changes the brightness of the image in the same way. Another useful feature of thecurves effect is the ability to change the contrast. You can do this by making a slight “S” shape with thediagonal line.Figure 18. Contrast added with RGB Curves4. The Tint effect allows you to change the overall color of your image, desaturate your image, or makeit entirely black and white. By default, the Tint effect makes your image black and white. To change thecolor of your image, you would click once in the “Map White To” colored box. This allows you to changethe color. If you left your “Map White To” color as white, any percantage above 0% will start to desaurateyour original image.Figure 19. Tint Effect1 4 . ADJUS T I NG VI DEO S P EED1. Select the clip in your timeline that you’d like to adjust and hit Command R, or Clip Speed/Duration.2. The Clip Speed/Duration window should pop up allowing you to adjust the percentage of the speedrelative to the original, as well as the option to reverse it, maintain the audio pitch, and ripple edit thetrailing clips.Figure 20. Clip Duration Pop-up Window3. To slow down the footage, insert a “Speed” number lower than 100%. Conversely, speeding thefootage up requires a number higher than 100%.14
14 . ADJUS TI NG VI DEO S P EED C on t .4. “Reverse Speed” flips your clip so it plays backwards. “Maintain Audio Pitch” keeps the same pitchof the clip as the original. “Ripple Edit” means that the clips following the one that you’re changing willmaintain the same distance that it held from that clip after the time conversion.1 5 . S AV I NG Y O U R P RO J EC T1. Remember to save your work often. Saving frequently reduces the risk of losing the work youhave been doing. To save your Premiere Pro project, go to File Save as. This will bring up the SaveProject dialog box that you see in Figure 21.Figure 21. Save Project dialog box2. Make sure to save your project under an “Adobe Premiere Pro Project” format. This allows you to goback and make changes to your project.3. Once you have renamed your file and chose where you want to save it, click Save.1 6 . EXPO RTI NG Y O U R VI DEO1. Once you have completed your project, you will want to export it. Simply press File Export Media. An “Export Settings” window will pop up that should look like Figure 22.Figure 22. Render Queue15
16. EXPO RTI NG Y O U R VI DEO C O NT.2. Here you have control over all the settings that you’d like your movie to export under. If you aresatisfied with the settings, click the blue text next to “Output name”. A window will pop up that willallow you to edit the file name, and where the exported file will appear once completed.3. At the bottom of that window should be an “Estimated File Size” text that will give you a rough ideaof how big your file will be. If this file size is too big, you have the ability to trim your project down, orexport the file under a different preset that will compress the final product more.4. Click Export.5. A pop-up window will show you the estimated time left to completion, as well as a progress barindicating how much of the project has exported.6. Once completed, play your video to make sure that your video is working correctly.1 7 . C O NC LU S I O NAfter reading this tutorial, you should have a basic understanding of Adobe Premiere Pro. Please come tothe Collab Lab if you have any questions about this tutorial or would like to learn more. The Collab Labis located in room 122 of the Jerome Library.16
Adobe Premiere Pro CC is a video layout software that can be used to create videos as well as manipulate video and audio files. Whether you plan to put a video together or alter video and audio with the use of effects, Premiere Pro offers all the tools n