Transcription
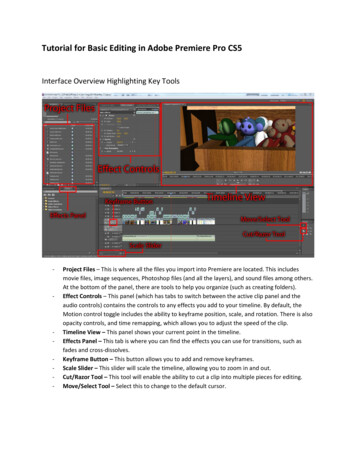
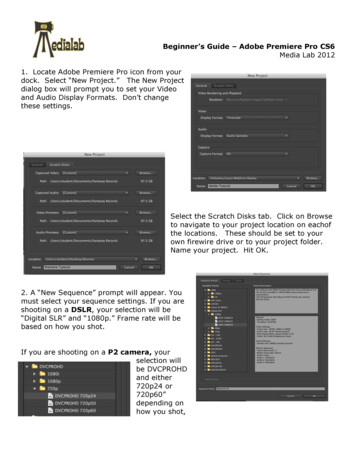
Beginner’s Guide – Adobe Premiere Pro CS6Media Lab 20121. Locate Adobe Premiere Pro icon from yourdock. Select “New Project.” The New Projectdialog box will prompt you to set your Videoand Audio Display Formats. Don’t changethese settings.Select the Scratch Disks tab. Click on Browseto navigate to your project location on eachofthe locations. These should be set to yourown firewire drive or to your project folder.Name your project. Hit OK.2. A “New Sequence” prompt will appear. Youmust select your sequence settings. If you areshooting on a DSLR, your selection will be“Digital SLR” and “1080p.” Frame rate will bebased on how you shot.If you are shooting on a P2 camera, yourselection willbe DVCPROHDand either720p24 or720p60”depending onhow you shot,
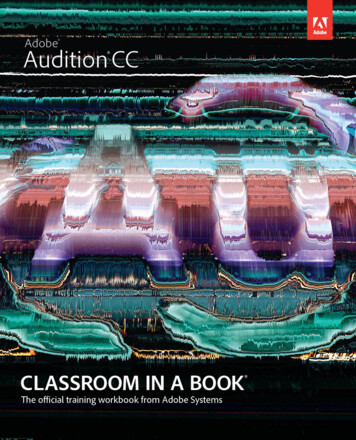
3. The Premiere workspace is set up with a timeline, a project bin, a viewer, and aprogram monitor. There is also a toolbar and function buttons.4. The next step is linking to your digital files.Got to your Project Bin. Select the Media Browser Tab. Navigate to the your file folder.Adobe Premiere Pro will automatically link to the digital files it recognizes.Clicking on the linked file will bring upthe video in the Viewer. Mark your Inand Out points using the “I” and “O”keys. Files in the viewer will appear toyour project tab once files have beenadded to your sequence in the timeline.In order to properly hear and view theaudio, double check audio preferences.Do this by selecting “Premiere Pro” “Preferences” “Audio Hardware.” Inthe Media Lab classroom, thepreferences should be set to “AJA KonaLhi (Systems 2,3,6,7, 10,11,12,13) ORMBox Mini (Systems 1,4,5,7,8). If neither of these appear, select Line Out. Turn upthe levels on your mixer corresponding to AJA 1 and AJA 2 or MBox 1 and 2. Also turnup the Speaker Output dial if you wish to listen through the speakers.
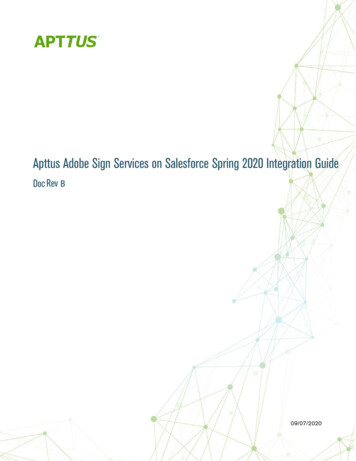
Audio levels are seen in the lower right side of the screen, as seen below.5. Editing. Double click on a clip in your project bin. View clips in your sourcemonitor. Select which parts of clips to drag to your timeline by hitting the “I” key for an“in-point” and the “O” key for an “out-point”. Click on the clip in the source screen anddrag it down to your timeline or use the Insert and Overwrite buttons and commands.Note* if you drag clips into timeline and receive a warning message indicating that yourclips settings do not match your timeline settings, select “Change sequence settings” toalign your clip and timeline settings. This warning will only appear in the first clip of thefirst sequence of the project. It will also only appear if you drag the clip in. Clips editedin after the first warning will simply resize to the sequence settings. Check sequencesettings on each additional sequence you create.
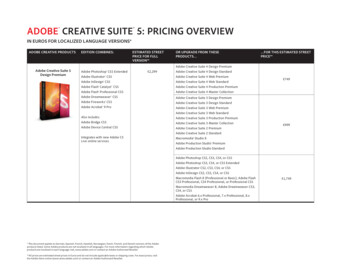
6. TIMELINEThe timeline displays multiple audio and video tracks. These tracksmake it easy to layer clips on top of each other. Whichever videotrack is on top will appear in the monitor. Each track expands todisplay lock and mute functions when you click triangle.7. TOOLBAR. The timeline can be manipulated by using the toolbar on the left hand side. Use the razor tool to cut clips and thepen tool to fade video or audio.8. EFFECTS. Effects like videoand audio fades, as well asmore complicated effects likedynamic audio editing and colorcorrection are found in the“Effects” tab next to yourproject bin. Each effect can be dragged into thedesired space on the timeline and edited throughthe “Effect Controls” tab on the source screen.Now that your have your project set up,mark and edit your clips into the desiredtracks one by one. Add effects, titles,and audio levels. See additional tutorialson editing in Premiere for additionalediting instruction. When your sequenceis complete, you will need to export it soothers can view it.
EXPORTING YOUR SEQUENCE TO A MOVIE:To export your project, select File Export Media. On the export screen, select fromthe list of presets or choose a codec from the list.In the bottom left of the screen, you can set an export range for your movie using thesmall triangle sliders. Choose either Work Area or Entire Sequence from the SourceRange menu. This will ensure your movie file will only include the media you haveselected.To export P2 movie, select “QuickTime” from theFormat menu. From the Preset menu, select “DVCProHD, 720p24, H.264”. To export Canon DSLRsequence, choose “HD 1080i, 29.97, H.264” from thePreset menu.Custom Settings: If your desired settings do notappear in the pull down menu, select a setting from thecodec menu below that best matches your sequencesettings. (To check your settings in Premiere Pro selectSequence/Settings and view the size and codec of yoursequence).For the best quality output, your input and outputsettings should match closely. You can see a previewof the output of your movie in the left hand viewer. Inthe Source Scaling pulldown, you can also change aspectratio of your movie.Note* Movies exported with non-standard codecs will only play on systems which havePremiere Pro or Final Cut. If you would like to create a cross platform or web version ofyour movie, choose H264 as your codec. Your size and frame rate will vary fromproject to project.Clicking on the “Output Name” and enter the name of your movie file and select thelocation you want the export to send to. Double check that both “export video” and“export audio” are selected and select “export.” Your movie will be saved.Now, save your project and quit.
Beginner’s Guide – Adobe Premiere Pro CS6 Media Lab 2012 1. Locate Adobe Premiere Pro icon from your dock. Select “New Project.” The New Project dialog box will prompt you to set your Video and Audio Display Formats. Don’t change these settings. Select the Scratch Disks tab. Click