Transcription
Kelly L. MurdockAutodesk Maya 2016 BASICS GUIDESDCP U B L I C AT I O N SBetter Textbooks. Lower Prices.www.SDCpublications.comACCESS CODEUNIQUE CODE INSIDE
Visit the following websites to learn more about this book:Powered by TCPDF (www.tcpdf.org)
Chapter 1Learning the Maya InterfaceIN THIS CHAPTER1.1Work with menus.1.2Use the Status Line buttons.1.3Access the Shelf.1.4Explore the Channel Box and Layer Editor.1.5Identify the animation controls, the Command Line, and the Help Line.1.6Use the Toolbox and Quick Layout buttons.1.7Discover the Secret menus.Maya is a program, created by Autodesk, used to model, animate, and render 3D scenes. 3D scenes created withMaya have appeared in movies, television, advertisements, games, product visualizations, and on the Web. WithMaya, you can create and animate your own 3D scenes and render them as still images or as animationsequences.Several versions of Maya exist and the difference between them lies in the features that are included in each.The commercial version of Maya includes everything you need to create and render 3D scenes and animations.An advanced version of Maya also includes the Fluid Effects, Cloth, Hair and Fur features. A freely availableversion of Maya called the Personal Learning Edition is also available. The Personal Learning Edition isidentical to Maya Complete, except that all renderings include a watermark, making it a great place to start ifyou want to learn Maya.At first glance, the Maya interface can be a little daunting, with buttons, controls, and parameters everywhere,but if you look closer you’ll realize that all of the controls are grouped into logical sets. Becoming familiar withthese various sets of controls makes the interface much easier to work with.Along the top edge of the interface are the menus and a toolbar of buttons called the Status Line. The menuswill change depending on the mode that you’re working in. Below the Status Line is a tabbed row of buttons.This row of buttons is called the Shelf, and it offers a convenient way to group sets of commands together. Tothe right of the interface is a panel of parameters called the Channel Box. These parameters, known asattributes, will change as different objects are selected. Under the Channel Box is the Layer Editor.Along the bottom of the interface are the Time Slider, the Range Slider, and the animation controls, which areused to specify and move between the different frames of an animation sequence; also at the bottom are theCommand Line, for entering textual commands, and the Help Line. Finally, the horizontal column of buttonsto the left of the interface is known as the Toolbox and the Quick Layout buttons. These buttons are used toselect and transform scene objects and to change the interface layout.A key concept that you need to understand as you begin to work with the interface is that there are several waysto access the same command. For example, you can create a sphere using the Create, Polygon Primitives,Sphere menu command or by using the Polygon Sphere button in the Polygons shelf. This design is intentional,allowing beginners an intuitive method for accessing a command, and giving advanced users an access methodthat lets them work quicker as they learn the shortcuts.1
Chapter 1: Learning the Maya InterfaceOne of the quickest ways to access advanced-user commands is with the Secret menus. These context-specificpop-up menus appear when you right-click in the interface. Another quick way to access commands is withkeyboard shortcuts, known as hotkeys.Maya gives users the option to customize the interface. Using the customization features, you can create acustom set of command icons, define keyboard shortcuts, and even alter menus. Many of the customizationoptions are included in the Window, Settings/Preferences menu.Lesson 1.1: Work with MenusThe main menu commands are the first place you should look for commands when you’re new to Maya. Thecommands are listed as text, making them easier to find until you learn what the various buttons do. Each menucan include several submenus. Submenus are identified by a small, right-pointing arrow at the right end of themenu.Changing Menu SetsThe menus are dynamic and change depending on the menu set that is selected. You can change between themenu sets using the drop-down list that is to the very left of the Status Line, as shown in Figure 1-1. The optionsinclude Modeling, Rigging, Animation, FX, Rendering and an option to Customize the menu set drop-down list.TipEach of the menu sets has an associated hotkey. These hotkeys are F2 forModeling, F3 for Rigging, F4 for Animation, F5 for FX, and F6 forRendering.The first six menu commands, File, Edit, Modify, Create, Display, and Window, are available in all menu sets.FIGURE 1-1Menu set selection listViewing Keyboard HotkeysSeveral menu commands have a keyboard hotkey listed to the right of the menu, as shown in Figure 1-2.Pressing these hotkeys on the keyboard executes the command. Hotkeys provide a quick and easy way toexecute a command, and learning to use them will make you much more efficient. You can customize hotkeysusing the Hotkey Editor, which you open with the Window, Settings/Preferences, Hotkeys menu command.2
Autodesk Maya 2016 Basics GuideFIGURE 1-2Hotkeys and option dialog boxes are displayed in the menusAccessing Option Dialog BoxesSeveral menus also include a small box icon to the right of the menu, also shown in Figure 1-2. These box iconswill open an Options dialog box for the selected command. These Options dialog boxes, such as the GroupOptions dialog box shown in Figure 1-3, include parameters that you can change. They also include Applybuttons that let you apply the command with the given parameters without closing the dialog box. The optiondialog box values are persistent. Any values that are changed will maintain their setting the next time thecommand is used. You can reset an options dialog box to its default values using the Edit, Reset Settings menucommand in the dialog box menu.FIGURE 1-3Settings dialog box for Create, Polygon Primitives, Sphere3
Chapter 1: Learning the Maya InterfaceUsing Tear-Off MenusAt the very top of most menus is a double line called the tear-off menu. Clicking on this line makes the menu atear-off menu and displays it as a separate panel, like the one shown in Figure 1-4, that you can move about bydragging on its title bar. Tear-off menus are convenient because they make the menu commands accessible withone click, but you need the space to leave the tear-off menu open without covering something else.NoteIn an effort to make the tear-off menu smaller, the keyboard hotkeysaren’t displayed on a tear-off menu.FIGURE 1-4Tear-off menuUnderstanding Tools versus ActionsIf you peruse the menus, you’ll see many commands that end in the word Tool. Tools, when selected, are activeuntil another tool is selected, but actions are only executed once. The last tool used is displayed at the bottom ofthe Toolbox for easy re-selection. Double-clicking a tool’s button will open the Tool Settings interface on theright side of the interface, as shown for the Move tool in Figure 1-5. You can also open the Tool Settings usingthe Show/Hide Tool Settings button at the right end of the Status Line. Tool settings are also persistent and canbe reset using the Reset Tool button at the top of the Tool Settings interface.4
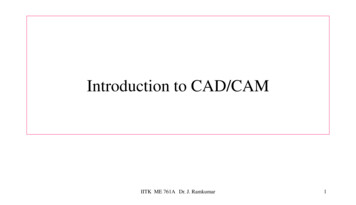
Autodesk Maya 2016 Basics GuideFIGURE 1-5Tool SettingsLesson 1.1-Tutorial 1: Use a Menu Command to Create a Polygon Sphere1.2.3.4.5.6.Click on the Create menu, and then select the Polygon Primitives submenu and click on the Optionsicon to the right of the Sphere menu to open the options dialog box, as shown in Figure 1‐3.In the Polygon Sphere Options dialog box, click the Apply button.A single sphere objects will appear at the origin in the Workspace.Click the Close button to exit the dialog box.Click on the Create menu, and then select the Polygon Primitives submenu and click on the Conemenu command. A cone object is added to the scene overlapping the sphere.Press the 5 key to see the objects as shaded objects. The objects resemble a simple crystal ball, asshown in Figure 1‐6.Select File, Save Scene As and save the file as Crystal ball.mb.5
Chapter 1: Learning the Maya InterfaceFIGURE 1-6A simple crystal ball created with sphere and cone objectsLesson 1.2: Use the Status Line ButtonsDirectly below the menus are a long row of buttons that are collectively known as the Status Line. Thesebuttons are constant and cannot be changed, but you can hide them. The buttons are divided into groups that areseparated by a dividing bar. These button groups include, from left to right, the Menu Set list, File buttons, theSelection Mode menu, Selection Mode buttons, Selection Mask buttons, Snapping buttons, History buttons,Rendering buttons, the Transform fields, and the Show/Hide Editors buttons, as shown in Figure 1-7. Most ofthese button groups are presented and discussed in the lesson that corresponds to their features.6
Autodesk Maya 2016 Basics GuideFIGURE 1-7Status Line groupsUsing Pop-up HelpWhen you first begin to use the Status Line buttons, it can be tricky to know which button does what, but youcan view the button’s title as a Pop-up Help by holding the mouse cursor over the top of the button, as shownin Figure 1-8. Pop-up Help is available for all buttons in the entire interface.NoteIf Pop-up Help starts to get annoying, you can disable it or set itsDisplay Time using the Help panel in the Preferences dialog box openedwith the Window, Settings/Preferences, Preferences menu command.FIGURE 1-8Pop-up HelpWatching for Cursor CluesAnother helpful visual clue is that the cursor changes when it is over any interface button that has an availableright-click pop-up menu. This new cursor displays a small menu icon under the cursor arrow, like the oneshown in Figure 1-9. When this icon appears, you can right-click to access an additional menu of options. Thecursor also changes when certain tools are used.7
Chapter 1: Learning the Maya InterfaceFIGURE 1-9Cursor indicating a right-click pop-up menuExpanding and Collapsing Icon Button GroupsEach button group in the Status Line is divided by a vertical line with a small rectangle through its center. Thisdivider is called the Show/Hide Bar, and if you click on it, and then all buttons included in that section will behidden. Click again to make the buttons reappear. Figure 1-10 shows several collapsed and expanded buttonsets.FIGURE 1-10Expanded and collapsed button setsOpening and Saving a SceneTo the right of the Menu Set selection list is a set of buttons that you can use to create a new scene, open anexisting scene, or save the current scene. Both the Open and Save buttons will open a file dialog box, as shownin Figure 1-11, in which you can select the directory and file name. When saved, the file name will appear onthe title bar.FIGURE 1-11File dialog box for Windows8
Autodesk Maya 2016 Basics GuideOpening EditorsAt the right side of the Status Line are four Sidebar buttons, shown in Figure 1-12, that don’t belong to a buttongroup and that are always visible. These Sidebar buttons are used to show and hide one of the sidebar panelsthat appear to the right of the view panel including the Attribute Editor, Tool Settings, and Channel Box/LayerEditor. The Attribute Editor lists all the attributes for the selected object, the Tool Settings will list all theconfigurable settings for the selected tool and the Channel Box is a subset of attributes that can be animated,known as being keyable and the Layer Editor lets you divide the scene objects into layers.NoteIn the Interface panel of the Preferences dialog box, you can select tohave each of the editors open as a separate window instead of the mainwindow.FIGURE 1-12Sidebar buttonsShowing and Hiding Interface ElementsYou can also hide any interface element by clicking on the dotted double line at the top (or to the left) of theinterface element, as shown for the Status Line in Figure 1-13. Right-clicking and holding down the mousebutton on the Show/Hide bar presents a pop-up menu of all interface elements. You can make hidden interfaceelements visible again using the Display, UI Elements menu. You can use the Display, UI Elements, Hide UIElements menu command to hide all UI elements at once.FIGURE 1-13Hide interface element barLesson 1.2-Tutorial 1: Open a File1.2.Move the mouse over the Status Line buttons at the left end until the Pop‐up Help reads Open ascene.Click on this button.A file dialog box appears, similar to the one shown in Figure 1‐11.9
Chapter 1: Learning the Maya Interface3.4.Locate the directory where the Skateboard.mb file is located.Click on the Skateboard.mb file name and click the Open button.The saved file is then loaded into Maya, as shown in Figure 1‐14.NoteBefore Maya opens a file, it gives you a chance to save the current file.FIGURE 1-14Opened skateboard fileLesson 1.2-Tutorial 2: Save a File1.2.3.Click on the Create menu, and then select the Polygon Primitives submenu and click on the Spheremenu to add a sphere to the skateboard scene.Move the mouse over the Status Line buttons at the left end until the Pop‐up Help reads Save thecurrent scene.Click on this button.This file is automatically saved replacing the existing file. When saved, the file name appearsin the title bar.NoteYou can save the scenes with a new file name using the File, Save As menucommand.10
Autodesk Maya 2016 Basics GuideLesson 1.2-Tutorial 3: Maximize the Workspace Interface1.2.3.Right click on the dotted double line on the left end of the Status Line and select Status Line.The Status Line becomes hidden.Right click dashed double lines for the Shelf, the Channel Box, and the Toolbox and select the otheroptions on the other interfaces.Right click on the dashed double lines for the controls at the bottom of the interface and selecteach.All interface elements will now be hidden, maximizing the Workspace, as shown in Figure1‐15.FIGURE 1-15A maximized Workspace interface4.5.Select the Display, UI Elements, Status Line menu command.The Status Line interface element reappears.Use the Display, UI Elements, Show UI Elements menu to make the rest of the interface elementsreappear.Lesson 1.3: Access the ShelfThe Shelf is like a toolbar on steroids. It includes several tabbed panels of buttons. To select a different set ofbuttons, just click on one of the tabs and the buttons in its set will appear. Figure 1-16 shows the buttons for thePolygons tab.11
Chapter 1: Learning the Maya InterfaceFIGURE 1-16The ShelfUsing the Shelf MenuAt the left end of the Shelf are two menu icons. The top one looks like a mini-tab and you can use it to select aShelf tab from a menu. The bottom menu icon is an arrow. You can use it to hide all of the Shelf tabs, open theShelf Editor, create and delete shelves, load a custom shelf, and save all shelves. You can save some interfacespace by hiding the Shelf tabs. To do this, select Shelf Tabs menu command from the Shelf menu to toggle theoption off.Creating and Deleting ShelvesThe Shelf menu can also be used to create and delete shelves. The New Shelf menu command will open asimple dialog box, as shown in Figure 1-17, in which you can name the new shelf. The new empty shelf willthen appear at the right end of the tabs. Selecting the Delete Shelf menu command will delete the currentlyselected shelf.FIGURE 1-17Create New Shelf dialog boxAdding Icons and Menu Commands to a ShelfYou can add buttons from any shelf to another shelf by selecting the button and dragging it with the middlemouse button onto the tab of the shelf that you wish to add it to. Menu commands can also be added to thecurrent shelf by clicking on the menu command with the Ctrl/Command and Shift keys held down. You candelete shelf icons by dragging them with the middle mouse button to the Delete Shelf icon (which looks like asmall trash can) on the right end of the tabs.NoteMaya uses all three mouse buttons. If you are using a two-button mousewith a scroll wheel, the scroll wheel acts as the middle mouse button. Ifyour two-button mouse doesn’t have a scroll wheel, you can use theCtrl/Command (command) key and the left mouse button as the middle mousebutton. For a Macintosh one-button mouse, the command key and the mousebutton act as the middle mouse button and the Option key and the mousebutton act as the right mouse button.12
Autodesk Maya 2016 Basics GuideAdding Layouts and Scripts to a ShelfYou can add custom layouts to a shelf. Just pick the shelf you want to hold the custom layout and then choosePanels, Panel Editor from the Panel menu. In the Layouts tab, shown in Figure 1-18, select the custom layoutthat you want to add to the current shelf and click the Add To Shelf button. You can drag scripts from the ScriptEditor with the middle mouse button and drop them into a shelf. Scripts appear on the Shelf as a button labeled‘MEL’, which stands for Maya Expression Language, Maya’s scripting language.FIGURE 1-18Panel EditorUsing the Shelf EditorThe Shelves menu includes an option that will open the Shelf Editor dialog box. Using this editor, shown inFigure 1-19, you can reorder and rename the tabs and shelves, edit the icons within each shelf, and change thesettings for the shelves.13
Chapter 1: Learning the Maya InterfaceFIGURE 1-19Shelf EditorLesson 1.3-Tutorial 1: Create a New Shelf1.2.Click on the Shelf menu and select New Shelf.The Create New Shelf dialog box appears.Type the name MyShelf for the new shelf and click OK.A new tab with the typed name appears at the right end of the Shelf.Lesson 1.3-Tutorial 2: Populate a New Shelf1.2.3.4.Select the MyShelf tab to make it active.Hold down the Shift and Ctrl/Command keys and select Create, NURBS Primitives, Sphere.A sphere icon is added to the new shelf.Repeat Step 2 with other primitive objects found in the Create menu.Each of the selected menu commands appears on the new shelf, as shown in Figure 1‐20.Select the Panel, Panel Editor panel menu command.The Panel Editor dialog box appears.14
Autodesk Maya 2016 Basics Guide5.6.7.Select the Layout tab and choose the Four View option. Then, click the Add to Shelf button andthen the Close button.When the Four View option is selected, the view window changes to show four separateviews. After clicking the Add to Shelf button, a new icon appears in the current shelf.Locate the Move tool in the Toolbox and drag the icon with the middle mouse button to the newshelf.Dragging an icon with the middle mouse button adds the icon to the current shelf. Figure1‐20 shows the new shelf.Select Save All Shelves from the Shelf menu.FIGURE 1-20A custom shelf of menu commandsLesson 1.4: Explore the Channel Box and Layer EditorWhen an object is selected, its keyable attributes (or channels) appear within the Channel Box, shown in Figure1-21, to the right of the interface. Each attribute has a value associated with it. These values are often numbers,but they can be a state like on or off, or a color. You can change these values by selecting the channel’s value,entering a different value, and pressing the Enter key.TipUse the two double-arrow buttons underneath the Layer Editor to widen orshrink the Channel Box and the Layer Editor.15
Chapter 1: Learning the Maya InterfaceFIGURE 1-21The Channel BoxSelecting AttributesYou can select a single attribute by clicking on its title. When selected, the attribute title will be highlighted.Holding down the Ctrl/Command key while clicking on several attributes will allow you to select multipleattributes at once; you can also drag the mouse over several attributes to select them.Using Channel SlidersYou can interactively change attribute values by selecting an attribute in the Channel Box and then draggingwith the middle mouse button in the view panel. Using the buttons at the top of the Channel Box, shown inFigure 1-22, you can change the channel slider settings to Slow, Medium, or Fast. The higher the setting, thefaster the attribute will change as you drag. You can also select a linear or hyperbolic slider setting. The Linearsetting will cause attribute values to change linearly as you drag with the mouse, but the Hyperbolic setting willcause the value to change more and more rapidly the longer you drag the mouse.16
Autodesk Maya 2016 Basics GuideTipYou can also enter and a number to add that amount to the currentvalue. For example, typing 2 in an attribute field for a Radius value of5.0 changes it to 7.0. You can also use - , * and / to subtract,multiply and divide relative values.FIGURE 1-22Channel Box settingsLocking AttributesLocked attributes cannot be changed. You can lock an attribute by selecting it and choosing the Lock Selectedmenu command from the Channels menu. Locked attributes will be appear “grayed out,” as shown in Figure 123. Unlock any locked attributes using the Channels, Unlock Selected menu command.FIGURE 1-23Locked attributes in the Channel BoxAdding and Deleting LayersThe Layer Editor, shown in Figure 1-24, divides the scene elements up into layers, making them easy to showand hide. Clicking the Create a New Layer button in the Layer Editor creates a new layer. You can give eachlayer a name, display type, and color. Delete layers using the Layers menu. Deleting a layer does not delete itsobjects. At the top of the Layer Editor are options for creating Display and Render layers. Render layers arediscussed in Chapter 14.17
Chapter 1: Learning the Maya InterfaceFIGURE 1-24Layer EditorAdding Objects to a LayerYou can add selected objects to a layer by right clicking on that layer and selecting Add Selected Objects fromthe pop-up menu. You can also use the Layers menu to select all objects in a layer and to remove objects from alayer. Objects assume the layer color when unselected.Hiding All Layer ObjectsYou can hide Layer objects by clicking the first column in the Layer Editor. This column sets the visibility forthe layer objects and is a simple toggle button that you can turn on or off. The letter V appears when the layerobjects are visible and the column is empty when the layer objects are hidden.Freezing All Layer ObjectsThe second column can be set to Normal, Template or Reference. The letter T appears in this column when thelayer is a template. Template layers cannot be selected or moved while they are templates. References are proxyobjects that stand in for complex objects. The third column is the layer color. Double-clicking on this column(or on the layer name) opens the Edit Layer dialog box, shown in Figure 1-25, where you can select a newcolor, change the layer’s attributes, or change the layer’s name.18
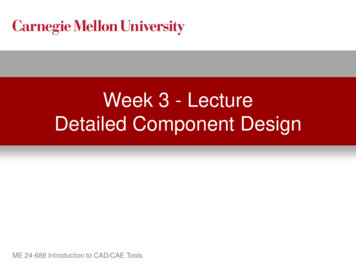
Autodesk Maya 2016 Basics GuideFIGURE 1-25Edit Layer dialog boxLesson 1.4-Tutorial 1: Change Channel Box Attributes1.2.3.4.Select File, Open Scene. Locate and open the Rocket.mb file.This file includes a simple rocket centered about the grid origin. All attributes for the rocketobject are displayed in the Channel Box.Enter a 5 in the Translate X attribute and press the Enter key.The rocket object is moved five units along the X‐axis.Click on the Translate Y attribute in the Channel Box and drag upward in the Workspace with themiddle mouse button.The rocket object is moved along the Y‐axis a distance equal to the amount that the mousewas dragged and the attribute value is changed, as shown in Figure 1‐26.Select File, Save Scene As and save the file as Translated rocket.mb.19
Chapter 1: Learning the Maya InterfaceFIGURE 1-26Translated rocketLesson 1.4-Tutorial 2: Create and Rename a New Layer1.2.3.Click the Create a new layer button in the Layer Editor.A new layer appears in the Layer Editor.Double‐click on the layer to open the Edit Layer dialog box.Type in a name for the new layer and click the Save button.Lesson 1.4-Tutorial 3: Add Objects to a New Layer1.2.3.4.Select Create, Polygon Primitives, Sphere to create a sphere object.Select the Edit, Select All menu command to select all of the objects.In the Layer Editor, right click on the new layer and select Add Selected Objects from the pop‐upmenu.All objects are added to the new layer.In the Layer Editor, click on the first column in which the V is displayed.All objects on the layer are hidden.Lesson 1.5: Identify the Animation Controls, the CommandLine, and the Help LineAt the bottom of the interface are several interface controls that are used to move through the various animationframes. Below these is a Command Line where you can type in commands to be executed. At the very bottomof the interface is a Help Line where context-specific information is displayed.20
Autodesk Maya 2016 Basics GuideSelecting an Animation FrameAll current animation frames are displayed on the Time Slider at the bottom of the interface, as shown in Figure1-27. You move between the different frames by dragging the black time marker or by entering the framenumber in the field to the right of the Time Slider.FIGURE 1-27Time SliderSetting an Animation RangeBelow the Time Slider is the Range Slider, as shown in Figure 1-28. Using this slider, you can focus on aspecific range of animation frames. The Time Slider changes as the Range Slider is moved.FIGURE 1-28Range SliderPlaying an AnimationTo the right of the animation frame value are several controls for playing, rewinding, and moving through theanimation frames, as shown in Figure 1-29. Using these buttons, you can jump to the animation start (or end),step back (or forward) one frame, step back (or forward) one key, or play the animation forward (or backward).FIGURE 1-29Animation controls21
Chapter 1: Learning the Maya InterfaceAccessing the Animation PreferencesBeneath the Go to End button is a button, shown in Figure 1-30, that will open the Preferences dialog box, asshown in Figure 1-31. This dialog box includes all of the preferences for Maya, but when it is opened using thisbutton the Timeline category is selected, allowing you to change the animation preferences.FIGURE 1-30Animation Preferences buttonFIGURE 1-31Preferences dialog boxUsing the Command LineIn the Command Line, you can enter textual commands to be executed. All commands should end with asemicolon. The results of these commands are displayed in the dark-colored Results line to the right of theCommand Line. To the right of the Results line is the Show Script Editor button, shown in Figure 1-32, thatopens the Script Editor, where you can enter more detailed scripts. More on the Script Editor is covered inChapter 15, “Using MEL Scripting.”22
Autodesk Maya 2016 Basics GuideTipAll commands that are entered into the Command Line are saved in a buffer.Using the Up and Down Arrow keys, you can scroll back and forth throughthe existing commands. Pressing the Enter key executes the listed command.FIGURE 1-32Script Editor buttonViewing the Help LineAt the very bottom of the interface is the Help Line, as shown in Figure 1-33. Within this line, Maya listsinstructions that it expects to happen next based on the selected tool or mode. If you’re stuck on what to donext, take a look at the Help Line.FIGURE 1-33Help LineLesson 1.5-Tutorial 1: Play an Animation1.2.Select File, Open Scene and open the Billiard balls.mb file.This file includes a simple animated scene.Click on the time marker in the Time Slider and drag it to the left.The objects in the scene will move as the frames are increased. A frame of the animationsequence is shown in Figure 1‐34.23
Chapter 1: Learning the Maya InterfaceFIGURE 1-34Animated billiard table3.4.Click the Play Forwards buttonThe entire animation sequence will play over and over.Click the Stop button to pause the animation.Lesson 1.5-Tutorial 2: Enter a Command1.2.3.4.5.Select Create, Polygon Primitives, Sphere to create a sphere object.Click on the view panel away from the sphere to deselect it.In the Command Line, type, select pSphere1; and press the Enter key.The sphere object is selected.In the Command Line, type, move ‐z 10;.The sphere is moved ten units along the z‐axis.Select File, Save Scene As and save the file as Command line sphere.mb.Lesson 1.6: Use the Toolbox and Quick Layout ButtonsOn the left side of the interface is a column of buttons collectively known as the Toolbox, as shown in Figure 135. Below the Toolbox are several layout buttons known collectively as the Quick Layout buttons.24
Autodesk Maya 2016 Basics GuideFIGURE 1-35ToolboxSelecting ObjectsThe first two buttons in the Toolbox are used to select objects in the scene. These are the Select Objects tool andthe Lasso tool. The Select Object tool lets you select objects by clicking on objects or by dragging a rectangularborder. The Lasso tool lets you drag a freehand outline over the object you want to select.Holding down the Shift key while clicking on objects with the Select Objects tool will add objects to theselection set. All selected objects will appear white except for the last object selected, which will appear lightgreen. This light green object is known as the key object.Using the Transform ToolsThe Toolbox also includes the Move, Rotate, and Scale tools. When any of these tools are selected, amanipulator will appear at the center (pivot point) of the selected object. With these tools, you can transform theselected object. Manipulator lets you transform the tool along a single axis or within a single plane, as shownfor the Move tool in Figure 1-36. You can also click on the transform values displayed near the manipulator andenter new values using the keyboard.TipOnce a transform handle on one of the transform tools is selected, itturns yellow. You can then drag the selected handle using the middle mousebutton.25
Chapter 1: Learning the Maya InterfaceFIGURE 1-36Universal Manipulator toolUnderstanding ManipulatorsEach of the transform manipulators has color-coded components that will let yo
Maya is a program, created by Autodesk, used to model, animate, and render 3D scenes. 3D scenes created with Maya have appeared in movies, television, advertisements, games, product visualizations, and on the Web. With Maya, you can create and animate your own 3D scenes a