Transcription
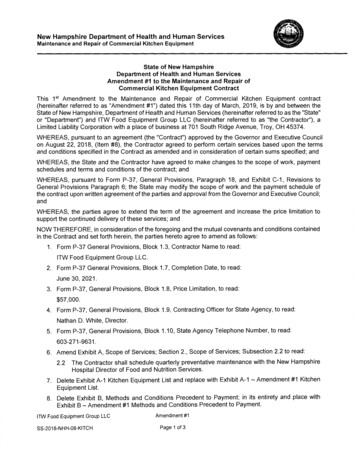
For All Models: 100, 200, 300, 500Models 300-5002345678Typical Installations& Installation of Cone Bowl or Sink CollarAttaching Disposer to Cone Bowl or Sink Collar& PlumbingElectricalOperating Instructions & TroubleshootingWarning & Safety InstructionsWarrantyGeneral Terms and Condition of SaleALL INSTALLATIONS SHOULD BE MADE IN ACCORDANCE WITHLOCAL AND NATIONAL PLUMBING AND ELECTRICAL CODES.FOR PRODUCT/WARRANTY REGISTRATION Go to www.salvajor.com Click on SUPPORT at the top of homepage Click on PRODUCT REGISTRATIONINSTRUCTIONSModels 100-200Installation & OperatingCommercial DisposersManufacturers of Commercial Food Waste Solutions - Since 19444530 East 75th Terrace Kansas City, MO 64132-2081, USAToll Free: 1.888.725.8256 I Fax: 1.800.832.9373service@salvajor.com I www.salvajor.com
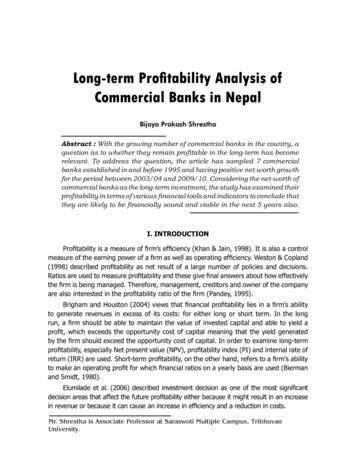
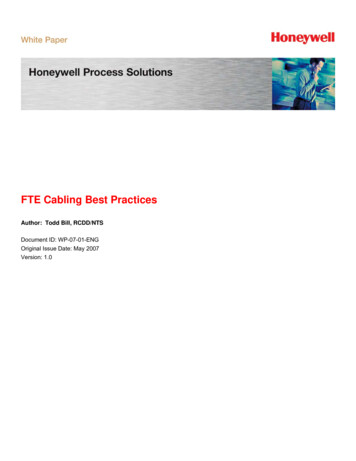
Typical Installations/2" PLUMBINGVACUUMBREAKER1OPTIONALPRE-RINSE/2" PLUMBING1SOLENOID VALVEWITH FLOW CONTROLVACUUMBREAKER/2" VALVE(NF)CONTROL WITH(P) OR (PP) OPTION(models 100-200)2" OR 3" DRAINVALVE(NF)INCOMING POWER2" DRAINCONTROLOPTIONALSHORT TOPHOUSINGModels 300 through500 furnished withsingle support leg.SOLENOID VALVEWITH FLOW CONTROLVACUUMBREAKER/2" PLUMBING1(models 300-500)INCOMING WATER3/4" PLUMBINGREDUCED TO 1/2"1/2"(models 300-500)2" OR 3" DRAINOPTIONALREMOTESTART/STOP2" DRAINWATERINLET(models 100-200)INCOMING POWER(P)(PP)INCOMING WATER3/4" PLUMBINGREDUCED TO 1/2"1CONEWATERINLETCONE OR SINK/2" VALVE(NF)1SINKINCOMING WATER3/4" PLUMBINGREDUCED TO 1/2"WATERINLET2" DRAIN(models 100-200)CONTROL2" OR 3" DRAININCOMING POWEROPTIONALSHORT LEG(models 300-500)Installation of CONE BOWL or SINK COLLARCONE ASSEMBLY3 1 2” Sink Collar #701. Cut a hole in the counter top using the appropriate tablecutout dimensions listed below.1. Apply caulking compound around the sink hole (TOP SIDE).ApplicationCutout Size12” Cone Bowl12 7 8” Diameter15” Cone Bowl18” Cone Bowl15 8” Diameter718 7 8” Diameter2. Place the large open end of the cone bowl against the underside of the counter top and weld the flange. Weld all the wayaround and then buff smooth for a watertight, sanitary installation.2. Insert the stainless steel adaptor in the sink hole.3. Place the gasket over the stainless steel adaptor (UNDERSINK).4. Place the hex metal washer over the stainless steel adaptor,up against the gasket.5. Place the sink collar with O-ring inserted over the stainlesssteel adaptor, up against the hex metal washer.6. Slip the spring steel snap ring over the bottom of the stainless steel adaptor and slide up until it snaps into the groove inthe stainless steel adaptor.SINK COLLARS:7. Screw the hex head bolts out of the sink collar and up againstthe hex metal washer tight enough to firmly set the assembly.6 1 2” Sink Collar #658. The disposer rubber adaptor fits over and clamps to the sinkcollar.1. If necessary, cut a 6 5/8” DIAMETER hole in the center of thebottom of the sink.2. Place the adaptor against the underside of the sink and weld allthe way around. Buff smooth for a watertight, sanitary installation.WARNING: Never put your hand thru the Sink Collarafter being installed as injury is possible.#70 SINK COLLARRUBBER STOPPER (5088)#65 SINK COLLARSINKSINKLARGE RUBBERSTOPPER (LRS)3 1/2" - 4" SINKOPENINGHEX METALWASHER (S5028F)S.S. HEX HEAD BOLTS (997031)WELD IN SINKCOLLAR (65)6 5/8” SINKOPENINGSPRING STEEL SNAP RINGRETAINER (S5028LS)2S.S. SINKADAPTOR(S5028)GASKET (S5028G)O-RING (568237)SINK COLLAR (70C)
Attaching Disposer to CONE BOWL or SINK COLLAR1. Carefully remove the top housing assembly by removing the eight boltsmaking sure not to damage the center gasket.2. Apply lubricant to the rubber collar on top housing and the beaded collar oncone or sink.3. Slip the top housing assembly up onto the beaded collar and tighten the clampso the top housing assembly can not be pulled down over the bead. If attachingdisposer to Salvajor ScrapMaster or TroughVeyor, use short top housing and cutout rubber baffles on hycar adaptor to reduce bridging of food waste.4. Measure distance from the bottom of the top housing to floor.5. Turn the disposer on its side and install the leg support (optional on Models100-200, standard on Models 300-500) on the bottom of the disposer and adjustthe leg extension so the disposer will stand approximately 1/2” below the bottomof the top housing.6. Carefully balancing the disposer on the leg support, walk it under the top housing, aligning the ears on the shredder ring with the locking tabs of the top housing.Measure distancebetween floor andbottom of tophousingLOCKINGTABS7. Slide the center gasket into place. Insert the top housing bolts through holes inthe top housing and into the disposer body housing. As you the tighten bolts, thedisposer will pull up securely to the top housing.8. Extend the leg extension securely on the floor, and tighten set screws.GASKETNOTE: It is important that the leg fit tightly between the disposer and the floor.STOP! If you have any questions about this installationcall 1-888-SALVAJOR for installation advice.PlumbingDRAIN PIPINGWATER SUPPLY1. Before installing the Salvajor disposer, the waste line shouldbe properly cleaned out to the connecting main sewer.6. Connect COLD WATER ONLY to disposer.2. Use as few elbows, tees and bends as possible when making connections.3. All horizontal drain lines should have a minimum slope of1/4” per linear foot.Models 100, 200Models 300, 5004. A 3” diameter pipe is recommended for Salvajor disposersmodels 300 thru 500. A 2” adapter is supplied for existing 2”drains. Models 100 thru 200 require a 2” drain.5GPM8GPMWater volume can be controlled by a properly rated flow controlvalve or hand operated valve.IMPORTANT!It is imperative to have a proper downward pitch from the disposeroutlet to the main sewer line to assure proper gravity flow. Improper drain line installation can result in drain backups.(Nos. 7-9 below for NEW INSTALLATIONS ONLY!)7. Plumb 3/4” IPS line and reduce to 1/2” at the hand valve.Install the factory-supplied solenoid valve with built-in flow control.8. From the solenoid, plumb 1/2” IPS line above the flood plane ofthe table and install the factory supplied vacuum breaker to localcode.5. Do not connect into a grease trap, interceptor or drum trap.NOTE: Pressure regulators should be installed in areas where pressureexceeds the recommended maximum of 80 psi.TYPICAL CONE LAYOUTRecommended Cold Water Supply9. Plumb 1/2” IPS line from the vacuum breaker to either conebowl, sink or top housing inlet on the disposer. If connecting tocone or sink, use 1 2” water inlet supplied by the factory.TYPICAL SINK LAYOUTNOTE: CONNECT COLD WATER ONLY TO DISPOSER.Tempered water from pre-rinse or Salvajor scrapping system isacceptable, but only in conjunction with an independent, continuous coldwater supply.3MAKE ALL PLUMBING CONNECTIONSIN ACCORDANCE WITH LOCAL ANDNATIONAL PLUMBING CODES.
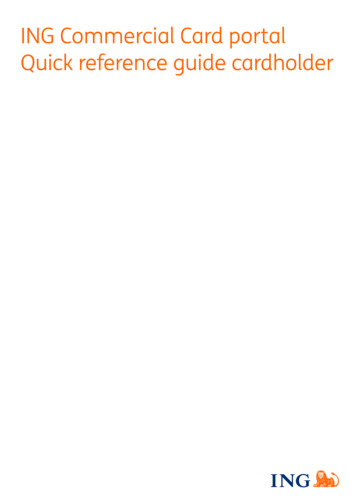
ElectricalGENERAL INSTRUCTIONSTEST PROCEDUREDual voltage disposers are shipped from the factoryNOT connected for a specific voltage. Please refer to thewiring diagrams on the disposer junction box cover. Whenconnecting single phase disposers to a reversing control,refer to the diagram supplied with the control. Salvajordisposer cutting elements are designed to operate ineither direction.1. Check to be sure the disposer cutting teeth are free offoreign objects.Use water tight conduit and fittings to make connections.4. If disposer fails to operate:A. Turn off power.B. Check wiring connections.C. Determine if the RESET button has tripped.Reset by hand only.2. Turn the disposer on and determine that the cuttingelements rotate freely and that water flows automatically.3. Check the mounting assembly and plumbing connectionsfor leaks.Caution: Be careful not to pinch wires when replacingjunction box cover.For new installations, an approved control will need to bemounted on or near the dish table with an optional bracket.Power will have to be run to a solenoid for incoming water.DANGER: If disposer stops, DO NOT look for the cause until thestarting control is turned OFF and the power is turned OFF.Consult Operating Instructions.NOTE: The RESET button is located on the bottom of the disposer.Full Load AmpsModel100Model100(1 HP )115 Volts208 Volts230 Volts208 Volts230 Volts460 Volts1 Phase1 Phase1 Phase3 Phase3 Phase3 PhaseModel200Model200(2 HP )115 Volts208 Volts230 Volts208 Volts230 Volts460 Volts1 Phase1 Phase1 Phase3 Phase3 Phase3 Phase208 Volts230 Volts460 Volts18.6 Amps10.2 Amps9.3 Amps4.9 Amps4.5 Amps2.3 Amps208 Volts230 Volts460 Volts24.0 Amps12.1 Amps12.0 Amps6.6 Amps6.0 Amps3.0 AmpsModel300Model300(3 HP )3 Phase3 Phase3 PhaseModel500Model500(5 HP )3 Phase3 Phase3 Phase8.8 Amps8.0 Amps4.0 Amps13.8 Amps12.5 Amps6.3 AmpsWIRING DIAGRAMSSINGLE PHASE 115 VOLT4L 15J2183L 2SINGLE PHASE 208 VOLT541L 1L 2J283SINGLE PHASE 230 VOLT541L 1L 2J283USE CONTROL PANEL WIRING DIAGRAM when using Salvajor Controls(Models ARSS, ARSS-LD, ARSS-2 or MRSS) (Single Phase Only)3 PHASE 208/230 VOLT3 PHASE 460 VOLT101112101112456456789789123123L 1L 2L 3L 1L 2L 3TO REVERSE ROTATION: Interchange #5 & #8 (Single Phase Only)MAKE ALL INSTALLATIONS IN ACCORDANCEWITH LOCAL AND NATIONAL ELECTRICAL CODES.4
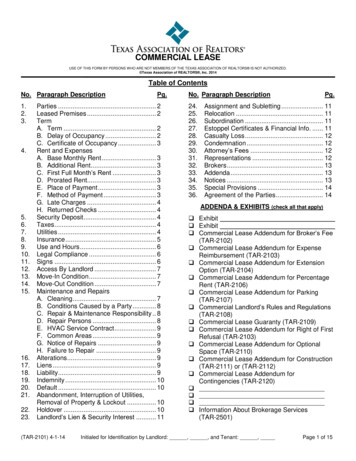
OPERATING INSTRUCTIONS1Push the START button on the control panel to begin operation. Before you startfeeding food waste into the disposer, make sure that a steady stream of wateris flowing into the unit. Do not start feeding food waste into the disposer until theunit is started and the water is running.2Feed food waste into the disposer in a steady continuous flow. Don’t overload the disposer with excessamounts of food waste and water. The disposer willconsume food waste faster when you feed it steadily.3Push the STOP button on the control panel to stopoperation. To prevent accidents, make sure thedisposer is shut off before you leave it unattended.Always keep your hands away from a disposer when it is operating.Don’t stop the disposer with food waste in it. Let it run for approximately 3 minutes to clear itself of all ground waste. This will help tomaintain a clean and odor-free unit and to avoid drain line clogs.IMPORTANT!Do NOT use corrosive chemicalsor cleaners in the disposer.TroubleshootingWARNING! DISCONNECT THE POWER TO THE DISPOSER BEFORE SERVICING.PROBLEMPOSSIBLE CAUSESOLUTIONThe disposer will not startand water does not flow.No incoming power.Check breaker and disconnect.Turn power on.The disposer will not startbut water flows.The disposer motoroverload is tripped.Turn the disposer control off and press the reset button on the disposer.If the disposer was running, allow the unit to cool for 3-5 minutes beforepressing the reset button. Never strike the reset button with an object.Note: This commercial reset requires a firm push.The disposer is jammed.Turn the power off to the disposer and complete the following steps:1. Insert optional dejamming prong through the sink (or cone) opening.Place the prong over the center raised bars found on the top of thedisposers revolving rotor. Do NOT turn the castle nut on the bottomof disposer or the top rotor nut in an attempt to unjam disposer.2. Twist the dejamming bar back and forth to free the jam.The revolving rotor should turn freely when the jam is released.3. Remove all foreign material that caused the stoppage. Do notinsert hand / fingers into the disposer. Use long tongs orpliers to remove objects.4. Allow the disposer to cool for 3-5 minutes after it stops running.Press the reset button to reset the motor overload protector.Never strike the reset button with an object.5. If the disposer remains inoperative after following these steps,contact the nearest Salvajor Factory Authorized Service Center, orthe factory direct. You may obtain the telephone number of theService Center nearest you by calling 1-888-SALVAJOR.Reset button locationWARNING: Never put your hand down into the disposer!The disposer motor stopswhile grinding, but watercontinues to flow.The disposer is jammed.See: The disposer is jammed, above.The disposer motoroverload is tripped.See: The disposer motor overload is tripped, above.The water flowscontinuously before thecontrols are turned on.Incorrect water solenoidinstallation.Reinstall so that the arrow on the solenoid is pointing in the direction ofthe water flow.Motor overload tripsfrequently.Disposer is overloadedwith food waste.Do not overload the disposer with excessive amounts of food waste.Refer to operating instructions above.Hot water used in lieu ofcold.Reconnect with cold water.5
Warning!HOPPERS, SINKS & CONE BOWLSRisk of injury to persons from hazardous moving parts.Serious injury possible if not properly installed with aUL- listed hopper, sink or cone.All replacement cones /hoppers, sinks and chutes used withSalvajor disposers should be of equal construction per thepreviously listed standard.All Salvajor cone bowls and chutes are designed and builtper UL Standard 430 Section 7 Enclosures, subsection 7.1.2(Exception 1), 7.1.3, and 7.1.6 using 16 Gauge nominalstainless steel sheet.The following Salvajor cones manufactured as of 11-01-96comply with UL Standard 430 Section 28.3.1 (Exception 1)and 28.3.2:P/N CB-12, CB-15, CB-18.TYPICAL SALVAJOR DISPOSER TO CONE BOWL / DEEP SINK INSTALLATION5 3/ 8"MIN.CONE BOWL / DEEP SINKWATER INLETINTERNAL THROATOPENING 6 1/2" IDDISPOSER TOP HOUSINGNOTE: Above Installation Per UL Standard 430 Height Requirements.CONTROLSPer UL 430, install using a UL-listed electrical control panel.The following Salvajor electrical control panels manufactured as of 11-01-96comply with UL Standard 430 Section 28.3.1 (Exception 1) and 28.3.2:model numbers MSS, MSS-LD, MRSS, MRSS-LD, ARSS-2, ARSS and ARSS-LD.SAFETY INSTRUCTIONS1Read all the instructions before using the disposer.2Keep safety baffle over throat of disposer.3Always keep your hands away from disposer when it is running.4Push STOP button on control panel and shut off electrical power to the panel before attemptingto clear a jam.56When attempting to clear a jam in a disposer use a Salvajor dejamming tool or a long woodenobject to reverse rotation. Remove all foreign material that caused the stoppage. Do not inserthand/fingers into the disposer. Use long tongs or pliers to remove objects.To reduce risk or injury by materials that may be expelled from the unit, do not put the followingitems into a disposer:A. Clam or oyster shellsB. Drain cleaner or corrosive detergentsC. Glass, china or plasticsD. Metal such as bottle caps, tin or aluminum cans, etc.REMEMBER! Always keep hands away from a disposer when it is running.6
Salvajor WarrantyONE YEAR PARTS AND LABOREquipment coveredby this warranty:Conditions not coveredby this warranty:All Salvajor commercial disposers, disposersystems, collector systems, accessories and parts.Faulty or improper electrical installations,faulty or improper plumbing installations,disposer jammed by foreign object, trippedoverload (re-set button), clogged drains,pump jams, clogged solenoid valves, blownfuses, abuse, accidental damage, unitimproperly sized for application accordingto factory recommendations.Length of this warranty:Parts and labor for 12 months from date ofinstallation or 15 months from date of shipmentfrom the factory, whichever expires first, onall disposers and systems. Accessoriesmanufactured by Salvajor are covered forparts and labor when they are sold as partof the original disposer assembly or systempackage. Accessories not manufactured bySalvajor are covered for parts only. Accessoriesand parts sold separately are covered for partsand/or workmanship for 90 days from date ofinstallation.Warranty coverage:Providing the equipment is unaltered, hasbeen properly installed, maintained andoperated, Salvajor will repair or replace atno cost, defective parts due to material orworkmanship, if such service is performedby a Salvajor Authorized Service Center.Parts wear is not considered a defect.7This warranty is limited to the continentalUnited States, Hawaii and Canada.For your nearestFactory Authorized Service Center:Call 1- 888 - SALVAJORor 816 - 363 - 1030Fax 1- 800 - 832 - 9373or 816 - 363 - 4914www.salvajor.comservice@salvajor.com
GENERAL TERMS AND CONDITIONS OF SALEBuyer agrees that in no event shall seller’s liability to buyer and/or its customers extend to include incidental, consequential or punitive damages. The term consequentialdamages shall include without limitation loss of anticipated profits business interruption loss of use or revenue, cost of capital or loss or damage to property or equipment.These Terms and Conditions shall govern the transaction by and between The SalvajorCompany (herein referred to as the “Seller”) and the customer or person or entity purchasing goods (“Goods”) from Seller (therein referred to as “Buyer”), together with any quotation oracknowledgment from Seller relevant to the sale of the Goods and all documentsincorporated by specific reference therein, and shall constitute the complete and exclusiveagreement governing the sale of Goods by Seller to Buyer. Buyer’s acceptance of the Goodswill manifest Buyer’s assent to these Terms and Conditions.1.PRICESUnless otherwise specified in writing by Seller, Seller shall have the right to change the price forthe Goods to Seller’s price for the Goods at the time of shipment. All prices are exclusive of taxes,transportation and insurance which are to be borne by Buyer.2.TAXESAll taxes or government charge (or increase in same) affecting Seller’s costs or whichseller is otherwise required to pay or collect in connection with the sale, purchase, delivery, storageprocessing, use or consumption of Goods shall be for Buyer’s account and shall be added tothe price.3.TERMS OF PAYMENTNet 30 days invoices will bear the date on which shipment is made and terms are basedupon date of shipment and not on date of arrival. Seller shall have the right among otherremedies, to terminate or suspend performance under any order, if Buyer fails to makeany payment when due. Buyer shall be liable for all expenses, including attorney’s fees,relating to the collection of past due amounts. Delinquent payments shall bear interestat a rate to be determined by Seller, which shall not exceed the legal maximum rate,from the date due until paid. Should Buyer’s financial responsibility becomeunsatisfactory to Seller, Seller may require cash payments or satisfactory security.4.SHIPMENT AND DELIVERYDeliveries are made F.O.B. Seller’s shipping point. Risk of loss or damage and liabilitytherefore shall pass to Buyer upon delivery to carrier. Shortages or damages must beacknowledged and signed for at the time of delivery. While Seller will use all reasonable commercial efforts to maintain the delivery date (s), all shipping dates are approximate and not guaranteed. Seller reserves the right to make partial shipments. If theshipment of the Goods is postponed or delayed by Buyer for any reason, Buyer agrees toreimburse Seller for any and all storage costs and other resulting expenses.5.LIMITED WARRANTYSubject to the limitations of Section 6 Seller warrants that the Goods manufacturedby Seller will be free from defects in material and workmanship and meet Seller’spublished specifications at the time of shipment under normal use and regular serviceand maintenance for a period of one year from the date of shipment of the Goods bySeller unless otherwise specified by Seller in writing. Products purchased by Sellerfrom a third party for resale to Buyer (“Resale Products”) shall carry only the warrantyextended by the original manufacturer whether or not the component is incorporatedin goods sold by the Seller.The warranties provided herein are the sole and exclusive warranties by seller withrespect to the goods and are in lieu of and exclude all other warranties, express orimplied arising by operation of law or otherwise, including without limitation,merchantability and fitness for a particular purpose whether or not the purpose oruse has been disclosed to seller in spec
A 3” diameter pipe is recommended for Salvajor disposers models 300 thru 500. A 2” adapter is supplied for existing 2” drains. Models 100 thru 200 require a 2” drain. IMPORTANT! It is imperative to have a proper downward pitch from the disposer outlet