Transcription
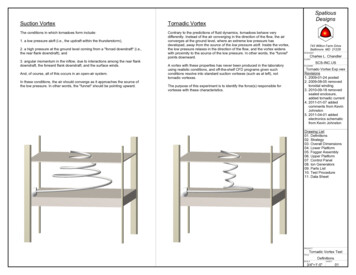
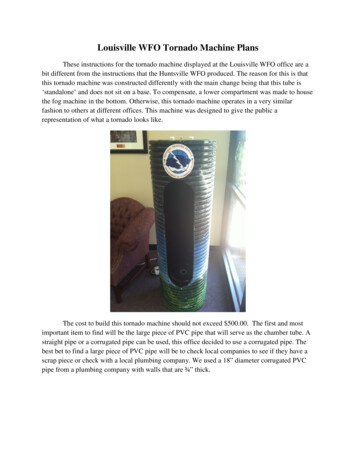
Louisville WFO Tornado Machine PlansThese instructions for the tornado machine displayed at the Louisville WFO office are abit different from the instructions that the Huntsville WFO produced. The reason for this is thatthis tornado machine was constructed differently with the main change being that this tube is‘standalone’ and does not sit on a base. To compensate, a lower compartment was made to housethe fog machine in the bottom. Otherwise, this tornado machine operates in a very similarfashion to others at different offices. This machine was designed to give the public arepresentation of what a tornado looks like.The cost to build this tornado machine should not exceed 500.00. The first and mostimportant item to find will be the large piece of PVC pipe that will serve as the chamber tube. Astraight pipe or a corrugated pipe can be used, this office decided to use a corrugated pipe. Thebest bet to find a large piece of PVC pipe will be to check local companies to see if they have ascrap piece or check with a local plumbing company. We used a 18” diameter corrugated PVCpipe from a plumbing company with walls that are ¾” thick.
Materials List:5’ X 18” Corrugate PVC Pipe (Chamber Tube)1 ½” Diameter PVC Pipe1 ½” Diameter PVC Elbow Pipe4’ X 4’ sheet of PVCJigsawSealant foamMarkerSilicone caulk12 Elbow bracketsDrywall screwsMachine screwsBucketDrainExhaust fanIncandescent cabinet lightDuplex electrical receptacleSwitch & dimmer lightsOil-based paint1) Creating a Viewing PortA. The first thing that will need to be done in order to create the viewing port is for anoutline to be marked on the pipe so you will know where to cut.B. To start the outline, draw a central, straight line down the length of the PVC pipe as thiswill be the alignment mark.C. Next, you will need to decide how big you want your viewing port to be. You will notwant to go any bigger than 1/5 of the circumference, because at this point you will startseeing the effects of the air movement outside of the chamber on the tornado. The widthof our viewing chamber is 8 ¾”.D. Regardless of the width you choose it is time to start drawing out a rectangle for theviewing chamber. To do this mark two parallel lines equidistant to the alignment line. Forexample, our viewing port is 8 ¾” in width so two lines were made 4 3/8” from thealignment line.E. To make the next two sides of the rectangle you will need to decide how far along thevertical axis you want the viewing port to be. It is important to leave space at the top andbottom for the compartments. Our viewing port sits 13 ½” from the base and 9 ¼” fromthe top rim. Two parallel horizontal lines at these distances were marked and now arectangle has been made.
F. Next, it is necessary to create some curvature at the top and bottom ends of the viewingport. To do this, it is recommended that you use a string and a pencil. Go to the horizontalline that is 9 ¼” from the top rim and find the alignment. Once you find the alignmentmark, follow the alignment line down 4 3/8”. Here will be the center point of a circlewith radius 4 3/8” that can be drawn. Cut a string to 4 3/8” length and tie a pencil to oneend of the circle. Place one end of the string at the center point and rotate the other end ofthe string in a circle with the pencil, drawing a perfect circle. (Note: It is only necessaryto draw the upper semicircle.) Now, repeat this process at the bottom end of yourrectangle only this time you will only draw the lower semicircle.G. While you’re in the process of marking portions of the pipe to cut, turn the pipe to thebackside and cut a small area at the bottom of the pipe to help drain out water from thefogging machine. The size of this area is up to your discretion. For reference, ours is arectangle roughly 5” wide by 6” tall.2. Cutting Out the Viewing PortA. Now that the lines have been drawn, it is time to cut out the viewing port. The best thingto use in cutting through the PVC pipe is a jigsaw.
B. If you use corrugated PVC like we did, once you cut away the viewing port there will beholes in the corrugation. To fill these in use some sort of sealant foam. (e.g. GreatStuff )After the foam hardens, it will become necessary to sand away the rough edges.Above: Sealant foam filling in the holes in the corrugation.3. Building the Bottom CompartmentA. Now that the frame of the tornado machine has been constructed, it is time to build acompartment to house the fogging machine.B. Take a 4’ X 4’ sheet of PVC material and cut it into four 2’ X 2’ pieces.C. Three of these 2’ X 2’ PVC pieces will be used to cut out the top of the bottomcompartment as well as the top and bottom of the top compartment.D. The PVC pipe shell may not be a perfect circle so instead of measuring to cut, it isnecessary to trace and cut.E. Place the shell on top of the 2’ X 2’ sheet of PVC and using the viewing port, trace acircle around the inside of the PVC shell onto the sheet.F. Cut the circle out using a jigsaw and this will be the top portion of the bottomcompartment. Repeat the last three steps for both portions of the top compartment.G. Before installing the top of the bottom compartment, it is necessary to make a few morecuts in the PVC. The first cut will be a removable inner circle so that you will be able toaccess the fogging machine. We cut a circle that was 10 5/8” in diameter. Once you cutyour inner circle, save this piece as it will be drilled back into the PVC sheet.H. Now it is necessary to cut a small, permanent circle in the removable inner circle. Thiswill allow moisture to escape from the bottom compartment. The circle we cut in themiddle was 2” in diameter.
I. Now that we have done our cutting, it is time to place the compartment in place. Take theouter circle of the top and place it in the bottom of the PVC shell. The top of the circleshould be even with the bottom of the viewing port. Once this in place, mount this to theshell using four elbow brackets at 0, 90,180, & 270 degrees around the circle. Aftersuccessfully mounting this, it is necessary to seal the perimeter of the circle with siliconecaulk to keep the compartment water tight.J. Next, using some of the extra PVC sheet we will need to cut a ring out so the removableinner circle can be mounted. The size of this circle can vary, as long a lip can be createdfor the removable inner circle to be drilled into place. It is recommended that the lipextends at least 1” beyond the opening in the top compartment. Use machine screws tomount this lip on the underside of the top of the compartment.K. With the lip in place, the removable inner circle can be drilled in place using drywallscrews as well.
L. Next, the fogger machine will need to be placed in the lower compartment. It will need tobe placed into some kind of holding compartment. This is another item that does not needto have an exact size. We used a plastic bucket that was large enough to house the foggermachine and had a lip around the edge so that drywalls screws could be used to mountthe bucket into the bottom of the compartment top.M. After mounting this bucket into the bottom compartment, it is necessary to install a drainso that excess moisture can be drained off easily. Make sure to line the drain up with theback of the pipe and the rectangle that was cut to allow for draining.4. Building the Top CompartmentA. The top and bottom shelves of the top compartment can be traced and cut out just like thetop shelve of the bottom compartment in steps 3: C, D, E, & F.B. Next, it is time to determine at what height the shelf will sit in the compartment. Measure8” down from the top of the PVC tube and make a few marks around the inside of thetube to serve as markers.C. Before mounting the bottom shelf of the top compartment, it is necessary to cut out aninner circle that will allow for intake into the exhaust fan. You will want the diameter ofthe inner circle to be ½” smaller than the diameter of the exhaust fan you choose to use.For example, the diameter of our exhaust fan is around 11 ½” in diameter so the diameterof the inner circle to cut out is 11”.D. Once you have found the appropriate diameter to cut, use a jigsaw and cut out the innercircle. Now the bottom shelf is ready for mounting.
E. In order to mount the shelf, use four elbow brackets once again. The brackets will bemounted at 0, 90, 180, and 270 degrees. Make sure that the bracket mounted at 0 degreesis aligned with the center of the viewing port and this will ensure that none of thebrackets will interfere with the exhaust tube running from the fan. First, mount the elbowbrackets on the shelf. Once these are mounted, place the shelf inside the PVC tube andbegin slowly sliding it down to the 8” mark made in step B. With the shelf now in place,pick one of the elbow brackets and pre drill the top hole for a screw. Then run a ½” screwinto the pre drilled hole and the shelf will be supported.F. Now use a level to make sure the shelf sits straight. As the shelf is leveled continuedrilling the screws into the elbow brackets until the shelf is secured in place.
G. Now it is time to place the fan into the top compartment. . The fan we used is just abathroom exhaust fan and this can be centered and drilled into the top compartment. It isimportant to locate the exhaust on the fan and make sure that this is pointed to the leftside of the PVC tube, where the 1 ½” diameter pipe will be placed.H. The exhaust will be flowing out of the fan and into a circular pipe. One of the mostimportant things here will be to find a way to get the air into the pipe. For example, ourfan’s exhaust was actually a square which required us to do some customization. We tooka 1 ½” diameter PVC elbow pipe and placed it over top of the exhaust. Then, sealantcaulk was used to fill in any gaps.I. Now it is time to install the 1 ½” diameter PVC pipe along the side of the inside of thetornado machine. Before installing this pipe, it is necessary to drill cut the pipe to 37.25”(or the length between your top and bottom compartment) and drill holes 1/8” in diameterspaced ¾” apart down the length of the pipe. Make sure the bottom of this PVC pipe iscapped so that no air flow will be wasted.J. AFTER you have fitted the PVC elbow and PVC pipe, it is time to secure the fan intoplace. Screw the fan into the bottom of the top shelf.K. Another item that can be mounted to the bottom of the top compartment is a light toilluminate the viewing port. We used a simple incandescent cabinet light, and cut a smallhole in the compartment to run power to the supply.L. The next item to be mounted will be a duplex electrical receptacle that will power the fan,fogger machine, and light. This can be mounted anywhere, as long as the placement ofthe receptacle will allow the power switches to be mounted somewhere on the top of thetop compartment.M. With everything in place, it is time to put the top of the tornado machine. It is necessaryto create another ring that will run along the inside of the top opening of the PVC tube.This ring should be the diameter of the pipe and only needs to be at least an inch in width.Mount this into the pipe using four elbow brackets and then drill the top of the topcompartment into this ring using drywall screws.N. On the top of the machine, install a power switch that is wired to turn the duplexreceptacle on and off. Then, two dimmer switches should be wired that will control boththe fogger machine and the fan.Now, your tornado machine has been created. You may wish to customize the apparatus nowand here are a few tips to do so. You will want to use a can of black spray paint to paint theinside of the tornado machine black to make the appearance look better. If you are wanting topaint the outside of the tornado machine, be sure to sand down the outside of the PVC pipe,apply a few coats of primer, and then used oil-based paint to cover the pipe.
.
I. Now it is time to install the 1 ½” diameter PVC pipe along the side of the inside of the tornado machine. Before installing this pipe, it is necessary to drill cut the pipe to 37.25” (or the length between your top and bottom compartment) and drill holes 1/8”