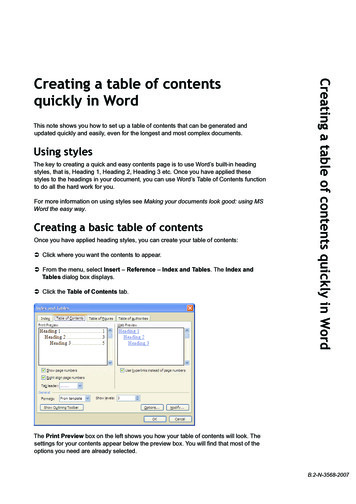
Transcription
WebNMS IoT – Raspberry Pi Deployment GuideTable of ContentsIntroduction . 1IoT Structure . 3Raspberry Pi Gateway Device . 5System Requirements . 5Prepare the Device. 7Prepare the Device . 7Pin Configuration .13Sensor Deployment and Configuration .14Digital Input Sensors .14Digital Output Sensors .16RS485 Sensors .18Data Acquisition .22Maintenance and Troubleshooting.25Frequently Asked Questions .26Finding Product Documentation .27Zoho Corp.
WebNMS IoT – Raspberry Pi Deployment GuideIntroductionInternet of things (IoT) is a network of connected devices, embedded in physical environment. Thesethings connect to the network to provide information they gather from the sensors. The connectedthings can be the devices well known to you or some new, purpose-built devices. The three keyaspects of IoT architecture are the sensors - where the data originates, the gateway device which willbridge the gap between the sensors and the cloud server, and the cloud server - which will store andprocess the data. WebNMS IoT platform, an enterprise scale application enablement platform thatmaximizes the potential of connected business infrastructure has the capabilities to acquire, store,and process the data received from the sensors. It is a mature, unified platform that provides highvolume, high-drill down Internet of Things services across enterprises.This document details about one of the gateway device - Raspberry Pi that helps in bridging the gapbetween the sensors and the cloud server. It will also guide you through the features of theRaspberry Pi device and the multi-purpose agent, EdgeX. Initial setup of the device - Details the procedure on how to start the device, update the dateand time settings, and onboarding the device in the WebNMS server. Compatible sensors - Lists all the sensors that are applicable with the Raspberry Pi device.Product Support For sale queries, send e-mail to iot-eval@webnms.com. For technical support queries, send e-mail to iot-support@webnms.com. For contact information, refer to our Contact page.Zoho Corp.
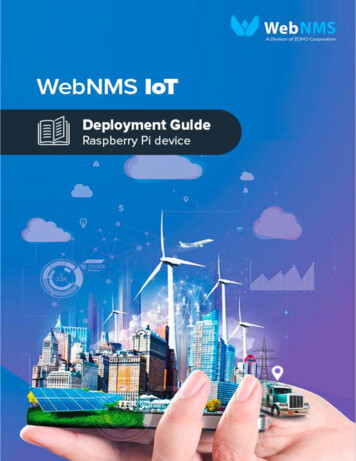
WebNMS IoT – Raspberry Pi Deployment GuideIoT StructureIoT is a network of tiny innovations like the sensors which can be attached to possibly anythingavailable and then make them communicate with the cloud server without any human interaction.So, the question is how to make this happen? Well the answer is to attach a sensor to a Raspberry Pidevice about which we will be discussing in the coming sections. Raspberry Pi device with theinstalled EdgeX agent helps the users to acquire, store, process, and take actions any kind of datafrom the device to the cloud server.Figure 1 : IoT StructureSensors - Tiny innovations that can be attached to anything and then with some additional help, canbe made to communicate with the internet. Sensors play a pivotal role in the IoT infrastructure.Zoho Corp.
WebNMS IoT – Raspberry Pi Deployment GuideGateway device - A gateway device is nothing but a piece of hardware bridging the gap betweenthe sensors and the IoT platform. This guide details about a Raspberry Pi device which is integratedwith EdgeX agent to help the sensors communicate the data to the cloud server.EdgeX agent - A revolutionary agent by Symphony IoT that makes the devices IoT enabled and helpthem to seamlessly discover, acquire, and process immense data smoothly.Cloud Server - A virtual but logical server that is built, hosted and delivered through cloudcomputing platform and can be accessed remotely.Sensors are deployed at the remote location so that they can detect any changes in the environmentand notify the user for the occurred changes. These changes are then captured and pushed to thecloud server. Multi-purpose EdgeX agent bridges the gap between the sensors installed at theremote location and the cloud server. The agent when pushed to the gateway device ensures thatthe communication establishes between the sensors and the cloud server.Sensors are made to communicate with the cloud server with the help of the EgdeX agent that isintegrated with the Raspberry pi device. Data is collected, translated, and then transferred to thecloud server from the sensors via the Raspberry Pi device.Zoho Corp.
WebNMS IoT – Raspberry Pi Deployment GuideRaspberry Pi Gateway DeviceSystem Requirements Hardware Requirements Software Requirements Windows System UBUNTU system MAC SystemA Raspberry Pi device is very easy to work with. Below listed are the minimum requirements beforewe start working with any Raspberry Pi device.Hardware RequirementsThe following are the minimum hardware requirements for working with any Raspberry Pi device: A Raspberry Pi 2 model B device or Raspberry Pi 3 model B 8Gb class 4 SD card A USB Micro power supply (like most standard mobile phone chargers) A good-quality power supply that can supply at least 2A at 5V for the Model 3B, or 700mA at5V for the earlier, lower powered models. Low current ( 700mA) power supply A memory card reader Ethernet for connectivity HDMI monitor to find the IP address of the R-Pi device A R-Pi cover case with cooling fan RS485 to USB converter for RS485 sensors 40 pin FRC cables or female header pins for connecting DI/DOSoftware RequirementsThe following are the minimum software requirements for working with any Raspberry Pi device: Raspbian OS image preferably Jessie-light OSZoho Corp.
WebNMS IoT – Raspberry Pi Deployment Guide EdgeX package (download here) for Raspberry Pi IP scanning software WebNMS IoT platform (download here)Windows SystemFor a Windows operating system, Win 32 disk imager software is required to burn the RPIimage onto the SD card.UBUNTU SystemFor a LINUX operating system, Disk software is required to burn the RPI image onto the SDcard.MAC SystemFor a MAC system, Apple Bake off or Burn it software is required to burn the RPI image ontothe SD card.Zoho Corp.
WebNMS IoT – Raspberry Pi Deployment GuidePrepare the DevicePrepare the Device Prepare the SD Card Install the SD Card Find the IP Address Using HDMI Cable Using IP Scanning Software Windows Platform Linux Platform Using ARP Scan Installing the EdgeX agent to the Raspberry Pi device Onboarding the Gateway in WebNMSBefore starting to work with any Raspberry Pi device, there are some basic preparations that are tobe done. The following sections will guide you on how to prepare the device.Prepare the SD CardBurn the image containing the Raspian OS onto the SD card using the below mentioned softwaresdepending on the OS:Windows system: Use Win 32 disk imager software to burn the image on the SD card.MAC system: Use apple bake off or Burn it software to burn the image on the SD card.Linux system: Use disk utility to burn the image on the SD card.Install the SD Card Once the RPI image is burnt onto the SD card, install the SD card in the SD card sloton the Raspberry Pi device.Zoho Corp.
WebNMS IoT – Raspberry Pi Deployment GuideFigure 2 : SD card slot position on the Raspberry Pi device Now the Raspberry Pi device is ready to be switched on and operated.Find the IP AddressAfter we have installed the SD card to the Raspberry Pi device, the next step is to identify the IPaddress of the device. There are various different methods to find the IP address of the Raspberry Pidevice which have been discussed in the coming sections.Using HDMI Cable1. Connect the keyboard and the monitor to the Raspberry Pi device by the USB and the HDMIcable respectively.Zoho Corp.
WebNMS IoT – Raspberry Pi Deployment GuideFigure 3 : Example circuit showing HDMI cable connection2. Switch on the Raspberry Pi device.3. Login using the credential username 'pi' and password 'raspberry'.4. Type the command 'ifconfig' and press Enter.5. IP address of the Raspberry Pi device will get listed on the screen if connected to a network.(Eg. inet addr:192.168.1.70)Figure 4 : Example circuit showing HDMI cable connectionZoho Corp.
WebNMS IoT – Raspberry Pi Deployment GuideUsing IP Scanning SoftwareWindows Platform1. Ensure that Raspberry-Pi is connected to the same network to which the system is alsoconnected.2. Open the Advanced IP Scanner software.3. Click on Scan in the pop-up window.4. The Advanced IP Software will show the IP address of all the devices on the network.5. Identity the IpAddress of the Raspberry pi device from the list displayed.Figure 5 : Example showing Advanced IP Scanner screenLINUX PlatformUsing ARP Scan1. Ensure that Raspberry-Pi is connected to the same network to which the system is alsoconnected.2. Open the terminal.3. Give the command sudo arp-scan --localnet --interface eth0 and enter the systempassword.Zoho Corp.
WebNMS IoT – Raspberry Pi Deployment Guide4. The devices available in the network will be displayed on the screen. The extra IP address isthe IP address of the Raspberry Pi device connected in the network.Figure 6 : Example screen showing ARP scan runningInstalling the EdgeX agent to the Raspberry Pi device1. Download the EdgeX agent (download here).2. Copy the downloaded agent file into the raspberry pi.3. Extract the agent file using unzip command using the below command:unzip RPI M2Magent.zip4. Change the access modifier for the installation script using the following command :chmod 777 install.sh5. Run the script to install the EdgeX agent into the raspberry pi ecosystem.sudo ./install.sh6. The Raspberry pi will restart after EdgeX installation.Note: Network connectivity is required to download the pre-requisites of EdgeX.Zoho Corp.
WebNMS IoT – Raspberry Pi Deployment GuideOnboarding the Gateway in WebNMSThe gateway and its connected sensors should be configured in the WebNMS application. Once it isconfigured, down the Json file. It will be used by the EdgeX agent to acquire the data from thesensors, process it, and send the data to the WebNMS application. To upload the Json file in thegateway follow the steps provided below:1. Login to the gateway using the credentials provided above.2. Open the browser in the system.3. Type http:// IPaddressofRPI :5000 in the URL of the browser. The page to upload the EdgeXagent will appear on the screen.4. Click browse to go to location of the downloaded EdgeX file.5. Select the file from the location.6. Click upload. On upload, the data from the gateway will be pushed to the application.Zoho Corp.
WebNMS IoT – Raspberry Pi Deployment GuidePin ConfigurationFigure 7 : Pin configuration on Raspberry Pi deviceZoho Corp.
WebNMS IoT – Raspberry Pi Deployment GuideSensor Deployment and Configuration Digital Sensors Digital Input Sensors Digital Output Sensors RS485 sensorsDigital Input Sensors IntroductionLimitationsTestingRaspberry Pi Device Connectiono Pull Up Stateo Pull Down StateIntroductionDigital sensors are the sensors in which the signal is directly converted into the digital signal output.The signal is usually measured in two states in digital sensors i.e. on state and off state. Typicalexample of a digital sensor can be a door sensor, which gives the output in two states eithernormally closed (NC) when the door is open or normally open (NO) when the door is closed. Someexamples of the digital sensors are the door sensor (magnetic), the LED lights, alarms, the pushbutton switches etc.LimitationsThe only limitation with the digital input sensors is the voltage limits of 0V to 3.3V.TestingThe digital input sensor is to be tested before connecting it to the Raspberry Pi device. To test thedigital input sensor, measure the voltage using a multi-meter.Zoho Corp.
WebNMS IoT – Raspberry Pi Deployment Guide If the multi-meter shows 0V or max voltage as suggested by the manufacturer of the sensor,it can be connected to the Raspberry Pi device.If the multi-meter does not show any reading, the digital input sensor is damaged and itmust be replaced.Raspberry Pi Device ConnectionPull Up StateIn pull up state of the digital input sensors, one wire from the sensor will be connected toone of the default pull up pins i.e. 2, 3, 4, 5, 6, 7, and 8 and the other wire will beconnected to one of the ground pin i.e. 9, 6, 14, 20, 25, 30, 34, and 3.Pull Down StateIn pull down state of the digital input sensors, one wire from the sensor will be connectedto one of the default pull down pins i.e. 9, 10, 11, 12, 13, 16, 17, 18, 19, 20, 21, 22, 23, 24,25, 26, and 27 and the other wire will be connected to the pins with 3.3V i.e. pin 1 and pin17.Zoho Corp.
WebNMS IoT – Raspberry Pi Deployment GuideDigital Output Sensors IntroductionLimitationsTestingRaspberry Pi Device ConnectionIntroductionDigital sensors are the sensors in which the signal is directly converted into the digital signal output.The signal is usually measured in two states in digital sensors i.e. on state and off state. Typicalexample of a digital sensor can be a door sensor, which gives the output in two states eithernormally closed (NC) when the door is open or normally open (NO) when the door is closed. Someexamples of the digital sensors are the door sensor (magnetic), the LED lights, alarms, the pushbutton switches etc. The compatible digital output sensors are the ones with the maximum voltageat 3.3V.LimitationsWhile using the digital output sensors with values of 3.3V or an AC voltage, relays should be used.TestingA digital output sensor is to be tested before connecting to the Raspberry Pi device. To test thedigital output sensor, inject a 3.3V power supply to the sensor.If you get the output value, the sensor can be connected to the Raspberry Pi device.If you don't get any output value, the digital output sensor is damaged and should be replaced.Raspberry Pi Device ConnectionAny pin can be configured as digital output in the Raspberry Pi device. One wire will be connected toa relay and the other wire will be connected to any one of the ground pins i.e. 9, 6, 14, 20, 25, 30, 34,and 39.Zoho Corp.
WebNMS IoT – Raspberry Pi Deployment GuideDigital Input SensorsThe compatible digital input sensors are the ones with the voltage limit between 0Vto 3.3V.Digital Output SensorsThe compatible digital output sensors are the ones with the maximum voltage at3.3V.Zoho Corp.
WebNMS IoT – Raspberry Pi Deployment GuideRS485 Sensors Introduction MODBUS MODBUS RTU MODBUS TCP Limitations Testing Check the Sensor with MODSCANRaspberry Pi Device ConnectionIntroductionRS485 sensors are the sensors that transmits signal over two lines rather than on single ended witha voltage referenced to the ground. The transmission is done via twisted pair of cables. A commonconfiguration for the RS485 sensors is the bus network i.e. multiple sensors can be attached to asingle cable over a long range of distance. Each sensor is given an individual id. This means thatmultiple sensors will only use up one port on the data logger, saving considerably on cable and datalogging costs. At the moment, the compatible RS485 sensors with the Raspberry Pi device are theones which can follow the MODBUS protocol. Examples of RS485 sensors are the energy meters, thehumidity sensors, and the temperature sensors etc.MODBUSAt the moment, the only protocol supported by the Raspberry Pi device is MODBUS protocol.MODBUS protocol follows the master-slave arrangement in which each device connected willcommunicate using a unique address. Being said that, one node which is assigned as the masternode will initiate communication to one of the slave nodes and will have the unique address of thatslave node. Only the intended slave node will respond back to the communication initiated by themaster node. Other nodes might receive the data but they won’t acknowledge the received data.Zoho Corp.
WebNMS IoT – Raspberry Pi Deployment GuideFigure 8 : MODBUS configurationMODBUS has different types of the variants like MODBUS RTU and MODBUS TCP.MODBUS RTU - MODBUS RTU is an open, serial protocol derived from the Master/Slavearchitecture. It is a widely accepted protocol due to its ease of use and reliability.MODBUS TCP - MODBUS TCP/IP (also MODBUS-TCP) is simply the MODBUS RTU protocol with a TCPinterface that runs on Ethernet. The MODBUS messaging structure is the application protocol thatdefines the rules for organizing and interpreting the data independent of the data transmissionmedium.LimitationsThe only limitation with RS485 sensors is the range. It can be used up to a range of 1200m only .TestingA RS485 sensor is to be tested before connecting to the Raspberry Pi device. To test a RS485 sensor,use a USB to RS485 converter. Once the connection is established, check the sensor with aMODSCAN.Check the Sensor with MODSCANTo check the sensor with MODSCAN you need to know the COM port number of the USBconverter. For checking the COM port number of the USB converter, follow the procedure as givenbelow.1. Click on the Start button and then click on the Control Panel.2. Click on the Device Manager button. A new window will appear listing all the devicesconnected to your system.Zoho Corp.
WebNMS IoT – Raspberry Pi Deployment GuideFigure 9 : Device Manager Configuration3. Double click on the Ports (COM & LPT). A list of available serial and parallel portdevices will appear on the screen. Your USB COM port should appear on the screenwith the number assigned to it.4. Open MODSCAN and click on the Connection tab. A new window will appear on thescreen where you will have to fill details like the COM port number, the baud rate,the word length, the parity, and the stop bits and click OK.Zoho Corp.
WebNMS IoT – Raspberry Pi Deployment GuideFigure 10 : MODSCAN Connection details1. Click on the Connect button to establish the connection. Once the connection isestablished it should show you a true value as given by the manufacturer.2. If it displays the true value, the RS485 sensor can be connected to the RaspberryPi device.3. If it does not display the true value, the RS485 sensor is damaged and should bereplaced.Zoho Corp.
WebNMS IoT – Raspberry Pi Deployment GuideData AcquisitionOnce the configuration file (a Json file which contains the info about where and how to collect thedata and alarms from the sensors) is uploaded to the device, the sensors starts transmitting thedata to the Raspberry Pi device. The data is received at the Raspberry Pi device where the EdgeXagent applies some logic and processes this data to send the alarms to the cloud server at theperiodic intervals (time intervals as would have been configured in the cloud server). Thetransmitted data is then collected and analyzed by the cloud server.Figure 11 : Data AcquisitionZoho Corp.
WebNMS IoT – Raspberry Pi Deployment GuideHow to confirm if the data from the sensors is being received by the cloud server?The solution is very simple to this problem. When the data starts getting transmitted fromthe Raspberry Pi device to the cloud server, the status in the configuration page will changefrom 'New' to 'Sync'.Other possible way to check whether the data is being received by the cloud server is bychecking the Events page of the cloud server. The Events page of the cloud server will showa new entry for the new device and a message will appear 'Manual configuration update'.Figure 12 : Events Page - Manual Configuration UpdateHow to check the data is being transferred to the cloud server?Based on the periodic interval configured in the configuration file initially generate reportsto check the data that is being transferred to the cloud server. In order to do so, click on theReports tab and select the Raspberry Pi device, performance metric, and the range. ClickView graph and a periodical data for the range applied will appear on the screen in the formof graphs. These graphs can be exported as HTML if the need be.The other way to check the data being transferred is to check the Events page where theperiodic data will get updated at the time intervals specified in the initial configuration.Zoho Corp.
WebNMS IoT – Raspberry Pi Deployment GuideFigure 13 : Reports page showing graphs of the periodical dataZoho Corp.
WebNMS IoT – Raspberry Pi Deployment GuideMaintenance and Troubleshooting For MAC and LINUX System For Windows SystemWebNMS support provides complete assistance for troubleshooting any errors that occurs duringany phase of data acquisition. For eradicating the errors completely, WebNMS support requires thelog reports which can be generated by the user and then mailed to the iot-support@webnms.com.For MAC and LINUX SystemFollow the procedure given below to take the logs from any MAC and UBUNTU system.1. Connect the Raspberry Pi device one to one with the system.2. Open the terminal.3. Give the command sftp pi@IP address of the device.4. If you are connected to the terminal, the system will ask for password. Give thedefault password as 'raspberry'. If you have changed the password previously, usethe changed password.5. Give the command mget - r/mnt/M2M/logs.6. A folder will appear with all the log files.7.Zip the entire folder and mail it to iot-support@webnms.com.For Windows SystemFollow the procedure given below to take the logs from any Windows system.1. Connect the Raspberry Pi device one to one with the system.2. Open the sftp or ftp application in the system.3. Browse and transfer the file /mnt/M2M/logs.4. A folder will appear with all the log files.5. Zip the entire folder and mail it to iot-support@webnms.com.Zoho Corp.
WebNMS IoT – Raspberry Pi Deployment GuideFrequently Asked Questions Which sensors are compatible with the device? How to change the pin configuration? How to identify if the sensor is working or not? What are the specifications of the connection cables? Which sensors are compatible with the device?Refer to the Compatible sensors with the Raspberry Pi device for details on this section. How to change the pin configuration?The pin configuration on the WebNMS cannot be changed dynamically. The old mappinghas to be deleted and the new mapping has to be done. It is not possible to change the pinor device name after initial configuration. How to identify if the sensor is working or not?Refer to testing of the sensors under each sensor topic. What are the specifications of the connection cables?There is no particular specification for the cables. It is preferred and convenient to usetwo/three core coaxial cables.Zoho Corp.
WebNMS IoT – Raspberry Pi Deployment GuideFinding Product Documentation Finding Product Documentation FeedbackFinding Product DocumentationAll the documents related to WebNMS IoT are available in our Documentation section.FeedbackYou can send your valuable feedback to iot-support@webnms.com.Zoho Corp.
WebNMS IoT – Raspberry Pi Deployment Guide Zoho Corp. Figure 2 : SD card slot position on the Raspberry Pi device Now the Raspberry Pi device is ready to be switched on and operated. Find the IP Address After we have installed the SD card to the Raspberry Pi device, t