Transcription
instructablesDIY Professional 18650 Battery Packby opengreenenergyThe world is shifting away from fossil fuels and will oneday become fully electric. In the present world, Lithiumion is the most promising chemistry of all batteries. Mostof the battery packs used in Laptops, RC Toys, Drones,Medical devices, Power tools, e-bikes, and electric cars(EV) are based on 18650 batteries. It is one of the mostmature Li-ion formats available, is produced in highvolume, and enjoys a low cost per Wh. Follow me on Instagram @ opengreenenergyYou can nd all of my projects onhttps://www.opengreenenergy.com/The 18650 (18mm diameter and 65mm length ) batteryis a size classi cation of lithium-ion batteries. It is thesame shape, but a bit larger than a AA battery. AAbatteries, by comparison, are sometimes called 14500batteries because they have a 14mm diameter and50mm height.Earlier I have made a Solar Power Generator which isworking really nice till now. But the main problem is itsweight, it is really heavy. The main weight of the SolarGenerator is due to the heavy lead-acid battery inside it.So I decided to make a light and compact 18650 Li-IonBattery Pack.In this Instructable, I will show you, how to make a 18650battery pack for applications like Power Bank, SolarGenerator, e-Bike, Power wall etc. The fundamental isvery simple: Just to combined the number of 18650 cellsin series and parallel to make a bigger pack and nally toensue safety adding a BMS to it.At the end of this project, I made a custom 3D printedenclosure for the battery pack.Disclaimer:I cannot be held responsible for any loss ofproperty, damage, or loss of life if it comes to that. Thistutorial was written for those who have knowledge ofrechargeable lithium-ion technology. Please do notattempt this if you are a novice. Stay Safe.Full Video Tutorial://www.youtube.com/embed/dq2JUwJisY0DIY Professional 18650 Battery Pack: Page 1
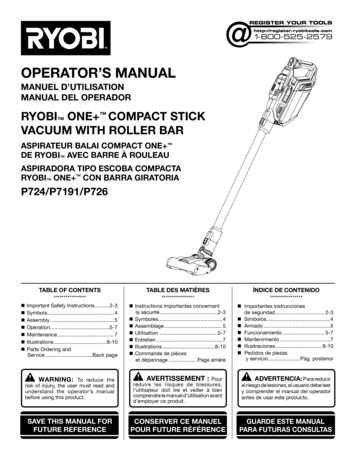
Step 1: Parts and Tools RequiredDIY Professional 18650 Battery Pack: Page 2
Parts Required:1. Spot Welder ( Banggood /Amazon)1. 18650 Battery ( GearBest / Amazon )2. 3D Printer (Creality CR10S )2. BMS ( Banggood / Amazon)2. Wire Stripper/ Cutter ( Amazon )3. Ni Strips ( Banggood / Amazon )3. Hot Air Blower ( GearBest )4. Battery Level Indicator ( Banggood )3. Multimeter ( Amazon )5. Rocker Switch ( Aliexpress / Banggood )5. Li Ion Charger ( GearBest )6. DC Jack ( Banggood /Aliexpress )Safety Equipment :7. 18650 Battery Holder ( Banggood )1. Safety Googles ( Amazon )8. 3M x 10mm Screws (Banggood / Aliexpress )2. Electrical Gloves ( Amazon)Tools UsedStep 2: Selecting the Right 18650 Cells for the Battery PackYou will nd many types of 18650 cells in the market inthe price range of 1 to 10, but which are the best? Iwill highly recommend buying 18650 cells from brandedcompanies like Panasonic, Samsung, Sanyo, and LG.These cells that have well-documented performancecharacteristics and excellent quality control. Reputedbrand 18650 cells are generally costly, but if you considerfor long time use then they are worth having it.Don't buy any cells with the word FIRE in the name likeUltra re, Sure re, and Trust re. In reality, these cells arejust factory rejects, purchased by companies likeUltra re and repackaged in their own branded cover.Many used batteries are rewrapped as new and whitelabeled. They sell the battery by marking capacity up to5000mAh, but in actual their capacity is between 1000 to2000 mAh. Another major problem with these cheap18650 cells is the high risk of explosion when overheatedduring the charging or discharging.In this project, I have used green Panasonic 18650B cellsof capacity 3400 mAh from GearBest.DIY Professional 18650 Battery Pack: Page 3
Step 3: Choosing the Right Battery StripsTo make the battery pack, you have to connect the18650 cells together by means of Nickel strips or thickwire. Generally, Nickel strips are widely used for this. Ingeneral two types of nickel, strips are available in themarket: nickel-plated steel strips and pure nickel strips. Iwill suggest buying a pure nickel. It is a little bit costlierthan nickel-plated steel, but it has much lowerresistance. Low resistance means, less heat generationduring the charging and discharging, which leads tolonger useful battery life.Nickel strips come with di erent dimensions andlengths. Choose the strips according to the currentrating.DIY Professional 18650 Battery Pack: Page 4
Step 4: Spot Welding Vs SolderingYou have two options two connect the 18650 cellstogether: 1. Soldering 2. Spot WeldingThe best choice is always Spot welding, but Spot Welderis much costlier than a good quality Soldering Iron.Soldering :You should know why Spot welding is preferred oversoldering, the problem with soldering is that you apply alot of heat to the cell and it doesn’t dissipate veryquickly. This enhances the chemical reaction in the cellwhich damages the cell's performance. Ultimately youwill lose some capacity and life the cells.and you use plenty of ux to allow for fast solder ow.2. It is better to have a good quality high wattage ( min80W ) iron with good thermal capacity so it can deliverthe heat to the joint quickly so you don't have to holdthe iron to the battery for ages and let the heat seep intoit, causing damage to the battery.Spot Welding :The reason we spot weld because it securely joins thecells together without adding much heat to them. Thereare two grades of spot welders currently available in themarket: hobby grade and professional grade. A decenthobby-grade Spot welder costs around 200 to 300,But if you are not interested to buy a costly Spot Welder, whereas a good professional grade may cost around tenyou can solder the nickel tabs to the cell by followingtimes more. So I will suggest buying a hobby-grade spotsome precaution and tricks :welder from any online store like Banggood, Aliexpress,or eBay.I am using the SUNKKO 709A 1.9kw Spot Welder1. To minimize the contact time of your soldering iron on from Banggood.the cell, make sure the surface is scu ed up su cientlyDIY Professional 18650 Battery Pack: Page 5
Step 5: Check the Cell VoltageBefore connecting the cells in parallel, rst, check theindividual cell voltages. For paralleling the cells, thevoltage of each cell should be near to each other,otherwise, a high amount of current will ow from thecell with a higher voltage to the cell with a lower voltage.This can damage the cells and even result in re on rareoccasions.3.5 V to 3.7 V, you can join them together withoutworrying much. But if you are going to use an old laptopbattery, be sure the cell's voltage is nearly the same,otherwise, charge the cells to the same voltage level byusing a good Li-Ion Battery Charger. I used my NitecoreSC4 Charger to charge all the 18650 cells before joiningthem together.If you are using brand new cells, the cell voltage is nearStep 6: Battery Pack Capacity and VoltageDIY Professional 18650 Battery Pack: Page 6
To make the battery pack, you have to rst nalize thenominal voltage and capacity of the pack. Either it will bein terms of Volt, mAh/ Ah, or Wh. You have to connectthe cells in parallel to reach the desired capacity (mAh )and connect such parallel group in series to achieve thenominal voltage (Volt ).so this pack will be known as a “5P pack”.When 5 cells areconnected in parallel, ultimately you made a single cellwith higher capacity ( i.e 4.2V, 17000 mAh )Voltage(Volt) :The desired nominal voltage of the battery pack is 11.1V.For this project let the requirement is: 11.1 V and 17Ah Battery PackSpeci cation of 18650 Cells Used: 3.7V and 3400 mAhThe nominal voltage of each cell 3.7 VNo of cells required for series connection 11.1 /3.7 3nosCapacity (mAh):The desired capacity of the battery pack 17 AH or17000 mAh.Commonly cells in series are abbreviated in terms of ‘S’,so this pack will be known as a “3S pack”.The capacity of each cell 3400 mAhSo we have to connect the 3 parallel groups (5 cells ineach group ) in series to make the battery pack.No of cells required for parallel connection 17000 /3400 5 nosThe nal pack con guration is designated as a “3S5Ppack” with a nal speci cation of 11.1V,17AH.Commonly cells in parallel are abbreviated in terms of ‘P’,Step 7: Assemble the 18650 CellsDIY Professional 18650 Battery Pack: Page 7
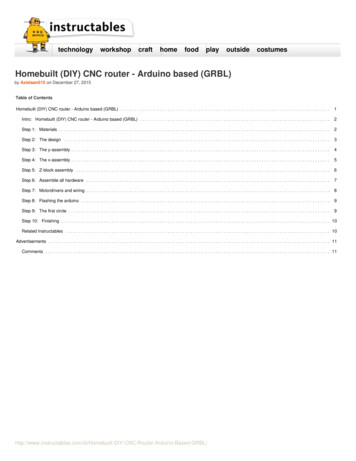
From the previous step, it is clear that our battery pack ismade up of 3 parallel groups connected in series ( 3 x3.7V 11.1V ), and each parallel group has 5 cells ( 3400mAh x 5 17000 mAh). Now we have to arrange the 15cells properly for making the electrical connectionamong them and with the BMS board.used plastic 18650 cell holders/spacers to assemble the15 cells. The main advantages of using these cell holdersarePlace the rst parallel group of cells (5 nos) positive sideup, then place the second parallel group negative sideup, and then nally the last parallel group positive sideup. For better understanding, you can see the abovepicture.2. It provides space between the cells, which allow freshair to pass and the battery gets cooled easily.1. You can make a custom pack of any size according toyour requirement.It's like solving a puzzle.3. It makes your battery pack solid and reliable.4. It provides safety anti-vibration to your battery packYou can assemble the cells to make the pack by usinghot glue or by using a plastic 18650 battery holder. IStep 8: Spot Weld the Nickel StripsDIY Professional 18650 Battery Pack: Page 8
Now it is time to know the procedure for using the SpotWelder ( I am talking about the Spot welder that I haveused in this project). The Spot welder has three weldingchoices: xed welding head, xed welding head withfoot switch, movable spot welding pen with thefootswitch. I prefer to use the second option. Beforewelding, you have to prepare the nickel strips andwelder.Cut the nickel strips :Lay your nickel strip on top of the 5 cells ( parallel ),ensuring that it covers all cells terminals, leave 10mmexcess strips for connecting it to the BMS, and then cutit. For series connection cut small nickel strips as shownin the gure. You will need four long strips for parallelconnection and 10 small strips for series connections.Connect the rst parallel group negative terminal to thepositive terminal of the second group and then thenegative terminal of the second group to the positiveterminal of the third group.This spot welder can be used to weld the pure nickel aswell as nickel-plated steel strips. You have to adjust thewelder pulse and current knob according to thethickness of the nickel strips.For 0.15 mm nickel strips, press the pulse knob 4P andcurrent knob to 4-5. Similarly for 0.2 mm nickel strip,press the pulse knob 4P,6P, and current knob to 7-8.Make sure the welding pen is compressed with thenickel strip and battery terminal, then press thefootswitch. You will notice a small spark and two-dotmark on the strip.Successful Welding :You can check the weld quality by pulling on the nickelstrip. If it doesn’t come o with hand pressure orrequires a lot of strength, then it’s a good weld. If youcan easily peel it o , then you have to increase thecurrent.Safety: Before starting the spot welding, always wearsafety goggles.Weld the Battery Strips :DIY Professional 18650 Battery Pack: Page 9
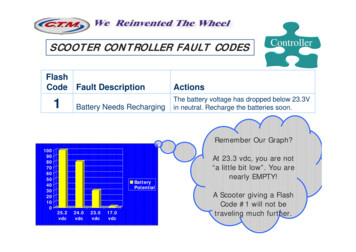
Step 9: Adding the BMSA battery management system (BMS) is an electronicsystem that manages a lithium battery pack and themain functionalities areMaximum operating current: 0 25A1. Monitors all of the parallel groups in the battery packand disconnect it from the input power source whenfully charged ( near 4.2V )How to Connect?2. Balance all the cells voltage equally3. Doesn't allow the pack from over-discharged.The two important parameters required to buy a BMSare: i) Number of cells in series - like 2S / 3S / 4Sii). Maximum discharge Current - like 10A/ 20A /25A/30AFor this project, I have used a 3S and 25A BMS board.These are the speci cations of that BMS :Overvoltage range: 4.25 4.35V 0.05VWorking temperature: -40 50Connect the BMS as shown in the wiring diagram. TheBMS has four soldering pads: B-, B1, B2, and B . You haveto connect the rst parallel group negative terminal busto the B- and positive terminal bus to the B1. Similarlythe third parallel group negative terminal bus to the B2and positive terminal bus to the B .You can spot weld the nickel strips to the BMS or solderit to the PCB pad. I preferred to solder the nickel strips tothe PCB for a sturdy connection. First, apply solderingux to the PCB pads and end of the nickel strips. Afterthat tin all the pads by applying a little amount of solderand then solder them together.Credit: The wiring diagram is taken from the Banggoodproduct page.Over-discharge voltage range: 2.3 3.0V 0.05VDIY Professional 18650 Battery Pack: Page 10
Step 10: 3D Printed EnclosureDIY Professional 18650 Battery Pack: Page 11
The battery pack has all-around exposed nickel strips, toavoid any accidental shorting, I designed an enclosurefor it. I used Autodesk Fusion 360 to design theenclosure for my battery pack. The enclosure has twoparts: The main Body and top lid. You can downloadthe.STL les from Thingiverse.My settings are:Print Speed: 70 mm/s LayerHeight : 0.3Fill Density: 100%I used my Creality CR-10S 3D printer and 1.75 mm greenPLA lament to print the parts. It took me about 6.5hours to print the main body and around 1.2 hours toprint the top lid.Extruder Temperature: 205 deg CBed Temp: 65 deg CStep 11: Wiring the ComponentsDIY Professional 18650 Battery Pack: Page 12
Normally a standard battery has only two terminal forconnecting the load and to charge the battery. Apartfrom this, I have added a battery level indicator, to seethe battery level whenever required. I have used a 5mmDC jack ( 12V /3A ) for input/output, 3S battery levelindicator module to see the battery status, and a rockerswitch to ON/OFF the battery level indicator.Now let's move on to the wiring of the components. I'veprepared this simple wiring diagram for all thecomponents. It's pretty simple! To insulate theconductive parts, I used heat shrink tubing.Note: Don't solder the wires ( P and P- ) to the BMSbefore installing the components into the enclosure.Step 12: Final AssemblingDIY Professional 18650 Battery Pack: Page 13
First, install the components into the respective slots inthe 3D printed enclosure. You can see the above picture.Solder the positive (red wire ) from the DC jack andRocker switch to the P of the BMS, negative wires fromthe DC jack, and Battery level indicator to the P- of BMS.Then apply hot glue at the base of the batterycompartment, then secure the battery pack. So that itwill seats rmly and prevent any loss of wireconnections.Charging the Battery Pack :You can charge the battery pack by a 12.6V DC adapterlike this. You can get it easily from aliexpress or eBay.Hope you enjoyed reading about my project as much asI have enjoyed building it. If you’re thinking aboutmaking your own I would encourage you to do so, youwill learn a lot. If you have any suggestions forimprovements, please comment below.Thanks!Finally, screw the top lids in place! I used 3M x 10 screwsfor securing the lid. Now the battery pack is ready to use.DIY Professional 18650 Battery Pack: Page 14
HOW TO CHARGE THIS BATTERY PACKwith a battery chargerHelloplease I want to start my lithium ion battery pack,I want to get recommendation on the best spot-welding machine to buy thanks.You can contact me on konnectkenny@gmail.com.This was made in 2017, now you can buy cell connectors from amazon, ebay etc for extremelycheap and they cut out the need to spot weld, it really isn't something you should do especially ifyou are using recycled cells as if you have an issue with a cell you can easily change it out whenusing the bolt together kit as opposed to pointlessly spot welding the cells. It also means if youmake any mistakes with your layout you can change it, or if you want to re-configure for differentvolt/amp output you don't risk damaging the cells. Have a search for Lithium ion diy kits. It willsave you a lot of money, problems, damaged cells and it will leave your options open if you wantto reuse the cells for a different application.In case anyone is interested, allow 163.8 Cubic Centimeters for 25 batteries for different batterycounts - 11.7 * 11.7 * 7 cm (4.5 * 4.5 * 2 3/4 in).i would like to make my own car battery with 18650 cells, but can you help me, i would like it tobe around 14 volt, and i ofc want it to be charged with th cars alternator, i also have a big soundsystem that have a max peak at about 15kw, would the cells be able to provide that anou t ofpower? if i would make it lets say 50AH or more, pleade help, been searchi g all over the internet50AH does not address the question. For a car battery, you need at least several HUNDREDAmps. That's why you buy a battery with, say, 550 CCA. If one series of 18650 batteries candeliver 10A, you need 55 parallel groups.Please see my informative answer to the first question!Your final output voltage will be 3 x 3.7 11.1. I suggest a series of 4 for 14.8 Volts. That is thesame voltage as the fully charged 6-cell Lead-Acid battery on your car will read.I made it (hello from Brazil o/ )DIY Professional 18650 Battery Pack: Page 15
Hi,If I connect load and charger together to this battery, Will it function as a UPS?Yes, as this is something I'm planning to do as a mini 12v UPS for my home network gear!like that I can integrated the battery in other projects! And, I have use battery holder to not solderon the cell and because I haven't a Spot Welder.Hi, is there any reason not to use battery holders like r-PlasticStorage/dp/B07MM1N459/ref sr 1 fkmr0 2?keywords 18650 battery holder 4 slotseries&qid 1578416247&sr 8-2-fkmr0After all that great work you used slotted screws?Great informative video great work.Thank you.Great way to make cheap battery banks thank you!Slightly different to what i do now, but a reliable method hey.I find all my 18650s for free from old laptop batteries and drill batteries, etc. Heres a video onhow i get them https://youtu.be/2U3Q0iEMr wMakes projects like these cost next to nothing :D next goal is a DIY Powerwall but i need to saveup a few more batteries for that first!Not trying to be an ahole but you can buy these 4 pack and 8 pack 18650 holders that charge thebatteries with a phone charger. From Ebay for 2 each and link as many as you can afford. Andpull the power from the usb port.Also I can't understand how a battery could know if it's being charged by another battery orcharger.That was not the point of this instructable. This is a much better pack than you can buy for 2.The diagrams and photos above show the batteries in parallel. I don't see the difference? If youreplaced. or added two dead batteries wouldn't it do the same thing?The above photos show a 3 series 5 parallel pack. Not intended to be used as singles."It is clear that our battery pack is made up of 3 parallel groups connected in series ( 3 x 3.7V 11.1V ) and each parallel group have 5 cells ( 3400 mAh x 5 17000 mAh).Now we have toarrange the 15 cells properly for making the electrical connection among them and with the BMSboard."I'm keeping 16 charged and ready for action with 2 8 bay chargers that I got for free. They wereabout 4 each but the led's didn't work and they just refunded me.True that you can use a TP4056 for like 0.35 and you could probably charge two 18650s inparallel with it. However, you definitely want those cells to be balanced when you connect them.The cell with the greater charge will dump its charge very rapidly into the cell with the lessercharge. This rapid charge / discharge can create A LOT of heat and even start a fire. TheTP4056, IIRC, doesn't output more than 1A (most TP4056 based boards will only output a maxDIY Professional 18650 Battery Pack: Page 16
current of 500mA) to prevent the cell from chargning too rapidly. The bottom line is that the cellwill happily destroy itself (and sometimes your lab) if you apply a load (or voltage) without currentlimitation.Nice set-up I believe it looks all good except for that last part where you used a glue gun tocreate adhesion between battery pack and the battery case (cool way of building your case, nicejob by the way!). Correct me if i am wrong but doesn't glue gun glue conduct electricity?So by the way you had done that last step. doesnt that cause either a short, or a serious lossdrain or leaky in the cell pack?Hot glue is non-conductive. I promise. I use it all the time.Hello sir I really love your project and I would love to see more. I'm now on of your fans, followingyou already. Keep it up for sharing, as sharing is caring, please I actually need exact what youmade to power my DC fan at home because the temperature over here is unbearable. How can Iget the materials. Can I get them from you. I'm actually an electronics student.Better still can I have your email address. Thanks as I look forward to your response.How do I calculate how many volts and amps the solar panel used to charge a 2s battery pack.Very interesting article! I am confused about the following:If the power supply is not designed for LiPo batteries, how would it be possible to achieve anefficient charging process (glide paths for Amp and Voltage)? Experts recommend using a LiPocharger, alongside the battery pack's BMS, as the batteries will otherwise not get chargedproperly and perform optimally (as intended). Is this not true, or am I missing something?I'd like to use 24x (or 28x) Samsung Q30 (18650/3000mAh/20A) batteries, to build a 24Voltsbattery pack, to power 2xRazon E100 motors (100W each). I'm not sure if I should build 4xbattery packs of 6S (and how to combine them, to increase the total capacity - mAh?), eachsupported by a 15A BMS (60A total), or a single battery pack of 6S4P (15A BMS), or a singlebattery pack of 7S4P (40A BMS). What's the best way forward, for an efficient (and safer) batterypack?I made same charger,12 volt,13 A,in a plate wood box.The BIG Power.1 x 12 Volt out,a on/off switch to check battery status and sure a internal BMS 20A max (everybattery is 2600 mAh).Given that you have a 3D printer, why mess about with soldering/welding the nickel to thebatteries to begin with? Why not just print caps with space to run the strips, which would allow foreasy replacement of the cells when they've worn out? I know with that solid connection there'sless resistance, but is it really that dramatic?It would be very sensitive unless you put a lot of force on it. Any vibration could separate the jointand possibly cause a short.oh yes it is. Also work clean, clean the parts so no, like hand, grease will be thereDIY Professional 18650 Battery Pack: Page 17
which charge controller i should use if i want to charge this battery pack with solar panel's output?Anyone with an adjustable output voltage.Just finished the inside and currently printing the box. but how long does it takes to charge up?I'm using a 12.6V 30A power supply and I wonder how do I know when it's done. I see no leds orany type of indicator. would be easy to add? Thanks and thanks for sharing the projectAdd a current meter in series to the charger. Once the current gets really low its full. Also if youare using a 25A BMS than that charger is overkill. If anything shorts your BMS is going to let thesmoke out.Your math for capacity doesn't make sense to me.not sure if I'm missing something. If eachbattery has 0.34Ahr and the desired capacity is 17Ahr, 17/.34 is not 5. Its 50. Where is that zerogoing?Your math is correct but your number is wrong 3400 mAhr 3.4 Ahr.17/3.4 5. That zero is from there. We all make mistake from time to time.Cheers!If looking for the plastic box for DIY 18650 Lithium battery pack, please check the -battery.Super nice project for improvement edit the 3d print to add some air vents for the BMS andbatteries ventilate the generated heat at discharge time.Hello, has become really nice and would like to build, but how can you load the solar system with12v output? is that overdone? or only via 12.6V DC adapter.Thank youNice idea, but how much would a commercially-built unit be? To make it you need to buy about300 quids-worth of gear plus new expensive batteries.Gread ible! Found some very useful information from it.Already a Fan.:)Hi Deba, how do you use this? From your configuration I can’t find an output port toconnect/charge anything.There is only ONE connector that is used for Input when charging, and Output when poweringsomething. No need for 2 connections since the pack is not meant to be used and charged at thesame time.It's just a battery pack for this project: larPower-Pack/ All the useful connections are in that project.what about the wires from each cell to the BMS so it can balance the cells when charging ? Ican't see them.Wires were not used for those connections. The ends from the longer nickel strips that protrudepast the edge of the battery pack are soldered directly to the board. That is why mounting theboard where it is was such a genius idea!DIY Professional 18650 Battery Pack: Page 18
Wires from each parallel groups is connected to BMS.The BMS will balance as well protect thecells from over charging and discharging.You can get 18650's with tabs pre-welded on, so you can just solder the tabs together. I've donethis with NiMH cells and it worked really well.Also the type of welder for battery tabs is a capacitive discharge welder, I've not tried it but lookseasy to build a simple version, much cheaper than buying one. Lots of CDW projects on the 'net!DIY Professional 18650 Battery Pack: Page 19
DIY Professional 18650 Battery Pack by opengreenenergy The world is shifting away from fossil fuels and will one day become fully electric. In the present world, Lithium-ion is the most promising chemistry of all batteries. Most of the battery packs used in Laptops, RC Toys, Drones,