Transcription
What is an Arduino? a learn.sparkfun.com tutorialAvailable online at: http://sfe.io/t50ContentsIntroductionWhat Does it Do?What's on the board?The Arduino FamilyThe Extended FamilyResources and Going FurtherIntroductionArduino is an open-source platform used for building electronics projects. Arduino consists of both a physical programmable circuit board (often referred to as amicrocontroller) and a piece of software, or IDE (Integrated Development Environment) that runs on your computer, used to write and upload computer code tothe physical board.The Arduino platform has become quite popular with people just starting out with electronics, and for good reason. Unlike most previous programmable circuitboards, the Arduino does not need a separate piece of hardware (called a programmer) in order to load new code onto the board -- you can simply use a USBcable. Additionally, the Arduino IDE uses a simplified version of C , making it easier to learn to program. Finally, Arduino provides a standard form factor thatbreaks out the functions of the micro-controller into a more accessible package.This is an Arduino UnoThe Uno is one of the more popular boards in the Arduino family and a great choice for beginners. We'll talk about what's on it and what it can do later in thetutorial.Page 1 of 13
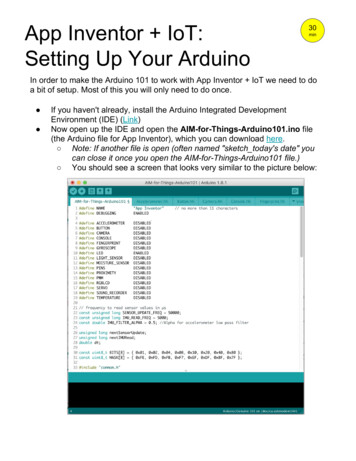
This is a screenshot of the Arduino IDE.Believe it or not, those 10 lines of code are all you need to blink the on-board LED on your Arduino. The code might not make perfect sense right now, but, afterreading this tutorial and the many more Arduino tutorials waiting for you on our site, we'll get you up to speed in no time!You Will LearnIn this tutorial, we’ll go over the following:What projects can be accomplished using an ArduinoWhat is on the typical Arduino board and whyThe different varieties of Arduino boardsSome useful widgets to use with your ArduinoSuggested ReadingArduino is a great tool for people of all skill levels. However, you will have a much better time learning along side your Arduino if you understand some basicfundamental electronics beforehand. We recommend that you have at least a decent understanding of these concepts before you dive in to the wonderful worldof Arduino.What is Electricity?Voltage, Current, Resistance, and Ohm's LawWhat is a Circuit?PolarityIntegrated Circuits (ICs)Logic LevelsDigital LogicAnalog vs. DigitalLooking for the right Arduino?Check out our Arduino Comparison Guide! We've compiled every Arduino development board we carry, so you can quickly compare them to find the perfectone for your needs.Take me there!Page 2 of 13
What Does it Do?The Arduino hardware and software was designed for artists, designers, hobbyists, hackers, newbies, and anyone interested in creating interactive objects orenvironments. Arduino can interact with buttons, LEDs, motors, speakers, GPS units, cameras, the internet, and even your smart-phone or your TV! Thisflexibility combined with the fact that the Arduino software is free, the hardware boards are pretty cheap, and both the software and hardware are easy to learnhas led to a large community of users who have contributed code and released instructions for a huge variety of Arduino-based projects.For everything from robots and a heating pad hand warming blanket to honest fortune-telling machines, and even a Dungeons and Dragons dice-throwinggauntlet, the Arduino can be used as the brains behind almost any electronics project.Wear your nerd cred on your sleev. err, arm.And that's really just the tip of the iceberg -- if you're curious about where to find more examples of Arduino projects in action, here are some good resources forArduino-based projects to get your creative juices flowing:InstructablesArduino PlaygroundThe ITP Physical Computing WikiLadyAdaMake: Projectsand, of course, you can find plenty more Arduino tutorials here at learn.sparkfun.com.What's on the board?There are many varieties of Arduino boards (explained on the next page) that can be used for different purposes. Some boards look a bit different from the onebelow, but most Arduinos have the majority of these components in common:Page 3 of 13
Power (USB / Barrel Jack)Every Arduino board needs a way to be connected to a power source. The Arduino UNO can be powered from a USB cable coming from your computer or a wallpower supply (like this) that is terminated in a barrel jack. In the picture above the USB connection is labeled(1) and the barrel jack is labeled (2).The USB connection is also how you will load code onto your Arduino board. More on how to program with Arduino can be found in ourInstalling andProgramming Arduino tutorial.NOTE: Do NOT use a power supply greater than 20 Volts as you will overpower (and thereby destroy) your Arduino. The recommended voltage for most Arduinomodels is between 6 and 12 Volts.Pins (5V, 3.3V, GND, Analog, Digital, PWM, AREF)The pins on your Arduino are the places where you connect wires to construct a circuit (probably in conjuction with abreadboard and some wire. They usuallyhave black plastic ‘headers’ that allow you to just plug a wire right into the board. The Arduino has several different kinds of pins, each of which is labeled on theboard and used for different functions.GND (3): Short for ‘Ground’. There are several GND pins on the Arduino, any of which can be used to ground your circuit.5V (4) & 3.3V (5): As you might guess, the 5V pin supplies 5 volts of power, and the 3.3V pin supplies 3.3 volts of power. Most of the simple componentsused with the Arduino run happily off of 5 or 3.3 volts.Analog (6): The area of pins under the ‘Analog In’ label (A0 through A5 on the UNO) are Analog In pins. These pins can read the signal from an analogsensor (like a temperature sensor) and convert it into a digital value that we can read.Digital (7): Across from the analog pins are the digital pins (0 through 13 on the UNO). These pins can be used for both digital input (like telling if a buttonis pushed) and digital output (like powering an LED).PWM (8): You may have noticed the tilde ( ) next to some of the digital pins (3, 5, 6, 9, 10, and 11 on the UNO). These pins act as normal digital pins, butcan also be used for something called Pulse-Width Modulation (PWM). We have a tutorial on PWM, but for now, think of these pins as being able tosimulate analog output (like fading an LED in and out).AREF (9): Stands for Analog Reference. Most of the time you can leave this pin alone. It is sometimes used to set an external reference voltage (between 0and 5 Volts) as the upper limit for the analog input pins.Reset ButtonJust like the original Nintendo, the Arduino has a reset button(10). Pushing it will temporarily connect the reset pin to ground and restart any code that is loadedon the Arduino. This can be very useful if your code doesn’t repeat, but you want to test it multiple times. Unlike the original Nintendo however, blowing on theArduino doesn't usually fix any problems.Power LED IndicatorJust beneath and to the right of the word “UNO” on your circuit board, there’s a tiny LED next to the word ‘ON’(11). This LED should light up whenever you plugyour Arduino into a power source. If this light doesn’t turn on, there’s a good chance something is wrong. Time to re-check your circuit!TX RX LEDsTX is short for transmit, RX is short for receive. These markings appear quite a bit in electronics to indicate the pins responsible forserial communication. In ourPage 4 of 13
case, there are two places on the Arduino UNO where TX and RX appear -- once by digital pins 0 and 1, and a second time next to the TX and RX indicatorLEDs (12). These LEDs will give us some nice visual indications whenever our Arduino is receiving or transmitting data (like when we’re loading a new programonto the board).Main ICThe black thing with all the metal legs is an IC, or Integrated Circuit(13). Think of it as the brains of our Arduino. The main IC on the Arduino is slightly differentfrom board type to board type, but is usually from the ATmega line of IC’s from the ATMEL company. This can be important, as you may need to know the ICtype (along with your board type) before loading up a new program from the Arduino software. This information can usually be found in writing on the top side ofthe IC. If you want to know more about the difference between various IC's, reading the datasheets is often a good idea.Voltage RegulatorThe voltage regulator (14) is not actually something you can (or should) interact with on the Arduino. But it is potentially useful to know that it is there and what it’sfor. The voltage regulator does exactly what it says -- it controls the amount of voltage that is let into the Arduino board. Think of it as a kind of gatekeeper; it willturn away an extra voltage that might harm the circuit. Of course, it has its limits, so don’t hook up your Arduino to anything greater than 20 volts.The Arduino FamilyArduino makes several different boards, each with different capabilities. In addition, part of being open source hardware means that others can modify andproduce derivatives of Arduino boards that provide even more form factors and functionality. If you’re not sure which one is right for your project, check this guidefor some helpful hints. Here are a few options that are well-suited to someone new to the world of Arduino:Arduino Uno (R3)The Uno is a great choice for your first Arduino. It's got everything you need to get started, and nothing you don't. It has 14 digital input/output pins (of which 6can be used as PWM outputs), 6 analog inputs, a USB connection, a power jack, a reset button and more. It contains everything needed to support themicrocontroller; simply connect it to a computer with a USB cable or power it with a AC-to-DC adapter or battery to get started.LilyPad ArduinoThis is LilyPad Arduino main board! LilyPad is a wearable e-textile technology developed byLeah Buechley and cooperatively designed by Leah and SparkFun.Each LilyPad was creatively designed with large connecting pads and a flat back to allow them to be sewn into clothing with conductive thread. The LilyPad alsohas its own family of input, output, power, and sensor boards that are also built specifically for e-textiles. They're even washable!Page 5 of 13
RedBoardAt SparkFun we use many Arduinos and we're always looking for the simplest, most stable one. Each board is a bit different and no one board has everything wewant -- so we decided to make our own version that combines all our favorite features.The RedBoard can be programmed over a USB Mini-B cable using the Arduino IDE. It'll work on Windows 8 without having to change your security settings (weused signed drivers, unlike the UNO). It's more stable due to the USB/FTDI chip we used, plus it's completely flat on the back, making it easier to embed in yourprojects. Just plug in the board, select "Arduino UNO" from the board menu and you're ready to upload code. You can power the RedBoard over USB or throughthe barrel jack. The on-board power regulator can handle anything from 7 to 15VDC.Arduino Mega (R3)The Arduino Mega is like the UNO's big brother. It has lots (54!) of digital input/output pins (14 can be used as PWM outputs), 16 analog inputs, a USBconnection, a power jack, and a reset button. It contains everything needed to support the microcontroller; simply connect it to a computer with a USB cable orpower it with a AC-to-DC adapter or battery to get started. The large number of pins make this board very handy for projects that require a bunch of digital inputsor outputs (like lots of LEDs or buttons).Page 6 of 13
Arduino LeonardoThe Leonardo is Arduino's first development board to use one microcontroller with built-in USB. This means that it can be cheaper and simpler. Also, because theboard is handling USB directly, code libraries are available which allow the board to emulate a computer keyboard, mouse, and more!The Extended FamilyWhile your Arduino board sure is pretty, it can't do a whole lot on its own -- you've got to hook it up to something. There are lots of tutorials here on learn as wellas the links back in the 'What does it do' section, but rarely do we talk about the general kinds of things you can easily hook into. In this section we'll introducebasic sensors as well as Arduino shields, two of the most handy tools to use in bringing your projects to life.SensorsWith some simple code, the Arduino can control and interact with a wide variety ofsensors - things that can measure light, temperature, degree of flex, pressure,proximity, acceleration, carbon monoxide, radioactivity, humidity, barometric pressure, you name it, you can sense it!Page 7 of 13
Just a few of the sensors that are easily compatible with ArduinoShieldsAdditionally, there are these things called shields -- basically they are pre-built circuit boards that fit on top of your Arduino and provide additional capabilities -controlling motors, connecting to the internet, providing cellular or other wireless communication, controlling an LCD screen, and much more.Page 8 of 13
A partial selection of available shields to extend the power of your ArduinoFor more on shields, check out:ShieldList.orgShieldStravaganza!!! (A series of videos briefly explaining all of the shields we have at SparkFun)Part 1, Part 2, and Part 3Resources and Going FurtherNow that you know all about the Arduino family, which board you might want to use for your project, and that there are tons of sensors and shields to help takeyour projects to the next level. Here are some further readings that may help you along in learning more about the world of electronics.Looking for the right Arduino?Check out our Arduino Comparison Guide! We've compiled every Arduino development board we carry, so you can quickly compare them to find the perfectone for your needs.Take me there!Page 9 of 13
Arduino IDEBasic Electrical ConceptsArduino Board Pin FunctionsArduino Boards Comparison GuidesArduino ShieldsOther Tutorials and ProjectsSparkFun TutorialsInstalling an Arduino LibraryHow do I install a custom Arduino library? It's easy! This tutorial will go over how to install an Arduino library using the Arduino Library Manager. For libraries notlinked with the Arduino IDE, we will also go over manually installing an Arduino library.Favorited Favorite 22Installing Arduino IDEA step-by-step guide to installing and testing the Arduino software on Windows, Mac, and Linux.Favorited Favorite 16Installing Board Definitions in the Arduino IDEHow do I install a custom Arduino board/core? It's easy! This tutorial will go over how to install an Arduino board definition using the Arduino Board Manager. Wewill also go over manually installing third-party cores, such as the board definitions required for many of the SparkFun development boards.Favorited Favorite 3Arduino TutorialsGetting Started Introduction: What is Arduino and what I can use it for?Getting Started with Arduino and Genuino productsArduino Software (IDE)Arduino TroubleshootingArduino: Contact UsArduino Board Comparison GuidesChoosing an Arduino for Your ProjectExamining the diverse world of Arduino boards and understanding the differences between them before choosing one for a project.Favorited Favorite 5Standard Arduino Comparison GuideArduino Comparison Guide Uno or Pro Mini? Bluetooth or wireless? When it comes to Arduinos, there are a lot of choices. We've compiled every Arduinodevelopment RedBoard vs. UnoIn this tutorial we discuss the differences and similarities between the RedBoard and the Arduino Uno (SMD and PTH). The development platformsFavorited Favorite 13Getting Started with Arduino ShieldsArduino Shields v2An update to our classic Arduino Shields Tutorial! All things Arduino shields. What they are and how to assemble them.Favorited Favorite 5Other Arduino Shield Related TutorialsWiFly Shield Hookup GuidePage 10 of 13
How to get the WiFly Shield up and running.Favorited Favorite 3Photon OLED Shield Hookup GuideThe Photon OLED Shield has everything you need to add a small yet crisp OLED screen to your Photon projects. This hookup guide will show you how to getstarted.Favorited Favorite 10Thumb Joystick Hookup GuideWhether you're blasting aliens, driving a robot, or write your awesome classic Arcade Game for your Arduino, you'll find the analog thumb joystick a very usefuladdition to your projects!Favorited Favorite 4New!Getting Started with the MyoWare 2.0 Muscle Sensor EcosystemThe MyoWare 2.0 Muscle Sensor, an Arduino-compatible, all-in-one electromyography (EMG) sensor from Advancer Technologies. In this tutorial, we will goover the features and related shields to connect the sensor to a muscle group.Favorited Favorite 0Beginner Intermediate AdvancedClick the buttons above for tutorials relating to the board functionality based on topic difficulty.BeginnerSerial CommunicationAsynchronous serial communication concepts: packets, signal levels, baud rates, UARTs and more!Favorited Favorite 97Analog to Digital ConversionThe world is analog. Use analog to digital conversion to help digital devices interpret the world.Favorited Favorite 55Logic LevelsLearn the difference between 3.3V and 5V devices and logic levels.Favorited Favorite 78Analog vs. DigitalThis tutorial covers the concept of analog and digital signals, as they relate to electronics.Favorited Favorite 62Data Types in ArduinoLearn about the common data types and what they signify in the Arduino programming environment.Favorited Favorite 38How to Work with Jumper Pads and PCB TracesHandling PCB jumper pads and traces is an essential skill. Learn how to cut a PCB trace, add a solder jumper between pads to reroute connections, and repair atrace with the green wire method if a trace is damaged.Favorited Favorite 10IntermediateSerial Peripheral Interface (SPI)SPI is commonly used to connect microcontrollers to peripherals such as sensors, shift registers, and SD cards.Favorited Favorite 87I2CAn introduction to I2C, one of the main embedded communications protocols in use today.Favorited Favorite 122Processor Interrupts with ArduinoWhat is an interrupt? In a nutshell, there is a method by which a processor can execute its normal program while continuously monitoring for some kind of event,Page 11 of 13
or interrupt. There are two types of interrupts: hardware and software interrupts. For the purposes of this tutorial, we will focus on hardware interrupts.Favorited Favorite 8AdvancedInstalling an Arduino BootloaderThis tutorial will teach you what a bootloader is and why you would need to install or reinstall it. We will also go over the process of burning a bootloader byflashing a hex file to an Arduino microcontroller.Favorited Favorite 25Integrated CircuitsAn introduction to integrated circuits (ICs). Electronics' ubiquitous black chips. Includes a focus on the variety of IC packages.Favorited Favorite 44Reading and Writing Serial EEPROMsEEPROM is a great way to add extra memory to your microcontroller project. Wait 'til you see how easy it is to use!Favorited Favorite 14What is a Circuit?Every electrical project starts with a circuit. Don't know what a circuit is? We're here to help.Favorited Favorite 72Voltage, Current, Resistance, and Ohm's LawLearn about Ohm's Law, one of the most fundamental equations in all electrical engineering.Favorited Favorite 122How to Power a ProjectA tutorial to help figure out the power requirements of your project.Favorited Favorite 64Working with WireHow to strip, crimp, and work with wire.Favorited Favorite 45How to Use a BreadboardWelcome to the wonderful world of breadboards. Here we will learn what a breadboard is and how to use one to build your very first circuit.Favorited Favorite 71What is Electricity?We can see electricity in action on our computers, lighting our houses, as lightning strikes in thunderstorms, but what is it? This is not an easy question, but thistutorial will shed some light on it!Favorited Favorite 74Electric PowerAn overview of electric power, the rate of energy transfer. We'll talk definition of power, watts, equations, and power ratings. 1.21 gigawatts of tutorial fun!Favorited Favorite 51PolarityAn introduction to polarity in electronic components. Discover what polarity is, which parts have it, and how to identify it.Favorited Favorite 48How to Use a MultimeterLearn the basics of using a multimeter to measure continuity, voltage, resistance and current.Favorited Favorite 62LilyPad Basics: E-SewingLearn how to use conductive thread with LilyPad components.Favorited Favorite 16Guides for our Beginner KitsPage 12 of 13
Digital Sandbox Arduino CompanionLet's take the same examples from the ArduBlock-based Digital Sandbox guide, and implement them using Arduino code.Favorited Favorite 4Assembly Guide for RedBot with Shadow ChassisAssembly Guide for the RedBot Kit. This tutorial includes extra parts to follow to go along with the RedBot Inventor's Kit tutorial.Favorited Favorite 13SparkFun Inventor's Kit Experiment Guide - v4.0The SparkFun Inventor's Kit (SIK) Experiment Guide contains all of the information needed to build all five projects, encompassing 16 circuits, in the latestversion of the kit, v4.0a.Favorited Favorite 8Other Arduino Related TutorialsUSB Serial Driver Quick InstallHow to install USB serial drivers on Windows, MacOS , and Linux.Favorited Favorite 1SparkFun LoRa Gateway 1-Channel Hookup GuideHow to setup and use the LoRa Gateway 1-Channel in Arduino.Favorited Favorite 3Wireless RC Robot with Arduino and XBeesIn this tutorial, we will expand on the SIK for RedBot to control the robot wirelessly with XBee radios! We'll explore a different microcontroller and wirelesslycontrol the RedBot at a distance.Favorited Favorite 6Artemis Development with ArduinoGet our powerful Artemis based boards (Artemis Nano, BlackBoard Artemis, and BlackBoard Artemis ATP) blinking in less than 5 minutes using the SparkFunArtemis Arduino Core!Favorited Favorite 5learn.sparkfun.com CC BY-SA 3.0 SparkFun Electronics Niwot, ColoradoPage 13 of 13
Arduino is an open-source platform used for building electronics projects. Arduino consists of both a physical programmable circuit board (often referred to as a microcontroller) and a piece ofsoftware, or IDE (Integrated Development Environment) that runs on your computer, used