Transcription
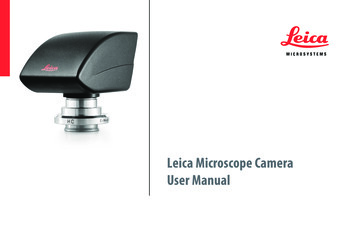
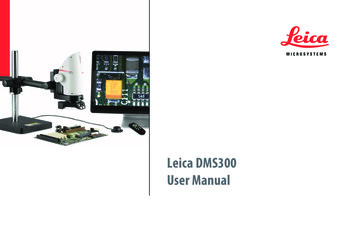
Leica DMS300User Manual
ContentsGeneral InstructionsGeneral Instructions Important Safety Notes Symbols Used Safety Instructions 5678IntroductionCongratulations! 11Standard Delivery 12System Overview – Boom Stand Configuration 13Overview of the Instrument 14System Overview – Standard Column Configuration 1516Effective Displayed Section AssemblyLeica DMS300 Swing-arm Stand Baseplate and Vertical Column Safety Ring and Horizontal Arm 10" Monitor Microscope Carrier and Leica DMS300 Objective Installation Installing the Leica Ring Light Leica DMS300 With Incident Light Stand 1818192021222325Leica DMS300 User Manual Incident Light Base and Focusing Column Microscope Carrier and Leica DMS300 10" Monitor Illumination: Installing the Leica LED3000 RL 25262728InstallationHD Mode (Standalone) Cables and Terminals, Activating HD Mode (Standalone) PC Mode Connecting a Computer, Installing Software, Activating PC Mode Limitations in PC Mode 3131323233Startup ProcedureLeica DMS300 Switching on the Leica DMS300 Switching on the Illumination Focusing, Adjusting the Resistance of the Focus Drive Changing Magnification, Click-stop Feature Remote Control Pairing Cameras With Remotes Configuring the Front Button or Footswitch 35353637383941422
Contents (Continued)OperationHD Mode (Standalone) Checking Cables and Terminals Switching on the Leica DMS300 Information About SD Memory Cards Capturing Images Without a Computer Displaying Images and Videos Without a Computer White Balance PC Mode Checking Cables, Terminals and Software Switching on the Leica DMS300 Additional Use of a HD Monitor in PC Mode 4545464748495051515253ServiceCare, Maintenance, Contact Persons Spare Parts 6972SpecificationsTechnical Data 7477Optical Data Dimensional Drawings 78Leica DMS300 7879Leica DMS300 With Incident Light Stand 80Leica DMS300 With Swing-arm Stand User Menu55Calling up the User Menu Automatic White Balance 56Manual White Balance 57Exposure 58Resolution 59Camera Settings 61User-Defined Settings 63Setting the Overlay (SETUP OVERLAY) 65Configuring Predefined Illumination Scenarios 67Leica DMS300 User Manual 3
General InstructionsLeica DMS300 User ManualGeneral Instructions 4
General InstructionsSafety conceptBefore using your Leica microscope for the firsttime, please read the "Safety Concept" bookletincluded with your instrument. It contains additional information on handling and care.Leica DMS300 User ManualCleaningODo not use any unsuitable cleaning agents,chemicals or techniques for cleaning.ONever use chemicals to clean coloredsurfaces or accessories with rubberizedparts. This could damage the surfaces,and specimens could be contaminated byabraded particles.ServicingRepairs may only be carried out by LeicaMicrosystems-trained service technicians.Only original Leica Microsystems spareparts may be used.OResponsibilities of person in charge ofinstrumentOEnsure that the Leica microscope is operated, maintained and repaired by authorized and trained personnel only.General Instructions 5
Important Safety NotesInstructions for UseYou can find information on individual systemcomponents on the interactive CD-ROMtogether with all relevant user manuals inadditional languages. Keep it in a safe place,and readily accessible to the user. User manuals and updates are also available for youto download and print from our websitewww.leica-microsystems.com.The "Safety Concept" booklet contains additional safety information regarding the servicework, requirements and the handling of themicroscope, accessories and electrical accessories as well as general safety instructions.To maintain the unit in its original condition andto ensure safe operation, the user must followthe instructions and warnings contained inthese user manuals.This operating manual describes the specialfunctions of the Leica DMS300 digital microscope system and contains important instructions for its operational safety, maintenance,and accessories.Leica DMS300 User ManualGeneral Instructions 6
Symbols UsedWarning! Safety hazard!This symbol indicates especially important information that is mandatory toread and observe. Warning of hazardous electrical voltageThis symbol indicates information thatmust be read and observed.Danger due to hot surfaceThis symbol warns against touching hotsurfaces, e.g. those of light bulbs.Failure to comply can cause the following:Failure to comply can cause the following:OOHazards to personnelFunctional disturbancesinstrumentsLeica DMS300 User ManualOOordamagedHazards to personnelFunctional disturbancesinstrumentsordamagedImportant informationThis symbol indicates additional information or explanations that are intended toprovide clarity.General Instructions 7
Safety InstructionsDescriptionOThe individual modules fulfill the highestrequirements for observation and documentation with the Leica DMS300 digitalmicroscope system.Intended UseORefer to "Safety Concept" bookletNon-intended useORefer to "Safety Concept" bookletNever use the Leica DMS300 or its componentsfor surgical procedures (such as eye surgery)since it is not intended for such use.The instruments and accessories described inthis User Manual have been tested for safety andpotential hazards. The responsible Leica affiliateLeica DMS300 User Manualmust be consulted whenever the instrument isaltered, modified or used in conjunction withnon-Leica components that are outside of thescope of this manual!Responsibilities of person in charge ofinstrumentORefer to "Safety Concept" bookletEnsure that:OThe Leica DMS300 digital microscopesystem and accessories are operated, maintained and repaired by authorized andtrained personnel only.OAll operators have read, understood andobserve this User Manual, and particularlythe safety regulations.Unauthorized alterations to the instrument ornoncompliant use shall void all rights to anywarranty claims.Place of useORefer to "Safety Concept" bookletOElectrical components must be placed atleast 10 cm away from the wall and fromflammable substances.OAvoid large temperature fluctuations, directsunlight and vibrations.OIn warm and warm-damp climatic zones,the individual components require specialcare in order to prevent the build-up offungus.General Instructions 8
Safety Instructions (continued)Repairs, service workORefer to "Safety Concept" bookletOOnly original Leica Microsystems spareparts may be used.OBefore opening the instruments, switch offthe power and unplug the power cable.OAvoid contact with powered electricalcircuits, which can lead to injury.TransportOUse the original packaging for shipping ortransporting the individual modules of theLeica DMS300 digital microscope systemand the accessory components.OIn order to prevent damage from vibrations,disassemble all moving parts that (according to the user manual) can be assembledand disassembled by the customer andpack them separately.Leica DMS300 User ManualIntegration in third-party productsRefer to "Safety Concept" bookletODisposalORefer to "Safety Concept" bookletLegal regulationsORefer to "Safety Concept" bookletEC Declaration of ConformityORefer to "Safety Concept" bookletOOptimal arrangement of workplace, workassignments and work flow (changing tasksfrequently).OThorough training of the personnel, givingconsideration to ergonomic and organizational aspects.The ergonomic optics concept and the designof the Leica DMS300 digital microscope systemaim to limit the strain on the user to the lowestpossible level.Health risksWorkplaces with microscopes facilitate andimprove the viewing task, but they also imposehigh demands on the eyes and holding musclesof the user. Depending on the duration of uninterrupted work, asthenopia and musculoskeletal problems may occur. For this reason, appropriate measures for reduction of the workloadmust be taken:General Instructions 9
IntroductionLeica DMS300 User ManualIntroduction 10
Congratulations!We congratulate you on purchasing theLeica DMS300 digital microscope system byLeica Microsystems. The special design of theLeica DMS300 makes it a universal tool for viewing microscopic specimens and capturing stillimages or even movies.Real Full HD displayThe integrated HDMI output allows the microscope image to be output to a high-definition(HD-capable) monitor, where the followingresolutions are possible:O1,920 1,080 (Full HD). This resolutionprovides the best possible imaging performance on a Full HD-capable monitor.O1,280 720 (HD ready). This resolution issuitable for display on monitors labeled"HD ready" or on smaller monitors with a10" or 12" diagonal.Leica DMS300 User ManualLeica Application Suite EZYour Leica DMS300 digital microscope systemincludes the "Leica Application Suite EZ"(LAS-EZ) software. It allows additional scenariosto be implemented in which an HD monitor andcomputer monitor can even be used together.This means you will be perfectly equipped forany situation, including: Working on a computer,during presentations, training sessions, tradeshow appearances, during materials testing andmore.User-friendly even in the smallest detailLike every digital camera, the Leica DMS300'sintegrated camera reacts differently to different light sources. However, the white balanceis matched to LED illuminators from Leica at thefactory. This means that if you use a Leica LEDilluminator, you automatically obtain the bestresults!If you want to perform advanced image analyses, the Leica Application Suite (LAS Core) andcountless (optionally available) LAS modules areavailable.Introduction 11
Standard DeliveryStandard delivery56781300239The Leica DMS300 digital microscope system'sstandard delivery includes:1. Digital Microscope System Leica DMS3002. Remote control unit, with 2 AAA batteries3. "Leica Application Suite EZ (LAS-EZ)"software DVD4. Hand/footswitch5. Connection for footswitch6. USB cable, for connecting to a computer or toa power supply unit for supplying power7. HDMI cable, for connecting to an HD monitor8. SD memory card9. Protective cover10. ObjectiveVarious functions can be assigned to the handswitch/footswitch (such as taking individualpictures, white balance).Additional information about workingon the computer and with Leica Application Suite EZ is provided in the software's onlinehelp.410Leica DMS300 User ManualIntroduction 12
System Overview – Boom Stand ConfigurationThis overview shows the Leica DMS300 in anexample application with additional components.172348951.2.3.4.5.6.7.8.9.10.11.HD monitor or computer with LAS EZ softwareHorizontal armCross-memberSafety ringColumnBaseplate10" monitorMonitor holderMicroscope carrierLeica DMS300Leica ring light illuminator61011Leica DMS300 User ManualIntroduction 13
Overview of the Instrument91011 30061.2.3.4.5.6.7.8.9.10.11.12.13.14.15.Card holder for SD cardFront buttonStatus lightIR receiver, for remote controlZoom knobClick-stop sliderLeica DMS300 mounting fixture in the microscope carrierProtective coverHDMI connectionUSB connectionConnection for footswitchMode switch, for PC or HD modeOn/off switchReset buttonObjective78Leica DMS300 User ManualIntroduction 14
System Overview – Standard Column ConfigurationThis overview shows the Leica DMS300 in anexample application with additional components.1.2.3.4.5.6.6Leica DMS300Microscope carrierIlluminationFocusing columnBaseplateHD monitor or computer with LAS software12345Leica DMS300 User ManualIntroduction 15
Effective Displayed SectionThe live image on the HD monitor andthe final captured image may not showthe same section depending on the sensor sizein the microscope.1. Live image in 16:9 format, displayed on theHD monitor2. Captured image in 4:3 format, displayed onthe computer or saved to an SD card.1Leica DMS300 User Manual2Introduction 16
AssemblyLeica DMS300 User ManualAssembly 17
Leica DMS300 Swing-arm StandBaseplate and Vertical ColumnInstructions for safe assemblyDue to the heavy weight of the baseplate, improper use can cause injuriesor damage to the surrounding area. For safetyreasons, use two people for this part of thesetup.Assembling the column1. Push the tapping screw through the baseplate from below.2. Fit the serrated lock washer onto the screw.3. Install the vertical column on the base plateusing the screw.3213Leica DMS300 User ManualAssembly 18
Safety Ring and Horizontal ArmInstalling the safety ringMounting the horizontal armFastening the horizontal arm122112131. Push the safety ring over the column.2. Securely tighten the clamping screw.The safety ring is the most importantsafety element of the entire configuration. It protects the horizontal arm from accidentally falling down.Leica DMS300 User Manual1. Push the cross-member with the horizontal arm over the column so that the crossmember lies securely on the safety ring.2. You can now rotate the horizontal arm inany direction desired.The swing-arm stand is designed sothat the Leica DMS300 can be moved asdesired.1. Rotate the horizontal arm into a secure position.2. Carefully tighten the clamping screw on thecross-member to prevent the joint on thecolumn from rotating.3. Tighten the clamping screw to prevent thearm from extending.For safety reasons, you should fasten thehorizontal arm in place when you leaveyour workstation.Assembly 19
10" MonitorInstall on the horizontal armInstall on the vertical arm2214131. Remove the clamping screw.2. Install the monitor holder on the horizontalarm.3. Fasten the monitor holder to the clampingscrew.1. Install the monitor holder on the verticalarm.2. Fasten the monitor holder to the clampingscrew.4. Reinstall the clamping screw.Leica DMS300 User ManualAssembly 20
Microscope Carrier and Leica DMS300Assembling the microscope carrierFree movement of the microscopeAssembling the Leica DMS300LEICA DMS30022211. Insert the connecting pin from below intothe bore of the horizontal arm.2. Fasten the microscope carrier in place usingthe washer and safety screw.131. Unscrew the clamping screw.2. Place the Leica DMS300 in the microscopecarrier so that the notch in the microscopehousing and the lower clamping screwoverlap.The microscope can be rotated freely togetherwith the microscope carrier.3. Fasten the microscope in place using theclamping screw.Leica DMS300 User ManualAssembly 21
Objective InstallationInstructions for safe assemblyHold the objective firmly during assembly and disassembly so that it does notfall onto the stage plate. Remove all specimensfrom the stage plate first.Assembly 11. Remove the protective cap on the opticscarrier by turning it.Leica DMS300 User Manual22. Screw the objective into the optics carrier.Assembly 22
Installing the Leica Ring LightAssembly of the Leica ring light illuminator3001231. Connect the external power supply unit tothe Leica ring light illuminator.2. Attach the Leica ring light illuminator to theobjective from below.Ensure that the locking screw of the illuminator and the locking screw of theoptics carrier are on a straight line.Connect the power supply to the power cable.3. Tighten the locking screw.Leica DMS300 User ManualAssembly 23
Illumination: Leica Ring Light Illuminator (Continued)Assembly of the diffuser11. The diffuser is attached and screwed inbelow the ring light illuminator.We recommend assembling the diffuseron the Leica ring light illuminator on atable in reverse and then mounting them on theobjective together.Leica DMS300 User ManualAssembly 24
Leica DMS300 With Incident Light StandIncident Light Base and Focusing ColumnGeneral notesThis chapter shows an example of assembly of the Leica DMS300 on an incidentlight base. Images and descriptions may varywhen using another incident light base.Assembling the column1. Take the three provided screws out of thepackaging.2. Install the incident light base on the columnusing the three screws.12Leica DMS300 User ManualAssembly 25
Microscope Carrier and Leica DMS300Assembling the Leica DMS300Assembling the microscope carrier2LEICA DMS300211. Fasten the microscope carrier to the columnusing the provided Allen key and theprovided screw (recommended variant forobjectives with a small working distance).122. Alternatively, the microscope carrier canalso be installed upside-down (recommended variant for objectives with a largeworking distance).2131. Unscrew the clamping screw.2. Place the Leica DMS300 in the microscopecarrier so that the notch in the microscopehousing and the lower clamping screwoverlap.3. Fasten the microscope in place using theclamping screw.Leica DMS300 User ManualAssembly 26
10" MonitorInstall on the column1. Align the mounting pins so that they arealigned with the vertical slot in the back ofthe focus column.2. Insert the pins into the slot so that themounting bracket is firmly seated on thefocus column3. Rotate the thumb screw so that the mounting pins rotate 90 clockwise.Leica DMS300 User Manual4. Slightly pull out on the thumb screw so thatthe mounting pins remain in place.5. While pulling out on the thumb screw,rotate clockwise to lock the monitor mounting bracket in place.7. Once the monitor bracket is secure, adjustthe monitor using the knob on the mounting arm to move the monitor to the optimalworking position.6. The bracket can be positioned as desired onthe back of the column.Assembly 27
Illumination: Installing the Leica LED3000 RLInstalling the Leica LED3000 RL1231. Connect the external power supply unit(10 450 266) to the Leica LED3000 RL.2. Attach the Leica LED3000 RL to the objective from below.4Ensure that the locking screw of the illuminator and the locking screw of theoptics carrier are on a straight line.Connect the power supply to the power cable.3. Tighten the locking screw.The supported working distance isbetween 60 mm and 150 mm.Leica DMS300 User ManualAssembly 28
Illumination: Installing the Leica LED3000 RL (Continued)Installing optional accessories11. The optional diffuser is attached andscrewed in below the ring illuminator.We recommend assembling the accessories on the Leica LED3000 RL on a table inreverse and then mounting them on the objective together.Leica DMS300 User Manual11. The optional polarization set (polarizer andanalyzer) is attached and screwed in belowthe ring illuminator. The provided smallmetal plate is used as a fastening aid in theprocess.Assembly 29
InstallationLeica DMS300 User ManualInstallation 30
HD Mode (Standalone)Cables and Terminals, Activating HD Mode (Standalone)General instructionsThe Leica DMS300 is designed for the useof HD-capable (high definition)monitors. We highly recommend connecting the HDmonitor using an HDMI connector and not usinga DVI adapter, as otherwise proper function canno longer be guaranteed!Please only connect the provided 5 Vpower supply unit. Using an incorrect voltage can substantially damage theLeica DMS300.Activating HD mode (standalone)Power supply and monitor2bPCHDFOF12a1. Set the mode switch to "HD" in order to setthe Leica DMS300 to HD mode (standalone).2I1. Connect the Leica DMS300 to a suitableDMHpower socket using the USB cable andpower supply.2a. Connect the Leica DMS300 to the HD monitor using the HDMI cable. Or:2b. Connect the Leica DMS300 to the 10" monitor using the HDMI cable. Connect the10" monitor to a suitable power socket.Leica DMS300 User ManualONAn SD card with sufficient free memorymust be inserted into the Leica DMS300in order to save images in HD mode (standalone).In order to avoid instrument malfunctions, do not connect the Leica DMS300to a computer while in HD mode (standalone).Installation 31
PC ModeConnecting a Computer, Installing Software, Activating PC ModeInstallation and connectionFor instructions on installing and usingthe software for PC mode, refer to theDVD provided with the Leica DMS300.1. Place the DVD provided into the computer'sdisk drive and follow the instructions forinstalling the software.Activating PC modeThe Leica DMS300 is powered by thecomputer via the USB cable. This changesthe color of the status light. The status light isred when switching on the Leica DMS300; assoon as it is green, you can open the softwareand view, record or manage images.PC222. Connect the Leica DMS300 to the computerusing the USB cable.Leica DMS300 User ManualONHDFOF1. Set the mode switch to "PC" in order to setthe Leica DMS300 to PC mode.ONHDPCFOFMIHD3. Follow the instructions in the software foradjusting and recording an image.Leica Application Suite has to be installedon the computer in order to use theLeica DMS300 in PC mode. The computer alsohas to have sufficient free hard drive space.Installation 32
Limitations in PC ModeOperationThe Leica DMS300 is controlled entirelyvia the computer in PC mode. The frontbutton, the remote control and the footswitchdo not work. The menus for the camera are alsonot displayed on the HD monitor. Status information can be retrieved at any time despite thisby usingon the remote control.Aspect ratioImages cannot be saved onto the SD cardin PC mode.4:316:9Images are always output in a 4:3aspect ratio when the Leica DMS300 isconnected to a computer – even if a 16:9 monitor is connected via HDMI. However, the imageis displayed correctly on these kinds of devices,just with black on the screen edges.Leica DMS300 User ManualInstallation 33
Startup ProcedureLeica DMS300 User ManualStartup Procedure 34
Leica DMS300Switching on the Leica DMS300HD mode (standalone)PCONHDPC ModeIf the Leica DMS300 is connected to anHD monitor in PC mode:1OFOF2Ensure that the objective is screwed ontothe microscope, the mode switch is set to"HD" and the HD monitor is switched on.PCthe remote control does not respond;in other words, the user menu does notappear.OOn the HD monitor, a live image is shownin 4:3 aspect ratio (with black bars right andleft).OThe menu does not appear.OThe message "No camera" appears whenstarting the LAS-EZ software.ONHD1FOF3Ensure that the objective is screwed ontothe microscope, the mode switch is set to"PC" and the computer monitor is switched on.1. Set the on/off switch to "ON" to switch onthe Leica DMS300.1. Set the on/off switch to "ON" to switch onthe Leica DMS300.2. The status light's LED switches from red togreen, a signal tone sounds and the liveimage is displayed on the HD monitor - theLeica DMS300 is ready to use.2. Start Leica Application Suite.Leica DMS300 User Manual3The status light's LED switches from red togreen, a signal tone sounds and the liveimage is displayed on the computer – theLeica DMS300 is ready to use.Startup Procedure 35
Switching on the IlluminationGeneral instructionsThe light from the Leica LED illuminatorcan be very bright. Avoid looking directlyinto the LEDs.The intensity of the illuminator can beadjusted in 10 increments.When pressing the buttons, hold thekeypad between your thumb and indexfinger. Avoid tapping the keypad with just onefinger if possible.Leica DMS300 User ManualUse11. Switch on the illuminator by briefly pressingthe(ON/OFF) button. The green LED onthe upper left corner now lights up.232. Adjust the brightness by briefly pressing theorbuttons.3. Switch off the illuminator by briefly pressingthebutton.Startup Procedure 36
Focusing, Adjusting the Resistance of the Focus DriveFocusingFocusing raises or lowers the microscope usingthe focusing drive. The specimen detail isbrought into sharp focus as soon as it is in thefocal point of the objective.OThe focusing drive can be operated eitherleft- or right-handed.Adjusting the resistanceIs the focusing drive too loose or too tight? Doesthe equipment tend to slide downwards? Theresistance can be adjusted individually depending on the equipment weight and personal preferences as follows:300300111. Grip the drive knobs with both hands andturn them towards each other until thedesired resistance is reached during focusing.Boom StandLeica DMS300 User ManualIncident light baseStartup Procedure 37
Changing Magnification, Click-stop FeatureEnabling and disabling click stopsChanging the magnification (zoom)2321. Look at the HD monitor.2. Focus on the specimen.3. Rotate the magnification changer until thedesired magnification is configured or it hasto be refocused.5.04.053.31300The magnification changer can optionallybe operated either with or without clickstops enabled. Continuous zoom is possiblewhen the click stops are disabled, which manyusers find convenient.6.01Parfocality: The Leica DMS300 is parfocally matched. If the specimen is in focusat the highest magnification level, this remainstrue across the entire magnification range.21. Push the button towards the knob to enablethe click stops.2. Push the button away from the knob todisable the click stops.The rotary knob for the zoom can be usedeither left or right-handed.Leica DMS300 User ManualStartup Procedure 38
Remote ControlGeneral instructionsDescription101112Always keep the remote control for controllingthe Leica DMS300 pointed towards the microscope's IR receiver.The remote control does not respondif the microscope is connected to acomputer.Instead of the remote control, the frontbutton or the footswitch (depending onthe configuration) can be used to trigger theLeica DMS300.Leica DMS300 User Manual13132564781. Start/stop video recording2. Save still image to SD card3. Stop/continue live image,pause/play movie clip4. View files on SD card5. Move to previous image on SD card6. Move to next image on SD card7. Brightness adjustment up or down8. Pairing button9. Show/hide information box10. White balance set button11. Call up the camera menu12. Arrow keys for navigation13. OK to confirm79Startup Procedure 39
Remote Control (Continued)Changing the batteriesChecking the batteries1. Switch on the microscope and HD monitorso that you see the live image on the HDmonitor.122Leica DMS300 User Manual2. Hold the remote control in the beam pathso that it faces upwards and press any key.1. Remove the battery cover on the rear side ofthe remote control.Because the microscope's chip also responds tothe infrared range, you can see how the LED ontop of the remote control lights up on the HDmonitor. If this is not the case, the batteries needto be changed.2. Replace the batteries (2x AAA) and close thebattery cover.For the battery replacement, you needtwo (2) type AAA batteries.Startup Procedure 40
Pairing Cameras With RemotesPairingThe Leica DMS300 and the remotecontrol can be paired and then onlyrespond to each other. This can be helpful whenusing multiple cameras and remote controls.1. Press theprocess.button to start or end the3. The microscope only responds to theremote control commands from the remotecontrol used for the pairing.Resetting to factory setting1. Press the buttonto start the process.until a corresponding2. Press the buttonconfirmation is displayed on the HD monitor.In order to achieve successful pairingand avoid pairing by mistake, the secondstep must be performed within 4 seconds.If a "timeout" is displayed after 4 seconds,press the "Pair" button again to start theprocess.2. Press and hold the button on your remotecontrol representing the channel that youwant to assign to the connection (seeimage to the right, channel selection) untila corresponding confirmation is displayedon the HD monitor. All of the buttonsexcept thebutton can be used for this.Leica DMS300 User ManualSee more on this topic in our online videos atour website www.leica-microsystems.com.Startup Procedure 41
Configuring the Front Button or FootswitchGeneral instructionsConfiguring1. Point the remote control towards theLeica DMS300.4. Select "FRONT BUTTON" for the front buttonor "FOOT SWITCH" for the footswitch:2. Press the buttonto show the user menuon the computer monitor.3. Select "SETUP USER" in the main menu:Both the Leica DMS300's front button andfootswitch can be configured with the remotecontrol as defined by the user.The default setting is "CAPTURE" forcapturing an image.The Leica DMS300's front button andfootswitch do not work in PC mode.Leica DMS300 User ManualStartup Procedure 42
Configuring the Front Button or Footswitch (Continued)5. The following configurations are possible byselecting the corresponding option:ONONE: No FunctionOCAPTURE: Capture an image and save it tothe SD card.OSHOW LAST: Show a preview of the mostrecently acquired image.OMOVIE: Start video recording or stop a videorecording that is in progress. Saved to theSD card as an MP4 file.OOVERLAY: Show crosshair or overlay. Pressing this button multiple times scrollsthrough the list of crosshairs or overlays.OWHITE BAL: Run white balance for colorcorrecting the camera. For additional information on white balance, refer to page 50.See more on this topic in our online videos atour website www.leica-microsystems.com.Leica DMS300 User ManualStartup Procedure 43
OperationLeica DMS300 User ManualOperation 44
HD Mode (Standalone)Checking Cables and TerminalsGeneral instructionsThe Leica DMS300 is designed for the useof HD-capable (high definition) monitors.We highly recommend connecting the HD monitor using an HDMI connector and not using aDVI adapter, as otherwise proper function can nolonger be guaranteed!Please only connect the provided 5 Vpower supply unit. Using an incorrect voltage can substantially damage the Leica DMS300.HD mode (standalone)Power supply and HD monitor2bPCONHDFOF12a1. Check whether the mode switch is set to"HD" (standalone).2IM1. Check that the Leica DMS300 is properlyHDsupplied with power via the USB powersupply.An SD card with sufficient free memorymust be inserted into the Leica DMS300in order to be able to save images in HD mode(standalone).2a. Check whether the Leica DMS300 isconnected to the HD monitor properly via theHDMI cable. Or:2a. Check whether the Leica DMS300 isconnected to the 10" monitor with the HDMIcable and the monitor is attached to a powersocket.Leica DMS300 User ManualOperation 45
Switching on the Leica DMS300Switching on the Leica DMS300 (standalone)En
Leica DMS300 User Manual General Instructions 9 Safety Instructions (continued) Repairs, service work O ORefer to "Safety Concept" booklet O Only original Leica Microsystems spare parts may be used. O Before opening the instruments, switch off the power and unplug the power cable. O Avoid con