Transcription
DVR 786HDFull HD Action CamcorderUser Manual 2009-2014 Sakar International, Inc. All rights reserved.Windows and the Windows logo are registered trademarks of Microsoft Corporation.All other trademarks are the property of their respective companies.
CONTENTSIntroduction . 2What’s Included . 3Parts of the Camcorder . 4Initial Camcorder Setup . 5Remote Control . 10Main Camcorder Modes . 11Camcorder Technical Specifications . 12Camcorder Mounts and Accessories . 13Powering On Your Camcorder . 16Changing Camcorder Mode . 17Navigating the Menus. 18Video Capture Mode . 19Photo Capture Mode . 23Playback Mode . 27Menu Options . 31Computer System Requirements . 45Installing the Software . 46Connecting the Camcorder to the Computer . 47Getting Photos and Videos from the Camcorder to the Computer . 48Getting Started! . 49Transferring Images Manually from the Camcorder to the Computer . 49Camcorder Maintenance . 51Sakar Warranty Card . 53Technical Support . 54Troubleshooting . 541
IntroductionThank you for purchasing this digital HD Action Camcorder. Everything you need to take qualitydigital videos and photos is included with your camcorder.Vivitar makes capturing those special moments as easy as possible.Please read this manual carefully first in order to get the most out of your digital camcorder.NOTE: Your digital action camcorder supports a Micro SD Memory Card (up to 32GB, Class 4 orhigher).In order to use your digital action camcorder normally, please insert the Micro SD Memorycard before use.Micro SD Memory cards are not included and need to be purchased separately. This camera is a plug and play device. You can download the pictures and videos withoutthe software by directly accessing the memory card from your computer. We wouldhowever recommend that you install the ‘Vivitar Experience Image Manager’ Software toenjoy the full Vivitar experience.2
What’s Included1. Action Camcorder6. Waterproof Casing2. USB Cable7. Bicycle Mount3. AC Adapter8. Helmet Mount & Band4. Vivitar Experience Installation CD5. Remote ControlNOTE: Camera shield and Built-in Lithium Battery included (not shown). Micro SD Card not included.3
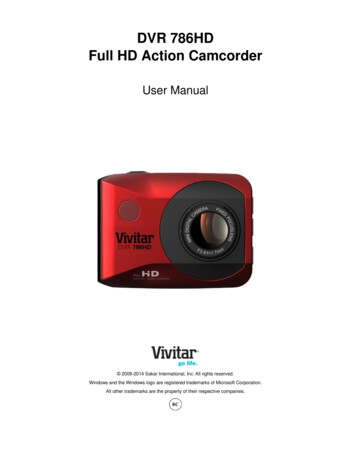
Parts of the Camcorder1. Shutter / OK button9. Down / Zoom Out Button2. Microphone10. Menu / Back Button3. Power / Mode Button11. Infrared Signal Reception Light4. Tripod Mount12. Lens5. Reset Button13. LCD Screen6. Micro SD Memory Card Slot14. LED Charge Light Indicator7. USB Interface15. LED Busy Light Indicator8. UP / Zoom In Button4
Initial Camcorder SetupCHARGING THE BATTERYTo charge the battery, follow either one of the charging methods below:CHARGING VIA THE COMPUTER1. Power off the camera.2. Use the supplied USB cable to connect the smaller end of the USB cable into the USBslot on the camcorder. Connect the other end to the USB interface of your computer.See images below: 1 and 2.3. The LED charge light turns on while charging is in progress. The charge light turns offwhen the battery is fully charged.See images below: 3 and 4.5
CHARGING VIA THE AC ADAPTER1. Power off the camera.2. Use the supplied USB cable to connect the smaller end of the USB cable into the USBslot on the camcorder. Connect the other end to the cable to the AC Adapter and thenplug the AC Adapter into a power socket. See images below: 1 and 2.3. The charge light will turn off when the battery is fully charged.See images below: 3 and 4.6
BATTERY INDICATORThe following icons appear on the camera and indicate the status of the camera’s battery powerlevel:Battery IndicatorDescriptionThe battery level is full.The battery level is half.The battery level is low, indicating to prepare forrecharging the built-in lithium battery.Once ‘Low Battery’ appears on the LCD, this indicatesthat the battery level is completely exhausted and thecamcorder automatically turns off after a few seconds.Please fully recharge the battery.7
INSTALLING THE MICRO SD MEMORY CARDMake sure a Micro SD Memory card Class 4 or higher (up to 32 GB) has been properly insertedinto your camcorder.Micro SD Memory card not included.To properly insert the Micro SD Memory Card:1. Power off the camcorder.2. Insert the Micro SD Card into the Micro SD Card slot in the direction as shown on thecamcorder (see SD icon by the Micro SD card slot).3. Gently press the Micro SD Card until you hear a slight clicking sound. This indicates thememory card has been inserted correctly.4. To remove the card, gently press on the edge of the card to release it and pull the cardout.5. If the card is inserted or removed while the camcorder's power is on, it may damage thecard and/or any recorded data. Always confirm that the power is off before inserting thecard into the camcorder.NOTE: Make sure there is room on the Micro SD Memory Card to capture images. If thememory card is full, additional images cannot be captured and saved to the card.8
TURNING ON AND USING THE CAMERAPress the POWER button, located on top of the camcorder, to turn on the camcorder./ Switching ModesNOTE: If the camcorder becomes unresponsive, insert a thin pin into the RESEThole and gently push the pin until you hear a slight ‘click’ sound. The camcorder willthen reset.9
Remote ControlSignal emission portPower off buttonVideo buttonPhoto buttonInfrared signal reception lightYou can use the remote control to record videos, take photos and shut down the Mini ActionCamcorder. When using the remote control, aim the signal emission to the port to the infraredsignal reception light of the camcorder, and then press the Video button, Photo (Snap) button orPOWER OFF button.Remote Control Buttons:-Video Button: Press the Video Button to start recording your video. Press the VideoButton again to stop recording the video.-Photo (Snap) Button: Press the Photo (Snap) Button to automatically open the PhotoCapture Mode and take a Photo.-Power Off: Press the Power Off Button to turn off your camcorder. To power on again,press the Power button on the camcorder.10
Main Camcorder ModesVIDEO CAPTURE MODEUse this mode to capture videos with your digital camcorder.Slide the MODE Switch to the Video Capture icon to open the Video Capture Mode.To take a video, aim your camcorder as desired and press the Shutter button to startrecording. A blinking, red record indicator appears on the LCD screen while the recordingis in progress. To stop the recording, press the Shutter button again. The video isautomatically saved to your camcorder’s memory card.PHOTO CAPTURE MODEUse this mode to capture pictures with your camcorder.Slide the MODE Switch to the Photo Capture icon to open the Photo Capture Mode.To take a picture, aim your camcorder as desired and press the Shutter button.The picture is automatically saved to your camcorder’s memory card.PLAYBACK MODE (PHOTOS & VIDEOS)Use this mode to view and manage the photos and videos on your camcorder.Slide the MODE Switch to the Playback icon to open the Playback mode for photos andvideos. You can scroll through the photos and videos that you’ve previously taken to viewor delete them as desired.11
Camcorder Technical SpecificationsImage SensorCMOS SensorFHD (1920x1080P@30fps), HD720P (1280X720@60fps),Video ResolutionHD720P (1280X720@30fps)12M (4000x3000), 8M (3264x2488),Photo Resolution5M (2592x1944), 1M (1280x960)File FormatAVI/MOV (Video), JPEG (Photo)External MemoryMicro SD Memory card, Class 4 or higher, up to 32GBLCD Display2.0”TFTZoom4X Digital ZoomFocus Range2.8MWhite BalanceAuto, Daily, Cloudy, Fluorescent H, TungstenLight Exposure (Photo) 2, 1, Auto, -1, -2MeteringCenter, Multi, SpotAuto Power OffOff, 1 min., 3 min., 5 min.English, French, Spanish, Italian, Portuguese, Polish,LanguagesRussian, GreekInterfaceMicro USBMICROSOFT Windows XP (SP3), Vista (SP1) or 7System RequirementsMACINTOSH OSX v10.5.x and aboveBatteryBuilt-in 700mAH Lithium Battery12
Camcorder Mounts and AccessoriesWATERPROOF CASE231. Clamp2. Shutter Release3. Power/Mode Button4. Tripod Mount14Your action camcorder comes with a waterproof casing for underwater action and addeddurability. To assemble your camera to the case, follow the instructions below:1. To open the case: Insert a finger at the half circle of the latch by prying the latch up - awayfrom the case.2. Insert the camera lens forward into the case.3. Before sealing the waterproof case, make sure the camera housing’s rubber seal clean.Close the door and secure the latch.4. While the camcorder is in the waterproof casing, press the POWER/MODE button to selectVideo Capture Mode, Photo Capture Mode or Playback Mode. Press the Shutter buttonfor recording your videos and capturing your photos.13
NOTE: A single hair or grain of sand can cause a leak. You can test by closing the case withoutinserting the camera. Submerse the case completely in water for about a minute. Removethe case from the water, dry off its exterior with a towel, and then open the case. If theentire interior is dry, the case is safe for use under water. Before opening the waterproof casing and putting the device in, carefully check whetherthe waterproof ring of the casing is flat and smooth. After placing the device into the waterproof casing and closing the cover, carefully checkwhether the waterproof ring is deformed due to pressure. After every use in salt water you will need to rinse the outside of the housing with non-saltwater and dry. Not doing this can eventually cause corrosion of the hinge pin and saltbuildup in the seal, which can cause failure. To clean the seal, rinse in fresh water and shake dry (drying with a cloth may cause lint tocompromise the seal). Re-install the seal into the grooves of the housing.14
INSTALLING THE BICYCLE MOUNT: HANDLEBAR CLAMPINSTALLING THE HELMET MOUNTING SYSTEM15
Powering On Your CamcorderTURNING POWER ON AND OFF1. Press and hold the POWER button for about 3 seconds to turn on the camcorder.The LCD screen briefly displays the ‘Vivitar’ screen and opens the default Video CaptureMode. A beep can be heard from the camcorder’s buzzer.2. Press and hold the POWER button again for about 3 seconds to turn the power off.The LCD screen briefly displays ‘Goodbye’ screen and then powers off.A beep canalso be heard from the buzzer as the camcorder is being powered off.AUTO POWER OFF – POWER SAVING FEATURE:Your digital camcorder includes an Auto Power Off power feature that automatically turns off yourcamcorder after a specified time that your camcorder is left idle. The specified time can be setusing the ‘Power Save’ menu option. Once the camcorder is automatically powered off, you canlong press the POWER button to power on the camcorder.16
Changing Camcorder ModeTHREE MAIN MODES1. Video Capture Mode - Use this mode to capture videos with your camcorder.2. Photo Capture Mode - Use this mode to capture photos with your camcorder.3. Playback Mode (for photos and videos) – Use this mode to view your captured photosand videos. When the camera is first powered ON, the Video Capture Mode will be active. The icons that appear on the LCD screen are the best default settings so that you can begin tocapture and enjoy clear quality photos and videos.SWITCHING MODESAfter turning on the camcorder, you can press the POWER/MODE button to switch between thethree modes in turn: In Video Capture Mode, press the SHUTTER button to start recording and press it againto stop. In Photo Capture Mode, press the SHUTTER button to take photo. In Playback Mode, press the SHUTTER button to play back your captured Video.When in Video Capture Mode, this icon will display on the top-left corner of the LCD display.When in Photo Capture Mode, this icon will display on the top-left corner of the LCD displayWhen in Playback Mode, this icon will display on the top-left corner of the LCD display.17
Navigating the MenusPHOTO CAPTURE, VIDEO CAPTURE AND PLAYBACK MENUSTo access the Main Menu for each Mode:1.Press the MENU button to open the Main Menus for the current mode.2.Press the DOWN or UP button to select a specific menu.The selected option appears highlighted.3.Press the SHUTTER/OK button to confirm and save your selection and open the options forthe menu you have selected.To select a specific option, press the DOWN or UP button and then the SHUTTER/OK4.button to save the selected option and return to the Main Menu.NOTE:To go back from the submenus or exit the Main Menu, press the MENU button.GENERAL CAMCORDER SETTINGS MENUSTo access the General Camcorder Settings Menu:1. Press the MENU button while in the Photo Capture, Video Capture or Playback Mode.2. Short press the POWER/MODE button to select the General Camcorder Settings icon.3. Press the DOWN or UP button to select a specific menu.4. Press the SHUTTER/OK button to confirm and save your selection and open the options forthe menu you have selected.5. To select a specific option, press the DOWN or UP button and then the SHUTTER/OKbutton to save the selected option and return to the Main Menu.NOTE: At any time you can press the MENU button to exit the menus and return to the previousscreen. Once you change a setting, the setting is saved by your camera until you manually changethe setting or restore the camera’s default factory settings. After selecting your desired setting, some settings appear as an icon on the LCD screen inCapture Mode – indicating the option selected.18
Video Capture ModeThe Video Capture Mode allows you to capture videos with your digital camcorder.When first powering on your camcorder, Video Capture Mode appears.The Video Capture icon appears on the LCD screen.TAKING A VIDEO1. Selecting the Scene with the LCD Display:While in Video Capture Mode use the LCD display to direct the camcorder at the sceneyou would like to capture.NOTE: The time available for video capture (as per the installed memory card size andselected resolution) is shown on the top right of the LCD screen.2. Zoom Options:Press the UP / ZOOM IN or DOWN /ZOOM OUT button to better set the camcorderdisplay if desired.NOTE: While using the Zoom options, the zoom magnification is indicated on the top rightof the LCD screen.3. Changing Resolution:If you would like to change the resolution, press the MENU button and then press the DOWN button to select ‘Movie Size’. Next, press the SHUTTER/OK button to view theMovie Size options. Press the UP / DOWN button to select an option and thenpress the SHUTTER/OK button to confirm the option.The Movie Size options include:1080P -FHD 1920x1080P@30fps720P -HD720P 1280X720@60fps720P -HD720P 1280X720@30fps4. Capturing the Video:START: Press the SHUTTER button to start the video capture.The camcorder’s LED busy light turns on and blinks. All icons disappear and the elapsedtime appears on the top right corner of the LCD screen along with a blinking ‘ REC’ icon19
that indicates the recording is in progress.STOP: To stop the video recording, press the SHUTTER button again.5. The video is automatically saved to the camcorder’s Micro SD Memory card.NOTE: When using the Waterproof Case, make sure to set the zoom and camcorder settings beforeplacing it into the case. While capturing your video, after approximately one minute of video capture, the LCD displayturns off in order to save power. The busy LED light remains on and the video continues to becaptured. Press the SHUTTER button to reactivate the LCD display.VIDEO CAPTURE MODE BUTTONSButtonSHUTTER/OKDescription START/STOP: Starts and stops the video capture. ENTERS and SAVES SELECTION: Within the Menu, enters and savesthe selected Menu Option.Opens and exits the menu options for Video Capture Mode and GeneralMENUCamera Settings.NOTE: Use the UP/DOWN/POWER buttons to navigate. LONG PRESS: Powers the camcorder on/off. SHORT PRESS:-POWER / MODEStandby Mode: Toggles between the Video Capture Mode, Photo CaptureMode and Playback Mode.-Menu Mode: Toggles between the current mode menu and the camcordersetting menus. UP DOWN ZOOM: Zooms IN NAVIGATES MENU: Navigates within the Menus. ZOOM: Zooms OUT NAVIGATES MENU: Navigates within the Menus.20
VIDEO CAPTURE MODE LCD ICON STATUS DESCRIPTIONThe following icons appear on the LCD screen and indicate the selected menu options andcamera status.ItemFunctionDescriptionDisplays the current selected Mode:1Mode SelectionVideo Capture ModeDisplays the selected Video Quality Setting.2Video QualityThe Video Quality options include:Super Fine, Fine, Normal3Video ResolutionDisplays the selected Resolution Setting.SelectionThe Resolution options include:21
1080P - FHD 1920x1080P@30fps720P -HD720P 1280X720@60fps720P -HD720P 1280X720@30fps Standby Mode: Displays the amount of timeavailable for video capture as per selected videoresolution and memory card size.Video Counter /4Record Indicator Record Mode: Displays the elapsed time as thevideo is being recorded and a blinking ‘ REC’icon appears. Note that all Standby icons do notappear while recording is in progress.Displays the zoom magnification amount as you5Zoom Indicatorpress Zoom In and Zoom Out. x1.0 – x4.0Displays the current status of the battery level.The battery level is full.6Battery IndicatorThe battery level is empty. Indication torecharge the battery.22
Photo Capture ModeThe Photo Capture Mode allows you to capture photos with your digital camcorder.To enter Photo Capture Mode, power on the camcorder and then short press the POWER/MODEbutton once.The Photo Capture icon appears on the LCD screen.TAKING A PICTURE1. Selecting the Scene with the LCD Display:While in Photo Capture Mode use the LCD display to direct the camcorder at the sceneyou would like to capture.2. Zoom Options:Press the UP / ZOOM IN or DOWN /ZOOM OUT button to better set the camcorderdisplay if desired.NOTE: While using the Zoom options, the zoom magnification is indicated on the top rightof the LCD screen.3. Changing Resolution:If you would like to change the resolution, press the MENU button and then press the DOWN button to select ‘Resolution’. Next, press the SHUTTER/OK button to view theResolution options. Press the UP / DOWN button to select an option and then pressthe SHUTTER/OK button to confirm the option.The Resolution options include:12M (4000x3000)8M (3264x2488)5M (2592x1944)1M (1280x960)4. Press the SHUTTER button to capture the photo.The amount of photos that can be captured with the available memory and selectedresolution appears on the top, right corner of the LCD screen.5. The photo is automatically saved to the camcorder’s Micro SD Memory card.23
NOTE:When using the Waterproof Case, make sure to set the zoom and camcorder settings beforeplacing it into the case.PHOTO CAPTURE MODE BUTTONSButtonSHUTTER/OKDescription PHOTO CAPTURE: Press to take the picture. ENTERS and SAVES SELECTION: Within the Menu, enters andsaves the selected Menu Option.Opens and exits the menu options for Photo Capture Mode and GeneralMENUCamera Settings.NOTE: Use the UP/DOWN/POWER buttons to navigate. LONG PRESS: Powers the camcorder on/off. SHORT PRESS:-POWER / MODEStandby Mode: Toggles between the Video Capture Mode, PhotoCapture Mode and Playback Mode.-Menu Mode: Toggles between the current mode menu and thecamcorder setting menus. UP DOWN ZOOM: Zooms IN NAVIGATES MENU: Navigates within the Menus. ZOOM: Zooms OUT NAVIGATES MENU: Navigates within the Menus.24
PHOTO CAPTURE MODE LCD ICON STATUS DESCRIPTIONThe following icons appear on the LCD screen and indicate the selected menu options andcamera status.ItemFunctionDescriptionDisplays the current selected Mode:1Mode SelectionPhoto Capture ModeDisplays the selected Burst Mode setting:2Burst ModeThe Burst Mode options include:OFF (no Icon), 3 photos, 5 photos, 10 photosDisplays the selected Self-Timer setting:3Self-TimerThe Self-Timer options include:OFF (no Icon), 2 seconds, 10 seconds25
Displays the selected Quality Setting.4Photo QualityThe Quality options include:Super Fine, Fine, NormalDisplays the selected Resolution Setting.Photo Resolution5SelectionThe Resolution options include:12M (4000x3000), 8M (3264x2488),5M (2592x1944), 1M (1280x960)Displays the amount of photos available for photoPhoto Counter /6capture as per selected photo resolution and memoryRecord Indicatorcard size.Displays the zoom magnification amount as you7Zoom Indicatorpress Zoom In and Zoom Out. x1.0 – x4.0Displays the current status of the battery level.The battery level is full.8Battery IndicatorThe battery level is empty. Indication torecharge the battery.9DetectionDisplays the selected Detection setting.The Detection options include:OFF (no icon), Face Tracking, Smile DetectNOTE: Some icons appear only when the selected setting is ON as per the selected option.These settings include: Burst Mode, Self-Timer, Detection If the selection is set to OFF: No icon is displayed on the LCD.26
Playback ModeThe Playback mode allows you to review and delete photos and videos that you’ve captured withyou camcorder.To enter Playback Mode, power on your camcorder and then short press the POWER/MODEbutton twice.The Playback Mode icon appears on the LCD screen.VIEWING CAPTURED IMAGESWhile in Playback mode, you can scroll through your captured images to view each image.1. Press the DOWN button to view the next image.2. Press the UP button to view the previous image.NOTE: Videos appear with the Video icon displayed on the bottom, left corner of the LCD screen.Photos appear without an icon. The numbered sequence of captured images is shown on the top, right of the LCDscreen.PLAYING CAPTURED VIDEOS ON YOUR CAMCORDER1. Scroll through your captured images to select the video you would like to play.2. VIDEO CONTROLS:-PLAY/PAUSE: To play the selected video, press the SHUTTER/OK button.While the video is playing the elapsed time is displayed on the top right.The video controls are displayed on the bottom:PLAY/: To play the selected video, press the SHUTTER/OK button.-REWIND: Press the UP button to fast REWIND the video.-PAUSE: Press the OK button to PAUSE the video and press again to continue playing27
the video.-FORWARD: Press the DOWN button to fast FORWARD the video.-STOP: Press the MENU button to STOP the video playback.NOTE: Your camcorder does not include a speaker. In order to hear the sound of the capturedvideo you must view the file on your computer. Connect your camcorder via the supplied USBcable to your computer and then you can either download or view directly from the camcorder onyour computer. See the following sections for more information:-‘Getting Photos and Videos from the Camera to the Computer’-‘Transferring Images Manually from the Camcorder to the Computer’DELETING CAPTURED IMAGESWhile in the Playback mode, you can delete captured videos and photos saved to the Micro SDMemory card in your camcorder using the Playback menu.1. Enter the Playback Mode.The last captured image (video or photo) appears.2. Select the image you would like to delete.3. Press the MENU button to enter the Playback Mode menu options.NOTE: To exit the menu options, press the MENU button.4. Press the UP or DOWN button to select and highlight the ‘Delete ’ menu option.5. Press OK to enter the ‘Delete’ menu options.The following options appear:- Single: This option deletes the selected image.- All: This option deletes all unlocked images (videos and photos).Press the UP or DOWN button to select an option and then press the OK button toconfirm.6. A window then appears to confirm your selected ‘Delete’ option.The following options appear:- Yes: This option deletes the selected file (if Single was selected) or all files (if All was28
selected).- No: This option returns to the previous ‘Delete’ menu screen without deleting theimage(s).Press the UP or DOWN button to select an option and then press the OK button toconfirm.Caution: Please use the ‘Delete’ feature with care. Once images are deleted they arepermanently deleted from the Micro SD Memory card. Please make sure that you onlyuse this feature once you have downloaded and saved all the images you wish to yourcomputer.PLAYBACK MODE LCD ICON STATUS DESCRIPTION29
The following icons appear on the LCD screen and indicate the selected menu options andcamera status.ItemFunctionDescriptionDisplays the current mode:1Mode SelectionPlayback Mode Preview Mode:Displays number of the current image / Total2Image Counter ;number of captured images (both photos andElapsed Timevideos) Video Playback Mode:Displays elapsed time of playing video.The lock symbol indicates the image is locked.3Protect/LockImage without the lock symbol indicates the image isnot locked.Video icon displays only when there is a capturedvideo shown in Playback Mode.When a photo is displayed in the Playback Mode, noicon is shown on the LCD.The following video controls are displayed on theVideo File &4bottom of the screen only during video playback:Video ControlsSHUTTER/OK:UP:Play andRewindDOWN:MENU:30Fast ForwardStopPause
Menu OptionsNAVIGATING THE MENUSPHOTO CAPTURE, VIDEO CAPTURE AND PLAYBACK MENUSTo access the Main Menu for each Mode:1.Press the MENU button to open the Main Menus for the current mode.2.Press the DOWN or UP button to select a specific menu.The selected option appears highlighted.3.Press the SHUTTER/OK button to confirm and save your selection and open the options forthe menu you have selected.To select a specific option, press the DOWN or UP button and then the SHUTTER/OK4.button to save the selected option and return to the Main Menu.NOTE:To go back from the submenus or exit the Main Menu, press the MENU button.GENERAL CAMERA SETTINGS MENUSTo access the General Camera Settings Menu:1. Press the MENU button while in the Photo Capture, Video Capture or Playback Mode.2. Short press the POWER/MODE button to select the General Camera Settings icon.3. Press the DOWN or UP button to select a specific menu.4. Press the SHUTTER/OK button to confirm and save your selection and open the options forthe menu you have selected.5. To select a specific option, press the DOWN or UP button and then the SHUTTER/OKbutton to save the selected option and return to the Main Menu.NOTE: At any time you can press the MENU button to exit the menus and return to the previousscreen. Once you change a setting, the setting is saved by your camera until you manually changethe setting or restore the camera’s default factory settings. After selecting your desired setting, some settings appear as an icon on the LCD screen inCapture Mode – indicating the option selected.31
VIDEO CAPTURE MODE MENUSTo open the Video Capture menu options, press the MENU button while in Video Capture Mode.The following menus appear:Movie Size, Video Quality, Seamless, White Balance, Metering, EffectMenu NameMenu OptionsMenu Options DetailsMovie Size1080P (Default)FHD 1920x1080P@30fpsThe Movie Size menu allows you to choose720PHD720P 1280X720@60fps720PHD720P 1280X720@60fpsand Descriptionthe desired size of the video taken by yourcamera. Keep in mind that videos with ahigher resolution will also take up more ofyour camera’s memory.Video QualitySuper FineThe Video Quality menu allows you to selectthe desired quality level of the images takenFine (Default)by your camera. Keep in mind that imageswith a higher image quality level will also takeNormalup more memory on your camera.SeamlessOff (Default)
3. Power / Mode Button 11. Infrared Signal Reception Light 4. Tripod Mount 12. Lens 5. Reset Button 13. LCD Screen 6. Micro SD Memory Card Slot 14. LED Charge Light Indicator 7. USB Interface 15. LED Bus