Transcription
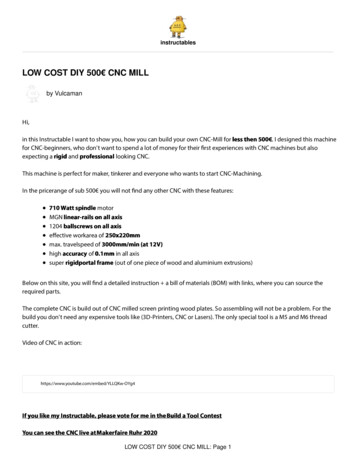
instructablesLOW COST DIY 500 CNC MILLby VulcamanHi,in this Instructable I want to show you, how you can build your own CNC-Mill for less then 500 . I designed this machinefor CNC-beginners, who don't want to spend a lot of money for their rst experiences with CNC machines but alsoexpecting a rigid and professional looking CNC.This machine is perfect for maker, tinkerer and everyone who wants to start CNC-Machining.In the pricerange of sub 500 you will not nd any other CNC with these features:710 Watt spindle motorMGN linear-rails on all axis1204 ballscrews on all axise ective workarea of 250x220mmmax. travelspeed of 3000mm/min (at 12V)high accuracy of 0.1mm in all axissuper rigidportal frame (out of one piece of wood and aluminium extrusions)Below on this site, you will nd a detailed instruction a bill of materials (BOM) with links, where you can source therequired parts.The complete CNC is build out of CNC milled screen printing wood plates. So assembling will not be a problem. For thebuild you don't need any expensive tools like (3D-Printers, CNC or Lasers). The only special tool is a M5 and M6 threadcutter.Video of CNC in action:https://www.youtube.com/embed/YLLQKw-OYg4If you like my Instructable, please vote for me in the Build a Tool ContestYou can see the CNC live at Makerfaire Ruhr 2020LOW COST DIY 500 CNC MILL: Page 1
I really like to see, when someone has rebuilded the CNC, so please post a photo of the CNC in the comments with "Imade it" :-)Change Log:[06.03.2019] Added step "Con gure Estlcam for This Machine" video of test run[07.03.2019] Added video of CNC in action[15.03.2019] Added photo of Linear PartsLOW COST DIY 500 CNC MILL: Page 2
Step 1: Mechanical PartsThe complete CNC is designed in Fusion 360, below you will see the complete CNC in an interactive mode embedRequired Parts:CNC-Milled-Parts:Here are all required CNC-milled parts. You can buy all the CNC-milled parts in my Online Shop. The total cost of all theCNC-milled parts will be 150 shipping.Quantity1x1x1xDescriptionY Axis FrontY Axis RearY Axis NutLOW COST DIY 500 CNC MILL: Page 3How the part looks like
2x1x1xPortal SidePortalX MotorLOW COST DIY 500 CNC MILL: Page 4
1x1x1xX BearingX CarriageZ MotorLOW COST DIY 500 CNC MILL: Page 5
1x2x(normal mirror)Z Plate FrontZ Plate SideLOW COST DIY 500 CNC MILL: Page 6
1x1xSpindle MountMain PlateAluminium Extrusion Parts:I am trying to use as much standart aluminium extrusion parts, so it will be relativly easy to source the parts.Quantity10xDescriptionLink2040 extrusion angle bracket AliexpressPrice9,10 (for 20 pieces)2x428mm 20x20mm aluminiumdold-mechatronikextrusion 6mm slot2,07 2x2x1x400mm 20x40mm aluminiumdold-mechatronikextrusion 6mm slot250mm 20x20mm aluminiumdold-mechatronikextrusion 6mm slot330mm 20x60mm aluminiumdold-mechatronikextrusion 5mm slot3,70 2,60 4,26 Nuts, Screws and Washers:I am trying to be as accurate as possible while counting all the screws and nuts. If you nd any fault on the list, please tellme, so I can update the parts list. Also I recommend to buy some more screws.QuantityDescription84xM3 T-slot Nut Slot 6mm40xM4 T-slot Nut Slot 6mm4xM4 T-slot Nut Slot 5mmWhere to buyAliexpressAliexpressDold-MechatronikLOW COST DIY 500 CNC MILL: Page 7Price5,60 5,60 0,88
32xM4x20mm DIN912cylinderhead screwlocal hardware store32xM4x16mm DIN912cylinderhead screwlocal hardware storeM4x12mm DIN912cylinderhead screwM3x16mm DIN912cylinderhead screwlocal hardware storeM3x12mm DIN912cylinderhead screwM3x10mm DIN912cylindergead screwlocal hardware storeM3x8mm DIN912cylinderhead screwlocal hardware store8x8x52x8x84xlocal hardware storelocal hardware store6xM5x20mm DIN912cylinderhead screwlocal hardware store12xM5x10mm DIN912cylinderhead screwlocal hardware store16xM6x20mm DIN912cylinderhead screwlocal hardware store8xM3 nylon nut24xM4 nylon nut8xM3 washer6xM5 washer80xM4 washer16xM6 washerlocal hardware storelocal hardware storelocal hardware storelocal hardware storelocal hardware storelocal hardware storeLinear parts and custom machined ballscrews:LOW COST DIY 500 CNC MILL: Page 8----
For the CNC mill you will need three custom machined 1204 ballscrews. I have attached a drawing with the dimesions atthe bottom of this step. Additionally you will need MGN12 linear rails, ballscrew, bearings and housings. Because it was alittlebit hard to source all the parts, I contacted a manufacture, who can supply all these parts for a resonable price. Thismanufacture will also make the custom machined ballscrews. You can buy all the parts here: AliexpressQuantity1x1x1x4x2x12x2xDescription1204 Ballscrew 425mm1204 Ballscrew 395mm1204 Ballscrew 200mm400mm MGN12 Linear Rail250mm MGN12 Linear RailMGN12H Linear Rail WagonFF10 Ballscrew BearingLOW COST DIY 500 CNC MILL: Page 9
24mm 1204 Ballscrew Housing3x5 to 8mm shaft coupler (rigid ; not the red or G/F1B/XKE0/JSOZ3A2X/F1BXKE0JSOZ3A2X.pdfStep 2: Electrical PartsElectrical Parts for the CNC:Here you will nd all the required electronic parts for the CNC mill. For the router you can use the Katsu from Amazon or aMakita RT0700C. Both will t to the CNC-milled parts.QuantityDescriptionLink1x3x710W 230V spindle motorAmazoninductive limit switches NPN Aliexpress59,99 4,44 3xNema 17 Motors33,00 Aliexpress1xArduino Uno CNC-Shield AliexpressDRV882512V Powersupply 5AAliexpresssomewires1x-LOW COST DIY 500 CNC MILL: Page 10Price9,76 7,05 -
Step 3: The Main FrameWhat you need for this step:Quantity32x32x2x4x1x1x8x8x2xDescriptionM3x8mm DIN912 cylinderhead screwM3-T-Slot-Nut 6mm-Slot400mm MGN12 Linear-RailMGN12H-Linear-Rail-WagonY Axis FrontY Axis RearM6x20mm DIN912 cylinderhead screwM6 washer20x40mm aluminium extrusion 6mm slotWhat you have to do:At frist you have to cut eight M6 threads inside the aluminium extrusions. After that you need to attach the MGN12 linearrails to the alumnium extrusions by using the M3x8mm screws. Then you have to take the two wood parts and attachthem to the aluminium extrusion with eight M6x20mm screws.LOW COST DIY 500 CNC MILL: Page 11
Step 4: Y-Ball-ScrewWhat you need for this step:Quantity8x4x8x1x1x1x1xDescriptionM3x16mm DIN912 cylinderhead screwM3-nylon nutM3-washerFK10 Bearing1204-ballscrew housing395mm 1204-ballscrew with custom end-machiningNema 17 Stepper MotorLOW COST DIY 500 CNC MILL: Page 12
1x5x8mm shaft-couplerWhat you have to do:Now it is time to install the Y-ballscrew to the main frame. At rst install the Nema 17-motor to the rear plate and x itwith four M3x16mm screws. Then you can slide the 395mm ballscrew in. Once the ballscrew is in place, attach the FK10bearing at the front plate. The FK10 bearing is xed by four M3x16mm screws and M3-nylon nuts.Step 5: Y-Ballscrew PlateWhat you need for this step:Quantity4x1xDescriptionM5x10mm DIN912 cylinderhead screwY Axis NutWhat you have to do:For that step, you have to install the Y Axis Nut plate to the ballscrew housing. You do that with four M5x10mm screws.LOW COST DIY 500 CNC MILL: Page 13
Step 6: The Portal SideWhat you need for this step:Quantity4x4x1x6x6x16x16x2xDescriptionM4x16mm DIN912 cylinderhead screwM4-T-slot nut 5mm Slot330mm 60x20mm aluminium extrusion 5mm slotM5x20mm DIN912 cylinderhead screwM5 washerM3x12mm DIN912 cylinderhead screwM3 washerPortal SideWhat you have to do:At rst you have to connect the two Portal Side plates to the linear wagons. After that you have to attach the 60x20mmextrusion to the Portal Side plates by using the six M5 screws. Finally connect the ballscrew housing from the previousstep to the extrusion.LOW COST DIY 500 CNC MILL: Page 14
Step 7: The Main PlateWhat you need for this step:Quantity1x16xDescriptionMain PlateM6 hammer nutWhat you have to do:You have to hammer the 16 hammer nuts to the predrilled holes.LOW COST DIY 500 CNC MILL: Page 15
Step 8: Attach the Main Plate to the Main Frame.What you need for this step:Quantity8x8x8xDescriptionM4x12mm DIN912 cylinderhead screwM4 T-Slot mut 6mm slotM4 washerWhat you have to do:You have to connect the preassembled Main Plate to the main frame. The connection is made with eight M4x12mmscrews.LOW COST DIY 500 CNC MILL: Page 16
Step 9: PortalWhat you need for this 8mm DIN912 cylinderhead screwM3-T-slot nut 6mm slotM4x12mm DIN912 cylinderhead screwM4x20mm DIN912 cylinderhead screwM4 washer400mm MGN12 Linear RailMGN12H Linear Wagon428mm 20x20mm 6mm slot aluminium extrusions4020 angle bracketportal plateWhat you have to do:At rst you have to connect the linear rail to the aluminium extrusion.Then place the extrusions on the portal plate. Nowscrew the extrusions to the extrusions. Don't forget to place the angle brackets.LOW COST DIY 500 CNC MILL: Page 17
Step 10: X-BallscrewWhat you need for this step:Quantity4x4xDescriptionM3x10mm DIN912 cylinderhead screwM3x16mm DIN912 cylinderhead screwM3 washer8x4x1x1x1x4x4xM3 nylon nut425mm 1204 Ballscrew1204 24mm Ballscrew housing5x8mm couplerM6x20mm DIN912 cylinderhead screwM6 washerLOW COST DIY 500 CNC MILL: Page 18
1x1x1x1xNema 17 MotorX BearingX MotorFF10 BearingWhat you have to do:You have to place the ballscrew between the two linear rails. The connection of the motor and the FF10 bearing is madeby four M6 screws. Don't forget to cut the four M6 threads to the aluminium extrusions.LOW COST DIY 500 CNC MILL: Page 19
Step 11: X-CarriageWhat you need for this step:Quantity4x32xDescriptionMGN12H Linear Rail WagonM3x12mm DIN912 cylinderhead screwM3 washer32x1xX-Carriage plateWhat you have to do:Connect the X-Carriage plate to the linear wagons by using the M3x12mm screws and the predrilled holes.Step 12: Z-Axis Part 1:What you need for this step:LOW COST DIY 500 CNC MILL: Page 20
QuantityDescriptionZ-Plate Front1x2x250mm MGN12 Linear Rail250mm 20x20 aluminium extrusions2x8x16x8x20x20xM4x16 DIN912 cylinderhead screwM4 washerM4 t slot nutM3x8mm DIN912 cylinderhead screwM3 t slot nutWhat you have to do:Connect the linear rails to the extrusions by using the M3x8mm screws. After that attach the extrusions to theZ Plate Front .LOW COST DIY 500 CNC MILL: Page 21
Step 13: Z-Axis Part 2:What you need for this step:QuantityDescriptionSpindle Mount plate1x1xZ Motor plateM6x20mm DIN912 screws4x4xM6 washerWhat you have to do:Connect the Spindle Mount at the bottom of the Z-Axis and the and the Z Motor plate at the top of the Z-axis. Don'tforget to cut a M6 thread inside the extrusions.LOW COST DIY 500 CNC MILL: Page 22
Step 14: Z-Axis Part 3:What you need for this step:QuantityDescriptionZ Plate Side2x8xM4x16mm DIN912 cylinderhead screwM4 washer16x8xM4 T-slot-nutWhat you have to do:Place the Z Plate Side plates at the side of the Z-axis. Then connect them with the M4x16mm screwsLOW COST DIY 500 CNC MILL: Page 23
Step 15: Z-Axis Part 4:What you need for this step:QuantityDescriptionNema17 Motor1x4x1x1x1xM3x10mm DIN912 cylinderhead screw200mm 1204 Ballscrew1204 Ballscrew Housing5x8mm shaft couplerWhat you have to do:Attach the Nema 17 motor to the predrilled holes and connect it with four M3x10mm screws. After that connect theballscrew to the Nema 17 motor with the 5x8mm shaft coupler.LOW COST DIY 500 CNC MILL: Page 24
Step 16: Connect the Z-Axis and the PortalWhat you need for this step:Quantity4xDescriptionM5x16mm DIN912 cylinderhead screw4xM5 washerWhat you have to do:Slide the Z-Axis into the linear wagons on the X-Carriage. Then connect the Z-ballscrew to the X-Carriage with fourM5x16mm screws.LOW COST DIY 500 CNC MILL: Page 25
Step 17: Connect the Portal to the Main FrameWhat you need for this step:Quantity6x32xDescription2040 angle bracketM4x20mm DIN912 screwsM4 washer64x32xM4 nylon nutWhat you have to do:Finally connect the portal to the main frame. You do this by using six additional angle brackets. All the requiered holesare predrilled. Please take a look at the pictures, where the angle brackets are located.LOW COST DIY 500 CNC MILL: Page 26
Step 18: Prepare the SpindleFor the connection between the spindle and the machine, I am using the allready existing spindle mount. You simplyneed to remove the plastic part at the bottom of the mount.Step 19: Attach the Spindle Mount to the MachineWhat you need for this step:QuantityDescriptionLOW COST DIY 500 CNC MILL: Page 27
4xM4x16mm DIN912 cylinder head screwM4 washer4xSpindle mount1xWhat you have to do:Place the spindle mount on the Z-axis. Then connect it to the Z-axis with four M4x16mm screws. Once completed, youcan slide the spindle inside the spindle mount.Step 20: ElectronicsLOW COST DIY 500 CNC MILL: Page 28
For the electronics I am using an Arduino Uno with aCNC-shield. This is the cheapest methode to controll theCNC.Now you should be able to move your machine.(coming soon):For the connection you have to connect the X-Motor tothe X-Motor-Port, the Y-Motor to the Y-Motor-Port andOn the machine there are also holders for inductivethe Z-Motor to the Z-Motor Port. Then you have to12mm end switches in the CNC milled frame. I am stillconnect 12V to the board at the blue terminal pins. After waiting for delivery, so when they arrieved, I will updatethat connect it to your PC and ash the software (GRBLthe instruction.or ESTLCAM) to the Arduino.Step 21: SoftwareLOW COST DIY 500 CNC MILL: Page 29
To controll the machine you need 3 types of software:3. G-code Sender:1. CAD software:Inside the CAD software you create your 3D-File, whichyou want to manufature. I personally use Fusion360 forthis kind of application.2.CAM software:In the CAM software you de ne the tool path of yourCNC machine, here you can also use Fusion360, becauseit has a build in CAM-module.The G-code sender took the G-code le, from the CAMSoftware and sends it to the controller of the machine.Because I am using an Arduino as the controller you canuse GRBL as a software on the Arduino and a G-codesender like "Univerversal-Gcode-Sender" or "bcnc"As an alternative I also want to mention Estlcam. InEstlcam, the CAM and controller part are combined inone software (If you use an Arduino as your controller).Also it is more simple to use compared to other CAMSoftware.Step 22: Configure Estlcam for This MachineI personally recommend to use Estlcam over GRBL for this CNC because of these aspects:It is a lot easier to con gurate than GRBLIt has a build in CAM, so you don't need any additional SoftwareLOW COST DIY 500 CNC MILL: Page 30
Controller and CAM are combined in one SoftwareNow I want to show you which con guration you have to do, that the machine will work propably:1. Open Estlcam and go to "Einstellungen" then click on "CNC Steuerung"2. Afterthat a window will open with some con gurations. There you will see all the basic values for this machine. Once you haveall the settings like in the picture, connect your Arduino to your computer, select the right COM-Port, click on"Steuerung-Programmieren":LOW COST DIY 500 CNC MILL: Page 31
3. If the programming of the Arduino was a success, close "Estlcam" and open "CNC-Controller". Now you should be ableto move your machine.4.Here is a video of the test- le. The test le can be downloaded at the bottom of this step. The feedrate in the test le isLOW COST DIY 500 CNC MILL: Page 32
PQC/JSUP1W2Z/FNX6PQCJSUP1W2Z.ncStep 23: CNC-Milled ResultsHere I will show you some CNC-milled parts, which where milled on this machine. ( list will be extended in the future )Can anyone point me to the .dxf files for the machined parts?This looks awesome, thanks. Unfortunately not having the cutout files would be a real pain.Someone has to do the work finding all the measurements and from there extrapolate theshapes. You don't even ship the cutouts to Canada. The community needs a truly open-sourcemachine.Great machine. Love mine. I got great help from Haraldhartmann78. First prosjekt I made aenclosure for the electronics. Second a dustshoeI built the machine including small changes. control with estlcam incl. limit switches.Mee to can't seem to find the files for the CNC parts. I am thinking about having them jetted outof alu. Are those files still available?Hi,How can I download your parts. I want to do it by different materials, but I dont see and can'tdownload some of your part. If you can, will you share your design with my Fusion 360 account1511026@hcmut.edu.vn.Thanks so much and best wish for you!Hi,the download button dont run. Whats wrong ?GreetingsLOW COST DIY 500 CNC MILL: Page 33
AndreasThe parts list unfortunately lacks the 2 250 mm aluminum profiles required in step 12.I already informed him in july via email.Step 17 lacks some m4 6mm t-slot-nuts and some shorter m4x12, because you have to mounttwo angle brackets in the portal aluminium profileI am stuck in my build in this stepp. I ordered the last profile on aliexpress. My steppers waswithout conections, so I orderd a crimp pilers to.I made it! It works like a charm. I milled some slade plate, too.From the remainder of the cutouts I have milled some clamps and tensioners.Since I photographed every step, I made a stopmotion out of it, have a look.In the introduction you mentioned "The only special tool is a M5 and M6 thread cutter."The M5 thread cutter isn't mentioned further. I think you have to use it in Step 6 "The PortalSide", right?Hi,you only need the thread cutter for the aluminium extrusions, to create the front threads.Danke für das Gespräch auf der Maker Faire!Viel Glück beim Wettbewerb. Habt meine Stimme.Freut mich zu höhren, dass es ihnen gefallen hat. Vielleicht sieht man sich irgendwo ja nochmal :)Excellent guide, really well made and useful.I have only one question: how did you align axis? How do you guarantee the perfect coplanarityof the X-Y axis and the perpendicularity between the 3 axes? Are there any adjustments?Thank youMe again. Just voted for you in the Make a Tool competition. Good luck with that.You've probably already thought about crowdfunding: if you were thinking of offering a completekit of parts you'd obviously have some upfront costs in obtaining everything and holding stock. Acrowdfunder would be a great way to get the money to be able to start offering full kits. I am sureit would be popular.Very nice instructables, one of the very best i have ever seen! Every part explained very well, ican't wait to start building mine! :)Thanks for your feedback! I can't wait to see your version of the CNC :-)Are you going to publish your Arduino sketch file ? Please.Don't want to buy frame parts without the ".ino" file.ThanksThanks for your feedback. I will publish the config files for the Arduino tomorrow. However, pleasetake a look at Estlcam, it is super easy to configure. In Estlcam you only need to set yourdimensions, steps per mm and max. feedrates. Then Estlcam will flash the Arduino automaticly.And you are done with the configuration.Thanks for your quick reply, look forward to seeing more, always wanted to make a cnc mill. I amat the other end to you .I'm 75 and still building.LOW COST DIY 500 CNC MILL: Page 34
I have added a step, where you can see, how the software needs to be configurated. I have alsoadded a video of a test run. Please take a look at step 22.Thanks for such a detailed instructable, it is very inspiring. I'm currently learning fusion360 forCAD/CAM and gcode.I can't find the files for the CNC milled parts or the fusion file. Will you publish also that file?Will help me a lot to learn from an experienced user!All best/lThanks for your feedback. I don't want to publish the Fusion file. But you can use the 3D-Onlineviewer. There is a measurement function, so you can take all the dimensions manually. So withknowing the dimensions it should be possible to reconstruct the CNC. This is also a good trainingto learn fusion 360.Ok thanks for the fast answer.I thought to get those files or the single parts, there was something related to the online viewer oron the fusion software that I was not catching.Good luck with the project.There is only 1 type of plywood that is made well enough to not have voids, and be stiff enoughto be successfully used in a CNC machine. That being Baltic Birch and those parts are not BalticBirch. The metric equivalent to 1/2" Baltic Birch has 9 plies all birch. The metric equivalent to 3/4"has 11 plies all birch. It is sold in 1500mm x 1500mm sheets (5' x 5") That machine is likely goodenough for wood projects, but not metal.Very well-done and well-documented. Nice work!Canthat machine mill aluminum ?Yes it is possible to mill aluminium on that machine, but do not expect the best results. I think foraluminium sheets with up to 3mm it will work good, but you will not be able to produce aluminiumparts like in my other instructable: .If you want to mill aluminium the right way, you need a more rigid frame (out of aluminium) and aspindle, where you can controll the speed. I think if you will build this machine completely out ofaluminium and use a spindle with a speed controll, you would be able to produce parts like in myother instructable.Congratulations ! I thing you engineered a pretty capable CNC router. I see nothing wrong aboutit. Straighteners for the Xends, a pretty stiff spindle carriage, good rails and correct transmission.Well done !Thanks for your feedback :-)WOW, Great instructable. Detail explain on steps. Did lots of work.Thanks for your feedback :-)Can you advise (approx) postage/freight costs for the CNC-Milled parts to Brisbane, Australia.The shipping costs to australia will be 62 .Good job, thank you for sharing. Just checking if Nema 17 is good for it or maybe Nema 23would be a better choise.For this CNC, a Nema 17 is a good choice, a Nema 23 is kind of over powered for thisapplication. Because of the ballscrew , you will get enough force to cut though material withoutloosing any steps.LOW COST DIY 500 CNC MILL: Page 35
Thank for this .The link to your site is no longer valid !!!Super project, not having a CNC (a bit for that I look at your sharing) I would be interested in thisone. Could you give this one?Merci ;)Thanks for your feedback. That is curious, I have checked all the links and they work correctly.What link do you mean exactly? Do you mean my website? Here is the link for it:https://www.vulcaman.de/Nicely done. One of the few instructable on CNC's posted that included limit switches in thedesign.I just wanted to throw this out there, if you're going to build this do not put this in an unheatedshop, damp basement, or unheated garage.CNC's are precision machines. Because it includes wood material, it will shrink or swelldepending on the weather. And. That will destroy any sort of tolerances.Considering using plastics or metal instead of wood for the frameWell done! Thank you for sharing your files and plans :DThanks for your feedback :-)Great instructable! Could you please provide the over all dimension.ThanksThe over all dimesions are around 470x510x510mm. You can also take exact mesurements ofevery part you need in the interactive online viewer. There is a measurement function at thebottom.What you think about how it compares to RS-CNC?LOW COST DIY 500 CNC MILL: Page 36
LOW COST DIY 500 CNC MILL by Vulcaman Hi, in this Instructable I want to show you, how you can build your own CNC-Mill for less then 500 . I designed this machine for CNC-beginners, who don't want to spend a lot of money for their rst experiences with CNC machines but also expecti