Transcription
CNC ApplicationsHistory and Terminology
Background & Definitions (Chapter 1) Requirements for a skilled machinistØ Serve a 4 year apprenticeship including classes in algebra,trigonometry, print reading, and drafting along with 8,000 hoursof on-the-job-training.Ø The machinist must purchase several thousand dollars worth ofprecision tools.Ø Machinists often make a lower hourly wage than other skilledtrades such as electricians and plumbers.Ø Production operations often require a very skilled person toperform the same operations over and over which mostmachinists find boring.
Background & Definitions(continued) During the 1930’s and 1940’s, there was much laborunrest between machinists and management at largecompanies. Work stoppages and strikes angeredmanagement. At the same time, World War II increased the complexityof parts required for common products. The most complicated product at the time was the jetaircraft which required large quantities of complex, highprecision components.
Background & Definitions(continued) The combination of labor problems and morecomplicated components precipitated the introduction ofautomatic machines that could be programmed toproduce different parts. Automatic machines had been available since the USCivil War (1861-1865), but the machines could onlyproduce one part and required large amounts of time toset up to produce a different part. An electronically controlled machine that could be easilychanged to produce a different part was required.
Background & Definitions(continued) NC – Numerical ControlØ The first successful electronically programmed automaticmachine was a joint project between Massachusetts Institute ofTechnology (MIT) and the US Air Force in the mid 1950’s. It wasa three axis milling machine controlled by a room full of vacuumtube electronics. Even though it was unreliable, it set the stagefor modern machines. The controller was called NumericalControl, or NC.Ø The Electronics Industry Association (EIA) defines NC as "asystem in which actions are controlled by the direct insertion ofnumerical data at some point.“Ø NC machines were controlled electronically, without the use of acomputer.
Background & Definitions(continued) CNC – Computer Numerical ControlØ CNC machines use a computer to assist and improvefunctionality of number and code control.Ø In the 1960’s, CNC machines became available with timesharingon mainframe computers. True NC machines continued to bebuilt.Ø By the 1970’s, specialized computers were being manufacturedfor CNC controls. By the late 1970’s, no true NC machines werebeing made, only CNC.Ø During the 1980’s, many machine manufactures took advantageof PC technology to increase the reliability and decrease the costof CNC controls.Ø Today, all machines are CNC although the term NC is still used,but not in its original definition.
Machine Control Systems Stepper Motor ControlØThe stepper motor takes voltage pulses and converts them to rotarymotion. If the machine resolution (smallest motion) is 0.0001” and youwant to move 3”, the computer sends 30,000 (30,000x0.0001” 3.0”)pulses to the motor and the machine moves 3”.ØProblem: stepper motors have limited torque, and if excess pressure isapplied, the motor will slip and the machine loses its position. Then, theoperator must restart the machine.ØThe machine does not know where it actually is, only where it shouldhave moved. This method works fine unless the motor slips.
Machine Control Systems(continued) Servo Motor ControlØThe servo motor has a feedback loop to check the machine’s actualposition. If the program tells the computer to move 3”, the servo motorstarts turning and does not stop until the feedback loop tells the computerthat the machine has actually moved 3”ØAdvantage: servo motors have high torque capabilities to take heavycuts at high speeds. It stops and gives an alarm when the motor is overtorqued.ØAdvantage: the machine always knows its actual position.
Modern CNC Machine CharacteristicsØ Massive, usually four times heavier than an equivalentconventional (manual) machine.Ø Large motors with high speed capabilities to take advantage ofmodern cutting tools. Horsepower and spindle speeds aregenerally four to ten times faster than conventional machines.Ø Automatic tool changers that hold from eight to hundreds ofcutting tools that are quickly changed under program control.Ø High accuracies. The minimum resolution of most machines is0.0001” or 0.001mm, and some machines are capable ofmanufacturing parts to that accuracy, depending on the process.Ball screws practically eliminate backlash (slop) in the movementscrews.
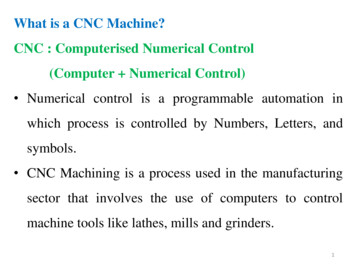
Modern CNC Machine AccuracyØ Accuracy of CNCmachines depends ontheir rigid construction,care in manufacturing,and the use of ballscrews to almosteliminate slop in thescrews used to moveportions of themachine. Thesepictures show theprecision balls whichre-circulate in the nut.Photo courtesy Thompson Ball Screw.Graphic courtesy BSA Co.
CNC ApplicationsIntroduction to Turning CentersHeadstock X DirectionCross Slidewith TurretSaddleChuck Z DirectionCutterTailstockBed
Turning CentersA Turning Center is simply a CNC lathewith a multi-station turret and anenclosure.HeadstockNotice the turretattached to the crossslide. X DirectionCross Slidewith TurretSaddleChuck Z DirectionCutterTailstockBedNote: the CNC controland the enclosure arenot shown.
Characteristics of Turning Centers Turret is on the far side to ease part loading andunloading. Heavy for increased rigidity. High spindle speeds to effectively use hardcutters. Powerful motors. Communication capabilities.
Haas SL-20A Typical Turning CenterThe Haas SL-20turning center has a 20HP motor, 45-4000RPM spindle, ten toolsin the turret, 8" cuttingdiameter and 20"between centers. Itweighs 9000 lbs.
Turning Center Coordinate SystemZ is the length of the part.X is the diameter of the part.The partially shaded circlerepresents the origin.The programmer chooses thelocation of the origin on the part,usually the back, center or front,center.We will always use the back,center since it simplifies machineset-up.Program to move the tool, notthe work.
The Coordinate System ProblemMachine Coordinate System OriginProgrammed Tipof the CutterWork Coordinate System OriginTop View of the Turning CenterThe machine operates from theMachine Coordinate System(MCS). Note that all MCSmovements are in the negativeX and Z directions.We program from the WorkCoordinate System (WCS).The tip of the cutter is offsetfrom the MCS and is different foreach cutter.
The Solution We can easily measure the distance from the MCS tothe WCS and enter it into the machine control. This iscalled a Fixture Offset. We can easily measure the distance from the MCS tothe tip of the each cutter and enter the values in themachine control. These values are called Tool Offsets.
Separating theProgrammer from the Machine The programmer chooses the WCS on the centerline ofthe part, generally at the back, and then programs thecutter movement from there. The programmer calls the correct fixture offset and tooloffset numbers in the program (we’ll cover these codeslater). So, the programmer does not have to be concerned withany machine specific measurements.
Incremental vs.Absolute ProgrammingSuppose we want to move from the originthrough points A, B, C, D, and E. We can move: incrementally – distance from previous point,or absolutely – new distance from the ABCDE12021101041335611226
Incremental vs.Absolute Programming (continued) Notice in the previous table that each move inincremental mode is the distance from the previouspoint, while each move in absolute is the distance fromthe origin, regardless of the previous point. Most programmers initially think incrementalprogramming is easier. However, editing for program changes is much easier inabsolute mode. About 95% of all programming is done in absolute mode. The remaining 5% is for special cases such as repetitivefeatures where incremental can be a real time saver.
CNC ApplicationsSpeed and Feed CalculationsPhoto courtesy ISCAR Metals.
Turning Center CuttersWhat types of cutters are used on CNC turningCenters?Ø Carbide (and other hard materials) insert turningand boring toolsØ High Speed Steel (HSS) drills and tapsWhere do I find information for calculating RPMand feed rates?Ø Cutting tool manufacturer (first choice)Ø Machining Data HandbookØ Machinery’s Handbook (we’ll use this option)
Standard Insert ShapesV – used for profiling, weakest insert, 2edges per side.D – somewhat stronger, used for profilingwhen the angle allows it, 2 edges per side.T – commonly used for turning because ithas 3 edges per side.C – popular insert because the same holdercan be used for turning and facing. 2 edgesper side.W – newest shape. Can turn and face likethe C, but 3 edges per side.S – Very strong, but mostly used forchamfering because it won’t cut a squareshoulder. 4 edges per side.R – strongest insert but least commonlyused.See the “Tooling” thumb tab in theMachinery’s Handbook.
Typical Turning,Threading, and Parting Tools
Tool Holder HandFor most CNC turning centers,the cutter is on the back side ofthe part and is upside down.LeftHandRight Hand tool then turnstowards the chuck.Left Hand tool then turns towardsthe tailstock.If the cutter is symmetrical withthe shank, it is called NEUTRALHAND.See the “Tooling” thumb tab inthe Machinery’s handbook formore information.RightHandSingle Point Indexable Insert Holders
Tooling Considerations Tooling choices depend on the type of workpiece,the machine, and the desired surface finish. Harder workpieces require harder cutters. Modern cutters require the turning center to havehigh spindle speeds and powerful motors.
Cutting Speed What is cutting speed?––––––Not RPMRelative speed of the work and cutterUnits in feet/minute (fpm)Usually designated as V, cs, or STabulated in the book based on material, cuttertype, and type of cut (roughing or finishing)Needed to calculate RPM
Calculating Turning RPM The formula for calculating RPM is given onpage 1016 as:12 VN RPM π DWhere V cutting speed to be looked up in the handbookp 3.14D diameter being cutWhen punching buttons on your calculator, do this:12 V π D Note the difference between this and the actual formula.To use this formula, we must first find V in the handbookSee page 1022 for a list of the tables.
Types of Cuts Roughing – primary considerations:Ø Just removing metal, surface finish does not matter.Ø Requires a strong cutter.Ø Generally have deep depth of cuts and fast feedrates.Ø The cutting speed is generally adjusted slower tokeep heat down.
Types of Cuts (continued) Finishing – primary considerations:Ø Must meet required surface finish and sizespecifications.Ø Requires a hard cutter to hold its shape well.Ø Generally have small depth of cuts and slow feedrates.Ø The cutting speed is generally adjusted upward togive a better surface finish.
Surface Finish RequirementsFeedThe surface finish depends on thefeed rate and on the cutter noseradius.Generally, a large nose radius and aslow feed rate coupled with highcutting speed gives the best finish.However, too large of a nose radiusinduces chatter ruining the finishand the size.Most inserts use a 1/32” nose radiusas a good compromise.hNose RadiusInsert2fh 8 rh height of marksf feed rater nose radiusandf2roughness 32 rActual roughness ininches, usually reportin microinches.
General Feed andDepth of Cut Recommendations Roughing:Ø 0.1” to 0.25” depth of cut (radial)Ø 0.012 inches per revolution (ipr) to 0.018 ipr feed rate Finishing:Ø 0.03” to 0.05” depth of cut (radial)Ø 0.006 ipr to 0.010 ipr feed rateNote 1: the depth of cut should not be less than thetool nose radius unless special finishing inserts arebeing used.Note 2: smaller feed rates can be used if specialfinishing inserts are being used.
Calculating RPM for TurningOperations with Hard Cutters Use this procedure for carbide, ceramic, andcermet inserts. We will adjust the cutting speed based on thedesired depth of cut and feed rate.
Calculating Turning RPM (continued)Six step process:1. Select depth of cut - as deep as possible.2. Select feed - appropriate for roughing or finishing.3. Find the original cutting speed in the tables. (See the listingon page 1022 for the appropriate table.)4. Find the feed and depth of cut factors in Table 5a,page 1035.5. Modify the original cutting speed based on step 4.6. Calculate the RPM.Note: All data will be found in the “Machining” thumb tab in theMachinery’s Handbook.
Calculating Turning RPM (continued)Example:Take 0.250 depth of cut, 0.012 feed in quenched andtempered 8620 steel with a Brinell hardness of 300,hard coated carbide cutter, 2.5” diameter part.Step 1:Depth of cut given at 0.25”.Step 2:Feed rate given as 0.012 ipr.
Calculating Turning RPM (continued)Step 3: From Table 1, page 1029, locate cutting parametersfor this materialMaterialHardnessCutting Parameters
Calculating Turning RPM (continued)Step 3 (continued):From Table 1, page 1029, we findVopt 585 fpm iprVavg 790 fpmFopt 0.017Note that the table lists cutting speed as S rather than V asused everywhere else. Note that the feed rates are given in0.001 ipr, so the 17 listed for Fopt is actually 0.017 ipr.
Calculating Turning RPM (continued)Step 4:Once we have located the optimum and averagecutting speeds and the optimum feed, we finish ourcalculation using the data and process described inTable 5A, page 1035.
Calculating Turning RPM (continued)First,calculatethe ratio ofthe feeds.Second, calculate the ratioof the cutting speedsThird, find the feed factor wherethe step 1 row and step 2column cross.Fourth, determine thenearest depth of cut andlead angle columnSixth, calculate the finalcutting speed.Fifth, find thedepth of cutfactor wherethe step 1rowcrosses thestep 4 column.
Calculating Turning RPM (continued)Step 4:For this example following the steps in 5a:F0.012 0.7Calculate the following ratios:Fopt 0.017VavgAndVopt790 1.35585From Table 5a, page 1035, find Ff 1.22 and Fd 0.87
Calculating Turning RPM (continued)Step 5:As shown at the bottom of Table 5a,V Vopt Ff FdWhere V cutting speed to be used (fpm)Vopt optimum cutting speed from the tablebased on material hardness and type ofcutterFf feed factor from Table 5aFd depth of cut factor from Table 5aFor this example, V (585)(1.22)(0.87) 621 fpm
Calculating Turning RPM (continued)Step 6:Finally, calculate the RPM with12 VN RPM π DFor this example:RPM 12 x 621 p 2.5 949 RPM
CNC ApplicationsProgramming Turning Centers
Planning and ProgrammingTo program a CNC machine tool to create apart, you must follow a series of steps to besuccessful:1.Examine the part drawing thoroughly and get a roughidea of how you want to proceed.2.Figure out how to hold the raw material so you canperform as much machining as possible in one setup.3.Decide what cutters are necessary to perform thevarious operations.4.Write down the exact sequence of operationsnecessary to machine the part, one cutter at a time.5.Convert your sequence of operations into a programand simulate the program if possible.
What is a block? The machine reads the program one line at a time.Each line is called a block.Blocks do not extend past one line.The order of information on a block does not matter:G0 X3.0 Z1.75 is the same as Z1.75 G0 X3.0 However, most programmers use the following order:NGXYZIJKUVWABCPQRFSTMH We’ll go over the meaning of each letter as the courseprogresses.
G and M CodesThe machine operation is divided into two basictypes:Ø G codes also called preparatory codesq tell the machine what type of movement orfunction should be performed. For example, rapidmoves, linear feed moves, arc feed moves, threadcutting, etc.Ø M codes also called miscellaneous functionsq turn the spindle on and off, coolant on and off,etc.
Common CodesPreparatory GCodeActionMiscellaneousM FunctionActionG0Linear rapidtraversepositioningmoveM3Spindle forwardG1Linear feedmoveM4Spindle reverseG2CW arcM5Spindle offG3CCW arcM8/M9Coolant on/offG28Go homeM30End of program
Other CodesPreparatory mberG40Cancel noseradiuscompensationX, ZAbsolutepositionG99IPR feed modeU, WIncrementalpositionG54First fixtureoffsetTTool numberSSpindle Speed
Modal Most codes are modal– they stay in effectuntil somethingchanges them. We only program whatchanges, nothingextra. For example:PreferredWorks, but poor styleG0 Z3.0X2.0G1 Z1.5 F0.012X2.5G0 Z3.0G0 X2.0 Z3.0G1 X2.0 Z1.5 F0.012G1 X2.5 Z1.5 F0.012Easy to readand change!Difficult to follow, andchanges requireconsiderable effort.
Notes onTurning Center G & M Codes Most machines only allow one M code per block. The capital “Oh” for the program number is the only “Oh”in the program. All others are zeros (0). Be sure you donot mistype. The tool code (T) is four digits – the first two for the toolnumber, the second two for the offset number. They areusually the same. All alpha characters must be in uppercase.
Notes on Number FormatsAll numbers except zero require a decimal point,otherwise the machine defaults to its resolution. Forexample:X3.0X3.X3Z0Z0.works fineworks finethe machines interprets as X0.0003works fineworks fine
Special Notes forSending a Turning Center Home The G28 code is used to send the machine home. G28 requires a move through an intermediate point. We generally position the tool clear of the part beforesending it home, so the intermediate point is not used. To give it a point, we incrementally program a 0movement like this:– G28 U0 which means go home in X incrementallythrough a point 0 distance from the current location– G28 W0 means the same for the Z direction
Program FunctionsFall into just Four (4) Categories1.2.3.4.Program StartTool ChangeProgram EndMachining FunctionsThe first 3 are generally the same for all programs fora given machine.Note that they will be different for different machines.You must know your machine by reading themachine manual!
Program Functions forthe Haas SL-20 Turning Center The CNC language is not 100% standard across allmachine and control manufacturers. Haas machines use fairly generic programming that issimilar to most Fanuc compatible machines. Fanuc isprobably the most common machine controller. Again, you must know your machine by reading themachine manual!
Haas SL-20 Program StartProgramExplanation%O999G20 G40 G99G28 U0G28 W0T0202G54S4000 M3G0 ZzzzXxxx M8.Starting character for file transferProgram number set to 999, note the capital “Oh”Initial conditionsGo home in the X directionGo home in the Z directionLoad tool 2 with offset 2Load the first fixture offsetSet the spindle to 4000 RPM in the forward directionRapid to the first Z location, zzz is the numerical valueRapid to the first X location (G0 is modal), turn thecoolant on, xxx is the numerical valueMachining moves follow
Haas SL-20 Tool ChangeProgramExplanationM9G28 U0G28 W0T0303G54S3500 M3G0 ZzzzXxxx M8.Turn the coolant offGo home in the X directionGo home in the Z directionLoad the next tool and offsetLoad the fixture offsetSet the spindle speed and directionRapid to the first Z location, zzz is the numerical valueRapid to the first X location (G0 is modal), turn thecoolant on, xxx is the numerical valueMachining moves follow
Haas SL-20 Program EndProgramExplanationM9M5G28 U0G28 W0M30%Turn the coolant offTurn the spindle offGo home in the X directionGo home in the Z directionEnd of program M codeEnd of file character for file transfer
A Simple Turning Center Program0.1251.2502.250Material: 1117 CD Steel 175HBProblem Statement:Face up to 1/8” (0.125”) off the end of a 1.250” diameter 1117 CDsteel bar that is 175 Hb using a hard, coated carbide C shaped insertat 0.004 ipr feed.
Follow Planning andProgramming Steps (1-3)1.2.3.Examine drawingHow will we hold the raw material – in a collet.Decide what cutters to use – given hard, coatedcarbide C shaped insert.Since f f avg, use Vavg 1410 fpm giving12 V 12 1410N RPM 4480π D π 1.25Since the machine only goes 4500RPM, we’ll use 4000RPMto stay a little under the maximum.
Follow Planning andProgramming Steps (4)4.Write down the exact sequence of operations:A. Rapid position the cutter in ZB. Rapid position the cutter 0.1” away from the partin XC. Face to X0. at F0.004D. Move away 0.050” in ZE. Rapid position 0.1” away from the part in XF. Program end.
Follow Planning andProgramming Steps (5)5.Convert the sequence of operations to a program:Program StartFacingProgram End
The Actual ProgramProgram Codes Action%O999G20 G40 G99G28 U0G28 W0T0202G54S4000 M3G0 Z2.25X1.350 M8G1 X0 F.006Z2.3G0 X1.350M9M5G28 U0G28 W0M30%Program StartA. Rapid to position in ZB. Rapid 0.1 away from part (0.2 on diameter)C. Feed to X is 0 (center of the part)D. Feed 0.050” away from the faceE. Rapid back to 0.1” away from part in XF. Rapid home in XG. Rapid home in ZProgram End
What the Machine DoesCutter atHome Position(Program Start)ABSmall ClearanceMoveDCCutter in Positionto CutFacingCutGRapid MoveClear of PartEFRapid Home First in XThen in Z
An Animation of theMachine’s MovementSelect this link tostart the animation.Notes on the animation:1.The isometric view orientation is the same as the earlier views of the complete machine with thetailstock to the right.2.The animation shows the motion of the cutter, but it does not differentiate between rapid and feedmoves.3.The cutter is upside-down because the spindle is going forward (CCW is this view) and the cutter is onthe back side of the part.4.Sorry, I can’t make the part rotate or chips fly!
Running aProgram for the First Time1.Install all cutters in the proper holders.2. Install the fixture or chuck on the machine andestablish the WCS.3. Set the cutter offsets.4. Simulate the program on the machine.5. Slow rapid traverse down as low as possible.6. Initiate the single step cycle with your hand on theE-stop button at all times.7. Carefully watch the operations, press the feed holdbutton to take notes for any corrections.8. Install a part and go to step 5.
CNC ApplicationsIntroduction to Machining Centers
Machining CentersA machining center is simply a CNC millingmachine with an automatic tool changer andan enclosure.There are a number of different types ofmachining centers differentiated by thenumber of programmable axes.
Three Axis Machining CenterSpindle MotorHeadA three axis machining centerhas programmable X and Yaxes in the plane of the tableand a Z axis in the spindle’sdirection.ZColumnCutting ToolYXSaddleTableWith three axes, we can machine onesurface of a cube with the end of the cutterand four additional surfaces with the sideof the cutter.This is the most basic type ofmachining center, and they startat about 30,000.Typically, three axis machinesare in the vertical configurationshown here.Note: tool changer, control, andenclosure not shown.
Horizontal Three Axis MachineColumnThe illustration depicts a threeaxis horizontal machining center.HeadNote the different orientation ofthe X, Y, and Z axes.SpindleThis type of machine starts atabout 90,000.TableCutterSaddleAgain, the tool changer, control,and enclosure are not shown.We can still only machine onesurface of a cube with the end ofthe cutter and four additionalsurfaces with the side of thecutter.
Four Axis Machining CenterFour axis machining centers aregenerally horizontal, and the tablerotates to create the forth axis. Truefour axis machines start around 100,000We can also do this by adding a CNCcontrolled rotary table to a three axisvertical machine, and this iscommonly done for small parts.We can machine four surfaces of acube with the end of the cutter andtwo additional surfaces with the sideof the cutter.Frequently, a fixture called atombstone (see sketch later) ismounted on the table and many smallparts machined at once on a largemachine.
Five Axis Machining CenterBe prepared to spend about 250,000 fora true five axis machine. Notice that it isvery similar to the four axis machineexcept the spindle rotates from horizontalto vertical.These machines are used to machinecomplex parts and molds in theaerospace and automotive industries.We can machine five sides of a cube withthe end of the cutter and six sides withthe side of the cutter.Besides complex geometry, we can oftenmachine a part in one setup on a five axismachine that would require two or moresetups in a simpler machine. This resultsin a more accurate part.
Machining Centerwith Pallet ChangerSecond pallet waitingto be swappedinto position.Most machining centers can befitted with a pallet changer toincrease productivity.On a plain machine, it sits idlewhile the operator removes thecompleted parts and loads thefixture with new ones.First Palletwith tombstonein placefor machining.With a pallet changer, theoperator unloads and reloads onepallet while the machine works onthe other. This way, the machinecontinuously cuts parts.
Machining CenterCoordinate SystemMachine Coordinate System (MCS)at the center, end of the spindlewhen head is in its uppermost position,saddle is all the way towards the operator,and the table is all the way left.Work Coordinate System(WCS)
The Haas VF-1We will be using a HaasVF-1 three axis machiningcenter with the followingspecifications: 20hp, 7500RPM, 710ipm rapid,300ipm feed, 20 CAT40tools, 20”x16”x20” travel,7100lbs!
Milling MachineCoordinate System Concerns Regardless of the machine design, you alwaysprogram as if you are moving the tool. On most machining centers, the head moves the cutterup and down, so a move in the Z direction moves thecutter and head up. However, most machines move the table in the XYdirections. So, a X move actually moves the table to theleft, but the cutter moves in the X direction relative tothe part. Don’t be concerned with this as it is anoperation issue, not a programming issue. Remember,always program as if you are moving the tool.
Milling Machine CoordinateSystem Concerns (continued) Read the Turning Centers Introduction if you have notalready done so. As with the lathe, a fixture offset is entered into themachine controller which includes the distance themachine moves from the MCS 0,0,0 to the WCS 0,0,0position on the part. As with the lathe, the programmer picks the WCS on thepart. This is more complicated because of the extra Yaxis. The length of each tool is also entered into the machinecontrol, so the machine compensates for the WCS andthe length of the cutter.
Separating theProgrammer from the Machine As with the lathe, the programmer chooses the WCS onthe part, and then programs the cutter movement fromthere. The programmer calls the correct fixture offset and toollength offset numbers in the program (we’ll cover thesecodes later). So, once again, the programmer does not have to be tooconcerned with any machine specific measurements.
Incremental and AbsoluteProgramming on Machining CentersJust as with turningcenters, machiningcenters can beprogrammed withabsolute orincrementalcoordinates, butmachining centersuse a differentformat:Turning CentersAbsolute0,0 startG0 X3.Z2.X3.5Incremental0,0 startG0 U3.W2.U0.5Notice the use of X,Z forabsolute and U,W forincremental.MachiningCentersAbsolute0,0,0 startIncremental0,0,0 startG90 G0 X3.Y2.0X3.5G91 G0 X3.Y2.X0.5Notice that G90 signifiesabsolute coordinates andG91 signifies incremental,and both use X,Y,Z.
Incremental vs.Absolute Programming As with turning centers, most machining centerprogramming will be done in absolute mode. Editing for program changes is much easier in absolutemode, and absolute programs are much easier tofollow. Certain repetitive operations such as drilling multipleholes lend themselves to incremental programming,and we will cover this later in the course.
CNC ApplicationsTooling for Machining Centers
Cutting ToolsMost machiningcenters use someform of HSS orcarbide insert endmillas the basic cuttingtool.Insert endmills cutmany times fasterthan HSS, but theHSS endmills leave abetter finish whenside cutting.Photo courtesy ISCAR.
Cutting Tools (continued)Facemills flatten largesurfaces quickly and withan excellent finish. Noticethe engine block beingfinished in one pass with alarge cutter.Photo courtesy ISCAR.
Cutting Tools (continued)Ball endmills (both HSS and insert)are used for a variety of profilingoperations such as the mold shownin the picture.Slitting and side cutters are usedwhen deep, narrow slots must becut.Photos courtesy ISCAR.
Milling Feed DirectionRemember, all CNC machines are equippedwith ball screws to minimize slop whenchanging feed directions. The otheradvantage to ball screws is they allow climbmilling instead of conventional milling asdone on most manual machines.Climb milling has many advantages includingbetter surface finish, longer tool life, and thecutter deflects away from the work ratherthan into it.Always climb mill on a CNC machiningcenter!
Drills, Taps, and ReamersCommon HSS tools such as drills,taps, and reamers are commonlyused on CNC machining centers.Note that a spot drill is used insteadof a centerdrill. Also, spiral point orgun taps are used for through holesand spiral flute for blind holes. Rarelyare hand taps used on a machiningcenter.Drawings courtesy Precision Twist Drill.
Tool HoldersAll cutting tools must be held in a holder that fits in the spindle.These include end mill holders (shown), collet holders, face milladapters, etc.Most machines in the USA use a CAT taper which is a modifiedNST 30, 40, or 50 taper that uses a pull stud and a
for CNC controls. By the late 1970’s, no true NC machines were being made, only CNC. ØDuring the 1980’s, many machine manufactures took advantage of PC technology to increase the reliability and decrease the cost of CNC controls. ØToday, all machines are CNC although the t