Transcription
PARENTS’ GUIDE TOPEDIATRICTUBE FEEDINGParents’ Guide to Pediatric Tube Feeding 1
FOREWORDPARENTS’ GUIDE TOPEDIATRIC TUBE FEEDING:A PERSONAL MESSAGEIf you’ve recently learned your child will need to be fed through a tube, it’snatural to have questions. Maybe you’re wondering why a feeding tube isnecessary. You’re unsure how much or how often to feed your child. Or youwish you felt more confident when setting up and using the equipment.If these questions and worries sound familiar, please know you’re not alone. In the United States,more than 200,000 children need home tube feeding (also called enteral feeding)—a number that isincreasing as nutrition science and feeding technology advances.1Good nutrition will support your child’s growth, general health, and optimal development. As a parent,you play an important role in providing the right nutrition for your child. Your child’s healthcare teamwill guide you. This resource will help you begin by sharing information on: The “whys and hows” of tube-feedingThe basics of getting startedSafe routine feeding practicesConditions that require special guidance from your child’s healthcare professionalsIn this resource, we’ve included the best-practice guidance from leaders of the American Societyfor Parenteral and Enteral Nutrition (ASPEN) from their newly-published practical handbook forprofessionals.2 Our goal is to provide you, as a parent with a guide that will lead you through this newexperience of tube-fed nutrition for your child.1. Mundi MS, Pattinson A, McMahon MT, et al. Prevalence of home parenteral andenteral nutrition in the United States. Nutr Clin Pract. 2017;32:799-805.2. ASPEN Enteral Nutrition Handbook: Second Edition. Silver Spring, MD: AmericanSociety for Parenteral and Enteral Nutrition; 2019.2 Parents’ Guide to Pediatric Tube Feeding
CONTENTSGETTING STARTED WITHHOME TUBE FEEDING4TUBE FEEDING BASICS5FEEDING YOUR CHILD10GIVING YOUR CHILD MEDICATIONTHROUGH A FEEDING TUBE16MANAGING AND MAINTAINING YOURCHILD’S FEEDING TUBE AND EQUIPMENT17RESOLVING ADVERSE PHYSICALSYMPTOMS RELATED TO TUBE FEEDING20NAVIGATING YOUR DOCTOR VISITS24COMMUNITY SUPPORT25SPECIAL CONSIDERATIONS27SUMMARY29APPENDIX30Content reviewed and approved by The American Society for Parenteral and Enteral Nutrition (ASPEN)These recommendations do not constitute medical or other professional advice and should not be taken as such. To the extent that the informationpublished herein may be used to assist in the care of patients, this is the result of the sole professional judgment of the attending healthcare professionalwhose judgment is the primary component of quality medical care. The information presented in these recommendations is not a substitute for theexercise of such judgment by the healthcare professional. Circumstances in clinical settings and patient indications may require actions different fromthose recommended in this document. In those cases, the judgement of the treating professional should prevail.Parents’ Guide to Pediatric Tube Feeding 3
GETTING STARTEDWITH HOMETUBE FEEDINGGood nutrition is important to your child’s growth and development, bothnow and in the years to come. Providing the right amounts of calories, protein,fat, and essential nutrients gives your child what is needed to maintain theirhealth. Good nutrition can also help prevent the onset of chronic diseaseslater in life.WHY TUBE FEEDING?Tube feeding may be necessary to ensure your child receives the proper amount and balance ofnutrients. The essential nutrients your child needs are provided by a specialized formula given througha tube directly into the stomach or small intestine.The length of time your child will require this feeding method is dependent upon several factors. Yourhealthcare team will provide further information based on your child’s clinical condition. Shorterperiods of tube feeding are typically associated with a major surgery or trauma, while longer periodsof tube feeding are commonly associated with an illness or medical condition that limits food intakethrough the mouth.Getting your child started on tube feeding can feel a bit overwhelming, but with help from yourdoctor and the information in this guide, you can learn the basics. The process will become easier withpractice.In this booklet, you will find: (1) general information on tube feeding, (2) instructions for managingtube feeding, and (3) strategies to help avoid common issues with tube feeding. Most importantly,this guide will help you develop a personalized plan for your child’s tube feeding care. This resourcecontains suggested durations and timelines, as well as suggested amounts of fluid for managingyour child’s feeding tube. These suggestions were developed using best practice guidance fromthe American Society for Parenteral and Enteral Nutrition’s (ASPEN) practical handbook forprofessionals. Your doctor will help you develop a personalized plan, which may include guidancethat is best for your child.Let’s get started.4 Parents’ Guide to Pediatric Tube Feeding
TUBE FEEDING BASICSTUBE FEEDING FORMULASThere are a few different types of formulas available. These formulas are available in different containers includingcans, recloseable plastic bottles, tetra packs and ready-to-hang bottles. Based on your child’s nutritional needs, yourdoctor will assist you in selecting the right type of formula and method of delivery. Your doctor will specify how muchformula to give for each feeding, and how many feedings are needed each day. To help you organize this information,we created a Tube Feeding Nutrition Plan. This form can be found in the appendix at the end of this book.THERE ARE FIVE BASIC TYPES OF TUBE FEEDING FORMULAS:TYPECOMPOSITIONMEETS THE NUTRITIONALNEEDS OFDESCRIPTIONSTANDARDIntact protein, carbohydrate,fat; vitamins and mineralsNutrients are similar to a regular oraldietPEPTIDEBASEDProtein in the form of peptides,carbohydrates and fat; vitaminsand mineralsProtein is made up of amino acidsELEMENTALOR AMINOACID-BASEDProtein in the form of aminoacids, carbohydrates, and fat;vitamins and mineralsProvides protein in the form of aminoacidsSPECIALTYProtein (intact, peptide orSpecialty formulas are designed foramino acid), carbohydrates, and specific medical conditions by providingfat; vitamins and mineralsingredients that may not be found instandard formulas.May also contain specializedingredients such as mediumchain triglycerides (MCT),structured lipids, fiberChildren with specific conditionsBLENDERIZEDFOODSCarbohydrates, protein, andfat; vitamins and mineralsChildren with regular digestion andabsorptionChildren with regular digestion andabsorptionChildren with malabsorption, maldiWhen protein is digested (broken down) gestion or other medical conditionsin the body, it is broken down into aminoacids. Peptides are chains of amino acidsat varying lengths, which are easier todigest and absorbAmino acids are the building blocks ofprotein. They are protein in the simplestform and are easy for the body toabsorbRegular food that has been liquified ina food processor. Blenderized formulasare either prepared by the caregiver orare available as commercial real foodformulasChildren with digestive problems,food allergy, or other medical conditions.TUBE FEEDING FORMULASIt is important to monitor how your child tolerates the formula. Use theTube Feeding Monitoring Checklist (in the appendix of this booklet) to keep arecord of your child’s response to the formula. Share this information withyour doctor during your child’s routine medical visits, or when your child isexperiencing any adverse reactions during feeding.Parents’ Guide to Pediatric Tube Feeding 5
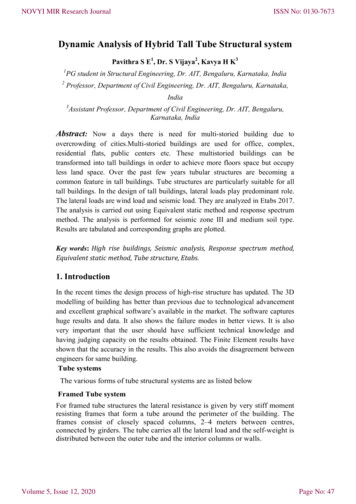
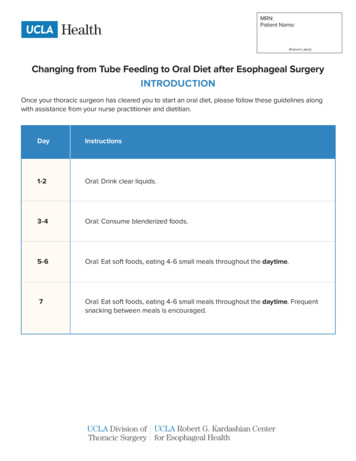
CHILD GASTROINTESTINALANATOMYTYPES OFFEEDING TUBESESOPHAGUSThere are a few types of feeding tubes available,and your doctor will determine which one isbest for your child. The type of tube your childwill receive depends on the underlying medicalcondition, the length of time that tube feedingwill be needed, and on your child’s gastrointestinaltract N/DURATION OFFEEDINGADDITIONALINFORMATIONTUBE TYPEDESCRIPTIONNASOGASTRICTUBE (NG)Tube insertedthrough the noseand into the stomachStomachTube feeding of lessthan 4 weeks durationNG tubes can remain safelyin place for weeks or removedafter each feedingNASODUODENAL(ND) ORNASOJEJUNAL(NJ)Tube inserted throughthe nose and into thesmall intestine (duodenum or jejunum)Duodenumor jejunum(smallintestine)Tube feeding of lessthan 4 weeks durationND and NJ tubes can remainsafely in place for weeksGASTROSTOMYTUBE (G-TUBE)*,PEG TUBE(PERCUTANEOUSENDOSCOPICGASTROSTOMY)OR LOW-PROFILEDEVICE.Tube insertedthrough a smallincision in theabdomenStomachTube feeding greaterthan 4 to 6 weeksdurationStitches may hold the tube inplace until the site is healed.Once the gastrostomy siteis healed, a G-tube belt, orholder is used to hold thetube in place.JEJUNOSTOMYTUBE (J-TUBE)Tube insertedthrough a smallincision in theabdomenJejunumTube feeding greaterthan 4 to 6 weeksdurationFeedings are usually administered at a constant rate usinga pump. The small intestinetolerates small volumes offeeding giving continuously.*Your child’s gastrostomy tube may need to be periodically resized and your healthcare team will discuss this process with you.6 Parents’ Guide to Pediatric Tube Feeding
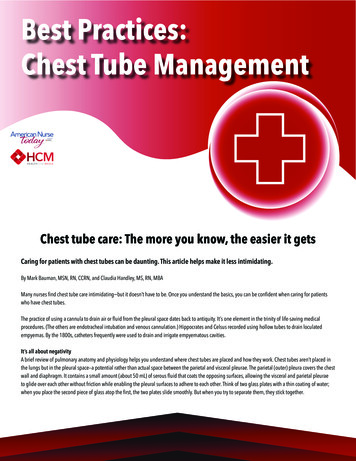
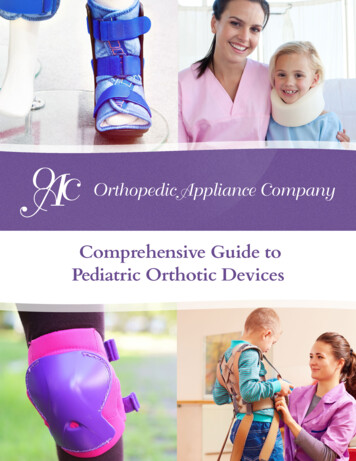
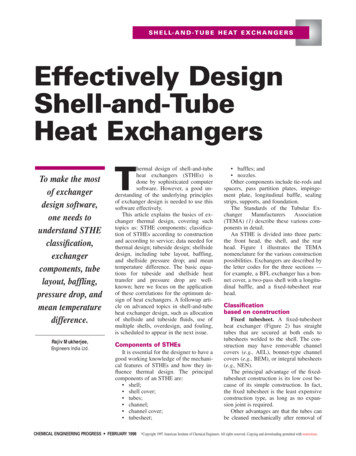
FEEDING TUBE STROSTOMYTUBEJEJUNOSTOMYTUBEFEEDING TUBE PLACEMENTFeeding tubes have different placement methods. Nasogastric tube placement does not require surgery. Nasogastric tubes are inserted byclinicians or parents who have been instructed on proper nasogastric tube placement. Nasoduodenal (or Nasojejunal) tubes are placed by a healthcare provider, and they do notrequire surgery. The physician will verify correct placement. Gastrostomy and jejunostomy tubes are put in by a doctor during surgery or atan outpatient clinic.If your child has a nasogastric tube, you may be instructed on how tosafely insert your child’s feeding tube. Once you have been guidedand instructed by your child’s doctor on proper placement techniques,you can use the following reminders to help you along the way.NASOGASTRIC TUBE INSERTIONMEASURING NASOGASTRICTUBE LENGTHMARK ONTHE TUBEHere is how to do it:BREASTBONE1. Wash your hands with soap and warm water.2. Measure your child’s nasogastric tube prior to each insertion. Theend of the nasogastric tube should be placed at the tip of yourchild’s nose and then to the ear. The tube is then extended to thespot halfway between the end of the breastbone and belly button(see figure below).BELLYBUTTONParents’ Guide to Pediatric Tube Feeding 7
3. Mark the tube at the nose with a permanent marker. This mark tells you how far the nasogastrictube needs to be inserted.Note: Once the nasogastric tube is in your child, the mark will let you know that the tube is in theright place. If the mark has moved, there is risk that the tube has been dislodged, and your childcould aspirate (get formula into the lungs) if fed. The nasogastric tube should be removed and anew one reinserted before feeding.4. Place your child in a comfortable position. Swaddling your child in a blanket may be comfortingand provide gentle restraint. Sucking on a pacifier or sipping water through a straw for olderchildren may help with the passage of the tube.5. Wipe your child’s cheek with a skin protectant and allow it to dry. This is the area where the tapewill be applied after the nasogastric tube is inserted.6. Place the tip of the nasogastric tube in water or a water-soluble lubricant. Some tubes havelubricant on the tip that needs to be activated with water. Check with your doctor about yourchild’s specific feeding tube. Moistening the tip of the nasogastric tube makes it easier to insert.7. Place the tip of the nasogastric feeding tube into the center of the nostril.8. Gently push the tube down the nose until you reach the mark on the tube that you made with themarker. If you feel resistance, pull the tube back slightly and try to push the tube forward again.Note: Crying, gagging and coughing is generally a normal reaction to tube placement. If yourchild can not breathe, remove the tube. Let your child rest before trying again to place the tube.9. Once the nasogastric tube is in place, apply a dressing between the tube and the skin before tapingthe nasogastric tube to your child’s cheek. The nasogastric tube should not press on the nostrils.10. If there is excess tubing outside the nose, wind the tubing into a circle and tape it to your child’sclothing to prevent the tube from being pulled out.FEEDING METHODSThere are several methods for giving your child tube feedings: syringe, gravity, or by using a pump.The method selected for feeding is dependent on your child’s clinical condition, and ability totolerate a typical eating schedule.Here is a summary of the feeding methods:TYPE OF FEEDING METHODBOLUSINTERMITTENTCONTINUOUSDELIVERY METHODSyringe or GravityGravity or PumpGravity or Pump8 Parents’ Guide to Pediatric Tube FeedingREASON FOR USEMimics normal eating patternMimics normal eating patternGradual feeding rate for children with feeding intolerance
Bolus feedings (syringe or gravity bag)Bolus feedings are specific volumes of food given over short periods of time. Bolus feedings areadministered by filling a syringe with formula and connecting the syringe to your child’s feeding tube.The feeding is given slowly over several minutes or as directed by your child’s doctor. A gravity bagcan also be used to infuse bolus feedings. Feedings are given several times per day.This method is used: For children who can tolerate a large volume of feeding into their stomachs over a short period oftime (usually less than 30 minutes) To mimic typical eating patterns To give your child more time free from tube feedingsIntermittent feedings (gravity)Intermittent feedings are provided by using a gravity bag or feeding pump to infuse the feeding overseveral hours at a constant rate, several times per day. The usual infusion time is 60-90 minutes.Discuss with your healthcare provider as infusion times may vary based on your child’s condition.This method is used for: Children with gastrostomy tubes who are receiving feeding into their stomachs Children who cannot tolerate bolus feedingsContinuous feeding (pump or gravity)Continuous feedings are administered by using an enteral feeding pump or by gravity to give thefeeding at a constant rate or as prescribed by your child’s physician.This method is used for: Children who do not tolerate large volumes of feeding into their stomach over shortperiods of time Children receiving jejunal feedingsParents’ Guide to Pediatric Tube Feeding 9
FEEDINGYOUR CHILDIn this section, you will learn how to administer your child’s tube feeding.Before you touch your child’s feeding tube or begin preparing your child’s tubefeeding, it is important that you wash your hands with soap and warm water.Clean your work surfaces to avoid contaminating your child’s feeding andequipment with bacteria.PROPER HAND WASHINGChecking tube placement is critical to ensuring that your child’s feeding tube is in the stomach orsmall intestine, not in the lung, before you begin the feeding. The method for checking placementwill vary depending on the type of feeding tube your child has.Note: If your child has a jejunostomy tube, you do not have to re-check tube placement by viewingstomach liquid before each feeding. Formula and fluid are absorbed quickly in the jejunum and do notremain in the jejunum.CHECKING PLACEMENT OF YOURCHILD’S NASOGASTRIC FEEDING TUBEHere is how to do it:1. Wash your hands with soap and warm water.2. Find the mark on the tube that was made to measure the lengthof the tube from the tip of the nose to the ear and then to themid-point between the bottom of the breastbone and the bellybutton.Note: If the mark on the tube is not at the nose, the nasogastrictube will need to be removed and reinserted because the tubemay have slipped out of the stomach.10 Parents’ Guide to Pediatric Tube FeedingCHECKING NASOGASTRICTUBE PLACEMENT
3. Attach a syringe to the end of the nasogastric tube and pull back gently on the plunger. If a smallamount of pale gray or yellow stomach liquid is seen in the syringe, this is a sign that the tip of thefeeding tube is in the stomach.4. Follow your doctor’s instructions for pushing the stomach liquid back into the stomach.5. If you do not get any stomach fluid, turn your child onto the left side, and pull back again on theplunger. If you still do not get fluid back, remove the plunger and fill with 2-3 mL of air. Pushthe air into the tube. If your child chokes, coughs or has difficulty breathing, remove the feedingtube. This indicates that your child’s feeding tube may be in the lung.6. If your child does not have any breathing problems after flushing with air, wait for 15-20 minutesand then reattach the syringe and pull back on the plunger to obtain stomach contents.7. Once you have 2-3 mL or more of fluid in the syringe, disconnect the syringe from the feedingtube.8. Put a small amount of the stomach fluid on the pH paper and check the pH (acid in the stomach).If the fluid is acidic, (pH of 5.5 or less), the tube tip should be in the stomach.Note: If your child is on antacids or other medications that can alter the pH of the stomach,check with your doctor for further instructions.9. Remember to flush your child’s feeding tube with water after obtaining stomach fluid. This willkeep the tube from clogging.CHECKING PLACEMENT OF YOURCHILD’S GASTROSTOMY FEEDINGTUBEHere is how to do it:1. Wash your hands with soap and warm water.2. Check tube placement by attaching a syringe to the end ofthe feeding tube and pull back gently on the plunger. If asmall amount of pale gray or yellow stomach liquid is seen inthe syringe, this is a sign that the tip of the feeding tube is inthe stomach.3. Follow your doctor’s instructions for pushing the stomachliquid back into the stomach.4. Flush the tube with water to clear the tube and preventclogging.CHECKING GASTROSTOMYTUBE PLACEMENT5. Remove the syringe from the feeding tube.Parents’ Guide to Pediatric Tube Feeding 11
FLUSHING ALL TYPES OF FEEDING TUBESFlushing the feeding tube routinely, or as directed, is important to keep the tube clean inside and toprevent clogging. A syringe filled with water is used to gently flush the feeding tube before and aftereach feeding. Flushing removes extra feeding from the tube and provides water for your child.Here is how to do it:1. Wash your hands with soap and warm water.2. Place the tip of the syringe into the water and pull back on the plunger until there is 15 mL ofwater in the syringe (or the amount of water that your doctor has prescribed for flushing thetube). Attach the syringe to the feeding tube and slowly inject the water into the feeding tube.3. Remove the syringe from the feeding tube afterflushing.4. Flush your child’s feeding tube with water beforeand after each feeding.Note: Extra water can be given throughthe feeding tube, as needed. If your child ison a fluid restricted diet, your doctor willprovide recommendations for your child’s dailyfluid intake.ADMINISTERING THE FEEDINGFLUSHING THE FEEDING TUBEWITH WATERNow that you have checked tube placement and flushed your child’s feeding tube, it is time to begin thefeeding. There are several methods that can be used. Your physician has prescribed the feeding methodthat is right for your child. Find your child’s feeding method below and follow the instructions.Note: Your child’s doctor may provide additional guidance for feeding. This guidance may includespecific amounts of fluid that should be used to flush the tube, and if your child requires additionalwater. Your child may be on a fluid restricted diet, and giving extra water through the feeding tubemay not be advised by your doctor.Bolus feeding instructionsMethod #1 (gravity)1. Wash your hands with soap and warm water.2. Remove the plunger of the syringe and attach the syringe to the feeding tube.3. Pour the formula into the syringe and allow the feeding to run into the stomach by gravity.12 Parents’ Guide to Pediatric Tube Feeding
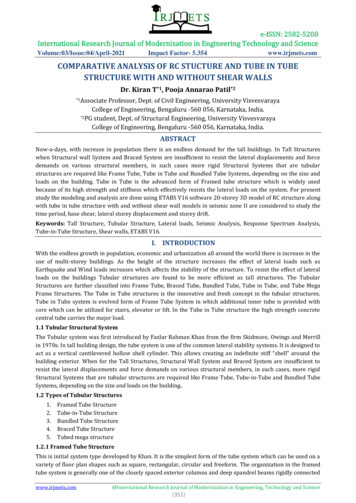
4. Repeat this process until all the prescribed feeding has been given.5. Once the syringe is empty, add water to the empty syringe and allow it to flow in. This will clearthe feeding from the feeding tube and provide extra water for your child.6. Clean your child’s feeding equipment as directed by your healthcare team.FORMULASYRINGESYRINGECLAMPTUBINGAdminister nasogastricfeedingAdminister gastrostomyfeedingMethod #2 (syringe)1. Wash your hands with soap and warm water.2. Place the tip of the syringe into the formula, then pull back on the plunger to fill the syringe.3. Connect the syringe to the feeding tube.4. Gently push the end of the syringe until all the formula has been given.5. Disconnect the syringe from the feeding tube. Refill the syringe with feeding and repeat theprocess until all your child’s feeding has been given.6. Once the feeding is complete, place the tip of the syringe into the water. Pull the plunger backand fill the syringe with water.7. Attach the syringe to the feeding tube and gently push the water into the feeding tube. This willclear any residual feeding from the feeding tube.8. Clean your child’s feeding equipment as directed by your doctor.Parents’ Guide to Pediatric Tube Feeding 13
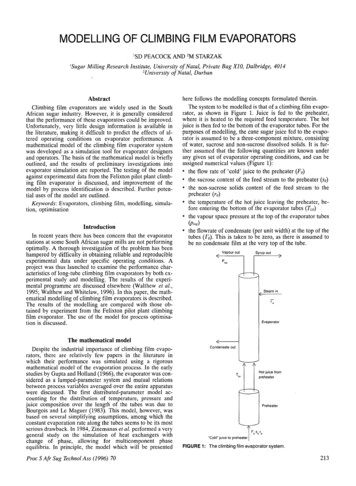
Intermittent feeding (gravity) instructions1. Wash your hands with soap and warm water.2. Pour the formula into the feeding bag and attach the bag in an elevated position on anintravenous pole (commonly called an IV pole).3. Insert the tip of the feeding bag tubing into your child’s feeding tube.4. Open the clamp on the feeding bag and allow the formula to flow into the stomach.5. When the feeding bag is empty of formula, add water to the feeding bag to rinse the bag andtubing. The water clears any left-over formula from the feeding tube, preventing clogs. The extrawater is also important for your child’s hydration.6. Clean your child’s feeding equipment as directed by your doctor.FORMULAFEEDINGBAG TUBEFEEDINGPORTFEEDINGBAGFEEDING TUBEPOUR FORMULA INTO THE FEEDING BAGContinuous (pump) feeding Instructions:1. Wash your hands with soap and warm water.2. A ready-to-use feeding bag or feeding container filled with formula is hung from an IV pole witha feeding pump attached. Your child may have the option or ability to use a backpack with theirpump. Discuss this possibility with your healthcare provider.3. Attach the feeding bag tubing to the pump.4. Connect your child’s feeding tube to the feeding bag tube.5. Set the pump to the rate of feeding as prescribed by your child’s physician.6. Once turned on, the pump will automatically infuse your child’s feeding. An alarm will soundwhen the feeding is complete.14 Parents’ Guide to Pediatric Tube Feeding
7. Once the feeding is complete, water can be added to the feeding bag to clear the tubing ofresidual formula. The feeding bag is then disconnected from your child’s feeding tube.8. Clean your child’s feeding equipment as directed by your doctor.Note: Follow the instructions provided by your doctor for the infusion of your child’s tubefeedings and use of your child’s specific feeding pump. Instructions for the routine maintenanceof the feeding pump can be found in the Pump Operating Manual.Note: Remember to write down the amount of each feeding and your child’s response to thefeeding on the Tube Feeding Monitoring Checklist (in the appendix of this booklet).TIP OF FEEDINGBAG TUBINGPUMPFEEDING PORTFEEDING TUBECONNECTING THE PUMP TO THE FEEDING TUBEParents’ Guide to Pediatric Tube Feeding 15
GIVING YOURCHILD MEDICATIONTHROUGHA FEEDING TUBETo make sure that your child’s medications are effective, it is important to givethe medications correctly as prescribed by your doctor. Use the MedicationRecord (in the appendix of this booklet) to keep a record of the medicationsyou give your child.HERE IS WHAT TO DO:1. Stop the feeding before giving any medication. Your doctor will tell you how long the feedingshould be held before you give the medication.2. Wash your hands with soap and warm water.3. Flush the feeding tube with water to remove any residual formula from the tube.4. Use a syringe to give the medications.5. Each medication should be given separately to avoid clogs.6. Flush with water between each medication, and after all medications have been given.7. Your doctor will tell you how soon your child’s feeding can be restarted after the medicationshave been given.Note: If you are unable to administer your child’s medications as prescribed, contact the doctorfor further instructions.Note: When flushing your child’s feeding tube, follow recommendations of your doctor,especially for infants and those on a fluid restriction.Note: When giving both medications and a feeding, give the medications first.16 Parents’ Guide to Pediatric Tube Feeding
MANAGING ANDMAINTAINING YOURCHILD’S FEEDINGTUBE AND EQUIPMENTIn this section, we will cover the basics of how to manage and maintain thefeeding tube and equipment. Proper maintenance keeps your child safe, and itkeeps the equipment performing at its optimal level. Your doctor may give youspecific instructions for managing your child’s feeding tube.Note: Remember to clean your child’s feeding equipment after each use.CLOGGED FEEDING TUBEIf you are unable to deliver the feeding, there may be a clog in the tubing. If your child uses a pumpfor feeding, the pump will alarm and stop the feeding infusion.Here is what to do:1. Wash your hands with soap and warm water.2. Check to be sure there are no kinks in your child’s feeding tube.3. Fill a syringe with warm water, and attach the syringe to your child’s feeding tube. Massage thefeeding tube gently to loosen the clog and flush with water to clear the tube.4. If the tube remains clogged, remove all fluid from the tube with a syringe. Next, inject warmwater into the tube and clamp the tube for 20-60 minutes. The warm water will help break downthe clog. Then, attach a syringe to the feeding tube and gently move the plunger in and out of thesyringe several times to help dislodge the clog.5. If the tube remains clogged, contact your doctor for further instructions.Parents’ Guide to Pediatric Tube Feeding 17
Practical management tips to prevent issues:1. Flush the feeding tube with water before and after each medication is given, and before and aftereach feeding. More information about flushing the feeding tube can be foundon page 12 of this guide.2. If your child is receiving continuous feedings, flush with water every 4-8 hours during thefeedings. Your doctor will advise you on how much water to use.NASOGASTRIC TUBE SITE COMPLICATIONSChildren with nasogastric tubes may experience irritation of the skin around or in their nose. Thisirritation may be caused by the movement of the tube, or by the adhesives that are used to securethe tube in place.Here is what to do:1. Clean the skin and nostrils with soap and water.2. Reposition the tube and secure it with tape or a tube holder to prevent excessive movement ofthe tube.3. If the nose or surrounding area is red, bleeding or is draining, contact your doctor for furtherinstructions.Practical management tips to prevent or minimize irritation:1. Keep the area clean and dry. Consider using a topical ointment to lubricate the area.2. Talk to your doctor about using a different type of tape or adhesive material.3. If the nasogastric tube is reinserted at intervals, alternate between the use of the right and leftnostril.4. If bleeding or irritation continues, contact your doctor to discuss additional measures.GASTROSTOMY AND JEJUNOSTOMYTUBE FEEDING COMPLICATIONSThe area around your child’s gastrostomy or jejunostomy tube may become irritated. Irritation may becaused by movement of the gastrostomy tube, tube tract enlargement, or gastrostomy balloon deflation.Sometimes gastrostomy and jejunostomy tubes may have drainage around the insertion site. Thedrainage may be cloudy white, yellow, green, or red in color indicating irritation and possibly infection.You may also notice a bad odor, or that your child has a fever, both are possible signs of infection.18 Parents’ Guide to Pediatric Tube Feeding
Your child’s skin around the tube site may be reddened with: Thick green or yellow drainage indicating an infection Raised papules (bumps) that may indicate a fungal infection Pus filled blisters or a burning sensationHere is what to do:1. Clean the skin around the tube daily with soap and water. Make sure that the area under the tube holder isalso cleaned.2. Evaluate the tube feeding site for redness and rashes. Check for leakage of fluids or formula around the site.3. Contact your doctor when you notice signs of infection, which include redness around the site and a fever.Antibiotics or other medications may be needed to treat the infection.Practical management tips to prevent issues:1. Keep the skin around the tube clean and dry. Dressings are not recommended for daily use.2. Do not use hydrogen peroxide or antibiotic ointments unless directed by your doctor. Hydrogen peroxideprevents healing and can cause skin irritation. Antibiotics may promote the growth of yeast if used forprolonged periods of time.3. Secure the gastrostomy tube with a tube holder to prevent excessive movement of the tube. Excessivemovement can cause irritation and lead to infection.4. Check the condition of the skin around the gastrostomy tube prior to each feeding for redness or drainage.If your child has excessive drainage around the tube insertion site, your doctor may recommend the use of adressing to absorb the fluid.FEEDING PUMP MAINTENANCEAND TROUBLESHOOTINGThere are many types of feeding pumps.
PEDIATRIC TUBE FEEDING: A PERSONAL MESSAGE If you’ve recently learned your child will need to be fed through a tube, it’s natural to have questions. Maybe you’re wondering why a feeding tube is necessary. You’re unsure how much or how often to feed your child. Or you wish you fel