Transcription
24785 CH02 BRONSON.qrk11/10/0412:44 PMPage 45Introduction to VisualBasic .NET2.2 Getting Started in Visual Basic2.3 Adding an Event Procedure2.4 Adding Controls2.5 Adding Additional Event Procedures2.6 Focus on Program Design and Implementation:Creating a Main Menu2.7 Knowing About: The Help Facility2.8 Common Programming Errors and Problems2.9 Chapter ReviewGoals2.1 Elements of a Visual Basic Application
24785 CH02 BRONSON.qrk46 11/10/0412:44 PMPage 46Chapter 2: Introduction to Visual Basic .NETIn this chapter we begin learning about the fundamentals of programming and VisualBasic .NET. First we examine the two elements that are required by every practicalVisual Basic program: the screens and instructions seen by the user, and the “behind thescenes” processing that is done by the program. We then present the basic design windows that you must be familiar with to produce such programs. Finally, we show youhow to use these design windows to create the visual user interface, or GUI, and thenadd processing instructions.2.1Elements of a Visual Basic ApplicationVisual Basic was initially introduced in 1991 as the first programming language thatdirectly supported programmable graphical user interfaces using language-suppliedobjects. From that time until 2002, there were five other versions released, each versionhaving features that increased the power of the language. In 2001, Microsoft releasedthe .NET (pronounced “dot net”) platform. Visual Basic .NET, or VB.NET, is an upgradeto the last version of VB (version 6.0) that conforms to the .NET platform. As you willsee in subsequent chapters, the changes in VB.NET allow programmers to write Web ordesk-top applications within the same language. In addition, VB.NET is fully object-oriented as opposed to prior versions that had many, but not all, of the elements of anobject-oriented language. This book is based on VB.NET. In the balance of the book wewill sometimes refer to Visual Basic as VB, omitting .NET.From a programming viewpoint, Visual Basic is an object-oriented language that consists of two fundamental parts: a visual part and a language part. The visual part of thelanguage consists of a set of objects, while the language part consists of a high-level procedural programming language. These two elements of the language are used together tocreate applications. An application is simply a Visual Basic program that can be run underthe Windows operating system. The term application is preferred to the term program fortwo reasons: one, it is the term selected by Microsoft to designate any program that can berun under its Windows Operating System (all versions) and two, it is used to avoid confusion with older procedural programs that consisted entirely of only a language element.Thus, for our purposes we can express the elements of a Visual Basic application as:Visual Basic Application Object-Based Visual Part Procedural-Based Language PartThus, learning to create Visual Basic applications requires being very familiar withboth elements, visual and language.The Visual ElementFrom a user’s standpoint, the visual part of an application is provided within a window.This is the graphical interface that allows the user to see the input and output provided
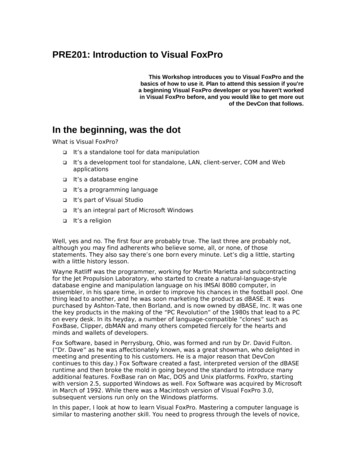
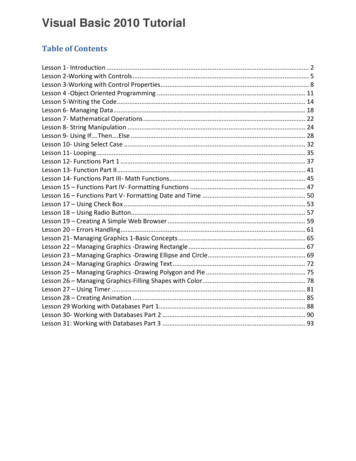
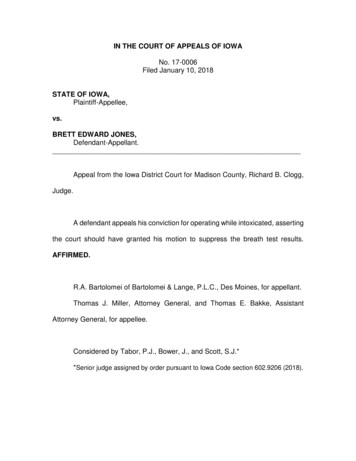
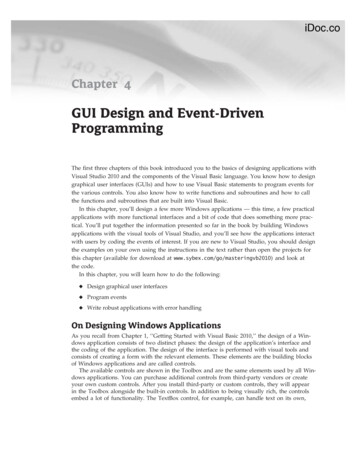
24785 CH02 BRONSON.qrk11/10/0412:44 PMPage 472.1Elements of a Visual Basic Application 47by the application. This user interface is referred to as the graphical user interface (GUI).From a programmer’s perspective the GUI is constructed by placing a set of visualobjects on a blank window, or form, when the program is being developed. For example, consider Figure 2–1, which shows how a particular application would look to theuser. From a programmer’s viewpoint, the application shown in Figure 2–1 is based onthe design form shown in Figure 2–2. The points displayed on the form are a design gridused to arrange objects on the form and are only displayed during design time.Figure 2–1A User’s View of an ApplicationDesign Form (Initial Form Window)Design WindowFigure 2–2The Design Form on which Figure 2–1 is Based
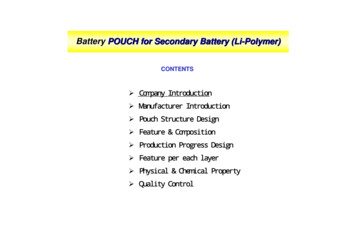
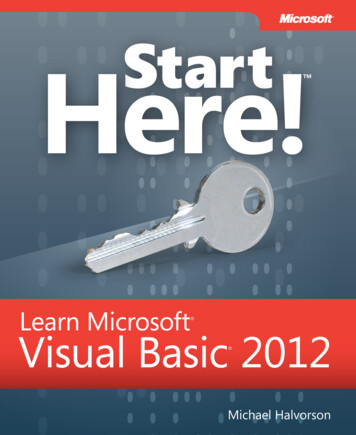
24785 CH02 BRONSON.qrk48 11/10/0412:44 PMPage 48Chapter 2: Introduction to Visual Basic .NETThe programmer can place various objects on this form, which is itself a VisualBasic object. When an application is run, the form becomes a window that provides thebackground for the various objects placed on the form by the programmer. The objectson the window become the controls used to direct program events. Let’s take a momentto look at the objects provided in the Visual Basic Toolbox. The standard object Toolbox, which is illustrated in Figure 2–3, contains the objects we will use in constructingeach graphical user interface.Figure 2–3The Standard Visual Basic Toolbox
24785 CH02 BRONSON.qrk11/10/0412:44 PMPage 492.1Elements of a Visual Basic ApplicationProgrammer NotesForms and ControlsWhen an application is being designed, a form is a container upon which controls areplaced. When an application is executed, the form becomes either a window or a dialog box.Forms can be of two types: SDI or MDI. The acronym SDI stands for Single Document Interface, which means that only one window at a time can be displayed by an application. SDIapplications can have multiple windows, but a user can only view one window at a time.The acronym MDI refers to Multiple Document Interface, which means the application consists of a single “parent” or main window that can contain multiple “child” or internal windows. For example, the Notepad application supplied with the Windows operating system isan SDI application, while Excel and Access are both MDI applications.A control is an object that can be placed on a form, and has its own set of recognized properties, methods, and events. Controls are used to receive user input, display output, and trigger event procedures.A majority of applications can be constructed using a minimal set of objects provided by the standard object Toolbox. This minimal set consists of the Label, TextBox,and Button objects. The next set of objects that are more frequently found in applications include the CheckBox, RadioButton, ListBox, and ComboBox. Finally, the Timerand PictureBox can be used for constructing interesting moving images across the window. Table 2–1 lists these object types and describes what each object is used for. Theremaining sections of the text will describe the use of objects in the toolbox, with special emphasis on the four objects (Label, TextBox, Button, and ListBox) that you will usein almost every application that you develop.In addition to the basic set of controls provided in VB, a great number of objects canbe purchased either for special purpose applications or to enhance standard applications.Table 2-1Fundamental Object Types and Their UsesObject xComboBoxCreate text that a user cannot directly change.Enter or display data.Initiate an action, such as a display or calculation.Select one option from two mutually exclusive options.Select one option from a group of mutually exclusive options.Display a list of items from which one can be selected.Display a list of items from which one can be selected, as well aspermit users to type the value of the desired item.Create a timer to automatically initiate program actions.Display text or graphics.TimerPictureBox 49
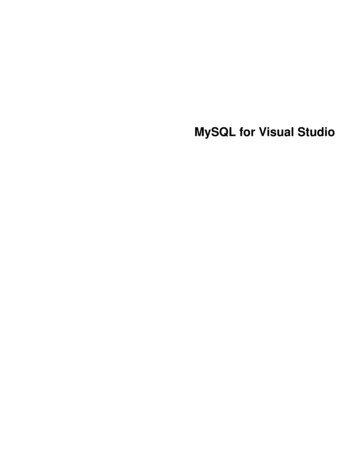
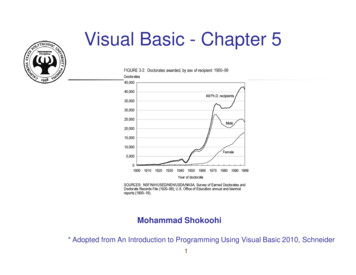
24785 CH02 BRONSON.qrk50 11/10/0412:44 PMPage 50Chapter 2: Introduction to Visual Basic .NETDon’t be overwhelmed by all of the available controls. At a minimum, you willalways have the objects provided by the standard Toolbox available to you, and theseare the ones we will be working with. Once you learn how to place the basic controlobjects on a form, you will also understand how to place the additional objects, becauseevery object used in a Visual Basic application, whether it is selected from a standard orpurchased control, is placed on a form in the same simple manner. Similarly, each andevery object contains two basic characteristics: properties and methods.An object’s properties define particular characteristics of the object. For example,the properties of a text box include the location of the text box on the form, the colorof the box (the background color), the color of text that will be displayed in the box (theforeground color), and whether it is read-only or can also be written to by the user.Methods are predefined procedures that are supplied with the object for performingspecific tasks. For example, you can use a method to move an object to a different location or change its size.Additionally, each object from the Toolbox recognizes certain actions. For example,a button recognizes when the mouse pointer is pointing to it and the left mouse buttonis clicked. These types of actions are referred to as events. In our example, we would saythat the button recognizes the mouse-click event. However, once an event is activated,we must write our own procedures to do something in response to the event. This iswhere the language element of Visual Basic comes into play.The Language ElementBefore the advent of GUIs, computer programs consisted entirely of a sequence ofinstructions. Programming was the process of writing these instructions in a languageto which the computer could respond. The set of instructions and rules that could beused to construct a program were called a programming language. Frequently, the wordcode was used to designate the instructions contained within a program. With theadvent of graphical user interfaces the need for code (program instructions) has notgone away—rather, it forms the basis for responding to the events taking place on theGUI. Figure 2–4 illustrates the interaction between an event and a program code.As illustrated in Figure 2–4, an event, such as clicking the mouse on a button, setsin motion a sequence of actions. If code has been written for the event, the code is exe-An event, such as clicking on this buttonFigure 2–4. . . causes this code to executeAn Event “Triggers” the Initiation of a Procedure
24785 CH02 BRONSON.qrk11/10/0412:44 PMPage 512.2Getting Started in Visual Basiccuted; otherwise the event is ignored. This is the essence of GUIs and event-drivenapplications—the selection of executed code depends on what events occur, which ultimately depends on what the user does. The programmer must still write the code thatperforms the desired action.Visual Basic is a high-level programming language that supports all of the procedural programming features found in other modern languages. These include statementsto perform calculations, permit repetitive instruction execution, and allow selectionbetween two or more alternatives.With these basics in mind, it is now time to create our first Visual Basic application.In the next section, we introduce the Visual Basic programming environment and createan application that uses only a single object: the form itself. We will then add additional objects and code to create a more complete Visual Basic application.Exercises 2.11. List the two elements of a Visual Basic Application.2. What is the purpose of a GUI and what elements does a user see in a GUI?3. What does a Visual Basic toolbox provide?4. Name and describe the four most commonly used Toolbox objects.5. When an application is run, what does a design form become?6. What is executed when an event occurs?2.2Getting Started in Visual BasicIt’s now time to begin designing and developing Visual Basic programs. To do this, youwill have to bring up the opening Visual Basic screen and understand the basic elementsof the Visual Basic development environment. Visual Studio is the integrated development environment (IDE, pronounced as both I-D-E, and IDEE) used to create, test, anddebug projects. Developers can also use Visual Studio to create applications using languages other than Visual Basic, such as C# and Visual C . To bring up the openingVisual Basic screen, either click the Microsoft Visual Studio .NET icon (see Figure 2–5),which is located within the Microsoft Visual Studio .NET Group, or, if you have a shortcut to Visual Basic .NET on the desktop, double-click this icon.When you first launch Visual Basic .NET, the Start Page similar to the one shown inFigure 2–6 will appear. While this page provides links to Web pages to help developersfind useful information, we will be concerned only with the following three areas: thecentral rectangle displaying recent programs, the Open Project button, and the New Project button. Clicking on any of the recent programs causes VB.NET to retrieve the program and load it into the IDE. Clicking the Open Project button opens a standardWindows file dialog box permiting you to retrieve a previously saved Visual Basic program and load it into the IDE. Clicking the New Project button opens the dialog boxshown in Figure 2–7. This dialog box provides a choice of eleven project types, shown 51
24785 CH02 BRONSON.qrk52 11/10/0412:44 PMPage 52Chapter 2: Introduction to Visual Basic .NETFigure 2–5The Microsoft Visual Studio .NET Icon within the Visual Studio .NET Groupin Table 2–2. In this text, we will be concerned with Windows Applications andASP.NET Web Applications.Click the New project button to open the New Project Dialog box displayed in Figure 2–7. Click the OK button to create a new project. Don’t be concerned with the Nameand Location, as the goal here is to display the IDE screen as shown in Figure 2–8The four windows shown in Figure 2–8 are, as marked, the Toolbox window, theInitial Form window, the Solution window, and the Properties window. Additionally,directly under the Title bar at the top of the screen sits a Menu bar and a Toolbar, whichshould not be confused with the Toolbox window. Table 2–3 lists a description of eachof these components. Before examining each of these components in depth, it will beuseful to consider the IDE as a whole and how it uses standard Windows keyboard andmouse techniques.
24785 CH02 BRONSON.qrk11/10/0412:44 PMPage 532.2Figure 2–6Getting Started in Visual BasicThe Visual Basic .NET Start PageFigure 2–7New Project DialogThe IDE as a Windows WorkspaceThe IDE consists of three main components: a GUI designer, a code editor, and a debugger. In the normal course of developing a Visual Basic program, you will use each ofthese components. Initially, we will work with GUI designer, which is the screen shownin Figure 2–8. The screen is actually composed of a main “parent” window containingmultiple “child” windows. 53
24785 CH02 BRONSON.qrk54 11/10/0412:44 PMPage 54Chapter 2: Introduction to Visual Basic .NETTable 2–2Eleven Project TypesWindows ApplicationWindows Control LibraryASP.NET Web ServiceConsole ApplicationEmpty ProjectNew Project in Existing FolderTitle BarMenu BarClass LibraryASP .NET Web ApplicationWeb Control LibraryWindows ServiceEmpty Web ProjectTool BarProjectWindowInitial FormWindowPropertiesWindowToolboxSizing HandleDebugging WindowFigure 2–8DesignWindowDynamic HelpWindowThe Integrated Development Environment’s Initial ScreenAs a Windows-based application, each child window within the overall parent window, as well as the parent window itself, can be resized and closed in the same manneras all windows. To close a window you can double-click the X in the upper right-handcorner of each window. Windows can be resized by first moving the mouse pointer to awindow’s border. Then, when the pointer changes to a double-headed arrow, click anddrag the border in the desired direction. You can move each window by clicking themouse within the window’s Title bar, and then dragging the window to the desired position on the screen.
24785 CH02 BRONSON.qrk11/10/0412:44 PMPage 552.2Getting Started in Visual BasicTable 2–3 Initial Development Screen ComponentsComponentDescriptionTitle BarThe colored bar at the top edge of a window that contains the windowname.Contains the names of the menus that can be used with the currentlyactive window. The menu bar can be modified, but cannot be deletedfrom the screen.Contains icons that provide quick access to commonly used Menu Barcommands. Clicking an icon, which is referred to as a button, carriesout the designated action represented by that button.Contains buttons that enable you to format the layout of controls on aform. These buttons enable you to control aligning, sizing, spacing,centering, and ordering controls.Contains a set of controls that can be placed on a Form window to produce a graphical user interface (GUI).The form upon which controls are placed to produce a graphical userinterface (GUI). By default, this form becomes the first window that isdisplayed when a program is executed.Lists the property settings for the selected Form or control and permitschanges to each setting to be made. Properties such as size, name, andcolor, which are characteristics of an object, can be viewed and alteredeither from an alphabetical or category listing.Displays a hierarchical list of projects and all of the items contained in aproject. Also referred to as both the Solution Resource Window and theSolution Explorer.Provides a visual means of setting the Initial Form window’s position onthe screen when a program is executed.Menu BarToolbarLayout ToolbarToolboxInitial FormWindowPropertiesWindowSolutionWindowForm LayoutWindowAs with any other Windows application, Visual Basic makes use of a menu bar toprovide an interface to the programmer. For example, if you wish to save a programyou have been working on and start a new one, you would choose the File item fromthe menu bar, which will bring up the File submenu shown in Figure 2–9. From thismenu you can save the current project by using the Save All option, then click the Newoption and click Project (Figure 2–10). The New Project dialog box appears. To accessan existing program, you can also use the menu bar File item, except you would thenclick Open and click Project to reopen a previously saved program. Similarly, these twooptions can also be activated by clicking the appropriate icons on the Toolbar locatedimmediately under the Menu bar.Once a program has been opened, you can always use the View item on the menubar to display any windows that you need. For example, if either the Properties or Toolbox windows are not visible on the development screen, select the View item from the 55
24785 CH02 BRONSON.qrk56 11/10/0412:44 PMPage 56Chapter 2: Introduction to Visual Basic .NETFigure 2–9The File SubMenuFigure 2–10 The New Project Dialog Boxmenu bar. This will open the View submenu illustrated in Figure 2–11. From this submenu, click the Properties Window or click Toolbox and then click a Toolbox item toopen the desired window. Note in Figure 2–11 that all Visual Basic’s windows are listedin the View submenu.Having examined the Menu bar and how it is used to configure the developmentscreen, make sure that you go back to the initial development screen shown in Figure2–8. If any additional windows appear on the screen, close them by clicking each win-
24785 CH02 BRONSON.qrk11/10/0412:44 PMPage 572.2Getting Started in Visual BasicFigure 2–11 The View SubMenudow’s close button (the box with the X in the upper right corner). The window does nothave to be active to do this.Note that the caption within the top title bar of the screen shown in Figure 2–8contains the words Microsoft Visual Basic [design]. The word [design] in the top Titlebar caption is important because it indicates that we are in the design phase of a VisualBasic program. At any point within our development, we can run the program and seehow it will look to the user.Once the design windows are visible, creating a Visual Basic application requiresthe following three steps:1. Create the graphical user interface (GUI).2. Set the properties of each object on the interface.3. Write the code.The foundation for creating the GUI (Step 1) is the Initial Form window. It is on thisdesign form that we place various objects to produce the interface we want users to seewhen the program is executed. When the program is run, the design form becomes awindow and the objects that we place on the design form become visual controls thatare used to input data, display output, and activate events. The objects that we canplace on the design form are contained within the Toolbox. The Toolbox drop-down listis shown in Figure 2–12. The visual controls we will be using are under the WindowsForms drop-down list. 57
24785 CH02 BRONSON.qrk58 11/10/0412:44 PMPage 58Chapter 2: Introduction to Visual Basic .NETFigure 2–12 The Standard Object ToolboxProgrammer NotesOpening the Basic Design WindowsTo create a Visual Basic program, you will need the following three windows: the Toolboxwindow for selecting objects, a Form window for placing objects, and a Properties windowfor altering an object’s properties. Additionally, the Solution Explorer window should be vis-
24785 CH02 BRONSON.qrk11/10/0412:44 PMPage 592.2Getting Started in Visual Basicible when you begin. If any of these windows are in the background, clicking on them willactivate them and bring them to the foreground, or you may use the following procedures:For a Form window:For a new project, first click File from the menu bar, click New from the submenu, and clickProject (or use the hot key sequence Alt F, then N, then P). This will open a new Form window.For an existing project, click File from the menu bar, click Open from the submenu, andthen click Project (or use the hot key sequence Alt F, then O, then P). This will open a project window. Then select the project file.For a Toolbox window:To either activate an existing Toolbox window or open one if it is not on the screen, doeither of the following: Click View and then click Toolbox. Use the hot key sequence Alt V and then press the X key (Alt V / X).For a Properties window:To activate an existing Properties window or open one if it is not on the screen, do one ofthe following: Click View and then click Properties Window. Use the hot key sequence Alt V, and then press the W key (Alt V / W). Press the F4 function key.For a Solution Explorer window:To activate an existing Solutions window or open one if it is not on the screen, do one ofthe following: Click View and then click Solution Explorer. Use the hot key sequence Alt V and then press the P key (Alt V / P).Don’t be confused by all of the available objects. Simply realize that Visual Basicprovides a basic set of object types that can be selected to produce a graphical userinterface. The balance of this book explains what some of the more important objectsrepresent and how to design a Visual Basic application using them. To give you an ideaof how simple it is to design such an interface, move the mouse pointer to the Buttonobject in the Toolbox and double-click the Button icon. Note that a Button objectappears in the form. Placing any object from the Toolbox onto the form is this simple.Now click the newly created button within the form and press the Delete key toremove it. 59
24785 CH02 BRONSON.qrk60 11/10/0412:44 PMPage 60Chapter 2: Introduction to Visual Basic .NETSetting an Object’s PropertiesAs previously stated, all objects on a form have properties, which define where on theform the object will appear (the object’s vertical and horizontal position relative to theleft-hand corner of the form), the color of the object, its size, and various other attributes. To understand these properties, we will now examine the most basic object inVisual Basic: the form. Like any other object, the Form object has properties that definehow it will appear as a screen when the program is run. As an introduction to the easewith which properties are set, we will first explore the Form object’s properties. To dothis, you need to have a basic design screen open (see Figure 2–8).First, click the Properties window to activate it. The Properties window, whichshould appear as shown in Figure 2–13, is used for setting and viewing an object’sproperties.The Properties window allows properties to be listed in alphabetic order, by property name, or by property category. By default, the properties are sorted by category. Tochange to property categories, click the first button on the Properties window toolbar.To switch back to alphabetic sort, click the second button on the Properties windowtoolbar. When viewed by category, individual properties are grouped according toappearance, font, position, behavior, and so on.No matter the order of properties selected, the first box within a Properties windowis the ObjectIdentification box, located immediately under the window’s Title bar. Thisbox lists the name of the object and its object type. In Figure 2–13 the name of theobject is Form1 and its type is Form.The two columns within the Properties window are where individual object properties are identified. The column on the left is the properties list, which provides thenames of all the properties of the object named in the object box. The column to theright is the settings list, which provides the current value assigned to the property onthe left. The currently selected property is the one that is highlighted. For example, theObjectIdentificationBoxThe Control’s Object TypeThe Control’sNameAn Individual Property SettingA SelectedPropertyThe List ofPropertyNamesThe List of Property SettingsFigure 2–13 The Properties Window
24785 CH02 BRONSON.qrk11/10/0412:44 PMPage 612.2Getting Started in Visual BasicName property is highlighted in Figure 2–13. The value assigned to a highlighted property can be changed directly in the property settings list.Take a moment now and, using the keyboard arrows, move down through the Properties window. Observe that each property is highlighted as it is selected, and that thedescription of the highlighted property is displayed in the description box at the bottomof the window.1 Now move back up until the Name property at the top of the alphabetical list is highlighted. The name Form1 shown in the figure is the default name thatVisual Basic gives to the first Form object provided for a new program. If a second formwere used, it would be given the default name Form2, the third form would be namedForm3, and so on.The Name Property There is nothing inherently wrong with keeping the default namethat Visual Basic provides for each Form object that you use. However, goodprogramming practice requires that all Form and other object names be moredescriptive and convey some idea about what the object is used for. The names that areallowed for all objects, of which a Form is one, are also used to name other elements inthe Visual Basic programming language and are collectively referred to as identifiers.Identifiers can be made up of any combination of letters, digits, or underscores ( )selected according to the following rules:1. The first character of an identifier must be a letter.2. Only letters, digits, or underscores may follow the initial letter. Blank spaces, specialcharacters, and punctuation marks are not allowed. Use the underscore or capitalletters to separate words in an identifier consisting of multiple words.3. An identifier can be no longer than 1016 characters.4. An identifier cannot be a keyword. (A keyword is a word that is set aside by thelanguage for a special purpose.)2Using these rules, development teams may then use whatever naming conventions theychoose. In this book, form names begin with frm and our first form will always begiven the name frmMain. To assign this name to our current form, do the following: ifthe name property is not already highlighted, click the name property and change thename to frmMain by directly typing in the settings list to the right of the Name property. The name change takes effect when you either press the Enter key, move toanother property, or activate another object.1The description box can be toggled on or off by clicking the right mouse button from within the Propertieswindow.2More specifically, an identifier cannot be a restricted keyword. A restricted keyword is a word that is set asideby the language for a specific purpose and can only be used in a specified manner. Examples of such wordsare If, Else, and Loop. Other languages refer to such words as reserved words. Use the Help Facility and searchfor “Word Choice” to find a table of keywords. 61
24785 CH02 BRONSON.qrk62 11/10/0412:44 PMPage 62Chapter 2: Introduction to Visual Basic .NETProgrammer NotesThe Properties WindowThe Properties window is where you set an object’s initial properties. These are the properties that the object will exhibit when the application is first run. These properties can bealtered later, using procedural code.To Activate the Properties Window:To activate a particular object’s Properties window, first click the object to select it and thenpress the F4 function key. You can also click View and then click Properties Window (or usethe hot-key sequence Alt V, then W). This will activate the Properties window for the currently active object. Once the Properties window is active, clicking the down-facing arrowhead to the right of the object identification box will activate a drop-down list that can beused to select any object on the form, including the form itself.To Move to a Specific Property:First, make sure that the Properties window is active. You can then cursor up or downthrough the properties by using the up and down arrow keys or by simply clicking thedesired property with the mouse.The Text Property A form’s name property is important to the programmer whendeveloping an application. However, it is the form’s Text property that is important tothe user when a program is run, because it is the Text property that the user sees withinthe window’s Title bar when an application is executing.To change the Text property, select it from the Properties window. To do this, makesure the Properties window is selected and use the arrow
will sometimes refer to Visual Basic as VB, omitting .NET. From a programming viewpoint, Visual Basic is an object-oriented language that con-sists of two fundamental parts: a visual part and a language part. The visual part of the language consists of a set of objects, while the language