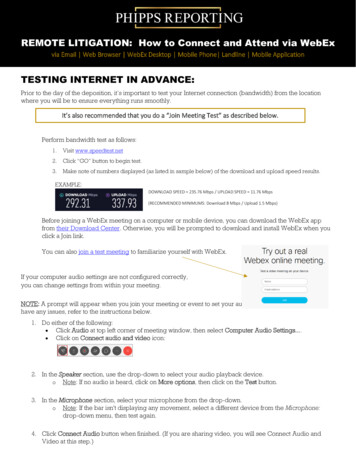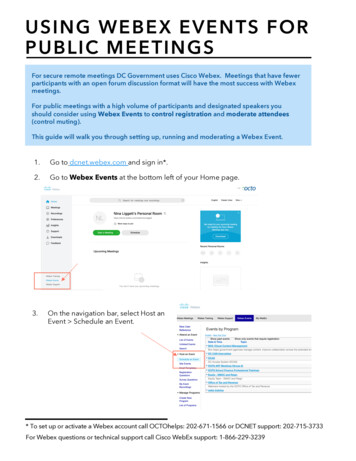
Transcription
Microflex Ecosystemand Webex devicesSetup guideD15479.01 2021 Cisco and/or its affiliates. All rights reserved.
WhitepaperDocument version: 1.0Date: 08th October 2021DisclaimerThe material and information contained in this publication is for general information purposes only. Cisco providesthis publication as is without warranty of any kind, either express or implied, including the implied warranties ofmerchantability or fitness for a particular purpose. 2021 Cisco Systems, Inc.D15479.01 2021 Cisco and/or its affiliates. All rights reserved.2
Whitepaper3ContentsD15479.01 2021 Cisco and/or its affiliates. All rights reserved.04Introduction05Devices & software/firmware versions06Webex Devices and recommendedaudio connectivity07Pin-outs08Installation and configuration12Configuration of the Shure devices14Configuration of the Webex devices17Audio tests18Legacy devices
Whitepaper4IntroductionThis setup guide has been developed by Shure andCisco. The guide provides comprehensive instructionson how to setup Shure’s Microflex Ecosystem solutionswith a selection of Webex room conference devices,using either the Shure P300 Conferencing Processor orANIUSB-MATRIX Dante Interface.Further reading Cisco Project Workplace Webex Maintain and Operate Guides Webex Device Configurations for Room and DeskDevices and Webex BoardsFor additional information please refer to the latestproduct documentation, FAQs, and user guides availableon the Shure and Cisco websites. Webex Desk and Room Devices: USB MicrophoneSupport Shure Tech PortalVideo conferencing and collaboration devices areused in different rooms and spaces. Optimizing theaudio experience is important to ensure a successfulonline meeting. Cisco has documented best practiceshow to create effective video-enabled rooms, and werecommend you to download the Best Practices guidefrom Project Workplace. Shure Audio Institute Shure Microflex Ecosystem Shure Knowledge Base - FAQ Shure Integrated Systems YouTube Channel Shure Technology Partners: Cisco Download Shure Designer Download Shure Web Device Discovery Download Shure Microflex Wireless Software Shure Product User Guides Shure - Enterprise Network TroubleshootingChecklist Shure Ignite Blog - Best Practices for Audio SecurityD15479.01 2021 Cisco and/or its affiliates. All rights reserved.
Whitepaper5Devices and software/firmware versionsCisco Webex devicesShure devicesThe following Webex devices are covered in thisdocument:Check for latest Shure device firmware using Designersoftware.ShureMinimum Firmware/Software VersionCodec Pro based devicesShure Designer Software4.4.1Cisco Webex Codec ProShure Microflex Wireless Software1.1.0Cisco Webex Room Kit ProShure P300 Conferencing Processor4.4.13Cisco Webex Room 70 G2Shure ANIUSB-MATRIX Dante4.4.14Audio connector type: EuroblockCisco Webex Room 70 PanoramaCisco Webex Room PanoramaCodec Plus based devicesAudio connector type: 3.5 mm mini jackCisco Webex Codec PlusCisco Webex Room Kit PlusCisco Webex Room 55 DualCisco Webex Room 70Other devicesAudio connector type: 3.5 mm mini jackCisco Webex Room KitCisco Webex Room 55InterfaceShure MXA910 Ceiling Array4.4.11MicrophoneShure MXA710 Linear Array1.2.1Microphone (2-foot and 4-footmodels)Shure MXA310 Table Array4.4.9MicrophoneShure MXN5 Networked Ceiling1.2.1LoudspeakerShure MXA-MUTE Networked Mute1.2.4ButtonShure Microflex Wireless9.0.4(MXWAPT2, MXWAPT4, MXWAPT8,MXWNCS2, MXWNCS4, MXWNCS8,MXW1/O, MXW2, MXW6, MXW8)Check for latest Webex device software here.Webex devices registered to the Webex cloud serviceget upgraded automatically.For Webex devices registered on-premises, softwareversion CE9.15 is a minimum requirement for some levelof integration. More details on functions enabled onthe different software versions are available later in thisdocument.D15479.01 2021 Cisco and/or its affiliates. All rights reserved.AudinateMinimum Firmware/Software VersionDante Controller4.4.0.8
Whitepaper6Webex Devices and recommended audio connectivityThis guide describes how to set-up Shure’s MicroflexEcosystem solutions with Webex room devices using: Bi-directional audio support over analog audioconnections, and Mute sync over USB.The Webex devices are grouped based on theconnector type used for audio I/O, refer to the tablebelow: 3.5 mm mini-jack connectors Euroblock balanced audio connectorsFor the first category, you should use the Shure VCC3Video Conference Cable Kit, which is pre-wired tointerface with Webex devices without adverselyaffecting the mute control. Modification to this cable isnot required.For the second category, you must make a custom cableaccording to the specification in the “Pin-outs” chapter.Shure and Cisco have tested at least one product ineach category. Exhaustive testing on every producthas not been carried out. Functionality is expected tobe consistent across products in the same categoriesunless explicitly noted.Shure’s tests were carried out with the followinghardware and software versions:HardwareRoomOS 10.4.1.1Codec ProRoomOS 10.4.1.1Cisco’s tests were carried out with the following Shurehardware and software version.HardwareShure P300 Conferencing Processor4.4.13Shure ANIUSB-MATRIX Dante4.4.14InterfaceWebex devices withShure MXA910 Ceiling Arraymini-jack connectorsEuroblock connectorsMicrophoneShure VCC3 VideoCustom 3-pin EuroblockShure MXA310 Table ArrayConference Cable Kitbalanced audio cableRoom KitCodec Pro based devicesCodec Plus based devices* For an optimal set-up, we recommend to integrate the ShureMicroflex Ecosystem with analog connections, as described in thisdocument.However, from RoomOS 10.8 onward, you can integrate third-partyUSB microphones with Webex devices by configuring the USB portas a USB input.A few Webex devices, e.g. Room Kit Mini, don’t have analogmicrophone inputs. Hence, USB is the only option for connectingexternal microphones to these devices.D15479.01 2021 Cisco and/or its affiliates. All rights reserved.Firmware/SoftwareVersionWebex devices with 3.5 mmRoom 55SoftwareRoom Kit PlusMicrophone4.4.114.4.9
Whitepaper7Pin-outsNote that the Webex devices use four-pin microphoneinputs: signal ; signal –; ground; and mute control(marked with a microphone symbol). The mute controlis for Cisco’s own-brand microphones only, and shallnot be connected. This is particularly important to notewhen using a bespoke balanced audio cable with theWebex devices.The connection must be done to the first microphoneinput and the first loudspeaker output connector.3.5 mm mini-jack, male connectorConnector pin outMicrophone inputLine outputTip HotTip Left channelRing 1 ColdRing Right channelRing 2 Mic Control (do not connect)Shield GNDShield GNDSignal typeBalancedUnbalancedConnector (codec)Mini-jack 3.5 mm,Mini-jack 3.5 mm, 3-conductor4-conductorInput impedance900 Ohm/legN/AOutput impedanceN/A470 OhmMaximum input level-18.3 dBu 2 dBN/AMaximum output levelN/A8.2 dBu 2 dBPhantom power10 V 0.5 VN/APhantom power resistor pin ”tip”1.0 kOhmN/APhantom power resistor pin ”ring 1”1.0 kOhmN/AFrequency response20 Hz-20 kHz 1 dB20 Hz-20 kHz 1 dBSignal to Noise Ratio-95 dB-100 dBEuroblock type male header, 3.5 mm pitchMic/Line inputLine outputSignal TypeBalancedPin-outPin 1 HotPin 1 HotPin 2 ColdPin 2 ColdPin 3 GNDPin 3 GNDPin 4 Mic Control (do not connect)Impedance2.5 kOhm/leg200 Ohm/legRecommended Load ImpedanceN/A 6 kOhmSignal LevelMax 24 dBu with 0 dB input gain0 dB output gain: 18 dBu /- 1 dBInput gain adjustable from 0 to 70 dB,Output gain adjustable from 0 to -24 dBdefault 58 dBD15479.01 2021 Cisco and/or its affiliates. All rights reserved.
Whitepaper8Installation and configurationConnectivityConnect the components as shown in the illustration.Although shown without connections, ANIUSB-MATRIXis included for illustration and is interchangeable withP300 where possible, depending on overall systemrequirements.MXA310 is used to illustrate microphone with in-builtmute button and LED ring. MXA910 and MXA710 areinterchangeable for illustration, but they do not includean in-built mute button but will reflect mute status withtheir respective LED indicators. If you wish to includeindependent muting while using MXA910 or MXA710,use the MXA-NMB Network Mute Button.D15479.01 2021 Cisco and/or its affiliates. All rights reserved.Only Room Kit is shown in the illustration, but a similarset-up also applies to the other Webex products.The connector placement for the Webex products isshown on the next page.
Whitepaper9Webex devices: Connector placementCodec Plus based devices2314Room 55 Dual and Room 70 use the USB port for internal purposes. To connect audio equipment,a small USB2hub needs to be inserted.Room KitRoom 5512Codec Pro based devices 12V 123GPIO4COMPoED15479.01 2021 Cisco and/or its affiliates. All rights reserved.PoE
WhitepaperAudio signal processingThe following audio signal processing options applieswhen deploying the Microflex Ecosystem with Webexdevices.In many cases both approaches can give a workingsolution. Since the resulting audio quality is impactedby many factors, it may be valuable to set up andtest both approaches to find the best solution in yourenvironment.IntelliMix DSP on-board the Shure microphonesand/or the P300-IMX processorIn this case all audio signal processing, including echocancellation, noise reduction, microphone auto-mixingand time-variant processing, is performed by the Shureproducts.We recommend you to turn off similar processing inthe Webex device, because doing it in two places maycause artifacts and quality reduction.This is an effective approach for many deployments ofMicroflex Ecosystem with Webex devices. It allows formore microphone channels than the Webex device canhandle natively, special signal routing, and integration ofproducts that allow non-linear processing, beamforming,and auto-mixing.Audio signal processing in the Webex deviceIn this case audio signal processing, including echocancellation, noise reduction, microphone auto-mixingand time-variant processing, is performed by the Webexdevice to the largest extent.We recommend you to turn off similar processing in theShure equipment, because doing it in two places maycause artifacts and quality reduction.Consider this approach in set-ups that require stereoor spatial audio. Such set-ups require multiple AECreferences to perform adequately.D15479.01 2021 Cisco and/or its affiliates. All rights reserved.10Currently, the IntelliMix DSP on the P300 ConferencingProcessor and in the MXA910 and MXA710 arraymicrophones only accepts one AEC reference. Thislimits the potential to deploy a spatial audio system withvariable sound sources in the room.Loudspeaker optionsThe term “networked loudspeaker(s)” refers to Shure’sMXN5C-W or any other suitable loudspeaker in thesame product range operating on DANTE or AES67.When using P300 with any of the named Webexdevices, you can use external analog loudspeakers,networked loudspeakers, and/or the internal loudspeakeron the Webex device. This is because the P300 has 2analog audio inputs and 2 outputs, so even if an analogaudio connection is required for mic input to the Webexdevice, there is another output available to connect to ananalog loudspeaker or amplifier.When using ANIUSB-MATRIX with any of thenamed Webex devices, it is recommended to useonly networked loudspeakers, and/or the internalloudspeaker on the Webex device, and not externalanalog loudspeakers or amplifiers. This is because theanalog output on the ANIUSB-MATRIX is used to carrythe microphone signal to the Webex device, and thereare no additional analog outputs to connect to an analogloudspeaker of amplifier.Switching between loudspeaker modes on the Webexdevices is typically done via the Webex device’s localweb interface under Settings Configurations Audio,or by accessing the command line API and performingsteps using xConfiguration Audio. This requires anadmin or integrator user role.For the Codec Pro based products, settings can bechanged via the web interface’s Audio Console.
WhitepaperNetwork security considerationsTo strengthen the protection of media and othernetworking services, precautions must be taken tominimize these risks. Encrypted and authenticated mediastreams as well as control signaling are important toprotect sensitive data.We recommend precautions such as isolation of thenetworked audio components from the corporatenetwork and enabling encryption and authentication.Shure has published several documents on this topic: Product user guides related to Network AudioEncryption, e.g., https://pubs.shure.com/guide/P300and https://pubs.shure.com/guide/MXA910 Best Practices for Audio SecurityKeep software and firmware of all devices up-to-dateto benefit from functional and security related fixes andimprovements.D15479.01 2021 Cisco and/or its affiliates. All rights reserved.11
Whitepaper12Configuration of the Shure devicesYour Microflex Ecosystem should be setup andconfigured in the normal way, following best practicesand latest guidance from Shure.Below are some notes on best practices.1. Install the Shure and Webex devices based on theschematics and use cases described earlier in thisdocument.Add Shure’s MXA-NMB Networked Mute Button tothe system if you wish to include additional physicalmute/LED interfaces when using the MicroflexEcosystem.3. When using P300: After using Optimize, all audiorouting paths should be made. Now go to Step 5.2. Use the Optimize feature in Shure Designer softwareto automatically configure the following settings:a. Creation of audio routes between devicesb. Turn on mute synchronizationc. Adjust audio settingsNote: Mute/LED synchronization and call status canbe manually enabled/disabled as follows:In Shure Designer:When using MXA310: Open the Settings page (cog icon) for theMXA310. Under the Logic Control heading and page, lookfor Mute Control Function and select Logic Out. For the given interface (P300, ANIUSB-MATRIX),open the Inputs page, and select the LogicEnable tick-box on any channel. This will enablelogic on all channels. LED/mute sync will now be active. Open the Settings page (cog icon) for the Shureinterface. Under the Settings header, find the Call Statussection. Select Enable Call Status. Call status will now be enabled.MXA710 and MXA910 do not include a mute button,so only the interface (P300/ANIUSB-MATRIX)requires logic enablement when using thosemicrophones.D15479.01 2021 Cisco and/or its affiliates. All rights reserved.4. When using ANIUSB-MATRIX: After using Optimize,open the Matrix Mixer. Map cross points for DanteAudio Input 1-4 Analog Output.
Whitepaper5. Set input and output levels on the Shure interface.13 If using loudspeaker(s) other than the MXN5W-C,you may need to manually adjust the matrix mixerrouting in the P300 or ANIUSB-MATRIX to ensureprogram and conference audio are fed to theloudspeakers appropriately. If using additional audio input or output devices(networked or analog) you may need to manuallyadjust matrix mixer routing and other audiosettings in the P300 or ANIUSB-MATRIX toensure satisfactory performance from all devices.If using analog audio I/O: In the Schematic page ofeither P300 or ANIUSB-MATRIX:a. Set Input Level on Analog Input to “Aux”.b. Set Output Level on Analog Output to “Mic”.6. Configure and aim microphone lobes and remainingitems as per product and system guidance.7. If you are using Shure DSP, skip this step andcontinue setting up the Webex system.If deploying a system with Webex audio DSP, youshould turn off AEC processing in the IntelliMixenabled microphone or P300 processor.a. On the MXA910 or MXA710 product configwindows in Designer, find the IntelliMix window.Select the AEC block in the IntelliMix Channelstrip and flip selector to OFF. Now AEC will notoccur in the microphone. (This step does notapply to MXA310 as there is no on-board AECprocessing offered).b. On the P300, open the Schematic window. Openthe AEC block on Chanel 1 and flip selector toOFF. Repeat for all channels. No AEC will occur inthe P300.Note, when using Microflex Wireless: When deploying a Microflex Wireless systemin conjunction with P300 or ANIUSB-MATRIX,you must manually create audio routesbetween devices - using Dante Controller and manually adjust audio settings using therespective MXWAPT, P300, or ANIUSB-MATRIXconfiguration tabs. Call status and LED/mute syncwill not be available.D15479.01 2021 Cisco and/or its affiliates. All rights reserved.
Whitepaper14Configuration of the Webex devicesAs explained previously, audio signal processing,including echo cancellation (AEC), may be done eitherin the Shure products, or in the Webex device. The nextsections explain how to configure the Webex device inboth cases.Echo cancellation using the Shure productsRoom Kit, Room 55, and Codec Plus based devicesConfiguration can typically be done using the Webexdevice’s local web interface (Settings Configurations Audio), the command line API (xConfiguration Audio),or via a management system such as Control Hubor Cisco UCM. Access to the relevant configurationsrequires an Admin or Integrator role.Audio settingRoom Kit, Room 55Codec Plus based devicesInput Microphone [n] level 1Mic 2 14Mic 1 14Input Microphone [n] Mode 1Mic 1 OffMic 1 OnMic 2 OnMic 2 OffMic 1 OffMicrophones AGCOffOffMicrophones Mute EnabledTrueTrueOffInput Microphone [n] EchoControl Mode1Microphones PhantomPowerOffOutput InternalSpeaker Mode2Output Line 1 ModeOnOnOutput Line 1 OutputTypeLoudspeakerLoudspeakerSee note 22See note 21Note 1: In Room Kit and Room 55, “Microphone 1” is the Webex device’s built-in microphone. Settings for the external microphoneconnection are “Microphone 2”.2Note 2: Options for the InternalSpeaker Mode are: Off / On / UltrasoundOnly. If you have designed the system to use external loudspeakersonly, we recommend selecting “UltrasoundOnly”. If you have chosen not to use external loudspeakers, then you should select the “On”setting for the InternalSpeaker Mode.D15479.01 2021 Cisco and/or its affiliates. All rights reserved.
WhitepaperCodec Pro based devicesWe recommend that you use the Audio Consoleapplication, which is part of the Webex device’s localweb interface to set up the audio inputs and outputs. Navigate to Audio Console and click Confirmto open the application and disable automaticconfiguration. Then configure as required.15Input groupsOutput groupsMicrophoneLoudspeaker Line 1Direct: OffMode: OnMixer Mode: GainSharedLevel (dB): -4Sharing Mute: OffChannel: MonoAGC: OffDelay (ms): 0Channels: 1Delay Mode: FixedEqualizer: OffMicrophone 1Mode: OnLevel (dB): 58Channel: MonoPhantom Power: OffEcho Control: OffNoise Reduction: N/AMute on Inactive Video: OffVideo Input Source: 1Equalizer: OffD15479.01 2021 Cisco and/or its affiliates. All rights reserved.
Whitepaper16Echo cancellation using the Webex deviceConfiguration can typically be done using the Webexdevice’s local web interface (Settings Configurations Audio), the command line API (xConfiguration Audio),or via a management system such as Control Hubor Cisco UCM. Access to the relevant configurationsrequires an Admin or Integrator role.For Codec Pro based devices, we recommend that youuse the Audio Console application, which is part of theWebex device’s local web interface to set up the audioinputs and outputs. Navigate to Audio Console and click Confirmto open the application and disable automaticconfiguration. Then configure as required.Audio settingRoom Kit, Room 55Codec Plus based devices Codec Pro based devicesInput Microphone [n] level 1Mic 2 14Mic 1 14Mic 1 56Input Microphone [n] Mode 1Mic 1 OffMic 1 OnMic 1 OnMic 2 OnMic 1 OnMic 1 OnMicrophones AGCOnOnN/A, default is OnMicrophones Mute EnabledTrueTrueTrueMicrophones PhantomPowerOffOffMicrophone 1 PhantomOutput InternalSpeaker Mode2Output Line 1 ModeOnOnOnOutput Line 1 OutputTypeLoudspeakerLoudspeakerN/AMic 2 OnInput Microphone [n] EchoControl Mode1Power: OffSee note 22See note 22See note 21Note 1: In Room Kit and Room 55, “Microphone 1” is the Webex device’s built-in microphone. Settings for the external microphoneconnection are “Microphone 2”.2Note 2: Options for the InternalSpeaker Mode are: Off / On / UltrasoundOnly. If you have designed the system to use external loudspeakersonly, we recommend selecting “UltrasoundOnly”. If you have chosen not to use external loudspeakers, then you should select the “On”setting for the InternalSpeaker Mode. All Codec Plus based devices except Codec Plus itself, have the UltrasoundOnly option.D15479.01 2021 Cisco and/or its affiliates. All rights reserved.
Whitepaper17Audio testsThere is currently no simple automatic and/or objectivetest to determine the audio quality of the overall system.Below are some suggestions for test call evaluation. Werecommend making several calls, and wherever possibleuse multiple participants in the meeting room beingtested and use multiple far end participants to gauge arange of responses.Check the following (not exhaustive): Your microphone volume, tone, and speechquality are received fully and perceived by far endparticipants as satisfactory. Maximum loudspeaker volume in your meetingroom is set to a reasonable level which cannot beexceeded by an in-room participant. Mute sync, LED, call status and their relevantfeedback indicators work as described and withoutnoticeable latency or lag between the touchcontroller (Touch 10 or Room Navigator) and/orShure device(s). Audio does not pass when system is muted, and youcannot be heard by the far end in the mute state. Audio passes when system is not muted, and the farend hears you clearly in this state. The far end participant does not hear themselvesback when talking. This proves AEC is working. Participants on both far end and in the meetingroom are able to hear each other clearly if theymomentarily talk over each other. System operates as normal following a power cycleof meeting room devices. System operates as normal following a power cycleof the network switch providing power to the ShureAudio Ecosystem.D15479.01 2021 Cisco and/or its affiliates. All rights reserved.There may be times when during setup it becomesclear the microphone gain or loudspeaker output levelsrequire altering. Use your best judgment and changesettings in as few points in the signal chain as possible,as little as possible.Once configured, the analog audio signal generatedby the system and input to Webex must not exceed amaximum signal level of -32 dBu.Microphone inputs on Webex devices can easily beoverloaded if the output gain from Shure IntelliMix P300or ANIUSB-MATRIX is not set to mic level (-46 dB)analog gain. This may result in microphone signalclipping and distortion.
Whitepaper18Legacy devicesWherever possible, Shure and Cisco recommendedusing the latest software and firmware versions forall devices.When using earlier software versions than CE9.15,the mute and LED sync functionality – while usinganalog audio connections – cannot be guaranteed.If using a earlier software version than CE9.15,connecting the ANIUSB-MATRIX or P300 to one ofthe named Webex devices will cause it to present itselfas a USB Headset. The user is then presented withoptions on the Touch 10 / Room Navigator to use “USBHeadset” mode, or “Speaker mode”. Even if analogaudio connections are in place, there is no guarantee ofconsistent mute sync functionality over USB regardlessof which audio mode is selected.October 2021For more informationPlease visit www.shure.com 2021 Cisco and/or its affiliates. All rights reserved. Cisco and the Cisco logo are trademarks or registered trademarks ofCisco and/or its affiliates in the U.S. and other countries. To view a list of Cisco trademarks, go to this URL: https://www.cisco.com/go/trademarks. Third-party trademarks mentioned are the property of their respective owners. The use of the wordpartner does not imply a partnership relationship between Cisco and any other company. (1110R)
Cisco’s tests were carried out with the following Shure hardware and software version. Hardware Firmware/Software Version Shure P300 Conferencing Processor 4.4.13 Shure ANIUSB-MATRIX Dante Interface 4.4.14 Shure MXA910 Ceiling
