Transcription
GUIDEDefense Travel System (DTS) Guide 3:VouchersFebruary 25, 2022v3.09Department of Defense Defense Human Resources Activity
DTS Guide 3: VouchersFebruary 25, 2022Table of ContentsRevision History . 21. Vouchers . 31.1 Create a Voucher . 32. Update the Trip Details and Travel Itinerary . 63. Update Expenses and Allowances . 83.1 Reservation Expenses . 103.2 Other Expenses . 123.3 Attaching Files and Substantiating Documents . 213.4 Expenses Screen Icons Explained . 284. Update Per Diem Information . 305. Update Accounting Information . 325.1 Update LOAs . 325.2 Review SPPs, Advances, and Accounting Summary . 336. Update Split Disbursements. 347. Review Module . 367.1 Update Profile Screen . 367.2 Review Trip Voucher Screen . 367.3 Other Auths and Pre Audits Screen . 387.4 Digital Signature Screen . 398. Helpful Resources . 43Defense Travel Management OfficeThis document is maintained at defensetravel.dod.milSaved or printed copies may be obsolete.1
DTS Guide 3: VouchersFebruary 25, 2022Revision HistoryRevisionNo.Authorization2.12/16/18Defense TravelManagementOffice (DTMO)Feb 2018 full DTS release:Removed look ahead noteCover2.22/23/18DTMOUpdated My Expense Screeninformation & iconsSection 43.08/17/18DTMOUpdated for major DTS changes:new Dashboard, navigation, andmodules.ThroughoutDTMOUpdated for major DTS changes toitinerary and financial summarySmall update to Expenses screenAdded legacy screen sectionSections 2 &6Section 3Section 9Throughout3.110/26/18Revision/Change DescriptionPage,SectionDate3.204/05/19DTMOGeneral text updatesDTS Release 3: Expense ChangesUpdated Trip TypesUpdated Trip PurposesUpdated screenshots3.305/08/19DTMORemoved Open Allotment Trip TypeReferenceSection 23.406/17/19DTMOUpdated Per Diem screenshotSection 3General UpdateUpdated for Expenses and ReceiptchangesThroughoutSection 3Section 4Section 5Section 6Section 73.505/07/20DTMO3.605/14/20DTMOUpdated Digital Signature Audit FailwarningsSection 73.712/11/20DTMOUpdated Dashboard screen shotGeneral reviewPage 4All3.812/30/20DTMOUpdated Expenses wordingSection 3.2,Page 163.902/25/22DTMORebranding effortThroughoutDefense Travel Management Office2
DTS Guide 3: VouchersFebruary 25, 20221. VouchersA voucher is a claim for reimbursement of actual expenses you* incurred and payment of allowances youearned while you were TDY. When you create a voucher in DTS, the system populates it with information fromyour approved DTS authorization.Information on authorizations includes (by design) cost estimates and assumptions about an upcoming trip.Since the voucher must always reflect accurate cost and trip information, you must update the voucher fromestimated charges to actuals based upon the trip. In other words, your primary responsibility on a voucher is tomake changes to it. This guide focuses on how to make those changes.DTS lets you create a voucher before or during your TDY, but you cannot sign it until your trip is complete. DoDpolicy mandates travel voucher submission within five working days of returning from TDY.* In this guide, “you” are a traveler, unless otherwise stated.DTS provides a What’s New feature alerting you when software changes occur. After a system update, the firsttime you access an affected module, the What’s New feature activates. You readily receive a series of pop-upscreens annotating any revisions. Once you proceed through the overview, you must select Got It to close themessaging. Your personal profile tracks your acknowledgement and then the What’s New feature inactivates. Asthis a one-time alert, unless there is another system change, you will not see the What’s New alert again.1.1 Create a VoucherTo create a voucher, select Create New Document, then Voucher on the DTS Dashboard (Figure 3-1).Figure 3-1: DTS DashboardDTS displays a list of authorizations (Figure 3-2) that allow you to create a voucher.Defense Travel Management Office3
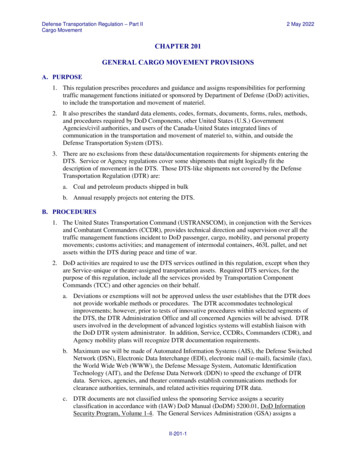
DTS Guide 3: VouchersFebruary 25, 2022Figure 3-2: Create Voucher from Authorization ScreenSelect Create Voucher next to the authorization you want to use to create the voucher. The Review TripVoucher screen (Figure 3-3) opens. This screen allows you to review all the information in the voucher. Fromhere, you can: Navigate to any DTS module* by selecting the Go to module links (Indicator 1) to access any moduleor choose an item from the Progress Bar in the left column (Indicator 2). Add Comments to the Approving Official regarding the trip (Indicator 3). Use the Expand All / Collapse All option to see or reduce the trip specific details (Indicator 4). Print trip data (Indicator 5) Add Reference (Indicator 6)Defense Travel Management Office4
DTS Guide 3: VouchersFebruary 25, 2022523641Figure 3-3: Review Trip Voucher ScreenDefense Travel Management Office5
DTS Guide 3: VouchersFebruary 25, 20222. Update the Trip Details and Travel ItineraryIf your trip details (e.g., Trip Purpose) or travel itinerary (e.g., travel days, TDY location) changed from what theAO approved on the authorization, select Edit Itinerary from the Progress Bar (Figure 3-3, Indicator 2). TheUpdate Itinerary screen (Figure 3-4) opens. The fields on this screen initially populate with the information youentered on the authorization. Note: Trip Type and TANUM data are view only. On this page, you can add orchange the following: Arriving and Departing dates TDY Location Leaving From*/ Returning On* locations (Trip) Purpose* Trip Duration* (Optional) Description (Optional) Reference Are You Attending a Conference or Event?*Defense Travel Management Office6
DTS Guide 3: VouchersFebruary 25, 2022Figure 3-4: Update Itinerary ScreenOnce you update all the fields, select Continue. After you acknowledge a pop-up reminding you to verify orupdate your reservation costs, expenses, and per diem information, the voucher opens on the Enter Expensesscreen.Note: The voucher does not contain a Reservations module. You must make all reservation changes (e.g., costs)on the Enter Expenses screen (see Section 3).Defense Travel Management Office7
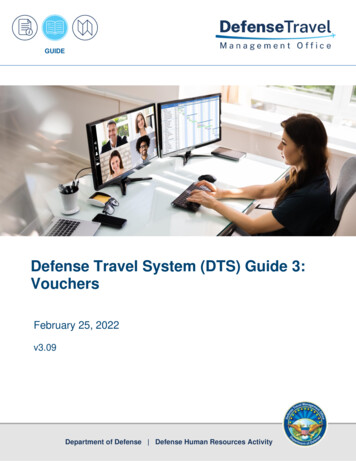
DTS Guide 3: VouchersFebruary 25, 20223. Update Expenses and AllowancesThe Expenses module (Figure 3-5) initially displays all the estimated expenses and allowances the AO approvedon the authorization. Since those were just estimates, you must adjust them to reflect what actually occurred onthe trip. When you are done, each expense must exactly match the amount you paid and each allowance mustbe accurate to ensure you receive the proper reimbursement. Open the Expenses module by selecting Expensesfrom the Progress Bar.The Enter Expenses screen opens (Figure 3-5) and provides a single running list of reservations and otherentered expenses and allowances. You can select the Sort By drop-down menu (Indicator 1) to change thedisplay options for the listing. On the screen (Figure 3-5), you can: Select Add to enter all new expenses or mileage entries (Indicator 2). Select Details to view or Update recorded expense information (Indicator 3). Select Details to add, browse, and upload files to expenses or Documents (Indicator 3). Select options (3-dot icon) to Delete Expense or Duplicate Expense (Indicator 4) for other enteredexpenses and mileage allowances. (Exception: See Section 4 for information about how to updatelodging cost). Select Add, and then choose Add Expense from GTCC to import into the voucher (Indicator 2). Import a PDF to attach a file to an expense or Documents (Indicator 5). Download all Attachments (Indicator 6). Note: Icon only appears once you attach a file to an expenseor Documents. Select the Expand All / Collapse All option (Indicator 7). View Receipt requirements (Indicator 8).Defense Travel Management Office8
DTS Guide 3: VouchersFebruary 25, 2022167528384Figure 3-5: Enter Expenses ScreenThe Enter Expenses screen communicates and executes tasks through the extensive use of icons. See Section 3.4for an explanation of icons.Defense Travel Management Office9
DTS Guide 3: VouchersFebruary 25, 2022Beware of duplicate expense entries as these cause overpayments. If you are ever in doubt, check the ReviewTrip Voucher screen (Section 7.2) to see if you have over-claimed any expense or allowance.3.1 Reservation ExpensesBased upon your actual trip cost, you will need to Update, Add, or Delete your reservation expenses. Be sureyou attach receipts for expenses, which meet the receipt requirements. Note: Per policy, DTS flags receiptrequired items using a triangle icon (Indicator 1). The icon changes to a paper clip once you attach the receipt.12Figure 3-6: Enter Expenses Screen Update a reservation expense such as airfare, rail, or rental car to reflect actual cost.oStart by selecting Details (Figure 3-6, Indicator 2). The Details screen opens to Info (Figure 37, Indicator 1).oFor flights or rail, you can change the Ticket Number, Ticket Date and cost fields. For rentalcar, you can change the Expense Date and Expense Amount fields. Note: Typically, you needto update the rental car cost on the voucher, as the vendor applies the final fees when youturn-in the vehicle.o(Optional) Select Notes to add comments.oSelect Update to save the change. The Enter Expenses screen updates reflecting the change.Attach a receipt to an entered expense.oStart by selecting Details. The window opens (Figure 3-7). On the right side of the reservationexpense entry, you can browse, Drag And Drop, or select the sign to add a receipt (Figure 37, Indicator 2). Regardless of which method you use to include a receipt, once you select it,the Attach Document window displays (Figure 3-8). It identifies the document you havechosen.Defense Travel Management Office10
DTS Guide 3: VouchersFebruary 25, 202218740982Figure 3-7: Details – Airfare ExpenseFigure 3-8: Attach Document Screen1. Select Attach to confirm that this is the correct file. Note: the file will automatically convert to the .pngimage for viewing. You should only use the “Attach as a PDF” method when you need to retain theformat for a digitally signed form. Once the file attaches (Figure 3-9), you should see the receipt andview number of Attachments. Icons on the screen you can use include: Trash can (Indicator 1) Rotate Left (Indicator 2) Rotate Right (Indicator 3) Zoom In (Indicator 4) Zoom Out (Indicator 5) Sign (Add) (Indicator 6)oDownload all Attachments (Indicator 7)Defense Travel Management Office11
DTS Guide 3: VouchersFebruary 25, 202221317145874098116Figure 3-9: Attachment – Airfare Receipt2. Select Details again to close the expense item. The Enter Expenses screen updates with the expenseentry reflecting a paper clip icon indicating an attachment is present. Manually Add a reservation expense by starting on the Enter Expenses screen.oSelect Add. The Add New screen appears.oSelect Ticketed Expenses to enter an airline and rail expense. Select Transportation Expensesto enter a rental car expense.oEnter data in the required fields, attach a receipt (if required), and select Add to save theentry. The recorded entry displays in the list of expenses on the Enter Expenses Screen.You can Delete Expense by locating options (3-dots icon) next to the expense you need to remove.oThe window expands. Select Delete Expense. A Delete window opens.oSelect Delete. DTS removes the expense.Key Note: DTS provides a lodging entry under Enter Expenses with a calendar feature to view the daily per diemfor the TDY location (Figure 3-6). You can attach your lodging receipt to this lodging entry. However, you mustchange lodging cost, account for leave and meals through the Per Diem module (Section 4). You can use thelodging entry options (3-dots icon) for quick access to the Per Diem module or select Per Diem directly from theProgress Bar.3.2 Other ExpensesBased upon your trip cost, you may need to Update, Add, or Delete other expenses or allowance entries. If youhave a reoccurring item, you can use the Duplicate Expenses feature to add the same expense quickly. Be sureyou carefully review the listing and claim only your actual expenses.Defense Travel Management Office12
DTS Guide 3: VouchersFebruary 25, 202211Figure 3-10: Enter Expenses ScreenIf you need to Update an expense or allowance to actual cost, start by:1. Start by selecting Details (Figure 3-10, Indicator 1). The Details screen opens to Info (Figure 3-11,Indicator 1).11Figure 3-11: Details Screen2. Select and change the Expense Date and/or Expense Amount and the Update button appears (Figure3-12).Defense Travel Management Office13
DTS Guide 3: VouchersFebruary 25, 202211Figure 3-12: Details Screen - Update3. (Optional) Select Notes.4. Select Update to save (Figure 3-12, Indicator 1). The Enter Expenses screen updates reflecting thechange (Figure 3-13, Indicator 1).11Figure 3-13: Enter Expenses – Update ExpenseEven though you estimated your trip cost on the authorization, there still may be expenses incurred for the trip(e.g., baggage fees) which you need to add to your voucher. On the Enter Expenses screen, there is a singleentry point to Add expenses (Figure 3-14).Figure 3-14: Enter Expenses – AddDTS provides six Expense categories containing many Expense types from which you can choose (see Table 3-2).Key Note: If the Expense table does not include an allowable incurred expense, contact your DTA or AO (seeyour local business rules) for guidance on entering the expense in DTS.Example: A traveler is overseas on official travel using the Government Travel Charge Card (GTCC) and incurs aCross Border Processing Fee. In DTS, an option could be to use the Foreign Currency Conv Fees expense type torecord the cost and add notes to the expense for the AO to review.Defense Travel Management Office14
DTS Guide 3: VouchersFebruary 25, 2022Table 3-2EXPENSE CATEGORYEXPENSE TYPEInternational Travel ExpensesForeign Currency Conv FeesImmunizations/InoculationsInternational Drivers Permit FeesInternational Entry/Exit FeesInternational GTCC Transaction FeeInternational Guide/Services/DriverPassport/Visa FeesLodging ExpensesDual LodgingLodging Cancellation FeeLodging Early Check-In FeeLodging Late Check-Out FeeLodging Resort FeesLodging Retained on LeaveLodging Taxes (CONUS and Non-foreign)Mileage ExpensesPrivate Auto – At TDY AreaPrivate Auto – To/From TDYPrivate Auto – To/From TerminalPrivate Motorcycle – At TDY AreaPrivate Motorcycle – To/From TDYPrivate Motorcycle – To/From TerminalPrivate PlanePrivate Vehicle – GOV Auth & AvailOther ExpensesBaggage – 1st Checked BagBaggage – ExcessBaggage – Unaccompanied (Civilian Only)Conference RegistrationInternet – In FlightInternet at Lodging FacilityMilitary Working Dog– AirfareMilitary Working Dog – Kennel Handle FeeMilitary Working Dog – Lodging FeeOther – Create Your OwnTDY household Goods - MilitaryTicketed ExpensesAirline Ticket (CBA)Airline Ticket (IBA)Bus Ticket (CBA)Bus Ticket (IBA)Defense Travel Management Office15
DTS Guide 3: VouchersFebruary 25, 2022EXPENSE CATEGORYEXPENSE TYPETMC Fee (CBA)TMC Fee (IBA)Train Ticket (CBA)Train Ticket (IBATransportation ExpensesAero Club – Rental and FeesAirfare – Cancellation FeeGovernment Vehicle – Fuel/OilParking – At the TerminalParking – TDY AreaPrivate Plane – FeesPublic Transit – ShuttlePublic Transit – TDY AreaPublic Transit – TerminalRental Car – FuelRental Car – TerminalRental Car – To/From TDYRental Car – at TDY AreaTMC Fee – Not in Air AmountTaxi – TDY AreaTaxi – To/From TerminalTolls/Ferry Fees1. Starting on the Enter Expenses screen, select Add to enter an expense. The Add New screen appears(Figure 3-15).Figure 3-15: Add New ScreenDefense Travel Management Office16
DTS Guide 3: VouchersFebruary 25, 20222. Under Select Type, use the dropdown menu, to choose the expense category and specific expense. TheAdd New screen opens.3. Select the expense item (e.g., Other Expenses). The screen updates again.4. Select the specific expense (e.g., Baggage – 1st Checked Bag) (Figure 3-16). The Add New widowappears (Figure 3-17).Figure 3-16: Add New – Specific ExpenseFigure 3-17: Add New Screen - Expense AddedDefense Travel Management Office17
DTS Guide 3: VouchersFebruary 25, 20225. Enter the Expense Amount.6. (Optional) Add Notes. Attach receipt is available.7. To attach a receipt: Select Attach Receipt. The Attach Receipt window opens (Figure 3-18).Figure 3-18: Attach Receipt Screen Select Browse to locate the file. File appears in the window. Choose Select to advance. DTS returns you to the Add New Screen (Figure 3-19).Figure 3-19: Add New Screen – View Attachments (1)8. Select Add to save the expense entry. The entry displays on the Enter Expenses Screen. You have the option to pull in charges from your Government Travel Charge Card (GTCC) and associatethe cost to an expense.oStart on the Enter Expenses screen, and select Add. The Add New screen opens.oSelect Add Expense From GTCC (Figure 3-20). The screen advances to Import Expense (Figure3-21).Figure 3-20: Add New Screen9. On the Import Expense screen, check the box to select the transaction or charged item from the list(Figure 3-21).Defense Travel Management Office18
DTS Guide 3: VouchersFebruary 25, 2022March 15, 2020XApril 24, 2020Figure 3-21: Import Expense10. Use the drop-down menu to select an expense category and then specific expense type (e.g., RentalCar – Fuel) (Figure 3-22).Figure 3-22: Import Expense Screen – Rental Car FuelDefense Travel Management Office19
DTS Guide 3: VouchersFebruary 25, 202211. Select Import. The Enter Expenses screen updates with the imported expense appearing in theexpenses listing. Note: Only import valid, reimbursable charges. For example, do not import mealtransactions into the Expenses Module. To replicate an expense, use the Duplicate Expense feature.oStart by locating the expense entry and then select options (3-dots icon). The windowexpands.oSelect Duplicate Expense (Figure 3-23, Indicator 1). The Add Duplicate window appears(Figure 3-23).11Figure 3-23: Duplicate Expense OptionFigure 3-24: Add Duplicate Screen oEnter the date to replicate the expense.o(Optional) Add Notes.oSelect Add to save the entry. The Enter Expenses screen updates reflecting the recorded itemin the expenses listing.To remove an expense item, locate the entry and select options (3-dots icon). The window expands.oSelect Delete Expense (Figure 3-25, Indicator 1). A Delete Expense window opens.Defense Travel Management Office20
DTS Guide 3: VouchersFebruary 25, 20221Figure 3-25: Delete Expense OptionoSelect Delete to remove the expense. The expense is no longer in DTS.Key Note: If you made lodging reservations using DTS or even reservations made outside the system, you mayattach your lodging receipt to the lodging entry, which identifies the daily per diem for your TDY location.However, you do not manually enter the lodging cost under Enter Expenses when TDY to a single location.Double entry for lodging will cause an overpayment. Update your lodging cost for your trip in the Per Diemmodule (see Section 4).3.3 Attaching Files and Substantiating DocumentsThe Enter Expenses screen allows you to attach documents that support your travel claim. Types of documents,which you may need to include in the voucher: Approval for Travel Memo Constructed Travel Worksheet (CTW) Approval for other than economy/coach class travel Leave form DD Form 1351-2 (for Non-DTS Entry Agents)You can attach files to your expenses or Documents by using the Details or Import a PDF feature. DTS convertsPDF documents to images during upload and Drag And Drop processes to improve the file quality; however, youcan still select to upload a PDF version for signed memorandums.Key Note: DTS requires an attached DD 1351-2 be included in the voucher before the Non-DTS Entry Agent(NDEA) can stamp the voucher T-Entered. If the NDEA applies the T-Entered stamp without an attached DD1351-2, an AUDIT FAIL occurs during the signing process, causing a hard stop. The NDEA must return to theEnter Expenses screen and Add the required record. Attach a receipt to an entered expense.oStart by selecting Details (Indicator 1). The window opens (Figure 3-26). On the right side ofthe entry, you can browse, Drag And Drop, or select the sign to add a receipt (Indicator 2).Defense Travel Management Office21
DTS Guide 3: VouchersFebruary 25, 20221121Figure 3-26: Details ScreenoChoose one of the attachment options to locate the file to upload. The Attach Documentwindow opens displaying the file (Figure 3-27).Figure 3-27: Attach DocumentoSelect Attach at the bottom of the page to advance (Figure 3-27). The file appears in theAttachments area (Figure 3-28). When it does, you will see the receipt and number ofAttachments. Icons on the screen that you can use, include:Defense Travel Management Office22
DTS Guide 3: VouchersFebruary 25, 2022 Trash can (Indicator 1) Rotate Left (Indicator 2) Rotate Right (Indicator 3) Zoom In (Indicator 4) Zoom Out (Indicator 5) sign (Add) (Indicator 6) Download all Attachments (Indicator 7)2374516Figure 3-28: Details - Attachments Select expense Details again to close the window. The Enter Expenses screen updates reflecting theexpense item, cost change, and paper clip icon for attachment (Figure 3-29).Figure 3-29: Enter Expenses Screen Import a PDF. When you import files into the voucher, (e.g., memos, leave forms, DD 1351-2) you mustattach each one to a specific expense or to Documents. If you attach files, but do not associated therecord to an expense, DTS provides an information message (Figure 3-30, Indicator 2). Here is how toimport files:Defense Travel Management Office23
DTS Guide 3: VouchersFebruary 25, 202221Figure 3-30: Enter Expenses ScreenoStart on the Enter Expenses screen and select the Import a PDF icon (Figure 3-30, Indicator1). The Import PDF window (Figure 3-31) opens.oBrowse for the file you need attach. The file appears in Select a PDF file*.oChoose Select at the bottom of the screen (Figure 3-31) to proceed.Figure 3-31: Import PDF ScreenoThe Import PDF window appears (Figure 3-32). Check the box (Indicator 1) and then selectNext (Indicator 2) to advance. The expense types list appears (Figure 3-33).Defense Travel Management Office24
DTS Guide 3: VouchersFebruary 25, 202212Figure 3-32: Import PDF Screen – Rental Car ReceiptoSelect Attach to Existing (Indicator 1) to associate the file with an existing expense, or selectan expense type from the list to create a new expense (Indicator 2), so you can attach the file.1121Figure 3-33: Import PDF Screen - Attach file to ExpenseoSelect the expense you want to associate the file to (Figure 3-34) or enter the expense detailsand select Attach. The Import PDF screen updates reflecting receipt Attached (Figure 3-35).Defense Travel Management Office25
DTS Guide 3: VouchersFebruary 25, 2022Figure 3-34: Import PDF Screen – With Rental Car ExpenseoSelect Done to exit the window. The Enter Expenses screen updates reflecting the expenseitem with the paper clip icon showing an attached file (Figure 3-36).Figure 3-35: Import PDF Screen - AttachedDefense Travel Management Office26
DTS Guide 3: VouchersFebruary 25, 2022 83.06Figure 3-36: Enter Expenses Screen Assign document now. As mentioned above in the Import a PDF section, DTS provides an informationmessage when you have unattached documents (Figure 3-37) for your trip. You need to either attachthe files or remove them from the voucher.Figure 3-37: Enter Expenses – Assign Documents MessageoStarting on the Enter Expenses screen, select the Assign documents now link. An AssignDocuments widow appears (Figure 3-38). You can view the data in Grid View or List View(Figure 3-38, Indicator 1).211131Figure 3-38: Assign Documents Screen (Grid View)oReview the pages to determine which to keep and which to remove. To attach a file to an expense: Check a box (Figure 38, Indicator 2) for a document. Select Next.Defense Travel Management Office27
DTS Guide 3: VouchersFebruary 25, 2022 o Process through the Import PDF screens. Select Done on the final screen.To remove a file: Select the trash can icon (Figure 38, Indicator 3). A Delete Attachmentmessage appears. Select Delete.When you have attached or removed all unassigned documents, the Enter Expenses screenupdates and removes the message for unassigned documents (Figure 3-39).Figure 39: Enter Expenses Screen - No Message for Unassigned Documents3.4 Expenses Screen Icons ExplainedTable 3-2 explains the most common icons used on the Enter Expenses screen.Table 3-2Icons Appearing in Area HeadersSelect to show more information for an itemIcon Identifying Expense TypesIdentifies Expense on the Progress BarIdentifies an Expense on Enter Expenses screen – Other than aReservation ExpenseFlight ExpenseRental Car ExpenseLodging ExpenseRail ExpenseIcons for Attaching, Editing and Removing DocumentsDefense Travel Management Office28
DTS Guide 3: VouchersFebruary 25, 2022Select to Import a PDF and attach to an expense item. Available on theEnter Expenses screen.Use to Add a receipt or file under Details (expense item)Select to remove an attached document under Details (expense item)Download Attachments - Under Details, select to download record in anentry. You can also download all records (zip file) and on the EnterExpenses screen.browseSelect to search for and attach a file under Details (expense item)Select to rotate an image right / left under Details (expense item)Select to zoom an image in / out under Details (expense item)Icons Appearing in the Document ColumnExpenses - warning required receipt is missingN/AExpenses – receipt not applicableExpenses - Number changes to show how many receipts attached. Selectto choose one and view it.Attached file to an expense itemReceipt Required icon for an expense. Displays under Review Trip screen.Icons Appearing in the Actions ColumnIcon appears for an entered expense. Select to duplicate or delete anexpense item.Defense Travel Management Office29
DTS Guide 3: VouchersFebruary 25, 20224. Update Per Diem InformationThe Review Per Diem Amounts screen (Figure 3-41) identifies the per diem allowances (daily lodging limits andMeals & Incidental Expenses [M&IE]) that the AO approved in your authorization. Select Per Diem from theProgress Bar to access the Review Per Diem Amounts page to make allowance changes. Note: On the EnterExpenses screen, you can select the Lodging quick access option to Edit Per Diem (Figure 3-40).Figure 3-40: Lodging Option - Edit Per DiemFigure 3-41: Per Diem Entitlements ScreenAvailable options for changing, adding, and deleting situations that modify your per diem allowances and theexplanations of those options are the same on the voucher as they were on the authorization.1. Select Adjust Per Diem Amounts. The Adjust Per Diem Amounts screen displays.2. Select the date range, then enter the updated information in the following sections: Meals Duty Conditions Other Entitlements Lodging CostDefense Travel Management Office30
DTS Guide 3: VouchersFebruary 25, 20223. Select Save Adjustments.If several changes affect your per diem conditions, it may be easiest to use the Reset link to remove all of a day’smanually entered allowance changes. The Reset link returns all options on the selected day to their initialdefault settings. You can then enter all necessary changes before saving them.Defense Travel Management Office31
DTS Guide 3: VouchersFebruary 25, 20225. Update Accounting InformationThe Accounting module only contains the Accounting screen (Figure 3-42). You can use it to update incorrectLines of Accounting (LOAs) that appear on your document.5.1 Update LOAsOpen the Accounting module from the Progress Bar. As was true on the authorization, you should only makechanges to this screen, if your organization allows you to do so.Figure 3-42: Accounting Codes Screen Change a LOA: The only change you should make to LOAs on a voucher is to remove invalid ones andadd missing ones as described below.Defense Travel Management Office32
DTS Guide 3: VouchersFebruary 25, 2022
the “Attach as a PDF” method when you need to retain the format for a 1 2 874098 . DTS Guide 3: Vouchers digitally signed form. 12/30/20 12 This document is maintained on the DTMO website at https://www.defensetra