Transcription
MIDI Setup with TonePort UX2 and KB37Table of ContentsFOOTSWITCH CONNECTIONS . 2TONEPORT KB37 CONTROLLER LAYOUT. 3TONEPORT KB37 DEFAULT MESSAGES . 4Default message map for GearBox 3.0 . 4Default MIDI messages (non-GearBox) . 4RE-MAPPING THE KB37 CONTROL MESSAGES . 5MIDI CONTROLLER MESSAGE TYPES . 7ASSIGN GEARBOX FUNCTIONS TO TONEPORT UX2/KB37 CONTROLLERS . 8Dual-Tone GearBox settings. 8TONEPORT UX2/KB37 CONTROLLERS AND ABLETON LIVE 5 LINE 6 EDITION . 9SETTING UP MIDI CONTROL MANUALLY IN ABLETON LIVE 5 LINE 6 EDITION . 11USING TONEPORT KB37 WITH REASON . 13What is a Remote codec? . 13KB37 mapping variations . 13To use the KB37 with Reason’s Remote codec: . 14USING MMC TO CONTROL TRANSPORT FUNCTIONS IN LOGIC 7. 15USING MIDI TO CONTROL TRANSPORT FUNCTIONS IN DIGITAL PERFORMER . 16This document provides general information for MIDI operation of GearBox and 3rd-partyrecording software, using TonePort UX2 and KB37 controllers, as well as instructions on using theKB37 with Reason’s Remote codec.Line 6, GuitarPort, POD, TonePort UX1/UX2/KB37, the Line 6 logo and the GearBox logo are trademarks of Line 6, Inc. 2006 Line 6, Inc. All rights reserved.Apple, Mac, Mac OS X, Safari and QuickTime are trademarks of Apple Computer, Inc.Windows and Internet Explorer are trademarks of Microsoft Corporation.Intel and Pentium are trademarks of Intel Corporation.Ableton and Ableton Live are trademarks of Ableton AG.Reason and Remote are trademarks of Propellerhead Software AB.Page 1 of 16
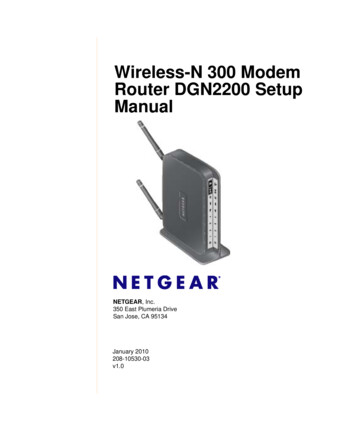
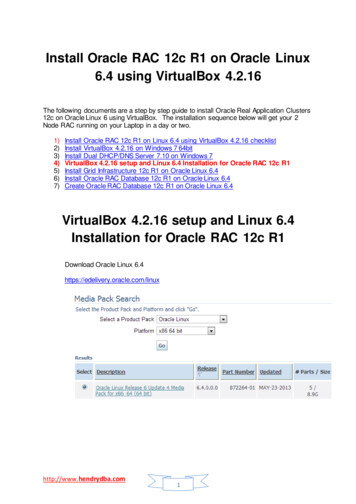
Footswitch ConnectionsThe two Footswitch jacks on the rear panel of TonePort UX2/KB37 provide remote control ofGearBox operations or functions within the included Ableton Live Lite 5 and other audiosoftware.TonePort KB37 features an expression pedal jack and a number of knobs, wheels and buttons thatcan be configured to control various parameters in GearBox or other audio software.Connect up to two footswitch pedals intothese Footswitches 1 & 2 jacksUX2Connect a Line 6 EX-1(or any other TS-styleexpression pedal) hereKB37Tip – You will want to first connect your hardware to TonePort before connecting the USB cableto your computer. If you already have a USB cable connecting TonePort to your computer, exitany software that is using TonePort, mute your speakers, and then disconnect your USB cable.Page 2 of 16
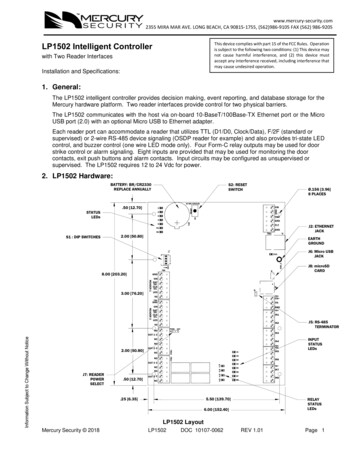
TonePort KB37 Controller LayoutThe KB37’s controls send MIDI events. The knobs and buttons are named as 0.17181911.12.13.14.15.16.17.18.19.Octave UpOctave DownPitch Bend WheelModulation WheelSound Select (Previous)Sound Select (Next)Knob 1Knob 2Knob 3Knob 4Page 3 of 16Transport - RewindTransport - ForwardTransport - StopTransport - PlayTransport - RecordButton 1Button 2Button 3Button 4
TonePort KB37 Default MessagesKB37 ships with a default set of messages assigned to its controllers as shown below, which you can ofcourse reconfigure in the Line 6 Audio-MIDI Devices control panel.Default message map for GearBox 3.0Default MIDI messages (non-GearBox)Controller nameGearBox parameterController nameModulation wheelTweakSound Select (Previous)Patch increment -1Sound Select (Next)Patch increment 1Knob 1CC 73 (Attack Time)Knob 2CC 75 (Decay Time)Sound Select (Previous)Next Tone PresetSound Select (Next)Previous Tone PresetKnob 1Amp – DriveKnob 2Amp – BassMIDI messageKnob 3CC 72 (Release Time)Knob 4CC 91 (Effects 1 Depth)Knob 3Amp – MiddleKnob 4Amp – TrebleButton 1CC 65 (Portamento)Button 1Stomp – toggle on/offButton 2CC 127 (Poly On)Button 2Mod – toggle on/offButton 3CC 126 (Mono On)Button 3Delay – toggle on/offButton 4CC 123 (All Notes Off)Button 4Reverb – toggle dForwardStopMMC PausePlayMMC Play/StopRecordMMC Record PunchRewindMMC RewindForwardMMC Fast ForwardExpression pedalWahExpression pedalCC 11 (Expression)Footswitch 1StompFootswitch 1(Sustain)CC 64 (Sustain)Footswitch 2TunerFootswitch 2MMC Record PunchNote – By default, KB37 send both GearBox and non-GearBox messagessimultaneously. The following section shows you how easy it is to change whatmessages are sent.Page 4 of 16
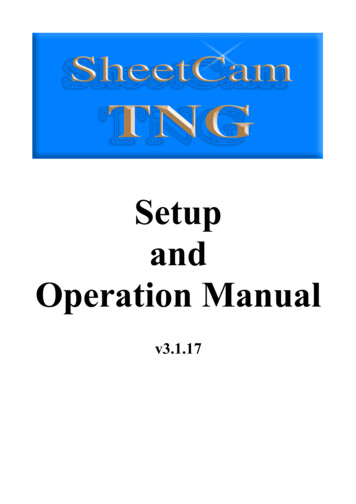
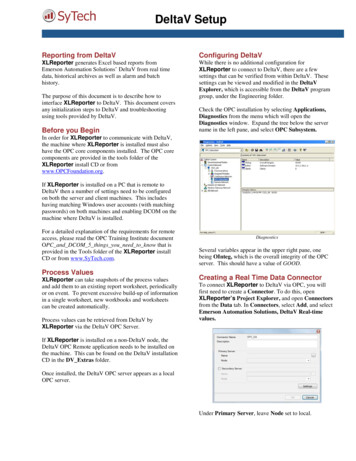
Re-mapping the KB37 control messagesTo re-map the functions of any of these controllers, go to Edit Preferences and follow these steps:Select theHardware tabClick here todisplay the Line 6Audio-MIDIDevice controlpanelSelect the MIDI tabClick here to recallany PresetMappingsClick here to display theMIDI Control SettingsPanelPage 5 of 16
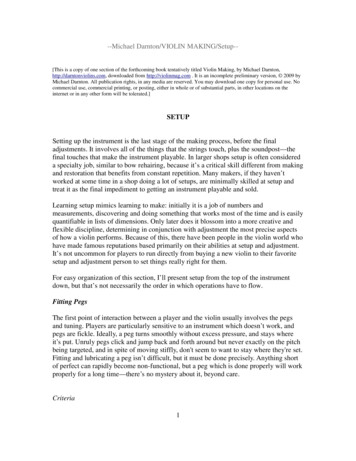
This column populates with all re-assignable controllersfor your device (TonePort KB37 shown here)Choose the Type of Control, which CC/Action it willperform, and the Switch Mode for your controllersPage 6 of 16Name and Save yourCustom Mapping as a PresetClick Apply, thenOK when done
MIDI Controller Message TypesTonePort UX2/KB37 allow you to configure controllers to send a variety of different MIDImessage formats (MIDI CC, MMC, Mackie/Logic Control), to remotely control functions withinother audio software. Below are the types of MIDI messages you can send from TonePort’scontrollers. Check the documentation for your audio software for its MIDI remote controlcapabilities and instructions for assigning functions.MIDI CC (On/Off) – Choosing this function allows selection of any CC from 0-127, listedby number and the standard command association (for example, 007 Volume).MIDI CC (Custom) – For Footswitches and Buttons, this function allows a pair of CC’sand values to be assigned so that the controller can trigger two different functions for eachsuccessive push. (See the Footswitch 1 example below in the Ableton Live Setup section foran example).MIDI Machine Control – This function offers a set of MMC commands listed by name.The command is sent on push down of the pedal/button, and no command is sent on pedalup. When the Fast Forward or Rewind commands are selected, the Switch Mode menubecomes available and Momentary is a selectable option. This offers the ability to eithertoggle these functions on/off, or to have them perform when the pedal is held down only.Mackie/Logic Control – This function offers a limited set of commands that can be sentconforming to the Mackie Control or Logic Control format. If the audio software supportsthese popular controller devices, then it should also support these commands fromTonePort.Note – The Mackie Control protocol uses MIDI note events to activate specificfunctions. When using the KB37 as a Mackie Control input device, MIDI notemessages may trigger Mackie Control-related functions within a given hostapplication. In Ableton Live for example, D5 (MIDI note 74) toggles between theArrangement and Session views.Page 7 of 16
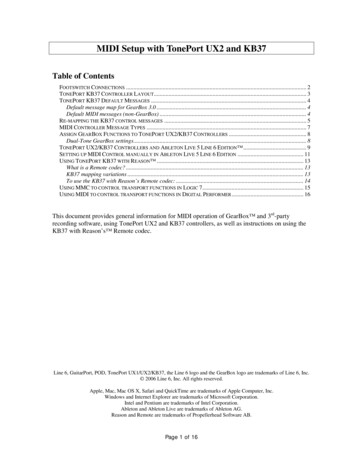
Assign GearBox Functions to TonePort UX2/KB37 ControllersRather than controlling Ableton Live or other recording software, you can choose to have one ormore controllers affect GearBox functions, such as amp/effect parameters, increment throughPresets, Mute outputs, switch to the tuner, and more!This is all done in the Line 6 Driver MIDI Control Settings Panel:KB37 Controllersshown here mapped tovarious GearBoxfunctions.Clicking the dropdownmenu reveals allGearBox parametersassignable to Knob 1Dual-Tone GearBox settingsNote that if you have selected one of the Dual-Tone settings in the Source Select menu, then thecontrollers will affect the parameters for Tone 1 only. The Dual-Tone settings are the ones withthe “&” in their names.Dual-Tone settings are the ones withthe “&” in their namesFor example, if you are currently using Inst & Mic 1 as your Source, then TonePortUX2/KB37 will only trigger their assigned functions for the Instrument tone.Page 8 of 16
TonePort UX2/KB37 Controllers and Ableton Live 5 Line 6 Edition The Line 6 Audio-MIDI driver includes a MIDI Mapping preset that configures TonePortUX2/KB37 controllers for Ableton Live 5 Line 6 Edition, so that anytime you start a new LiveSession, it will load with the following MIDI control settings:Footswitch 1: Play/StopFootswitch 2: Record ordStopAll you need to do is choose your TonePort UX2/KB37 as an “active” controller device within theAbleton Live software, and select the Ableton Live MIDI Preset in the Line 6 Driver. The followingsteps show you how 1. Select TonePort UX2/KB37 as an active remote control device in Ableton Live 5With TonePort UX2 connected to your computer’s USB port and the GearBox softwarerunning, launch Ableton Live Lite 5 and go Options Preferences (Windows) or Live Preferences (Mac).Go to the MIDI tabClick Track, Sync andRemote buttons On tomake your TonePort anactive MIDIdevice/controllerPage 9 of 16
2. Once the above settings are made, go to the GearBox application Edit Preferences Hardware Driver Settings, and click the MIDI TabSelect theAbleton LiveMIDIMappingPreset, andclick ApplyPage 10 of 16
Setting up MIDI Control manually in Ableton Live 5 Line 6 EditionAs an example, we’ll show you how to set up the Start/Stop and Punch In/Out functions for theTonePort UX2/KB37 footswitches manually. First, set up your TonePort as the active MIDIdevice/controller as described above, then set/verify the MIDI settings shown below in the Line 6Driver MIDI Control Settings Panel.In Ableton Live Lite 5 Line 6 Edition, follow these steps In the upper rightcorner of the MainWindow, click on theMIDI button. It shouldlight up blue,indicating you haveentered Learn ModeThen go over to theTransport and clickon the Play buttonPress Footswitch 1.The numbers 1/2appear inside the PlayButton (MIDI CC 2)Click on the StopButton then pressFootswitch 1 again.The numbers 1/3appear (MIDI CC3)Now click on theRecord button, thenpress Footswitch 2.The numbers 1/6appear, meaningMIDI CC 6 togglesRecord on/offPage 11 of 16
Click on the MIDI button when done, toexit MIDI Learn ModeYou’re done! Using the same procedure, you can now re-map any of the TonePort UX2/KB37controllers to remotely control various operations in Ableton Live 5 Line 6 Edition. For moreinformation on Live controls, please refer to your Ableton help documentation.Page 12 of 16
Using TonePort KB37 with Reason The Line 6 Audio-MIDI driver includes a MIDI Mapping preset that configures TonePort KB37for use with Reason. Due to Reason’s dynamic environment, the KB37 works with Reason’sRemote interface via a Remote codec for KB37, which is installed with GearBox 3.0.IMPORTANT: Earlier versions of Reason do not support the Remote codec, so be sure to install thelatest available update (see http://www.propellerheads.se).What is a Remote codec?The Remote codec performs the task of mapping KB37 MIDI messages to Reason-specificfunctions. For example, the codec maps the KB37’s transport control to Reason’s transportfunctions.But there are hundreds of knobs and buttons in Reason, and only a few controls on the KB37. Tomanage all those Reason parameters, the Remote codec maps the knobs and buttons to variousReason Device parameters, relative to the currently selected track. Therefore, a default map for theKB37’s buttons and knobs exists for each device.KB37 mapping variationsBecause most Reason devices have more parameters than the KB37 has physical controls, we haveprovided mapping variations for these devices.When selecting a mapping variation, a new set of parameters will be mapped to the KB37 for aselected Reason device. For example, the KB37’s “Sound Select” buttons are mapped to move upand down across tracks. Variation 2 maps the buttons to the target device’s “patch up/patch down”parameters.To switch between mapping variations in Reason, you need to use the following keystrokes:Mac[Command] [Option] numerical keys [1] to [10]Windows[Ctrl] [Alt] numerical keys [1] to [10]Note that in both cases, [1] selects the default standard mappingTip – You can get an overview of which Reason parameters are assigned to a givenmapping variation. To do this, select “Remote Override Edit Mode” from Reason’sOptions menu.Page 13 of 16
To use the KB37 with Reason’s Remote codec:1. Select the “Reason 3” MIDI Mapping preset and click OK:2. In Reason, open the “Control Surfaces and Keyboards” page in Reason’s Preferences dialog, click‘Add’, then select “Line 6” from the Manufacturer list, and click OK:Voila! You should see the KB37 pictureappear in the Model box:Click OK and you’re ready to Remote!Page 14 of 16
Using MMC to control transport functions in Logic 7Listen to MMC Input must be enabled in Logic 7 in order to receive MMC from the KB37. Here’show:1. From the main application menu, open Preferences MIDI2. Select the Sync tab3. Click the MIDI Sync Song Settings button in the bottom right; this launches the Song Settingsdialog.4. In the section labeled “MIDI Machine Control (MMC)” check the Listen to MMC Input optionNote that this is a per-Song option. To make this option global, you must modify your template file.Page 15 of 16
Using MIDI to control transport functions in Digital PerformerListen to MMC Input must be enabled in Logic 7 in order to receive MMC from the KB37. Here’show:1. Create new MIDI Settings preset in the Line 6 Audio-MIDI Preferences dialog, using MIDI CCassignments for transport button functions. For example:Transport RewCC 115MomentaryTransport FwdCC 116Transport StopCC 117MomentaryMomentaryTransport PlayCC 118MomentaryTransport RecCC 119Momentary2. Save preset (e.g. name them "Digital Performer MIDI preset")3. Click 'Apply' (if available), then 'OK' to dismiss the dialog4. Open (or return focus to) Digital Performer 5.15. Type Shift L or select the Setup menu, Commands item6. Eliminate any MIDI note mappings found in this list to avoid unexpected events7. Type 'stop' into the search string (top of the dialog window) & click ‘Search’ (dialog will scroll tothe appropriate section of the list)8. Under Transport Commands, click the cell in the "Play" row, "MIDI EVENT" column9. Press-and-hold the Play button on the KB37 and press Enter or Return before releasing theKB37 button10. Notice that the captured MIDI CC msg. is '#118 127' (momentary down state)11. Under the adjacent source field, select TonePort KB37 from the list12. Repeat the same procedure for the remaining transport buttons; the Learn function should ensurethat the proper CCs are captured. Note: the enter -while-depressed part is crucial, as releasing theKB37 button before accepting the captured message can cause it to 'listen' for a value of '0' from theassigned CC13. Important: Scroll to the top of the Commands list and click the square box to the left of'Master Master' under the heading 'MIDI Masters', so it's in a a grey [active] stateKB37 Transport buttons should now work with Digital Performer.Page 16 of 16
Ableton Live software, and select the Ableton Live MIDI Preset in the Line 6 Driver. The following steps show you how 1. Select TonePort UX2/KB37 as an active remote control device in