Transcription
XenApp 7.5 and 7.6 and XenDesktop 7.5 and 7.6Deploy XenApp 7.5 and 7.6 and XenDesktop 7.5and 7.6 with Amazon VPCPrepared by: Peter BatsCommissioning Editor: Linda BelliveauVersion: 5.0Last Updated: September 3, 2014Page 1 2014 Citrix Systems, Inc. All rights reserved.
Table of ContentsIntroduction . 3Known issues. 3Requirements. 3Prerequisites . 3Link AWS Marketplace AMIs to your account . 4Automated deployment using an AWS CloudFormation template . 5XenApp or XenDesktop Infrastructure Stack Creation using the CloudFormation template . 5Set up XenApp or XenDesktop on the AWS Infrastructure . 15Configure the Master VDA machine . 21Set up machines in Studio using the Master VDA AMI . 30Set up Delivery Groups . 35Set up NetScaler Gateway Remote Access . 36Set up StoreFront . 36Configure NetScaler Gateway using the Enterprise Store wizard . 40Create template AMIs from other templates . 46Appendix . 47Manually deploy XenApp and XenDesktop in AWS . 47Security and firewall mappings . 48Set up the VPC network . 51Create the VPC network infrastructure . 51Add security groups . 55Add public security group . 58Add Private Security Group. 60DHCP options . 62Create a DHCP options set . 62Set up the XenApp or XenDesktop infrastructure instances . 65Page 2 2014 Citrix Systems, Inc. All rights reserved.
IntroductionThis document describes setting up Citrix XenApp or XenDesktop with the Amazon Web Services (AWS)Virtual Private Cloud (VPC).Known issuesAmazon Web Services depreciated the ECU terminology and no longer lists this value for new instancetypes. However, Studio lists some new instance types for Memory Optimized and General purpose thatdisplay 2.5 in the ECU column. The 2.5 actually refers to the clock speed in GHZ for these instance typesand not ECU. Refer to the Amazon Web Services website https://aws.amazon.com/ for details on eachinstance type and its technical specification. [#496972]RequirementsTo deploy a XenApp or XenDesktop 7.5 or 7.6 Site in an Amazon VPC, ensure that you complete theprerequisites and link AWS Marketplace AMIs to your account as follows.PrerequisitesMake sure you perform the following before you begin: Plan to take one day for the first-time implementation of the deployment.Have an AWS environment set up and running, with an active AWS account and preferably an AWSIdentity and Access Management user account that can be used for this specific deployment.For this proof of concept (POC) deployment, the IAM user must have administrative rights to yourAWS environment. For information about the rights you need, see the XenApp and XenDesktoptopic Prepare to Install.Subscribe with your AWS account to the NetScaler VPX AMI located in AWS Marketplace.Page 3 2014 Citrix Systems, Inc. All rights reserved.
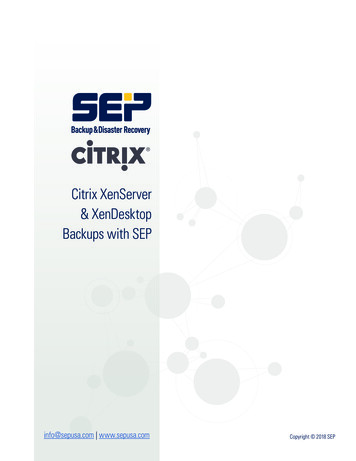
Link AWS Marketplace AMIs to your accountThe CloudFormation template uses AWS Marketplace AMIs. Link the AMIs to your account beforebeginning the install as follows.1. From the AWS console, select Find software on AWS MarketPlace under the additional informationsection on the right side of the console.2. Search for NetScaler VPX Platinum Edition – 10 Mbps, and select version 10.1-123.9.3. Select your AWS account and register it.Page 4 2014 Citrix Systems, Inc. All rights reserved.
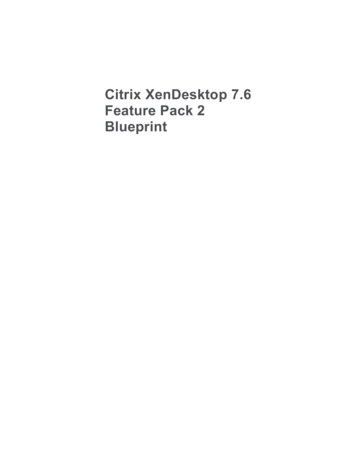
Automated deployment using an AWS CloudFormationtemplateXenApp or XenDesktop Infrastructure Stack Creation using theCloudFormation templateThe following steps show how to use the CloudFormation template to automate building all necessaryresources in the Amazon EC2 cloud for a XenApp or XenDesktop Site.1. On the CloudFormation Stack console tab, use the drop-down box in the upper-right-handcorner to select the region in which you want to build the environment.Page 5 2014 Citrix Systems, Inc. All rights reserved.
2. Click Create New Stack.3. Provide the stack name, and point to the CloudFormation JSON template available WS CF v1 2.json,and click Continue.Page 6 2014 Citrix Systems, Inc. All rights reserved.
4. Provide parameters for the script to run. The template provides the following information,including brief explanations for each parameter, and displays the following default values.DefaultDefault rd10.0.0.0/24User ud.netDomainLDIFFormatDC xencloud,DC netDomainNetBIOSNameXENCLOUDIAMUserAccessKeyUser SuppliedKeyPairNameUser NSMIPhttps://s3.amazonaws.com/cfXenApp/NS VPX PLT 10MB Template v4.4.json10.0.1.102NSNSIP10.0.1.100Page 7DescriptionAmazon EC2 instance type for the ActiveDirectory Instance.Fixed private IP for the Active Directory serverName of Availability Zone that will containpublic and private subnets. Select a valid zonefor your region.Amazon EC2 instance type for the Bastioninstance.CIDR Block for the public subnet.Password for the domain admin user that iscreated by the user. Must be at least eightcharacters and contain letters, numbers, andsymbols.User name for the account that will be addedas a domain administrator. This is separatefrom the default administrator account.Fully qualified domain name (FQDN) to beused for the DHCP scope; for example,xencloud.com.LDIF domain (up to 30 characters) for creatingusers in the Active Directory Domain Tree.NetBIOS name of the domain (up to 15characters) for users of earlier versions ofWindows; for example, XENCLOUD.IAM user access key used to create andconfigure the various instances.Public/private key pairs allow you to securelyconnect to your instance after it launches.Amazon EC2 instance type for the NATinstances.The public URL for the NetScaler VPXCloudFormation v4.4 template.The IP address used. This can be a MIP or aSNIP for the NetScaler NIC connected to theprivate NIC should be within the CIDR of theprivate subnet.Fixed private IP for the NetScaler NICconnected to the private subnet should be 2014 Citrix Systems, Inc. All rights reserved.
0/24User SuppliedUser erVPCCIDRVPCName10.0.0.0/16XenDesktop 7.5 and 7.6POC XenApp and XenDesktop 7 5.isoUser suppliedXDAdminUserXDFarmAdminPage 8within the CIDR of the private subnet.Fixed public IP for the NetScaler NICconnected to the public subnet, should bewithin the CIDR of the public subnet.Fixed VIP for the NetScaler NIC connected tothe public subnet, should be within the CIDRof the public subnet.CIDR block for private subnet.IAM user secret access key to be used.NetBIOS name of the AD server (up to 15characters).Amazon EC2 instance type for the VDAmaster instance.NetBIOS name of the machine used as themaster image for VDAs.VPC Subnet.Name of the XenDesktop VPC.Install server used to build the server farmusing the App Delivery Setup PowerShellscripts. Can be powered down after the farmis built.Network address translation server, whichallows outbound access to the Internet forthe servers in the private subnet.NetScaler VPX instance that is used to provideICA proxy functionality for the StoreFrontserver. 2014 Citrix Systems, Inc. All rights reserved.
5. Different firmware versions of the NetScaler VPX are supported. Select the version you want bychoosing the appropriate JSON template from one of the following firmware zonaws.com/cf-XenApp/NS VPX Template enApp/NS VPX Template p/NS VPX Template v4.1.json10.1-120.136. After specifying the required parameters, select I acknowledge that this template may createIAM resources check box, and click Continue.Page 9 2014 Citrix Systems, Inc. All rights reserved.
7. Add any additional tags on the next screen, and click Continue.Verify that the values provided match your environment.Note: It is important to ensure that the availability zone, your access credentials and keypair are correct. Ifnot, go back and correct the error; otherwise, the template creation will fail. Once correct, click Continueto start the stack build process.8. Click Create on the stack creation information screen.Page 10 2014 Citrix Systems, Inc. All rights reserved.
Page 11 2014 Citrix Systems, Inc. All rights reserved.
The CloudFormation template builds the environment according to the parameters you specified; thetemplate will appear in the CloudFormation Console when completed.It displays two CloudFormation stacks: one for the EC2 Infrastructure and one for the NetScaler VPX.Page 12 2014 Citrix Systems, Inc. All rights reserved.
9. When you select the Outputs section of the Infrastructure Stack, the IP addresses of the maincomponents appear.Page 13 2014 Citrix Systems, Inc. All rights reserved.
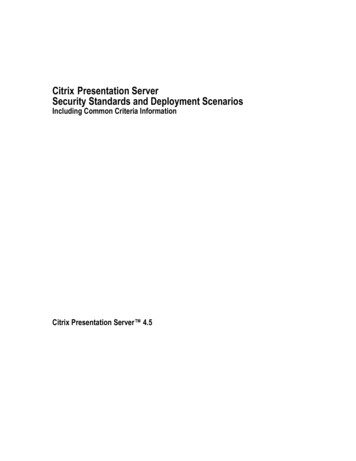
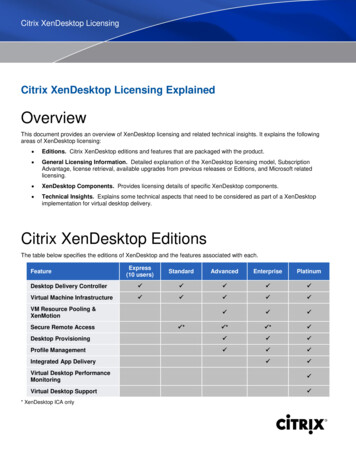
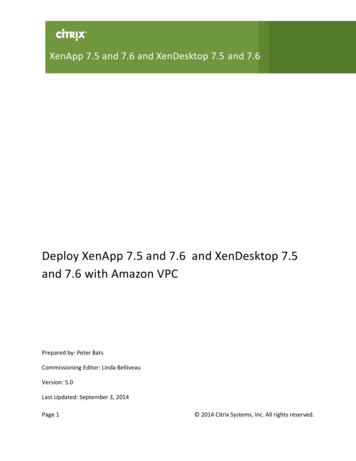
If you select the default values, the template constructs a XenApp or XenDesktop Site infrastructure inthe AWS cloud similar to the following example:Site infrastructure using the CloudFormation templateXenApp / XenDesktop in AWS CloudAWS Regional DataCenterVirtual Private Cloud (VPC)Private Subnet (10.0.1.x)DMZ 10.0.0.xBastionEth 0/1EIPEth 0/0NetScaler NSVPX-1Eth 0/0 (.175)Eth 0/1 (.100)Remote& MobileUsersPage 14NAT SG(22)EIPNAT iNetGatewayPrivate SG(80,443,1494,2598,3389,53,5986,8080,27000)Public SG(80, 443, 3389)EIPCorporateOfficeWorkersAD DCDC01 (.5)Delivery ControllerSQL ServerStoreFrontXD7DDCXenApp /XenDesktopWorkersVDAMaster 2014 Citrix Systems, Inc. All rights reserved.
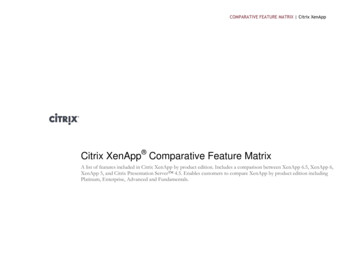
Set up XenApp or XenDesktop on the AWS InfrastructureOnce you have setup AWS using an AWS CloudFormation template, you can configure XenApp orXenDesktop to deliver virtual desktops and applications from AWS.1. From the EC2 instances management console, select Download Desktop File to connect to theBastion host using RDP.2. Log in with the domain administrator credentials you provided during the CloudFormation Stackcreation.3. From the Bastion host, RDP to the Delivery Controller (the controller is xd7ddc.xencloud.netwhen using the default domain name), and log in as the domain administrator using again theDomainAdminUser and DomainAdminPassword provided as parameters during the stackcreation event.Page 15 2014 Citrix Systems, Inc. All rights reserved.
4. The XenApp and XenDesktop 7.5 and 7.6 product media is already mounted. RunAutoSelect.exe to start the installation.Note: The credentials file for the root AWS account, retrieved ity credential is not in the same format forcredentials files downloaded for standard AWS users. Because of this, Studio cannot use the file topopulate the API and secret key fields when creating a connection. Ensure that you are using IAMcredentials files when administering Studio.5. Install XenApp or XenDesktop as required for your environment.a. Select the Delivery Controller.b. Select All Core Components.c. Follow the wizard instructions to complete the Delivery Controller Installation.6. Start Citrix Studio, and follow the wizard to create the site. Note that the CloudFormationtemplate has preinstalled SQL Server 2012 on the Delivery Controller.Page 16 2014 Citrix Systems, Inc. All rights reserved.
7. Select the local host as the database server location, and allow the wizard to create thedatabase.8. Complete the licensing setup.Page 17 2014 Citrix Systems, Inc. All rights reserved.
9. Provide your AWS access credentials to allow the Delivery Controller to provision instances onAWS.10. Select the AWS region, your VPC, and the desired availability zone for this connection.Page 18 2014 Citrix Systems, Inc. All rights reserved.
11. Select the subnets to host your instances, and then enter a name. In this example, the privatesubnet, 10.0.1.0/24 is selected to access the VDAs running in this private network, as shown inSite Infrastructure using the CloudFormation template.12. Skip the configuration for the App-V Publishing option to complete the Site setup. You can addthis feature later.Page 19 2014 Citrix Systems, Inc. All rights reserved.
When the configuration completes, the wizard displays the Site Setup page.Page 20 2014 Citrix Systems, Inc. All rights reserved.
Configure the Master VDA machineOnce you have configured the Delivery Controller, you must configure a master image by configuring amaster VDA machine.1. From the Bastion host, RDP to the VDA Master (you can find the IP address from the EC2console), and log in as the domain administrator, using again the DomainAdminUser andDomainAdminPassword provided as parameters during the stack creation event.2. The XenApp and XenDesktop 7.5 and 7.6 product media is already mounted. RunAutoSelect.exe to start the installation.Page 21 2014 Citrix Systems, Inc. All rights reserved.
3. Select Virtual Delivery Agent for Windows Server OS for a XenApp Worker installation. SeeServer VDI for information on setting up a Server VDI Master VDA.Page 22 2014 Citrix Systems, Inc. All rights reserved.
10. Select Create a Master Image.11. Supply the FQDN of the Delivery Controller you configured earlier in this process.12. Review the specified settings for the Master VDA13. Select Install to start the VDA Master installation.Page 23 2014 Citrix Systems, Inc. All rights reserved.
Note: You must reboot the machine to complete the addition of the Microsoft Remote Desktop Sessionhost. You can reboot from within the instance; you do not need to use the AWS console to do so. It cantake several minutes after reboot before the instance responds to RDP connections again.14. After the machine reboots, log in to the Master VDA. The XenApp and XenDesktop product media isno longer mounted (it searches for the media), and the installation does not continue.Page 24 2014 Citrix Systems, Inc. All rights reserved.
15. Click Cancel, and remount the media from its location. For example,C:\Users\Public\Downloads.16. When the media is mounted, select the Virtual Delivery Agent for Windows installation, whichautomatically continues from where it left off.17. Restart the machine.Page 25 2014 Citrix Systems, Inc. All rights reserved.
18. After the VDA installation completes, install applications that will be published or available on theusers' desktops on the master VDA.Page 26 2014 Citrix Systems, Inc. All rights reserved.
19. After installing additional software, from the EC2 Console, select Actions Stop to shut down theVDA Master Image.Page 27 2014 Citrix Systems, Inc. All rights reserved.
20. After shutdown, create an AMI from your Master VDA by selecting Actions Create Image.Page 28 2014 Citrix Systems, Inc. All rights reserved.
21. Assign a name and description, and then click Create Image.Important: By default, Delete on Termination is selected. Do not change this setting. The product workson the assumption that root disk volumes are deleted automatically by Amazon. Unchecking this box cancause the deployment to leak volumes in EBS storage.Depending on the size of the instance volume, image creation can take a long time. You must wait untilthe image is fully created before you can see it in Studio.When the AMI creation process completes, set up machines in Studio using Master VDA AMI.Page 29 2014 Citrix Systems, Inc. All rights reserved.
Set up machines in Studio using the Master VDA AMINow that the master AMI is configured, use Studio to provision applications and desktops by creating amachine catalog.1. Open Studio on the Delivery Controller and select Option 2.2. Select Server OS. If your configuration has Server VDI available on a Desktop OS, you canalternatively choose the Desktop OS option.Page 30 2014 Citrix Systems, Inc. All rights reserved.
3. To enable XenApp or XenDesktop to control machine provisioning in AWS, select the settings shownin this example:Note: AWS does not support Citrix Provisioning Services.Page 31 2014 Citrix Systems, Inc. All rights reserved.
4. Select the machine template the AMI created in the EC2 console as described in Configure theMaster VDA machine.5. Select the required security groups. In this example, you must select the DomainMemberSGSecurity as well as the private security group PrivateSecurityGroup.You can also indicate that dedicated hardware is required to host your instances. Use SharedHardware is the default.Page 32 2014 Citrix Systems, Inc. All rights reserved.
6. Select the number of machines and instance type to for the machine catalog.7. Select the networking configuration.Page 33 2014 Citrix Systems, Inc. All rights reserved.
8. Configure the computer accounts.9. Enter a name, and click Finish. Note that the process of copying the master image can take a longtime to complete. It may take 30 to 40 minutes, or more if there are a lot of machines in the catalog.Page 34 2014 Citrix Systems, Inc. All rights reserved.
Set up Delivery GroupsAfter setting up machines in the machine catalog, configure Delivery Groups to specify which users canaccess desk
Sep 03, 2014 · Requirements To deploy a XenApp or XenDesktop 7.5 or 7.6 Site in an Amazon VPC, ensure that you complete the prerequisites and link AWS Marketplace AMIs to your account as follows. Prerequisites Make sure you perform the following before you begin: Plan to take one