Transcription
Asset Management for InventoryScannersCore-CT 9.2 Finance Implementation1
Asset Management for Inventory ScannersINTRODUCTION2
Today’s ScheduleModule NameDurationOverview of Core-CT 9.215 minutesIntroduce Fluid30 minutes(Including 10 minute Oracle Video)Perform Physical Inventory90 minutesScan Asset15 minutesFind Asset15 minutesReview and Q&A15 minutesAsset Management for Physical Inventory20 minutesProcessors3
Learning Objectives At the end of this course, you will be able to:– Describe Fluid.– Explain device and connectivity requirements for Fluid.– Explain the function of the new Inventory Scanner role for AssetManagement.– Prepare for transition into Fluid.– For Physical Inventory Processors: Set Up and Process PhysicalInventory.4
Asset Management for Inventory ScannersOVERVIEW OF THE CORE-CT 9.2UPGRADE5
Upgrading to 9.2 Asset Management addition of the new Fluid User Interface. The new Fluid User Interface will:– Eliminate a number of setup steps for physical inventory, therebyincreasing efficiency.– Centralize data access through the asset repository.– Modernize technology through integration of new mobilescanning devices for physical inventory scanning .6
Core-CT 9.2 Upgrade Timeline User Acceptance Testing (UAT) began in mid-January. Go Live is scheduled for March 13.7
Asset Management for Inventory ScannersINTRODUCTION TO FLUID8
What is Fluid? Fluid is a new interface that provides direct access to CoreCT through a connected mobile device. Fluid will seamlessly interact with the Asset Repository.– The connected devices communicate directly with the AssetRepository via the web.– Data will not be saved on mobile devices, but will connect directlyto Core-CT. Inventory Scanners will be using Fluid to scan assets, retrieveand display real-time asset information, and automaticallystage the physical inventory.9
Fluid Video Asset Tracking10
Advantages to Fluid Mobile ScanningThe Fluid Mobile Scanning will: No longer support the Intermec Scanner. Maintain asset scan data in the scan history. Eliminate processing steps, creating fewer errors, due toelimination of:– Flat file upload– Flat file download– Extract file11
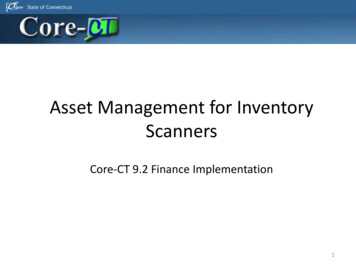
Asset Tracking Homepage The Asset Tracking Homepage will provide real time accessto the Asset Repository. The Physical Inventory Tile is hosted on the Asset TrackingHomepage and is accessible via navigation in Core-CT fromthe mobile device. It is important to note that access to tiles on the AssetTracking Homepage is determined by role.– Inventory Scanners will see the Physical Inventory, ScanAsset, and Find Asset tiles.12
Asset Tracking Homepage13
Overview of Tiles From the Physical Inventory Tile, the following activities canbe performed:– Mobile physical inventory.– Scan assets.– Retrieve and display asset information from the Asset Repositoryin real time.– Automatically populate the physical inventory interface and scanhistory tables with scan data. From the Scan Asset Tile:– Retrieve general information about an asset by scanning abarcode. From the Find Asset Tile:– Retrieve general information about an asset without scanning abarcode.14
Asset Management for Inventory ScannersPERFORM PHYSICAL INVENTORY15
Overview of Physical Inventory for Inventory Scanners To perform PhysicalInventory:– Physical Inventory Processorsset up physical inventory forscanning.– Inventory Scanners capturescan data.Perform Mobile Physical InventoryStepNameRole1Define Inventory OccurrencePhysical InventoryProcessors2Generate Scan ScopePhysical InventoryProcessors3Perform Physical InventoryScanInventory Scanners16
Logging into FluidAsset Management for Inventory Scanners17
Logging into Fluid Enter the assigned User IDand Password into the fields. Select the Sign In button.18
Logging into Fluid In some devices, the Core-CT Homepage displays. To access the Asset Tracking Homepage, navigate to: Main Menu FluidHome If your device automatically navigated to the Asset Tracking Homepage,disregard this step.19
Logging into Fluid The Asset TrackingHomepage displays.20
Logging into FluidExercise 1: Logging into Fluid This exercise will walk through the steps onlogging into Core-CT using your mobile device.Job Aid Utilizing Mobile Devices21
Perform Physical Inventory forAssets in the RepositoryAsset Management for Inventory Scanners22
Perform Physical Inventory for Assets in the Repository Before Inventory Scanners may scan assets in the repository,Physical Inventory Processors must first define the InventoryOccurrence (PI ID) and generate the Scan Scope.– If these steps are not complete, the inventory scanner will not seeany assets to perform physical inventory in Fluid. The Inventory Scanner will scan an asset barcode to performphysical inventory and populate the Physical Inventory andScan History tables with scan records.23
Perform Physical Inventory for Assets in the Repository To access the Asset TrackingHomepage, navigate to:Main Menu Fluid Home Select the PhysicalInventory Tile.24
Perform Physical Inventory for Assets in the Repository Enter the appropriate PI ID.25
Perform Physical Inventory for Assets in the Repository Select the Magnifying Glassicon.26
Perform Physical Inventory for Assets in the Repository Select the appropriate PI IDfrom the Lookup page.27
Perform Physical Inventory for Assets in the Repository The PI Name and BusinessUnit fields will automaticallypopulate. Select the Done button.28
Perform Physical Inventory for Assets in the Repository Select the Scan Value field. Scan the Barcode of theasset.29
Perform Physical Inventory for Assets in the Repository The asset scan recorddisplays.30
Perform Physical Inventory for Assets in the Repository The asset inventory list canbe displayed on the lefthand side of the page, selectthe Side Arrow icon.31
Perform Physical Inventory for Assets in the Repository The menu hosts three tabs:– All: Displays all of the assets in thescan scope.– Scanned: Displays all of the assetsthat have already been scanned inthe scan scope.– Remaining : Displays the assets tobe scanned in the scan scope.32
Perform Physical Inventory for Assets in the RepositoryExercise 2: Perform Physical Inventory forAssets in the Repository This exercise will walk through the steps onscanning assets in the asset repository with thePhysical Inventory Tile.33
Edit an AssetAsset Management for Inventory Scanners34
Edit Asset Scan Records The Edit Scan Record page is accessible through the Editbutton when reviewing asset details. Use the Edit Scan Record page to modify scanned assetinformation.– If the asset is a new asset, all fields on the page are editable.– If the asset is an existing asset, the Business Unit, Asset ID, and Tagare not editable.35
Edit Asset Scan Records To access the Asset TrackingHomepage, navigate to:Main Menu Fluid Home. Select the PhysicalInventory Tile.36
Edit Asset Scan Records Enter the appropriate PI ID.37
Edit Asset Scan Records Select the Magnifying Glassicon.38
Edit Asset Scan Records Select the appropriate PI IDfrom the Lookup page.39
Edit Asset Scan Records The PI Name and BusinessUnit fields will automaticallypopulate. Select the Done button.40
Edit Asset Scan Records Select the Scan Value field. Scan the Barcode of theasset.41
Edit Asset Scan Records The asset scan recorddisplays.42
Edit Asset Scan Records Select the Edit button.43
Edit Asset Scan Records The Edit Scan Record pagedisplays.44
Edit Asset Scan Records Edit the appropriate fields,including:– Description– Location Code– Mfg Name– Model– Dept ID– Custodian– Comments45
Edit Asset Scan Records Select the Done button.46
Edit Asset Scan Records The ribbon confirms theupdates to the asset scanrecord.47
Edit Asset Scan RecordsExercise 3: Edit Asset Scan Records This exercise will walk through the steps onediting asset scan records with the PhysicalInventory Tile.48
Manually Count an Asset thatCannot be ScannedAsset Management for Inventory Scanners49
Manually Count an Asset that Cannot be Scanned Select the 3 Bar menuto access the Find Asset page.From the Find Asset page, manually create a scan record foran asset without scanning a barcode. This process may be necessary when the barcode isdamaged or missing. The process populates the Physical Inventory and ScanHistory tables with the scan record.50
Manually Count an Asset that Cannot be Scanned To access the Asset TrackingHomepage, navigate to:Main Menu Fluid Home Select the PhysicalInventory Tile.51
Manually Count an Asset that Cannot be Scanned Enter the appropriate PI ID.52
Manually Count an Asset that Cannot be Scanned Select the Magnifying Glassicon.53
Manually Count an Asset that Cannot be Scanned Select the appropriate PI IDfrom the Lookup page.54
Manually Count an Asset that Cannot be Scanned The PI Name and BusinessUnit fields will automaticallypopulate. Select the Done button.55
Manually Count an Asset that Cannot be Scanned Select the 3 Bar menu.56
Manually Count an Asset that Cannot be Scanned Select Find Asset dropdownoption.57
Manually Count an Asset that Cannot be Scanned Select the Side Arrow iconto reveal the search criteria.58
Manually Count an Asset that Cannot be Scanned Edit the appropriate fields,including:– Business Unit– Asset ID– Tag– Serial ID– Mfg Name– Model59
Manually Count an Asset that Cannot be Scanned Select the Search button.60
Manually Count an Asset that Cannot be Scanned Select the Asset.61
Manually Count an Asset that Cannot be Scanned Select the Confirm ManualScan button.62
Manually Count an Asset that Cannot be Scanned The ribbon confirms themanual scan. Notice that the Scan Type is“Manual.”63
Manually Count an Asset that Cannot be ScannedExercise 4: Manually Count an Asset thatCannot be Scanned This exercise will walk through the steps onmanually searching and scanning an asset withthe Physical Inventory Tile.64
Scan a New AssetAsset Management for Inventory Scanners65
New Asset Scan Use the New Asset Scan Record page, accessible from the 3Bar menu, to manually enter new asset data. This process generates a new scanned asset, and the countwill route to the Physical Inventory interface table.66
New Asset Scan To access the Asset TrackingHomepage, navigate to:Main Menu Fluid Home Select the PhysicalInventory Tile.67
New Asset Scan Enter the appropriate PI ID.68
New Asset Scan Select the Magnifying Glassicon.69
New Asset Scan Select the appropriate PI IDfrom the Lookup page.70
New Asset Scan The PI Name and BusinessUnit fields will automaticallypopulate. Select the Done button.71
New Asset Scan Select the 3 Bar menu.72
New Asset Scan Select the New Assetdropdown option.73
New Asset Scan Enter the applicable –––Tag*Serial ID*Description*Location*Area IDMfg NameModelDepartmentCustodian Dept IdCustodianEmpl IDIP AliasIP AddressComments* Denotes a required field74
New Asset Scan Select the Done button.75
New Asset Scan The ribbon confirms the newasset scan. Notice that the Scan Type is“New.”76
New Asset ScanExercise 5: New Asset Scan This exercise will walk through the steps onmanually scanning new assets with the PhysicalInventory Tile.77
Asset Management for Inventory ScannersVIEWING ASSET INFORMATION78
Scan AssetAsset Management for Inventory Scanners79
Overview of Scan Asset Use the Scan Asset tile to retrieve general informationassociated with a scanned asset. Asset information may be retrieved from the AssetRepository through scanning the barcode with a mobiledevice, or through manual search on the mobile device. The information retrieval occurs in real time, which is aunique feature of Fluid. It is important to note that asset information displayed onthe Scan Asset page is not editable.80
Scan Assets To access the Asset TrackingHomepage, navigate to:Main Menu Fluid Home Select the Scan Asset Tile.81
Scan Assets To scan the asset with themobile device, select theScan Value field. Scan the Barcode with themobile device.82
Scan Assets The Assets tab displays,showing detailedinformation about the asset.83
Scan Assets If a tag is scanned and foundto be a duplicate with anexisting tag, regardless ofBusiness Unit, a warningmessage will display. Click the OK button.84
Scan Assets To scan the asset throughmanual search, select theSide Arrow icon to displaythe Search Criteria.85
Scan Assets Enter the appropriate searchcriteria, including:––––––UnitAsset IDTagSerial IDMfg NameModel86
Scan Assets Select the Search button.87
Scan Assets Select the Asset in theSearch Results section todisplay additional details.88
Scan Assets The Assets tab displays,showing detailedinformation about the asset.89
Scan AssetsExercise 6: Scan Assets This exercise will walk through the steps toretrieve asset information with the Scan Assetstile.90
Find AssetAsset Management for Inventory Scanners91
Overview of Find Assets Use the Find Asset tile to retrieve information for assetswithout scanning a barcode. Enter search parameters, such as Business Unit and Asset ID,to retrieve information for scanned assets. Asset information displayed on this page is retrieved fromthe Asset Repository.92
Find Assets To access the Asset TrackingHomepage, navigate to:Main Menu Fluid Home Select the Find Asset Tile.93
Find Assets Select the Side Arrow iconto display the SearchCriteria.94
Find Assets Enter the appropriate searchcriteria, including:––––––UnitAsset IDTagSerial IDMfg NameModel95
Find Assets Select the Search button.96
Find Assets Select the Asset in theSearch Results section todisplay additional assetdetails.97
Find Assets The asset details pagedisplays.98
Find AssetsExercise 7: Finding Assets This exercise will walk through the steps to findassets, without scanning a barcode, in the FindAssets tile.99
Asset Management for Inventory ScannersREVIEW AND Q&A100
Questions?Q&A 101
SummaryLet’s review our Learning Objectives:You should now be able to:– Describe Fluid.– Explain device and connectivity requirements for Fluid.– Explain the function of the new Inventory Scanner role for AssetManagement .– Prepare for transition into Fluid.102
Congratulations!You have now completed the Asset Management for InventoryScanners course!Next Steps: Fill out the course evaluation. For additional help, utilize Footprints to log helpdesk tickets. If you also have the role of Physical Inventory Processor,please return after the break for the next section of training.103
Asset Management for PhysicalInventory Processors104
Asset Management for Physical Inventory ProcessorsSETUP FOR PHYSICAL INVENTORYSCANNING105
Defining Inventory OccurrenceAsset Management for Asset Processors106
Defining Inventory Occurrence The Define Inventory Occurrence page establishes a physicalinventory ID and defines the scan scope within AssetManagement for each physical inventory. Scan scopes must be defined for mobile physical inventory,the scan scope should include the area of the actual scan. Each physical inventory occurrence must have a uniquePhysical Inventory ID.– When creating a physical inventory ID, it is important to note thatspaces may not be used.107
Defining Inventory Occurrence To define the inventory occurrence, navigate to: Main Menu Core-CT FIN Asset Management Physical Inventory Define Inventory Occurrence Click the Add a New Value tab.108
Defining Inventory Occurrence Enter the appropriate Physical Inventory ID in the Physical Inventory IDfield.109
Defining Inventory Occurrence Click the Add button.110
Defining Inventory Occurrence Enter the PI Name, Business Unit, Start Date, and End Date.111
Defining Inventory Occurrence Ensure the Enable Mobile Inventory, Capital Assets, and Non-CapitalAssets checkboxes are selected.112
Defining Inventory Occurrence Click the Enter Criteria tab.113
Defining Inventory Occurrence Enter the Business Unit and the Location Codes for the Capital and NonCapital Asset Scan Scopes.114
Defining Inventory Occurrence Click the Transaction Defaults tab.115
Defining Inventory Occurrence Ensure the Approve, Non-Financial Adds, Physical Asset Changes, andAsset Updates boxes are selected.116
Defining Inventory Occurrence Enter the Transaction Date and the Accounting Date.117
Defining Inventory Occurrence Click the Save button.118
Scan ScopeAsset Management for Physical Inventory Processors119
Scan Scope After defining the inventory occurrence, continue on to theLoad/Match/Reconcile Process. Generating the scan scope is step 1 of 4 in the Load/Match/ReconcileProcess. The process automatically defines a set of assets to be scanned andsends list to the Physical Inventory page accessible via mobile device. In Core-CT 9.2, each PI ID must have a unique run control inLoad/Match/Reconcile.– The run control created for the PI ID may only be used for that specific PI ID.120
Scan Scope To define the scope of the asset scan, navigate to: Main Menu Core-CT FIN Asset Management Physical Inventory Load/Match/Reconcile PI InfoClick the Add a New Value tab.121
Scan Scope Enter the appropriate Run Control ID in the Run Control IDField.122
Scan Scope Click the Add button.123
Scan Scope Enter the appropriate Physical Inventory ID in the Physical Inventory IDField.124
Scan Scope Click the Run button.125
Scan Scope Click OK.126
Scan Scope Click the Process Monitor link.127
Scan Scope Click Refresh periodically until the process completes with a Run Status ofSuccess and a Distribution Status of Posted.128
Scan Scope Click the Go Back to Physical Inventory link.129
Scan Scope The page confirms the scan scope was generated.130
Asset Tracking Homepage 12 The Asset Tracking Homepage will provide real time access to the Asset Repository. The Physical Inventory Tile is hosted on the Asset Tracking Homepage and is accessible via navigation in Core-CT from the mobile device. It is important to note that access to til