Transcription
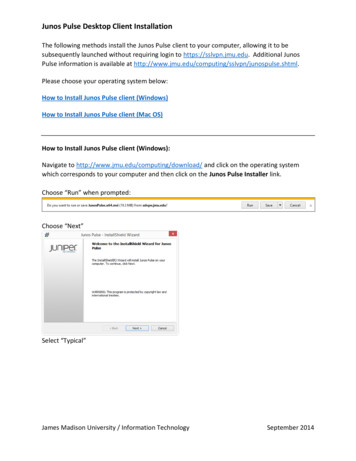
Junos Pulse Installation and Setup Instructions: Microsoft Windows 7/8, MAC OS XAuto install (Windows and MAC)1. Open a web browser and go to https://sslvpn.uc.edu. Log in with your CLS credentials.2. Once logged in, there will be a “Client Application Sessions” section with Junos Pulse listed. Tothe right of that there will be a start button. Click “Start” to initiate the client download andinstallation.a. Java must be installed for this auto installation to work. You may receive a promptasking to allow or block the java process. You must allow it to continue with theinstallation.b. If you are unable to run the auto install for any reason, see the manual installinstructions below. (Windows or MAC)3. Depending on your machine security settings, you may receive several popup windows asking toallow permissions for Java to install the Junos Pulse client. Please read these carefully to ensureyou are permitting the desired application.4. One the client is installed, it will automatically create an sslvpn.uc.edu profile and connect.5. To disconnect the VPN client, open the Junos Pulse client and click “Disconnect”6. For future connections to the VPN you will only need to open the Junos Pulse client and click“Connect” next to the desired profile.Manual install (Windows)1. Open a web browser and go to https://sslvpn.uc.edu/test. Log in with your CLS credentials.2. Under the “Web Bookmarks”, click on the proper “Junos Pluse” link for your machine. This willstart the download of the client.3. Browse to the folder location on your computer where the Junos Pulse file was saved.4. Double click the Junos Pulse .msi installer file and click “Run”, then click “Next”.
5. Select “Typical”, then click “Next”.6. Click “Install”.7. If prompted by User Account Control to allow program named a3695d9.msi to install software,click “Yes”.8. Leave the “Launch Junos Pulse” box checked. Click “Finish”.9. When the Junos Pulse client opens, click the “ ” icon in the Connections bar to add a newconnection.
10. Leave “Type” set to UAC or SSL-VPN. Set “Name” and “Server URL” to: sslvpn.uc.edu. Click “Add”11. Select the connection named “sslvpn.uc.edu”. Click “Connect”.12. Enter your CLS username and password. Click “Connect”.***CAUTION: If using a public/shared computer, please do NOT save your username andpassword.
13. To disconnect the client, click “Disconnect” next to the vpn profile.Manual Install (MAC OS X)If you are unable to install Java on your MAC with the instructions below, try installing Firefox, theninstall Java, and then download Junos Pulse.1. Open a web browser and go to https://sslvpn.uc.edu/test. Log in with your CLS credentials.2. Under the “Web Bookmarks”, click on the proper “Junos Pluse” link for your machine. This willstart the download of the client.3. Browse to the folder location on your computer where the Junos Pulse file was saved. Click onthe .dmg file to mount it and start the installation4. When the installation begins, click “Continue”.
5. Verify the installation location and click “Install” to continue.6. Once the installation is complete, click “Close”.7. Open the Junos Pulse client by clicking the icon in the toolbar and select “Open Junos Pulse”.8. Click the “ ” button on the bottom left of the client window to add a new connection9. Leave “Type” set to UAC or SSL-VPN. Set “Name” and “Server URL” to: sslvpn.uc.edu. Click “Add”
10. Select the connection named “sslvpn.uc.edu”. Click “Connect”.11. Enter your CLS username and password. Click “Connect”.***CAUTION: If using a public/shared computer, please do NOT save your username andpassword.12. To disconnect the client, click “Disconnect” next to the vpn profile.
To disconnect the VPN client, open the Junos Pulse client and click “Disconnect” 6. For future connections to the VPN you will only need to open the Junos Pulse client and click “Connect” next to the desired profile. Manual install (Windows) 1.