Transcription
Junos Pulse Secure Access Cluster UpgradeHow-to Juniper Networks, Inc.1
Junos Pulse Secure Access Cluster UpgradeThis document covers the required steps to upgrade an Active/Active (A/A) or Active/Passive (A/P) Junos Pulse SecureAccess Cluster.Table of ContentsStep 1: Confirm a Supported Upgrade Path. 2Step 2: Downloading the Service Package . 2Step 3: Creating Backup Files . 2 Step 3.1: Exporting a System Configuration File . 3 Step 3.2: Exporting a User Account File . 3 Step 3.3: Exporting an IVS Configuration File. 3Step 4: Clearing your Logs . 4 Step 4.1: Clearing your System Log Files . 4 Step 4.2: Clearing your Client Upload logs . 5 Step 4.3: Clearing your System Snapshot Files. 6Step 5: Upgrading or Downgrading the Appliance . 7 Step 5.a: Install Service Package . 8 Step 5.b: Manage Staged Service Package . 9Active/Passive scenario . 10Active/Active scenario . 10Note: This document applies to SA OS 7.0 and above.Step 1: Confirming a Supported Upgrade PathIn order to ensure configuration and user data integrity after the upgrade, we strongly recommend that you follow thesupported upgrade path documented in the first Release Notes (R1) for that branch. In the first Release Note forevery branch, there is a section titled "Upgrading to this Release" where you can find this information. SubsequentRelease Notes will only list branch fixes and limitations. If you are upgrading from a release which is not listed, thenplease upgrade to one of the listed releases first before proceeding to your chosen branch. For example, if you arecurrently running 6.0R3.1 and you would like to upgrade to 7.1R2, you would need to check the Secure AccessRelease Notes for Release version 7.1R1.Step 2: Downloading the Service PackageYou can install a different service package by first obtaining the software from the Juniper Support Web site. Packagefiles are encrypted and signed so that the SA Series Appliance server accepts only valid packages issued by JuniperNetworks. This measure prevents the SA Series Appliance server from accepting Trojan horse programs.Step 3: Creating Backup FilesBefore installing a new service package, please export your current system configuration, local user accounts,customized user settings, and role and policy information. Juniper Networks, Inc.2
Junos Pulse Secure Access Cluster UpgradeStep 3.1: Exporting a System Configuration FileYour System Configuration file contains Network, Cluster, License, and SNMP settings. To export an encrypted binarysystem configuration file:1.In the admin console, choose Maintenance Import/Export Configuration.2. Under Export, enter a password if you’d like to password-protect the configuration file.3. Click Save Config As to create the system.cfg file.NOTE: When exporting an SA Series FIPS configuration file, note that information about the machine’s security worldor key store is included in the file. Therefore, you need an administrator card that is associated with the security worldin order to successfully import the configuration file into another machine.Step 3.2: Exporting a User Accounts FileThe User Accounts file contains Sign in Settings (includes sign sing policies, sign in pages, and all authenticationservers), Authentication Realms, Roles, Network Access, Resource policies, Resource Profiles, User accounts, andMeeting settings. To export an encrypted binary local user accounts file:1. In the admin console, choose Maintenance Import/Export Import/Export User Accounts.2. Under Export, enter a password if you’d like to password-protect the configuration file.3. Click Save Config As to create the user.cfg file. Juniper Networks, Inc.3
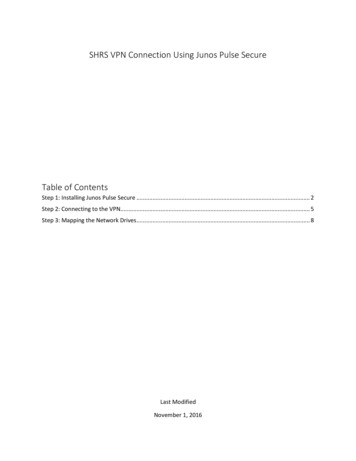
Junos Pulse Secure Access Cluster UpgradeStep 3.3: Exporting an IVS Configuration File (Applies only to SA-x000 & x500 devices)The Instant Virtual System (IVS) configuration file contains IVS Profiles, System, Authentication, Administrators,Administrators, Users, Resources Policies, and Maintenance settings. To export an encrypted binary IVS file:1. In the admin console, choose Maintenance Import/Export Import/Export IVS.2. Under Export, enter a password if you’d like to password-protect the configuration file.3. Click Save Config As to create the ivs.cfg file.Note: IVS is only available if you have an IVS license.Step 4: Clearing your LogsInstalling a service package can take several minutes and requires the SA Series Appliance to reboot. Becauseexisting system data is backed up during this process, you can decrease installation time by clearing your system logsbefore trying to install a service package. System log Files are text files stored on an SA Series Appliance to tracksystem events. An SA Series Appliance produces an Events log, User Access log, Administrator Access log, Sensorslog, Client Upload logs, and System Snapshot Files. These files will be preserved unless these files are deleted priorto upgrading.Step 4.1: Deleting the System Log FilesTo delete the System Log Files:1. In the admin console, choose Log/Monitoring.2. Select Events log, User Access log, Administrator Access log, or Sensors log.3. If you would like to save your System Logs before upgrading select Save All Logs to download your Events log,User Access log, Administrator Access log, and Sensors log in a single zip file. Juniper Networks, Inc.4
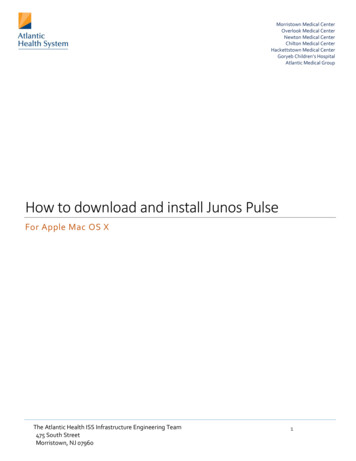
Junos Pulse Secure Access Cluster Upgrade4. Select Clear Log, and repeat for each remaining System Log.5. Select Clear Log, and repeat for each remaining System Log.Step 4.2: Deleting the Client Upload logsTo delete the Client Upload logs:1. In the admin console, choose Log/Monitoring Client Logs Uploaded Logs.2. If you would like to save your Client Uploaded Logs before upgrading select Log-File-Name .zip to downloadeach log file. Juniper Networks, Inc.5
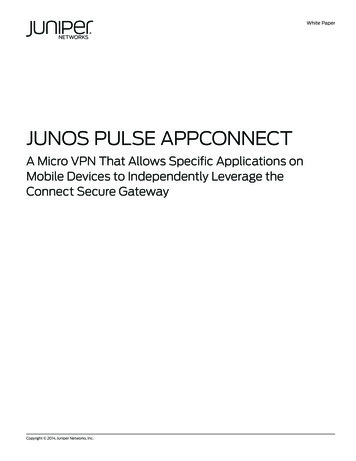
Junos Pulse Secure Access Cluster Upgrade3. Select the trash icon to delete each file.Step 4.3: Deleting the System Snapshot FilesTo delete the System Snapshot Files:1. In the admin console, choose Maintenance Troubleshooting System Snapshot.2. If you would like to save your System Snapshot files before upgrading select Snapshot-File-Name to downloadeach snapshot.3. Put a check each snapshot file you would like to delete and choose Delete. Juniper Networks, Inc.6
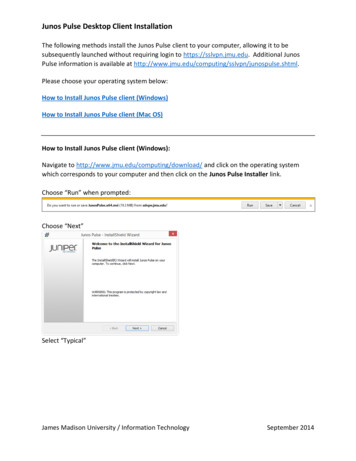
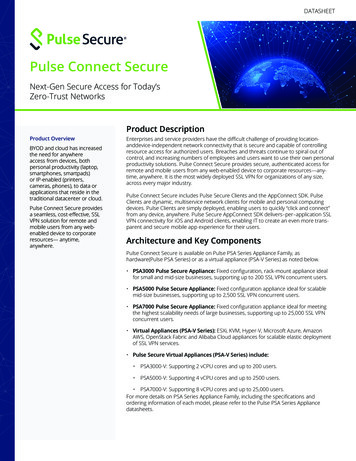
Junos Pulse Secure Access Cluster UpgradeStep 5: Upgrading or Downgrading the ApplianceNote: Juniper Networks recommends to schedule a maintenance window when performing an upgrade or downgradeto a cluster. While each node is being upgraded, the SA device will transfer user sessions (core access, SAM,Network Connect or Junos Pulse) from one node to another. This will cause a short disconnect for SAM and NetworkConnect/Junos Pulse clients as these applications will automatically reconnect to the new node without any userinteraction. Applications accessing resources through SAM and Network Connect/Junos Pulse will be required toautomatically reconnect to the backend resources through the tunnel.The SA Series Appliance offers the ability to easily upgrade every node in a cluster. When installation of a newerservice package on one cluster node has completed, it will automatically push the service package to the rest of thecluster nodes.If you disable or remove any cluster nodes, then upgrade the cluster, these devices will be automatically upgraded bythe existing node in the cluster when they are re-enabled or re-joined to the cluster.If you disable or remove any nodes and then roll back the cluster to an older version, the following error will beobserved until the joining or disabled cluster members have also been rolled back or downgraded to same version ora lower version than what is already running on the Cluster. Juniper Networks, Inc.7
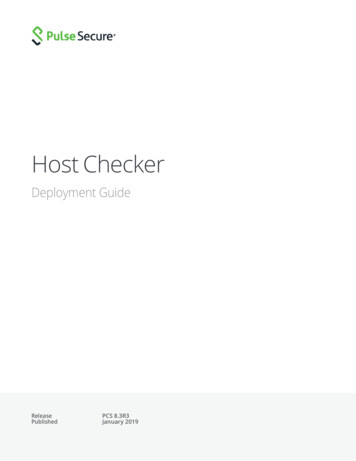
Junos Pulse Secure Access Cluster UpgradeIn short, if the joining or disabled device is on a higher version than what is running on the cluster, then you willreceive the error above when you try to re-enable or join it. If the joining member is on a lower version that what isrunning on the cluster, then it will be automatically upgraded by the existing cluster member once it is re-enabled orre-joined.The admin console lets you install a new service package immediately or stage the service package. For clusters, werecommend you stage the service package at each cluster node, especially for “slower” networks. This reduces theupgrade time by allowing each node to upgrade simultaneously instead of having one node push the upgrade processto each of the other cluster’s nodes. Note, however, that the service package revision at the node where you first startthe installation process overwrites the service package revision at the other cluster’s nodes if they are different.For example, suppose you stage service packages at clusterNode1, clusterNode2 and clusterNode3. Now start theupgrade process on clusterNode3. The service pack revision on clusterNode1 is compared to clusterNode3. If it isdifferent, then the service package on clusterNode3 is pushed to clusterNode1 before clusterNode1 starts its upgrade.If the revisions are the same, then clusterNode3 does not push its service package to clusterNode1. Similarly forclusterNode2.Step 5.a: Install Service PackageThis feature is typically used to upgrade to newer versions of the system software, but you can also use this processto downgrade to a previous version or to delete all your current configuration settings and start from a “clean slate.” Ifneeded, you may also roll back to a previous system state through the serial console or the web admin console.To install a service package:1. In the admin console, select Maintenance System Upgrade/Downgrade.2. Under Section Install Service Package, select Browse to find the service package on your hard drive that youobtained from the Juniper Networks Customer Support Center.3. Alternately, if you are downgrading to an older service package or deleting your configuration settings, you willneed to select Delete all system and user data.WARNING: The option to delete all system and user data is only required if you are downgrading you’re anappliance to a version which is lower than the version which is currently running on your system. Selecting theoption to delete all system and user data will restore your appliance to an un-configured state, and you will haveto reestablish network connectivity before reconfiguring the system. Do NOT check this box if you wish to retainexisting settings and data during a system upgrade to a newer service package. Please note that if your applianceis an SA Series FIPS, then choosing this option will delete your existing security world or key store, and also yourcertificates.Note: If you want to delete your current configuration settings but continue to use the same SA Series Applianceversion, choose the service package that is currently installed on your appliance and select Delete all systemand user data. If you do not choose Delete all system and user data, then you will receive the following errorbelow: Juniper Networks, Inc.8
Junos Pulse Secure Access Cluster Upgrade4. Select the service package file and click Install Now.Step 5.b: Manage Staged Service PackageStaging lets you to push the package to a directory on the SA Series Appliance before the planned maintenance timeand then install the package during the maintenance window. Note that staging does not provide the ability toschedule the installation of the stored service package. It only pushes the service package to the device withoutinstalling it. You must still manually start the installation process.To install a service package:1. In the admin console, select Maintenance System Upgrade/Downgrade.2. Under Section Manage Staged Service Package, select Browse to find the service package on your hard drivethat you obtained from the Juniper Networks Customer Support Center.3. Alternately, if you are downgrading to an older service package or deleting your configuration settings, selectDelete all system and user data.WARNING: The option to delete all system and user data is only required if you are downgrading you’re anappliance to a version which is lower than the version which is currently running on your system. Selecting theoption to delete all system and user data will restore your appliance to an un-configured state, and you will haveto reestablish network connectivity before reconfiguring the system. Do NOT check this box if you wish to retainexisting settings and data during a system upgrade to a newer service package. Please note that if your applianceis an SA Series FIPS, then choosing this option will delete your existing security world or key store, and also yourcertificates.Note: If you want to delete your current configuration settings but continue to use the same SA Series Applianceversion, choose the service package that is currently installed on your appliance and select Delete all systemand user data. If you do not choose Delete all system and user data, then you will receive the following errorbelow: Juniper Networks, Inc.9
Junos Pulse Secure Access Cluster Upgrade4. Select Submit to upload new package into staging areaNOTE: If you choose to revert to delete all system and user data from the appliance using this option, you will have toreestablish network connectivity before reconfiguring the system. Also note that you cannot roll back to a versionlower than 3.1.5. Under Section Install Service Package, select From Staged Package SA Version and Build .Active/Passive scenarioNote: The term “passive node” used in this example to describe the node that does NOT own the VIP. Please checkthe VIP owner on Clustering Status page.To reduce the number of reconnection attempts due to VIP failover, Juniper Networks recommends to upgrade thepassive node first. Once the upgrade is complete, the passive node will push the service package to the active nodeand cause the VIP to failover to the passive node. All existing user session will be automatically transferred to the Juniper Networks, Inc.10
Junos Pulse Secure Access Cluster Upgradepassive node. When the active node has completed the upgrade process, the passive node will remain the VIPowner. If you would like the active node to own the VIP again, a manual failover is required.Juniper components will be upgraded only for new user sessions. Existing session will not be affected.Active/Active scenarioNote: Active/Active example is assuming a load balancer with health check is handling traffic to the SA cluster.When the upgrade process begins on the initial device, the initial device will become unresponsive and the loadbalancer will send traffic to the other nodes in the cluster. Once the initial device has completed the upgrade process,it will push the service package to the other nodes in the cluster. When upgrade process begins in the additionalnodes, these nodes will become unresponsive. The load balancer will send traffic to the initial device to handle trafficuntil the upgrade process has completed on the additional nodes.Juniper components will be upgraded only for new user sessions. Existing sessions will not be affected.For any questions or issues relating to the procedures outlined in this document, please contact support. For detailson how to engage support, please refer to the following link: html Juniper Networks, Inc.11
Network Connect or Junos Pulse) from one node to another. This will cause a short disconnect for SAM and Network Connect/Junos Pulse clients as these applications will automatically reconnect to the new node without any user interaction. Applications accessing resources through SAM and Network