Transcription
Preparing to Deploy Reflection :A Guide for System AdministratorsVersion 14.1
Table of ContentsTable of Contents . 2Preparing to Deploy Reflection 14.1: . 3A Guide for System Administrators . 3Overview of the Installation and Deployment Process . 3Phase I – Preparing to Install Reflection . 4Install Reflection to the Administrator's Workstation . 4Install the Reflection Administrator's Toolkit . 4Create New Settings or Client Files . 5Preset FTP Settings for Export . 5Locate Existing Settings Files . 6Prepare for Installation Access . 6Phase 2 – Customizing Reflection . 9Open the Installation (Reflection Installer Package) . 10Set Installation Options . 11Edit Product Shortcuts . 12Add Files to the Installation . 12Define Profiles and Default Settings for Reflection . 13Set Client Metering Options . 15Make Additional Files Available for Your Users with Companion Packages . 16View Customization Details . 17Phase 3 – Deploying Reflection . 18Create a Deployment Shortcut . 18Deploy Silently, Without User Intervention . 20Assign and Publish with Active Directory . 20Use SMS . 20Other Deployment Methods . 20Now you're ready to install and deploy Reflection! . 21
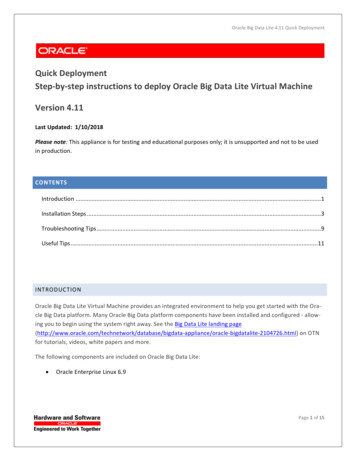
Preparing to Deploy Reflection 14.1:A Guide for System AdministratorsThis guide will help you through the process of preparing to deploy Reflection to your users usingthe Microsoft Windows Installer (MSI) technology. The intended audience for this guide issystem administrators who plan to customize Reflection or who need to make additional filesavailable to their users.Several options are available to you to customize Reflection and its deployment to your users. Thisguide will explain many of those options and list the steps to follow for each option. If you do notplan to customize Reflection or make additional files available to your users, refer to TechnicalNote 1686 for information about a simple Reflection deployment.Overview of the Installation and Deployment ProcessIf you plan to customize Reflection, preparing to deploy Reflection is a three-phase process:1.Preparation—Install product and utilities to your workstation and prepare Reflection foruser installation access. Create or locate settings or client files and preset FTP settings.2.Customization—Customize Reflection.3.Deployment—Determine and prepare for your deployment method.The diagram below shows the phases and the options you can choose from during the installationand deployment process.PREPARING TO DEPLOY REFLECTION 14.13
Phase I – Preparing to Install ReflectionBefore you can deploy Reflection to your users, you must install Reflection and Reflection'sadministrator utilities to your workstation, create new or locate existing settings or client files, andif appropriate, prepare Reflection FTP settings for export. In Phase 1, you will perform thefollowing functions: Install Reflection to the administrator's workstation Install the Reflection Administrator's Toolkit Create new settings or client files Preset Reflection FTP settings for export Locate existing settings files Prepare for installation accessInstall Reflection to the Administrator's WorkstationIf you plan to customize Reflection, the first step is to install the product to your workstation.1.Start the installation program, Install.exe.2.Select the product you wish to install, for example, Reflection Suite for X.3.Click Workstation Install.4.The Attachmate Reflection Installation Wizard opens. Follow the prompts to complete theReflection installation to your workstation. Select Custom as the Installation Type so thatyou can see which features are installed to your machine.Install the Reflection Administrator's ToolkitThe Reflection Administrator's Toolkit includes the Customization Manager and product profilers.Follow the steps below to install these tools:1.Navigate to Install.exe and double-click.2.Click Install Reflection.3.Select Reflection Administrator's Toolkit.4.Click Workstation Install. The Attachmate Reflection Installation Wizard opens. ClickNext.5.Accept the license agreement and click Next.6.(Optional) Enter your customer information and click Next.7.Accept the Destination Folder default, C:\Program Files\Attachmate\RToolkit\.Note: The destination folder should be different from your Reflection's installation folder.PREPARING TO DEPLOY REFLECTION 14.14
8.Select the features you wish to install: the Customization Manager, the appropriate productprofilers, and language support, if required.9.Follow the prompts to complete the installation.About Reflection Customization ManagerUse Reflection Customization Manager to customize your installation for deployment. In Phase 1,you can use this utility to access the Connection Wizard to create new settings or client files and toput your installation on a file or web server before you customize Reflection. You will also useReflection Customization Manager in Phase 2.To open Reflection Customization Manager, click Start Programs Attachmate Reflection Administrative Tools Customization Manager.Create New Settings or Client FilesIf you want to configure settings files or client files to include with your installation, launchReflection and create and save your files.You will access these files later when you create a companion package (a separate installationpackage with settings or client files) for your Reflection deployment.Preset FTP Settings for ExportIf you want to export FTP settings to your users, you must install Reflection FTP to your PC andperform customizations on your machine. Customization Manager will export these settings fromyour administrative machine's registry. The steps to export FTP settings are covered in Phase 2.PREPARING TO DEPLOY REFLECTION 14.15
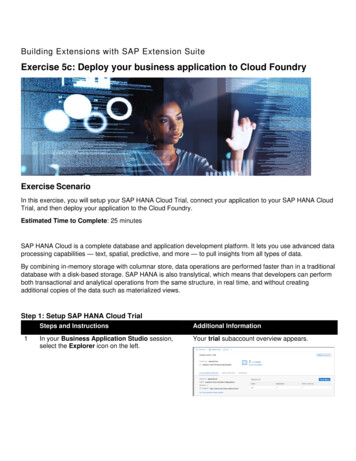
Locate Existing Settings FilesIf you have existing settings or client files that you want to make available to your users, note theirlocation. You will use this information later when you create a companion package (a separateinstallation package with settings or client files) for your deployment.Prepare for Installation AccessNow you need to decide how your users will access the installation—from a file server or from aweb server. The steps you take depend on which method you choose.Note: Each user may need administrative privileges (depending on the deployment software used)to install MSI and Reflection. When the service is installed, a reboot will be required and theinstallation will need to be restarted.You can deploy Reflection from a file server or from some web servers.PREPARING TO DEPLOY REFLECTION 14.16
Deploy Reflection from a File ServerAn administrative installation of Reflection on a file server is used when an end user will install theproduct using the file system. The administrative installation is put on the server before the systemadministrator customizes it. Follow the procedure below to perform an administrative installationusing Customization Manager.1.Start Reflection Customization Manager.2.On the left, click Prepare, and then click Prepare Reflection Installation for Deploymentfrom a File Server.3.Under Installation package (*.msi), specify the path to the Reflection installation packagefile (*.msi). Type the path directly or click Browse to open a dialog box you can use to findthis file. (This will be on the product CD in your CD-ROM drive.)4.Under File server installation point, specify the file server folder where the administrativeinstallation will be created. This location must be accessible to the end users installingReflection.5.Click OK. Customization Manager begins the process of preparing the installation packagefor your customizations at the file server.Note: The time required to create the administrative installation varies depending on whichReflection product you are installing.PREPARING TO DEPLOY REFLECTION 14.17
Deploy Reflection from a Web ServerYou can deploy Reflection to your users from some web servers. For detailed information aboutthis topic, see the Customization Manager help.Important Security Note:If installing Reflection from a web server, firewalls, proxy servers and settings, and external accessto your site are issues that can both prevent installation of Reflection to the end user and/orpermit an unauthorized user to gain access to the product and your site. For more information, seeMicrosoft Knowledge Base Article 328748.Copy Added Files Between InstallationsUse this dialog box to copy added files and shortcuts from one Reflection transform file to anothertransform or to a companion package.See the Customization Manager help for detailed instructions.PREPARING TO DEPLOY REFLECTION 14.18
Phase 2 – Customizing ReflectionAt this point, you have Reflection and the administrative tools installed to your administrativemachine, and Reflection has been installed to the file server or web server, depending on how youchose to make Reflection available to your users.Your task in Phase 2 is to customize the installation for your users using the ReflectionCustomization Manager. You can select which features you want installed on user machines, limituser access to Reflection functionality, and distribute these customizations to the appropriate usergroups.Phase 2 addresses the following topics: Open the installation Set installation options Edit product shortcuts Add files to the installation Define profiles and default settings for Reflection Set client metering options Make additional files available for your users with companion packages View customization detailsPREPARING TO DEPLOY REFLECTION 14.19
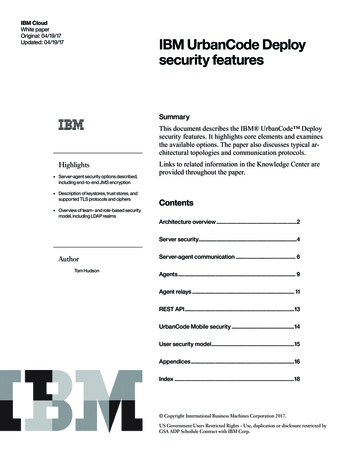
Open the Installation (Reflection Installer Package)To start Reflection Customization Manager, click Start Programs Attachmate Reflection Administrative Tools Customization Manager. On the left panel, click Customize, and then clickOpen Installation.To customize the Reflection installation, select the Customize a Reflection installation option onthe Open Installation dialog box and browse to the Reflection Installer package on your server.Click OK.Once you open the installer package, you can begin to customize the Reflection installation.PREPARING TO DEPLOY REFLECTION 14.110
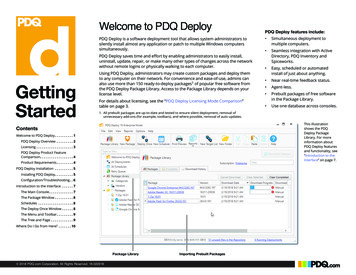
Set Installation OptionsUse this dialog box to specify the installation locations for the Reflection product, the end user'sfolder for their Reflection-generated files, and the Start menu location for Reflection.The buttons near the bottom of the dialog box let you choose features and properties.Select Features—Select the features and mode of installation for your end users. You can hideunneeded features from your users. For example, in the graphic below, FTP Client is unavailablefor users:PREPARING TO DEPLOY REFLECTION 14.111
Application Properties—Set properties specific to a Reflection application, such as preferredTelnet provider, X password-caching preferences, and settings for your preferred host type. Thisoption is not available if the installation you are customizing does not have properties applicable tothe features.Installation Properties—Add Installer properties to your customized installation. Doing this letsyou, for example, modify the information and functionality of the Add/Remove Software controlpanel entry for Reflection or control the action of restarting the PC.Edit Product ShortcutsUse this dialog box to view the attributes of each product shortcut associated with a Reflectionfeature. If a shortcut setting should be changed, the options in this dialog box let you change theseattributes to control the shortcut behavior at the end user's machine.To do this, use the Properties button to open the Shortcut Properties dialog box where you can setthe shortcut name, location, description, and parameters included in a shortcut's associatedcommand line. You can also make a copy of a shortcut if you want it in more than one location or ifyou want to run it with two different command lines.Note: Resiliency, or the ability to "self-repair" if a feature is accidentally deleted, is supported whenyou choose Windows Installer shortcuts in the Shortcut style for all shortcuts.Add Files to the InstallationIt is possible to add additional files (such as settings files, client files, text files, or document files)to the installation using the Add Files feature. If you want the file to remain after upgrading oruninstalling the product, select the "Make this file permanent" check box in the Add File toInstallation dialog box.Another way to add files to the installation is by creating a companion package. Using a companionpackage also allows you to retain additional files when you upgrade or uninstall Reflection. Formore information, see a later section titled, "Make Additional Files Available for Your Users withCompanion Packages."PREPARING TO DEPLOY REFLECTION 14.112
Define Profiles and Default Settings for ReflectionUse this dialog box to include a profiled version of Reflection or to make your preferred defaultapplication settings the default in the deployed installation (Reflection FTP, for example).The following options are available: Reflection Product—The list of Reflection products you can install. This list is filtered toshow only those products that can be profiled or that contain settings that can be exported.A symbol denotes the difference.Note: If a profiler is not installed for a product, you will see a triangular symbol with anexclamation mark. Check to see that you installed the Reflection Profiler feature, andensure that you are using version 14.x of the Reflection products. Reflection FTP must beinstalled locally in order to export the settings. Modification Information—The word Default appears if no changes have been made. If achange is made using a profiling or exporting utility, then the time and date of the action isshown here. Define button—Highlight an application and click this button to open an associated Profileror Export dialog box you can use to customize the functionality of the application. Default button—Highlight an application and click this button to return the application toits default settings.Note: To include profiled copies of Reflection for deployment to your users, you must profileReflection by launching the Profiler from Reflection Customization Manager. If you launch theProfiler from the Start menu, you will profile only your local copy of Reflection.PREPARING TO DEPLOY REFLECTION 14.113
Profile ReflectionWhen you highlight an application and click Define, the associated utility starts. For example, thefollowing graphic shows the Reflection for UNIX and OpenVMS Profiler that starts after selecting“Reflection for UNIX and OpenVMS” and clicking the Define button.Use the tabs in the Profiler to profile and define default settings for Reflection.Export FTP SettingsBefore you can export FTP settings, you must Install Reflection FTP locally. Set the settings for Reflection prior to exporting the settings to the transform file.Follow this procedure to set the FTP settings:1.In the Define Profiles and Default Settings dialog box, select Reflection FTP from theReflection Product column.Note: If you see an exclamation point symbol, then Reflection FTP is not installed on yourlocal machine. It should be located in a different folder from the Reflection AdministratorToolkit, but must be installed locally in order to set registry settings that will be exportedto your customized installation.2.Click Define. This launches the Export FTP Settings dialog box.3.Click Help to view help on Sites, Application Settings, User Settings, and File Nameinformation. These settings reflect your current FTP configuration and should be the onesyou want your end users to use.4.Click OK in the Export FTP Settings dialog box to return to the Define Profiles andDefault Settings dialog box.5.Click OK to close the dialog box and return to Customization Manager main panel. Anychanges you made are now saved to the transform file.PREPARING TO DEPLOY REFLECTION 14.114
Set Client Metering OptionsUse this dialog box to enable metering at install time and set the host URL for the meteringsoftware. Optionally, you can also require Reflection connect to the metering server before startinga session and include the Volume Purchase Account number (available from the About box underSystem in the Reflection product). When the customized Reflection package is installed at theworkstation, metering information is placed in the registry and each workstation will then beconfigured to report to the server running Reflection for the Web Metering Server. This enables anAdministrator to monitor the use of Reflection and ensure licensing compliance if desired.Client Metering OptionsConfigure the following options in the Client Metering dialog box: Enable metering—Select this option to enable metering (all other options become active).Metering information is sent to the server specified in the Metering web server box. Metering web server—Enter the URL of the Reflection for the Web Metering Server in thisbox. Require metering server (Optional)—When this option is selected, Reflection will not run ifit cannot contact the specified server. If this box is cleared and Reflection is launched whenthe server is unavailable, Reflection will still run, but the session will not be metered andlicense limits (where licensing limits are configured) will not be enforced. VPA number (Optional)—Use this option to enter the Volume Purchase Account numberassociated with your Reflection product. The VPA number will be displayed under Systemin the Reflection About box.Note: Metering options can be configured after installation by using Group Policy. When you dothis, Group Policy setting
package with settings or client files) for your Reflection deployment. Preset FTP Settings for Export If you want to export FTP settings to your users, you must install Reflection FTP to your PC and perform customizations on your machine. Customization Manager will export th