Transcription
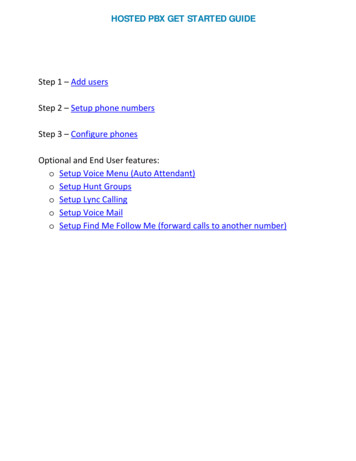
HOSTED PBX GET STARTED GUIDEStep 1 – Add usersStep 2 – Setup phone numbersStep 3 – Configure phonesOptional and End User features:o Setup Voice Menu (Auto Attendant)o Setup Hunt Groupso Setup Lync Callingo Setup Voice Mailo Setup Find Me Follow Me (forward calls to another number)WWW.INTERMEDIA.NET800-379-7729
GETTING STARTED WITH HOSTED PBXThe following overview helps you get started with your new Hosted PBX service. It includes links to moredetailed technical information. The steps for setting up your Hosted PBX service include the following,which are detailed further in the subsequent sections.1. Add users. Enable Hosted PBX service for existing users or create new users and enable HostedPBX for them. Note: Your account is charged per user, per month each user comes with aphone number. Additional phone numbers are available at an additional cost.2. Choose phone numbers . Choose phone numbers for your account and assign them to your users3. Configure IP or soft phones for users.4. Optionally, you can then set up auto attendant Voice Menu, Hunt Groups, and Music-on-Hold.5. After the basic setup is complete, you can set up end-user features like voice mail and Find Me,Follow Me for your users or allow users to configure those settings in My Services.For more information about setting up and managing Hosted PBX, please refer to the Hosted PBX sectionin our Knowledge Base.MAIN FEATURESSTEP 1: ADD USERSTo enable Hosted PBX for existing users:1. Log in to End user Control Panel2. Navigate to the Users menu on the left3. Click the Hosted PBX tab4. In the Hosted PBX column, select checkboxes for the users you wish to enable Hosted PBX (asshown below)5. Click Proceed to apply changes (as shown below)WWW.INTERMEDIA.NET800-379-7729
To enable Hosted PBX while creating a new user:1. Log in to End user Control Panel2. Navigate to Users menu on the left3. Click Create User (as shown below)4. When setting up the user information, select the Hosted PBX checkbox in the Services list (asshown below) to enable Hosted PBX service for the new user. Please enter the Hosted PBXextension that this user will use at this point, if can be changed in the future:5. After the user is created, navigate to the Hosted PBX tab for further actions; Note: You can alsoenable the Hosted PBX service for users during mass user import; Note: Each user with HostedPBX service enabled will receive an email with information on how to configure their phones (seeSTEP 4)STEP 2: SETUP PHONE NUMBERSTo set up phone numbers, you will first add phone numbers to your account and then assign them to yourusers. Make sure that Hosted PBX is enabled for each user to which you will assign a number (see STEP 1).To add phone numbers to your account:1. After completing Step 1, go to Users menu Hosted PBX tab2. Click Phone Numbers (as shown below)WWW.INTERMEDIA.NET800-379-7729
3. Click Choose New Numbers (as shown below)4. In the Choose Phone Numbers pop-up, enter the quantity of phone numbers you want to create,and select the area code you want the new numbers to have (as shown below). If you need tocreate numbers in different area codes, click Add another area code. This adds another linewhere you can specify the quantity to add in a different area code. Note: . If you do not see therequired Area Code, please contact Support.5. Click Choose (as shown below)6. You will now see the new numbers listed on the Phone Numbers tab.Note: You can choose the area code to create numbers in, but the individual phone numbers will beautomatically assigned.To assign a phone number to a user:1. After phone numbers as outlined in the steps above, you will see the list of phone numbers inHosted PBX Phone Numbers2. Numbers which are available to be assigned to your Hosted PBX users will have an Assign to linkin the Action column. To assign a phone number to a user, click Assign to for the desirednumber (as shown below)WWW.INTERMEDIA.NET800-379-7729
3. A new window will open asking where you’d like to assign the number to a User, Hunt Group orVoice Menu. Based on your selection, a new window will display a list of Hunt Groups, your VoiceMenu or users who have Hosted PBX service enabled (If the desired user is not in the list, youneed to first enable Hosted PBX for the user); Select a user to assign the phone number to andclick Select (as shown below)4. Complete the 911 location information by entering the address for this user and click Accept &Save Changes (as shown below); NOTE: Make sure the address is complete and correct as this isthe information that is provided to emergency services and is used when someone dials 911 fromthis phone.5. You should now see the user's name in the Assigned To column for the phone number; Note:Each user can only have one phone numberWWW.INTERMEDIA.NET800-379-7729
STEP 3: CONFIGURE PHONESAt this point you have have enabled Hosted PBX for and assigned phone numbers and/or extensions tothem. The next step is to configure IP desk phones or soft phones for each user so they can make andreceive calls.1. To configure a phone, you need to know the following information:o Phone device IDo Phone passwordo PBX server nameThis information is located in the Edit Selected User page for each user (Users Hosted PBX click on a user) and under Settings for a Phone Device. It is also sent by email to each user thathas Hosted PBX service enabled.2. The first phone device is created by default and is called “Phone #1.” You can rename it and youcan also create additional phone devices for each user by clicking Add another phone devicelink. You will need to create as many phone devices for each user for as many actual phones thisuser is going to use. For example, if a user has one IP desk phone at work, another IP desk phoneat home and a soft phone installed on his or her computer, you should create three phone devicesin HostPilot. Different device settings should be used to configure each phone.3. To configure phone devices use Device Setup Instructions:o located in the General Tab under GetStarted:oChoose your device and follow thesteps based on your device andinstructions or select a user forspecific settingsWWW.INTERMEDIA.NET800-379-7729
4. Below are links to the Knowledge Base articles on setting up the types of phones supported byVoice Services. (Other IP phones, softphones or applications that support SIP protocol may beused, however we cannot guarantee they will work with Hosted PBX.)o Cisco/Linksys SPA IP phoneso Polycom IP phoneso X-Lite Soft phoneIf you need to order IP desk phones, you can contact your Support desk.WWW.INTERMEDIA.NET800-379-7729
OPTIONAL FEATURESSET UP A VOICE MENU (AUTO ATTENDANT)A voice menu is an automated system that answers calls for your company and allows callers to navigatethrough a set of options by pressing keys on a touchtone phone. From the voice menu, calls can bedirected to a specific user, to a hunt group (if configured) or callers can choose to dial a user’s extensiondirectly. You can only have one voice menu. The phone number for the voice menu isgenerated automatically after you select the area code of your main business operation location. Thevoice menu phone number will not be listed on the Phone Numbers tab and it cannot be assigned tousers. The basic steps for setting up a voice menu are:1. Enable the voice menu and generate a phone number for it2. Set menu options that will correspond to the keys callers press3. Record and upload a greeting, which tells callers what the menu options areNote: If you want to redirect callers to a particular user and/or a hunt group, you will need to assign anextension to a user and/or create a hunt group before configuring the voice menu options.To enable the Voice Menu:1. Navigate to the Hosted PBX menu item on the left2. Click on Voice Menu3. Click Enable Voice Menu (as shown below)4. In the Set Up Voice Menu pop-up window, choose the Voice Menu Area Code (as shown below) –the area code for your primary business location; The phone number will be generatedautomatically in this area code (you cannot choose the number) and assigned to your voice menu5. Enter the 911 location information; NOTE: Make sure the address is complete and correct as thisis the information that is provided to emergency services (as shown below)6. Click Accept & Save Changes (as shown below)WWW.INTERMEDIA.NET800-379-7729
7. You are returned to the Voice Menu tab where you can configure your voice menu options; Youcan see the phone number that was generated for the voice menu in the Voice Menu numberfield (as shown below)To set Voice Menu options:1. On the lower half of the same page (Hosted PBX Voice Menu), choose a phone key and select adesired action for it from the drop-down boxes (see the list below for all options); Repeat thisaction for each key you want to use as an option in the voice menu (as shown below)Available Voice Menu actions are: Forward to Hunt Group: When selected, a box is displayed to the right that lists allexisting hunt groups. Select a hunt group where calls should be redirected when a callerselects the corresponding key. (This option is not available if you do not have any huntgroups created. Follow instructions of the next section to create hunt groups.)Forward to User: When selected, a box is displayed to the right that lists all users whohave an extension assigned. Select which user to redirect the call to when a caller pushesthe corresponding key. (This option is not available if you do not have any users withextensions.)Dial by Name Directory: When selected, this option allows callers to select who theywant to speak with without having to know their Extension number. When the Dial ByName feature is enabled, your caller will be asked to press the first few letters of thefirst or last name of the person they are trying to reach.Forward to Company Voice Mail: When selected, the assigned button will redirect thecall to voice mail and the recorded messages will be sent to the email address set up forVoice Menu voice mail.Play Announcement: If you select this option, it will allow you to upload anannouncement you have recorded, you are able to upload different announcements basedon key selection.WWW.INTERMEDIA.NET800-379-7729
2. When you have set the desired keys and actions, click Save Changes3. You may want to call the voice menu phone number and make sure the options work as youwant; You can also listen to the default greeting before you replace it with your owngreeting.NOTE: Direct Extension Dialing is always available in the voice menu. Callers can enter an extension atany time if they already know the extension they want to reach. The call will be transferred to theextension.To record and upload a greeting:1. Record and save your greeting using any voice recording program (like Windows Sound Recorder).To do this, you will need a microphone as well as headphones or speakers) or Text to Speechtools. The file must be in either .WAV or .OGG format and cannot be larger than 16 MB. Astandard template for a voice menu greeting that you may want to refer to is below. Customizeit based on your needs:Thank you for calling [Your Company Name]. Visit us on the web at www.your web site.com.If you know your party's extension, you may dial it at any time. Otherwise, please choosefrom one of the following options. For sales, press '1'. For customer service, press '2'. Forpurchasing or accounting, press '3'. For technical support, press '4'. If you would like to talk tothe receptionist, press '0' and one of our friendly staff members will assist you shortly. Thankyou for calling the [Your Company Name].2. On Hosted PBX Voice Menu, click the green replace greeting icon (as shown below)3. Click Browse to find the file on your computer (as shown below)4. When choosing files to upload, be aware that you are responsible for copyright regulations andthe Voice Services Acceptable Use Policy. Please read the agreement carefully and clickUpload (as shown below)5. Call the Voice Menu phone number and listen to and confirm the greetingNOTE: There is a default greeting for the voice menu, which is erased when you upload your own file.Make sure your greeting explains each option and corresponding key that you have set up. You may alsowant the greeting to explain that callers can dial an extension at any time, and that they can press thestar key (*) to cancel or go back.WWW.INTERMEDIA.NET800-379-7729
SET UP HUNT GROUPSA Hunt Group is an automated way of handling incoming calls to specific groups in your organization.When callers dial a phone number that is assigned to a hunt group, their calls are automaticallydistributed to a group of agents. Agents are users who are members of a hunt group. Each hunt groupcan have any number of agents. Agents cannot change their own hunt group membership or hunt groupsettings. However, agents do need to log in to a hunt group in My Services so they can receive calls forthe hunt group. In order to participate as a hunt group agent, a user must: Have Hosted PBX service enabled and a phone device configured Have an extension assigned Be assigned to the hunt group as an agent Log in to the hunt groupTo set up a hunt group, you need to:1. Create the hunt group2. Add agents to the hunt group3. Set up a voice menu and forward calls to the hunt group (see instructions for the sectionabove)4. Optionally: set up music-on-holdTo create a hunt group:1. Navigate to Hosted PBX Hunt Groups2. Click Create Hunt Group (as shown below)1. Enter the hunt group settings:ooooHunt Group Name: Choose a meaningful name for the group, forexample, Sales or Customer ServiceExtension: Type a an extension that has not been already assigned to a user oranother hunt groupRinging Order: Select the way calls will be distributed among agentso Longest Idle: An incoming call goes to the agent who has not been on the phonefor the longest period of timeo Round-Robin: Distributes the calls in a sequential order, ringing each agent onthe list until the call is answeredo Ring all: An incoming call rings all agents at the same time until the call isanswered by an available agent.Default Wrap-Up Time: The number of seconds an agent is considered "unavailable" afterhanging up the phone; Calls will not be directed to the agent during this time - thisallows the agent to make notes and prepare for the next callWWW.INTERMEDIA.NET800-379-7729
NOTE: You can create five hunt groups for your account as part of your plan. You may create additionalhunt groups for an additional monthly charge.Enable Email for Voice Mail: To Enable Voice Mail for the Hunt Group:1. On the Services Hosted PBX Hunt Groups tab, click the name of the Hunt Group to open it forediting.2. Check the box for Enable email for voice mail.3. Email for Voice Mail: Enter the email address you want the voice mail sent.4. Timeout: Enter the number of minutes the phone should ring before being sent to voicemail.5. Voice Mail Greeting: To upload a new voice mail greeting click edit.3. Click Create (If you are adding an additional hunt group, you will see a window with informationabout charges to your account for this hunt group; Click Charge to confirm)4. You will be redirected to “Agents” tab of your new hunt groupTo add agents to a hunt group:1. To add agents to a hunt group:o Create a comma- or semicolon-separated list of display names or email addresses of userswho will be agents of this group; Click Check to the right of the box to verify that theyare correcto Alternatively, you can open an address book by clicking on the according book icon andselect users from the listWWW.INTERMEDIA.NET800-379-7729
2. Click Add; Specified users will be added to a list of agents for this hunt group at the bottom ofthe pageNOTE: In order to receive hunt group calls, agents need to be logged in to their hunt groups. Agents canlog in to hunt groups through My Services, or you can log agents in and out of hunt groups from either theHunt Groups page or the User Settings page (as shown below).WWW.INTERMEDIA.NET800-379-7729
SET UP LYNC CALLINGThe Lync Calling add-on integrates the Hosted PBX service with Microsoft Lync 2010. Users can click the Callbutton to automatically dial a selected contact in Lync. You may use Hosted PBX and/or Lync with orwithout Lync Calling.If you want a user to have Lync Calling available: Both Lync and Hosted PBX must be enabled for a userLync must be installed on user’s PC and at least one phone device should be configuredTo enable Lync calling for a user:1.2.3.4.Navigate to HostPilot Users Hosted PBXCheck the Lync Calling boxClick Proceed at the bottom of the pageConfirm the chargesTo make a call:1. Find the contact name in Lync (type part of the name in the search box to see a list ofmatches).2. Click the Call button to the right of the name.Optionally, click the down arrow next to the call button to see a list of phone numbersfor this contact, and select which number to dial.WWW.INTERMEDIA.NET800-379-7729
3. Your phone will ring first. After you answer your phone, Lync Calling will complete thecall and ring the other party.END USER FEATURESSET UP VOICE MAILCalls are redirected to voice mail if they are not answered within 25 seconds. If the Find Me, Follow Mefeature is set up for a phone (see instructions in the section below), calls are redirected to theforwarding numbers after 15 seconds, and then sent to voicemail after 30 seconds more. You cannotdisable the voice mail system. When Hosted PBX service is enabled for a user, the voice mail PIN isgenerated automatically using four random numbers and sent to the user's primary email address. Theuser must enter this PIN when calling the voice mail number to check voicemail over the phone. Voicemail messages are also forwarded to the user's email address as attached sound files. The user must haveheadphones or speakers for listening to voice mail on the computer.To change a PIN or an email address for voice mail using HostPilot:1. Navigate to Users Hosted PBX2. In the list of users, click the display name of the user you want to work with3. On Edit Selected User page, find the Send Voice Mail To field; the email displayed is theaddress where voicemail messages are currently sent to - You cannot view the current PIN4. To change the email address for receiving voice mails, click Edit and type the new address andclick Save Changes5. To change the PIN for checking voice mail over the phone, click Reset PIN, in Reset Voice MailPIN window, type the new PIN in both boxes, and click Reset; Note: The voice mail PIN canonly contain digits 0 through 9Note: All users with Hosted PBX service enabled receive email notifications with their default PINs.End-users can also update their voice mail PINs in My ServicesWWW.INTERMEDIA.NET800-379-7729
To listen to voice mail messages: Voice mail messages are sent to users’ email addresses specified in Send Voice Mail To sectionand can be listened to as .wav attachments Voice mails can be listened to by dialing user’s extension or phone number from user’s phonedevice; extension and PIN is required to listen to voice mailsSET UP FIND ME, FOLLOW ME (FORWARD CALLS TO ANOTHER NUMBER)The Find Me, Follow Me option is used to redirect user’s calls to up to 3 additional phone numbers. Asan administrator, you can set up this feature for users in HostPilot or users can set up and manage theirown settings through My Services.When Find Me, Follow Me is enabled, if a call has not been answered on the Hosted PBX device after 15seconds, it rings to the Find Me, Follow Me phone numbers. If the call is not answered on a Find Me,Follow Me number within 30 seconds, it is redirected to your Hosted PBX voice mail.To set up Find Me, Follow Me for a user:1. Navigate to Users Hosted PBX2. In the list of users click the display name of the user you want to work with3. On the Edit Selected User page, click Edi
WWW.INTERMEDIA.NET. 800-379-7729 . HOSTED PBX GET STARTED GUIDE. Step 1 – Add users. Step 2 – Setup phone numbers . S