Transcription
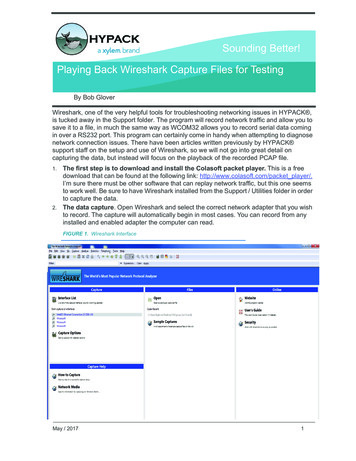
Installing and Using Wireshark for Capturing Network TrafficThese instructions are written for using a Windows computer, but are mostly valid for a Linux/Appleenvironment too.In order to better troubleshoot issues with your ATA, you can capture all network traffic off of thenetwork cable and submit to Cisco as follows.Downloading WiresharkDownload the most current version of Wireshark from http://wireshark.org/download.htmlInstall Wireshark and WinPcap and accept all defaults. [Additional help is located at:http://www.wireshark.org/docs/wsug html chunked/ChBuildInstallWinInstall.html ]SPA122 all firmware versionsPage 1 of 11thNovember 30 2012
Network Interfaces on ComputerYou need to understand a little about your network in order to properly collect all network traffic. Forexample, your computer may be on a data VLAN and your ATA may be on a voice VLAN without yourealizing it. For this reason, I recommend that you use a separate network interface for Wireshark suchas a USB NIC [network interface card/connector]. I use the Cisco‐Linksys USB Ethernet Adaptor withgreat success.Using an additional adaptor allows my computer to remain connected to the network via its regularinterface [wired or wireless, it doesn't matter] while my Wireshark USB NIC is connected to a switch portthat is mirrored [also known as being in "span" mode] so that all switch data is seen by my Wiresharkinterface.You must configure your network switch so that it copies (mirrors) network data to the Wireshark port.[Switches, by design, do not send all network traffic to all ports. Read more here if you're interested.]SPA122 all firmware versionsPage 2 of 11thNovember 30 2012
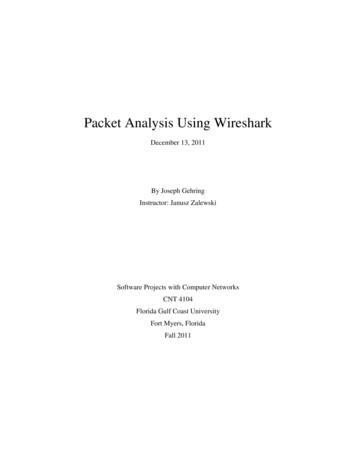
Configuring Mirroring on the Network SwitchHere's an example of configuring a Cisco SG300‐10P switch:1. Log in to the switch as an administrative user.2. Decide which port will be the mirror/span target. In my lab, I usually use the right‐most port asthe mirror target, making it easier for me to remember which port does what. Only one portcan be a mirror target but multiple ports can be configured as mirror source ports.3. Navigate to Administration Diagnostics Port and VLAN Mirroring:a. Click Add to display the Add Port and VLAN Mirroring pop‐up window.b. Select the Destination Port. I changed from the default of GE1 to GE10.c. Select the Source Interface. This is the port to which your ATA is connected and whosenetwork traffic you want to see. In this example, I use GE1. [Leave VLAN unselected]d. Select the Type of Tx and Rx to allow you to see all network traffic transmitted (Tx) andreceived (Rx) by the connected ATA.e. Click Apply.SPA122 all firmware versionsPage 3 of 11thNovember 30 2012
f.The Port and VLAN Mirroring Table is updated with the change:g. Save the switch's configuration.4. Connect to port GE10 of the switch, the network cable from the Wireshark interface.5. Connect to port GE1 of the switch, the network cable from the ATA that you want to monitor.6. You've now completed configuring the network switch.SPA122 all firmware versionsPage 4 of 11thNovember 30 2012
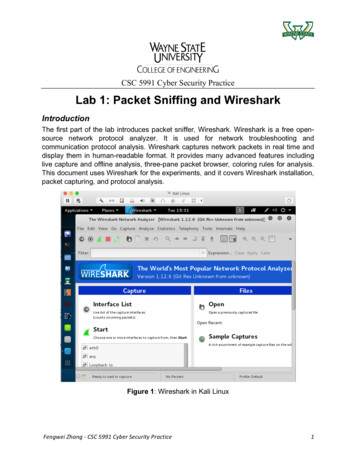
Using WiresharkWireshark is extremely capable and very powerful. This section provides the bare minimum informationto get you started. The Wireshark University provides an excellent source of deep technical training onusing Wireshark and protocol analysis.Starting Wireshark for the First TimeMake sure that the network interface that you plan to use for Wireshark captures is properly connectedto your computer and to the network switch, or else Wireshark may not properly detect the interfacewhen Wireshark starts up. Locate the Wireshark shortcut on your desktop if you installed a shortcutduring Wireshark installation. Otherwise, click Start All Programs and locate and double‐click theWireshark iconWireshark will load its configuration files and display its progress:Once Wireshark is running, its main interface will display:SPA122 all firmware versionsPage 5 of 11thNovember 30 2012
SPA122 all firmware versionsPage 6 of 11thNovember 30 2012
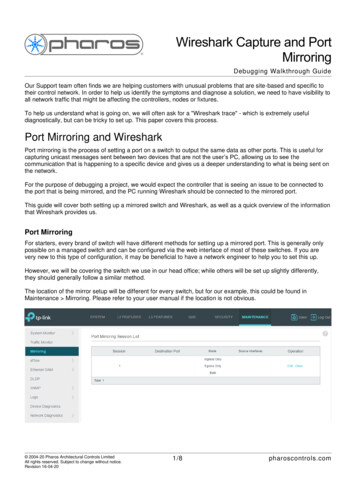
Selecting a Wireshark Capture InterfaceYou must select an interface from the available interfaces on your computer. In this example, I'll selectthe USB2.0 to Fast Ethernet Adapter from the list:If you are not sure which interface to use, click Interface List to view details about each interface whichmay help with your selection:SPA122 all firmware versionsPage 7 of 11thNovember 30 2012
You can also click the Details button if you need more help selecting the appropriate interface:Once you've selected the appropriate interface, click Options to make user‐display selections:I find these options to be best for my every‐day use:SPA122 all firmware versionsPage 8 of 11thNovember 30 2012
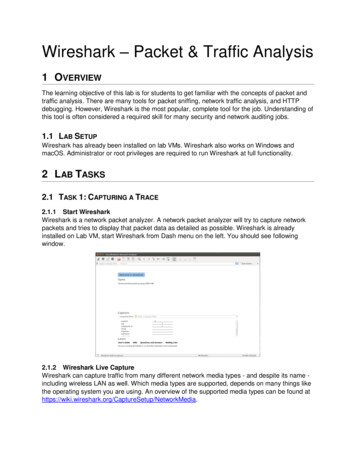
Starting a CaptureYou're finally ready to start your first capture. Click any of the Start buttons:Or:Or:SPA122 all firmware versionsPage 9 of 11thNovember 30 2012
Wireshark will display the capture window:SPA122 all firmware versionsPage 10 of 11thNovember 30 2012
Stopping and Saving a CaptureOnce you have replicated the scenario that you wanted to capture, for example, the SPA ATA's networkbehavior when power is applied to it, you must stop the capture by clicking on the stop icon:Once the capture is stopped, click the save icon:When saving the Wireshark trace, be sure to use a descriptive name to help you easily recall why youcaptured the trace.You can now locate the trace on your storage device and compress it and share with someone foranalysis. end SPA122 all firmware versionsPage 11 of 11thNovember 30 2012
In order to better troubleshoot issues with your ATA, you can capture all network traffic off of the network cable and submit to Cisco as follows. Downloading Wireshark Download the most current version of Wireshark from http://wireshark.org/download.html Install Wireshark and WinPcap and accept all defaults. [Additional help is located at: